Table of Contents
Advertisement
Advertisement
Table of Contents

Subscribe to Our Youtube Channel
Related Manuals for mr. steam Tempo/Plus Control


Summary of Contents for mr. steam Tempo/Plus Control
-
Page 2: Table Of Contents
Table of Contents General Information & Care Tips Safety & Operating Information TEMPO & TEMPO/PLUS ® ® Installation Instructions 6-7-8 TEMPO Operating Instructions ® TEMPO/PLUS Operating Instructions 10-11 ® TEMPO/REMOTE ® Programming the Code Using the Remote Pausing The Unit Setting Program Values Battery Replacement Installing the Holder... -
Page 3: General Information & Care Tips
General Information As you follow these instructions, you will notice warning and caution symbols. This blocked infor- mation is important for the safe and efficient installation and operation of this generator. These are types of potential hazards that may occur during installation and operation: states a hazard may cause serious injury or death if precautions are not followed. -
Page 4: Safety & Operating Information
Safety & Operating Information Do not install or use any TEMPO/PLUS , TEMPO , TEMPO/EXT ® ® ® TEMPO/ REMOTE controls without reading and understanding the ® MrSteam steam generator Installation and Operation Manual (part number 101289 Revision number 6.2/03 or higher). Failure to read and understand these instructions may result in an inoperative or hazardous installation. -
Page 7: Tempo ® & Tempo/Plus
Dimensional Information for TEMPO & TEMPO/PLUS ® ® BOX CONTENTS: • TEMPO or TEMPO/PLUS Control ® ® • Control Cable (30 ft.) • Steam Head • Tube of Silicon Sealant • Owner’s Manual Installation Instructions for TEMPO & TEMPO/PLUS ® ®... - Page 8 Installation Instructions for TEMPO & TEMPO/PLUS ® ® Step 3 Step 4 Route the control cable ( provided with the Firmly connect the connector near the control ) from the wall cutout to the steam gen- “CONTROL END” marking to the back of the erator.
- Page 9 Installation Instructions for TEMPO & TEMPO/PLUS ® ® Step 6 Step 7 Run a bead of silicone (provided) as shown to Insure the mounting surface is clean and dry the C shaped groove as shown in Diagram 5. as required for good adhesion. Apply silicone into the hole in the wall as required to create a moisture seal.
-
Page 10: Tempo Operating Instructions
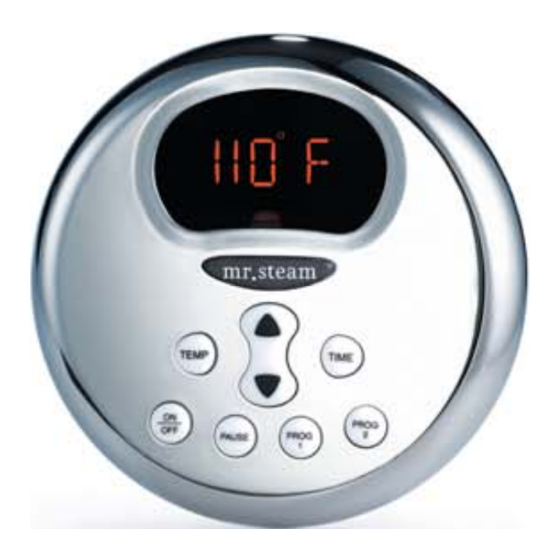
TEMPO Operating Instruction ® The TEMPO Control features programmable digital temperature ® control, a fixed (60) minute duration, ON/OFF and PAUSE. Setting the temperature ON/OFF The control is preset and will display the tempera- Press the ON/OFF key to start or stop the flow ture setting of 110°F (default setting). -
Page 11: Tempo/Plus
TEMPO/PLUS Operating Instruction ® The TEMPO/PLUS Control features programmable digital ® temperature control, programmable time duration, ON/OFF and PAUSE and two personal settings storage. ON/OFF Setting the time duration Press the ON/OFF key to start or stop the flow Press TIME key to set or display the remaining of steam. - Page 12 TEMPO/PLUS Operating Instruction ® Changing the Temperature Units (°F/°C) Hold ON/OFF key for 10 seconds. The temper- ature units will be displayed as Fahrenheit (TuF) or Celsius (TuC). Use the UP/DOWN keys to choose between (TuF) and (TuC). Press PAUSE key to accept the new value and exit.
-
Page 15: Tempo/Remote
Dimensional Information for TEMPO/REMOTE ® BOX CONTENTS: • TEMPO/REMOTE Control ® • Control Holder • (2) Holder Screws • Owner’s Manual The TEMPO/REMOTE Control operates all ® functions of the TEMPO/PLUS Control from ® a maximum distance of about 15 feet. It’s to be use inside the steam room and requires a direct line of sight with the TEMPO/ PLUS... -
Page 16: Programming The Code
Programming the Code The TEMPO/REMOTE control is supplied with two AAA batteries already ® installed. If these batteries have been removed for more than 3 minutes or are discharged then the TEMPO/REMOTE code must be re-entered. ® 1• Press SETUP key. 2•... -
Page 17: Using The Remote
Using the TEMPO/REMOTE ® To control your TEMPO/PLUS with the remote control: ® Temp Time Turning Unit ON/OFF Setting Temperature Set Point a• Press ON/OFF key to turn unit on. Press the TEMP UP or TEMP DOWN key. b• Press ON/OFF key a second time Setting Duration Time to turn unit off. -
Page 18: Setting Program Values
Setting Program Values To Set PROG 1 and PROG 2: Temp Time 1• Press the PROG 1 or PROG 2 key. 2• Press TEMP UP or TEMP DOWN key to set the desired temperature. 3• Press TIME UP or TIME DOWN key to set the desired duration time. -
Page 19: Battery Replacement
Battery Replacement Your remote control is powered by two AAA batteries. Note: Before you start it’s important to note that you have only 3 minutes to change batteries if you want to retain codes recorded in the memory! 1• Unscrew and remove bottom cap. 3•... -
Page 20: Installing The Holder
Installing the TEMPO/REMOTE Holder ® A holder is provided with the TEMPO/REMOTE ® Control as an optional convenience. Mount the holder in a location away from direct steam emission. Secure the holder to a wall so the TEMPO/REMOTE is oriented in the upright ®... -
Page 23: Tempo/Ext
Dimensional Information for TEMPO/EXT ® BOX CONTENTS: • TEMPO/EXT Control ® • Owner’s Manual The TEMPO/EXT control can only be used ® with a TEMPO or TEMPO/PLUS control. ® ® Using the TEMPO/EXT Control ® LED INDICATOR will light up when the generator is ON. -
Page 24: Installing The Tempo/Ext
Installing the TEMPO/EXT Control ® Diagram 1 Diagram 3 STEP 2 Route the cable from the wall to the steam The TEMPO/EXT has a 30 foot cable with a ® generator (Diagram 3). Plug & Play connector at one end and an ON/OFF switch at the other end (Diagram 1). - Page 25 Installing the TEMPO/EXT Control ® Diagram 5 Diagram 6 STEP 4 STEP 6 Apply silicone (provided with TEMPO Firmly connect the Plug & Play connector to ® TEMPO/PLUS control) to the hole in the wall the steam generator connector “B” as shown ®...
Need help?
Do you have a question about the Tempo/Plus Control and is the answer not in the manual?
Questions and answers