Table of Contents
Advertisement
Quick Links
Advertisement
Table of Contents

Related Manuals for FUNKY MONKEY BARS THE MARMOSET


Summary of Contents for FUNKY MONKEY BARS THE MARMOSET
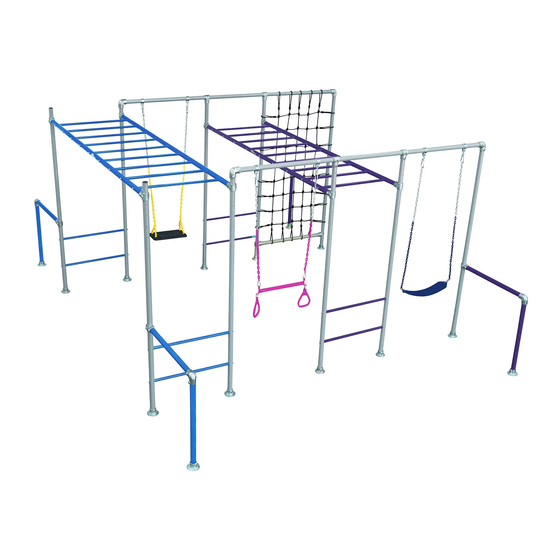
- Page 1 THE MARMOSET ASSEMBLY INSTRUCTIONS...
-
Page 2: Table Of Contents
Bars®, especially lower quality products that have not been approved by Funky Monkey Bars®. 15. Ensure the height of your Funky Monkey Bars® (horizontal ladder) are set at a level that is age appropriate. 16. DO NOT install your Funky Monkey Bars® over or near objects that could interfere with users in an unsafe way. - Page 3 Work on flat level surface. LOCATION A safe fall zone around your Funky Monkey Bars® is essential. A minimum distance of 1.5m to 2m (5 ft to 6.5ft) is recommended around the elevated hanging points of your Funky Monkey Bars®.
-
Page 4: Load Rating
QUALITY & INDEPENDENT TESTING At Funky Monkey Bars® we take the quality of our designs and safety very seriously. All Funky Monkey Bars® frames go through a stringent, independent structural testing process prior to being made available for release to our customers. -
Page 5: Dimensions
FUNKY MONKEY BARS ® THE MARMOSET OVERALL DIMENSIONS A mimimum of 2.0 Metres clear fall zone is recommended around the elevated hanging points of your Funky Monkey Bars®. 5.0 Metres 2.0 Metres clear fall zone 2.0 Metres clear fall zone 2.0 Metres... -
Page 6: Assembly Tips
ASSEMBLY TIPS CORRECT INSERTION INTO FITTINGS - (indicative diagram shown) Gap. No gap. All tubes must be fully inserted until contact is made with adjoining tube. CORRECT TIGHTENING METHOD OF GRUB SCREWS - (indicative diagram shown) + 360 2. Using other end of the allen key do one full 1. - Page 7 ASSEMBLY TIPS (continued) IT IS CRITICAL YOUR MAIN FRAME IS 100% SQUARE AND LEVEL (indicative diagram shown) PLAN VIEW Check assembly is 100% level, square & straight. SIDE VIEW If your frame is not straight or level remove pegs, loosen grub screws, re-adjust re-tighten and re-peg the frame.
-
Page 8: Inventory
INVENTORY TOOLS REQUIRED FOR INSTALLATION Soft Hammer 17mm Rachet Spirit Level Tape Measure 8mm Allen key (Included) (Not included) (Not included) (Not included) (Not included) TUBES Rung Tube Twirly Tube Cargo Tube Swing Leg Tube Double Swing Tube Adj. Leg Tube Ladder Tube FITTINGS Short Tee... - Page 9 INVENTORY (continued) HARDWARE 108x 108x M10 Bolt Rung Insert Washer M10 Hex Nut Plastic End Cap Manufacture Sticker Height Sticker COMPONENTS (accessories if applicable) Trapeze Sling swing Rubber Swing Cargo Net Swing Hooks One of the best things about a Funky Monkey Bar is the ability to add new equipment and accessories as your child and family grows.
-
Page 10: Assembly Instructions
ASSEMBLY INSTRUCTIONS - LADDER BAR ASSEMBLY RUNG ASSEMBLY (x26) Rung Tube 25Dia x 850mm 1. Assemble plastic rung inserts as shown above. 2. Push inserts into both ends of all rungs. MONKEY BAR LADDER ASSEMBLY M10 Bolts Washers Hand tighten all bolts. Assemble on flat surface. - Page 11 ATTACH SECOND LADDER TUBE Hand tighten all bolts Ladder Tube Washers 50Dia x 2950mm M10 Bolts FIRMLY TIGHTEN ALL RUNG BOLTS. See page 5 for correct tightening method. 3-4 turns Page 10...
-
Page 12: Ladder Bar Assembly
REPEAT STEPS 2 - 4 FOR 1 MORE LADDER BAR ASSEMBLY. LADDER BAR ASSEMBLY x2. Page 11... - Page 13 ASSEMBLY INSTRUCTIONS - LEG ASSEMBLY LEG ASSEMBLY x 2 Insert plastic end caps into leg tubes. Adj. Leg Tube Dia 50 x 2300mm Plastic End Cap INSERT RUNGS M10 Bolts Washers Hand tighten all bolts. Assembled Rungs from step 1 ATTACH SECOND LEG AND CARGO NET 1.
- Page 14 ATTACH BASE PLATES AND 1x SHORT TEE (A) (cargo net side) Tighten all grub screws on base plates. Short Tee Leave short tee (A) loose. D-101 (Short tee (A) only with cargo net) Base Plate + 360 D-125 APPLY HEIGHT STICKERS Height Sticker Move net downwards to allow height sticker application.
- Page 15 SET LADDER BAR HEIGHT. 200mm Short Tee D-101 Good starting height is 100-200mm above reach. Position top short-tee at measured height. Push through cargo hoops if required. FIRMLY TIGHTEN ALL GRUB SCREWS AND RUNG BOLTS. Hand tighten grub screw A. (Temporary location).
-
Page 16: Leg Assembly
REPEAT STEPS 7-13 FOR 3 MORE SETS OF LEGS. SAME PROCEDURE BUT WITHOUT CARGO NET AND DIFFERENT LOCATION/DELETION OF ADDITIONAL SHORT TEE (A). SEE BELOW FOR DESIRED RESULT. LEG ASSEMBLY x 4. Additional short tee (A). Leg assembly (2) with no cargo Leg assembly (1) with cargo net and no aditional short tee (A). -
Page 17: Twirly Whirly Bar Assembly
ASSEMBLY INSTRUCTIONS - TWIRLY WHIRLY BAR ASSEMBLY ASSEMBLE VERTICAL TWIRLY TUBE Elbow D-125 Tighten all grub screws. Insert Twirly Tube fully into Elbow. Twirly Tube 50Dia x 900mm Base Plate D-131 ATTACH HORIZONTAL TWIRLY TUBE Fully insert twirly tube then Twirly Tube firmly tighten all grub screws. - Page 18 ASSEMBLY INSTRUCTIONS - MAIN MONKEY BAR ASSEMBLY FLIP LEGS 1 & 2 OVER For the following step the legs should be flipped over & attached one at a time. 180º 180º ATTACH 2x LEGS TO LADDER 1. Attach first set of legs 1 - tighten all grub screws. 2.
- Page 19 FLIP ASSEMBLY OVER CRITICAL : ENSURE YOUR FRAME IS 100% SQUARE AND LEVEL (AS PER PAGE 6) BEFORE MOVING ONTO THE REST OF THE ASSEMBLY SECURE TO GROUND Hammer in pegs x4. Pegs Page 18...
-
Page 20: Main Monkey Bar Assembly
REPEAT STEPS 20-22 FOR 1 MORE COMPLETE MAIN MONKEY BAR ASSEMBLY. SAME PROCEDURE BUT USING LEGS 3 & 4 FROM STEP 15 SEE BELOW FOR DESIRED RESULT. MAIN MONKEY BAR ASSEMBLY x2. Locate and align the new main monkey bar assembly along side the first one (on the opposite side to the cargo net), at a distance of approximately 105cm apart. -
Page 21: Swing Bar Assembly
ASSEMBLY INSTRUCTIONS - SWING BAR ASSEMBLY SWING BAR ASSEMBLY x2. Slide on all fittings and fully tighten elbow grub screws Leave short tees and swing hooks loose for assembly adjustment. Swing Hooks Short Tee D-101 Double Swing Tube Short Tee D-101 Swing Hooks Elbow... - Page 22 ATTACH 2x SWING BAR ASSEMBLY. Attach the short tees and the elbows (on the swing bars) to the main Cargo Net Side monkey bar ladder legs. The cargo net side will need to be threaded through the top cargo net hoops before attaching.
- Page 23 ATTACH CARGO TUBE 1. Ensure the main monkey ladder is located centrally between the swing leg and the other monkey ladder. Approx 1040 apart. 2. Loosen grub screws on A,B & C. 3. Thread in bottom cargo tube between cargo net hoops &...
- Page 24 SECURE TO GROUND Pegs ATTACH TWIRLY WHIRLY BARS x4 Adjust height of short tees to align with horizontal twirly whirly bar. Tighten all grub screws fixing twirly whirlys to legs. 4x Twirly whirly bars from step 19. + 360 Page 23...
-
Page 25: Load Twirly Whirly Bars
ASSEMBLY INSTRUCTIONS - LOAD TWIRLY WHIRLY BARS LOAD YOUR TWIRLY WHIRLY BARS x4 To reduce movement in your frame load your twirly whirly bars as follows. . Loosen the grub screw fixing the short tee to the swing leg. Swing leg Twirly Whirly . - Page 26 ATTACH ACCESSORIES (if applicable) Attach new accesories in desired position (if applicable) and tighten swing hook bolts with rachet. Marmoset supplied accessory: (sling swing shown) Marmoset supplied accessory: (rubber swing shown) Marmoset supplied accessory: (trapeze shown) FINAL CHECKS 1. Ensure frame is square and level. 2.
-
Page 27: Maintenance
MAINTENANCE. At the beginning of each heavy play session (especially a party) and twice a month during play season ensure; 1. Tighten all hardware - grub screws, nuts and bolts. 2. Pegs are in place and fully secure. 3. Lubricate all metallic moving parts with WD40 or Vasaline - (trolley and swing hooks.) 4. - Page 28 72 164 496 520 1300 912 198 info@funkymonkeybars.com www.funkymonkeybars.com ® AUSTRALIAN MADE 9 Cutting Way, we are social monkeys AND OWNED Yangebup WA 6164 All Funky Monkey Bars® designs are registered and protected under IP Australian certification. IP Australia...
Need help?
Do you have a question about the THE MARMOSET and is the answer not in the manual?
Questions and answers