Cisco IE 3000 Getting Started Manual
Cisco systems switch user manual
Hide thumbs
Also See for IE 3000:
- Software configuration manual (760 pages) ,
- Hardware installation manual (186 pages) ,
- Command reference manual (802 pages)
Table of Contents
Advertisement
About This Guide
OL-16234-01
Cisco IE 3000 Switch
Getting Started Guide
•
About This Guide, page 1
Taking Out What You Need, page 2
•
Connecting Expansion Modules, page 3
•
Running Express Setup, page 5
•
Managing the Switch, page 9
•
•
Installing the Switch, page 11
Connecting to the Switch Ports, page 21
•
In Case of Difficulty, page 25
•
•
•
This guide provides instructions on how to use Express Setup to initially
configure your Cisco IE 3000 switch. Also covered are switch management
options, module connection procedures, basic mounting procedures, and
troubleshooting help.
Cisco IE 3000 Switch Getting Started Guide
1
Advertisement
Chapters
Table of Contents

Related Manuals for Cisco IE 3000


Summary of Contents for Cisco IE 3000
-
Page 1: Table Of Contents
Cisco One-Year Limited Hardware Warranty Terms, page 28 • About This Guide This guide provides instructions on how to use Express Setup to initially configure your Cisco IE 3000 switch. Also covered are switch management options, module connection procedures, basic mounting procedures, and troubleshooting help. OL-16234-01... -
Page 2: Taking Out What You Need
For additional installation and configuration information for Cisco IE 3000 switches, see the Cisco IE 3000 documentation on Cisco.com. For system requirements, important notes, limitations, open and resolved bugs, and last-minute documentation updates, see the release notes, also on Cisco.com. -
Page 3: Connecting Expansion Modules
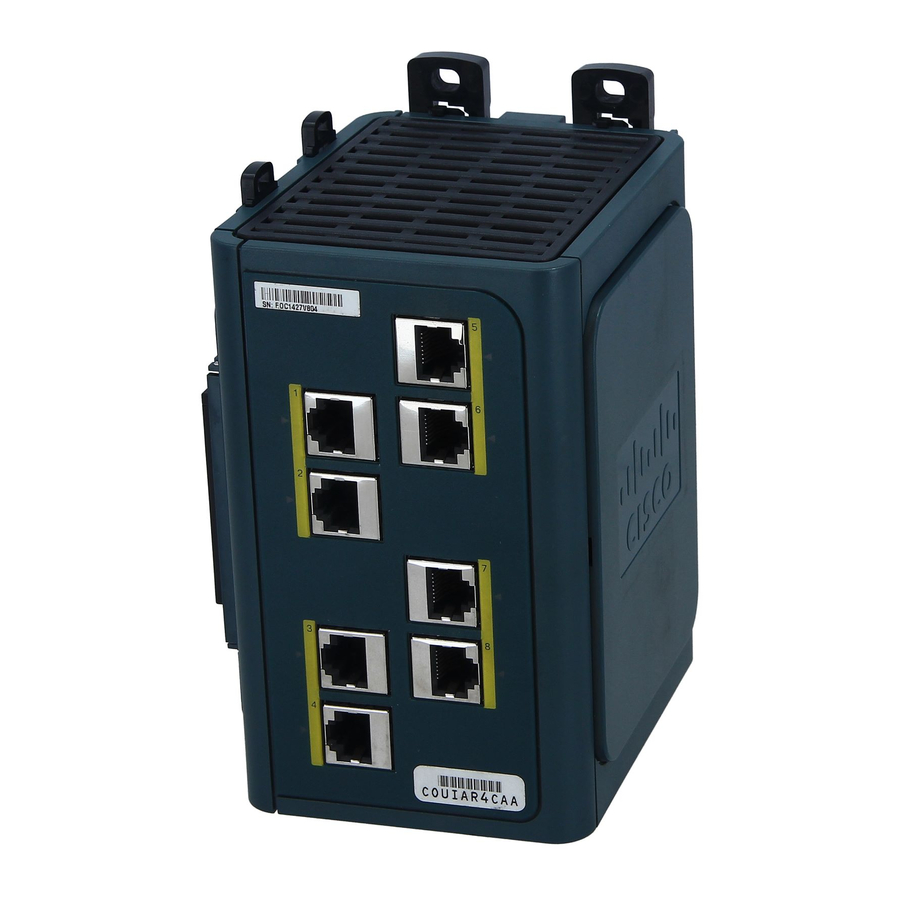
Figure 1 Cisco IE 3000 switch Documentation 1. The Cisco IE-3000-4TC is shown as an example. Your switch model might look different. Connecting Expansion Modules The switch can operate as a standalone device with Fast Ethernet ports. You can increase the number of Fast Ethernet ports by connecting the Cisco IEM-3000-8TM or the Cisco IEM-3000-8FM expansion module. - Page 4 If you are installing a Cisco Note IEM-3000-8TM module and a Cisco IEM-3000-8FM module, install the Cisco IEM-3000-8TM first. Cisco IE 3000 Switch Getting Started Guide Cisco IE 3000 Switch Getting Started Guide OL-16234-01...
-
Page 5: Running Express Setup
Running Express Setup When you first set up the switch, you should use Express Setup to enter the initial IP information. Doing this enables the switch to connect to local routers and the Internet. - Page 6 When the switch powers on, it begins the power-on self-test (POST). During POST, the System LED blinks while a series of tests verify that the switch functions properly. Wait for the switch to complete POST, which takes approximately 1 minute.
- Page 7 Cisco IE 3000 Switch Getting Started Guide Step 6 Connect a Category 5 Ethernet cable (not provided) from the blinking switch port to the Ethernet port on your PC. The port LEDs on your PC and the switch blink green while the switch configures the connection.
- Page 8 You have completed the initial switch setup. If you click Cancel, the fields are cleared, and you can start over. Step 12 Turn off DC power at the source, disconnect all cables to the switch, and install the switch in your network. See the configuring and managing the switch.
-
Page 9: Refreshing The Pc Ip Address
• Using the Device Manager The simplest way to manage the switch is by using the device manager that is in the Cisco IOS image. The device manager has a web interface that simplifies configuration and monitoring of the switch. You can access the device manager from anywhere in your network through a web browser. -
Page 10: Downloading Cisco Network Assistant
Command-Line Interface You can manage the switch from the command-line interface (CLI) by connecting your PC directly to the switch console port or to an Ethernet port. This procedure explains how to access the CLI through the console port. Cisco IE 3000 Switch Getting Started Guide... -
Page 11: Other Management Options
“Accessing Online Help” section on page 27 documents. Installing the Switch These sections explain how to install the switch on a DIN rail or in a rack. Refer to the switch hardware guide for instructions on mounting the switch on a wall: •... -
Page 12: Equipment That You Supply
• – – – Cisco IE 3000 Switch Getting Started Guide Front-panel LEDs can be easily read. Access to ports is sufficient for unrestricted cabling. Front-panel direct current (DC) power and relay connector is within reach of the connection to the DC power source. -
Page 13: Installation Warning Statements
Cisco IE 3000 Switch Getting Started Guide Airflow around the switch and through the vents is unrestricted. To prevent • the switch from overheating, these must be the minimum clearances: – – – Temperature surrounding the unit does not exceed 140°F (60°C), the •... - Page 14 This equipment is intended to be grounded to comply with emission and Warning immunity requirements. Ensure that the switch functional ground lug is connected to earth ground during normal use. Statement 1064 Cisco IE 3000 Switch Getting Started Guide Cisco IE 3000 Switch Getting Started Guide OL-16234-01...
- Page 15 Cisco IE 3000 Switch Getting Started Guide When used in a Class I, Division 2, hazardous location, this equipment must be Warning mounted in a suitable enclosure with proper wiring method, for all power, input and output wiring, that complies with the governing electrical codes and in accordance with the authority having jurisdiction over Class I, Division 2 installations.
-
Page 16: Mounting The Switch To A Din Rail Or To The Rack Adapter
Mounting the Switch to a DIN Rail or to the Rack Adapter Follow these steps to mount the switch on a DIN rail or in a rack. Step 1 If you are mounting the switch in a rack, first secure the Cisco IE 3000 rack adapter to the rack. -
Page 17: Grounding The Switch
DIN rail fits in the space between the two latches. Step 5 Push the DIN rail latches in after the switch is over the DIN rail to secure the switch to the rail. You hear a click when the latches are completely locked. Step 6 Connect power to the switch. -
Page 18: Wiring The Dc Power Source
Follow these steps to prepare the DC power cable. Before performing any of the following procedures, ensure that power is Warning removed from the DC circuit. Statement 1003 Cisco IE 3000 Switch Getting Started Guide Cisco IE 3000 Switch Getting Started Guide OL-16234-01... - Page 19 Cisco IE 3000 Switch Getting Started Guide This product relies on the building’s installation for short-circuit (overcurrent) Warning protection. Ensure that the protective device is rated not greater than: 5A. Statement 1005 Warning Only trained and qualified personnel should be allowed to install, replace, or service this equipment.
-
Page 20: Attaching The Power And Relay Connector
Step 8 When you are testing the switch, one power connection is sufficient. If you are installing the switch and are using a second power source, repeat Step 3 through Step 7 using a second power and relay connector. Attaching the Power and Relay Connector... -
Page 21: Optional Procedures
Use a flathead screwdriver to tighten the captive screws on the sides of the second power and relay connector. Optional Procedures For detailed instructions on these procedures, see the Cisco IE 3000 Switch Hardware Installation Guide on Cisco.com. Wiring the external alarm relays •... -
Page 22: Step 1
Ethernet connections and configures the interfaces accordingly. Therefore, you can use either a crossover or a straight-through cable for connections to a switch 10/100 or 10/100/1000 Ethernet port, regardless of the type of device on the other end of the connection. -
Page 23: Installing Sfp Modules And Connecting To Ports
Cisco IE 3000 Switch Getting Started Guide Installing SFP Modules and Connecting to Ports Follow these steps: Step 1 Grasp the module on the sides, and insert it into the switch slot until you feel the connector snap into place. -
Page 24: Connecting To Dual-Purpose Ports
Insert the other cable end into the other device. Verifying Port Connectivity After you connect to the switch port and another device, the port LED turns amber while the switch establishes a link. This process takes about 30 seconds, and then the LED turns green when the switch and the target device have an established link. -
Page 25: In Case Of Difficulty
OL-16234-01 Recommendation If no, or you are not sure, restart the switch. Make sure that the SETUP LED is blinking when you press the Express Setup button. Verify that you are connected to the switch port with the blinking LED. -
Page 26: Resetting The Switch
To reset the password on the switch: Power off the switch. Power on the switch, and at the same time, press and hold down the Express Setup button until all the system LEDs turn red. Release the Express Setup button, and the switch continues to boot. -
Page 27: Accessing Online Help
• Cisco IE 3000 Switch Hardware Installation Guide. This guide provides complete hardware descriptions and detailed installation procedures. Regulatory Compliance and Safety Information for the Cisco IE 3000 Switch. • This guide contains agency approvals, compliance information, and translated warning statements. -
Page 28: Obtaining Documentation And Submitting A Service Request
The Warranties and License Agreements page appears. To read the Cisco Information Packet, follow these steps: Cisco IE 3000 Switch Getting Started Guide Click the Information Packet Number field, and make sure that the part number 78-5235-03C0 is highlighted. - Page 29 Cisco IE 3000 Switch Getting Started Guide You must have Adobe Acrobat Reader to view and print PDF files. You Note can download the reader from Adobe’s website: To read translated and localized warranty information about your product, follow these steps:...
- Page 30 Complete the information below, and keep it for reference. Company product purchased from Company telephone number Product model number Product serial number Maintenance contract number Cisco IE 3000 Switch Getting Started Guide Cisco IE 3000 Switch Getting Started Guide OL-16234-01...
- Page 31 Cisco IE 3000 Switch Getting Started Guide Cisco IE 3000 Switch Getting Started Guide OL-16234-01...
- Page 32 Aironet, AsyncOS, Bringing the Meeting To You, Catalyst, CCDA, CCDP, CCIE, CCIP, CCNA, CCNP, CCSP, CCVP, Cisco, the Cisco Certified Internetwork Expert logo, Cisco IOS, Cisco Press, Cisco Systems, Cisco Systems Capital, the Cisco Systems logo, Cisco Unity, Collaboration Without Limitation, EtherFast, EtherSwitch, Event...
Need help?
Do you have a question about the IE 3000 and is the answer not in the manual?
Questions and answers