MSA Advantage 4000 Maintenance And Repair
Hide thumbs
Also See for Advantage 4000:
- Operation and instructions manual (36 pages) ,
- Instructions manual (24 pages)

Related Manuals for MSA Advantage 4000


Summary of Contents for MSA Advantage 4000
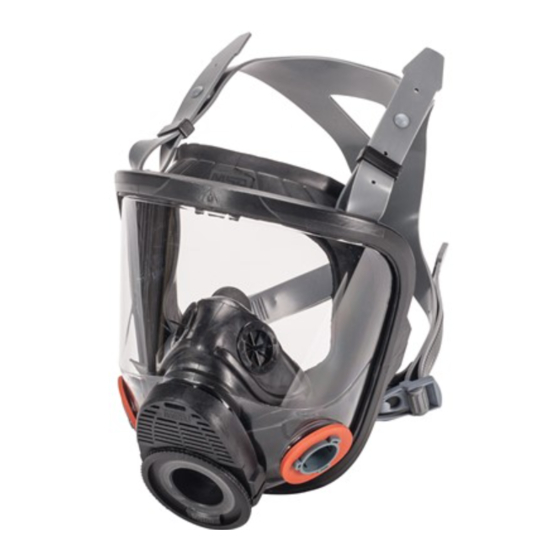
- Page 1 Advantage ® 4000 Facepiece: AirHawk II ® Air Mask MAINTENANCE AND REPAIR MSA 9011 (L) Rev. 0 © MSA 2009 Prnt. Spec. 10000005389(I) Mat. 10104243 Doc. 10104243...
-
Page 2: Table Of Contents
10025288 Head Harness Button (2 req’d) 10029294 Lens Cover (Not Shown) 10075903 Cloth Head Harness (Not Shown) 10075901 Silicone Head Harness (Not Shown) 604070 Christo-Lube Lubricant (Not Shown) 465008 Drawstring Bag (Not Shown) MSA 9011 (L) Rev. 0 - 10104243... - Page 3 ADVANTAGE 4000 FACEPIECE Christo-Lube MSA 9011 (L) Rev. 0 - 10104243...
-
Page 4: Disassembly
1. Pull the top straps from the pre-adjusting button. 2. Remove the bottom strap a. Slide the metal tab off the button 2. Pull the straps through the sliders. b. Remove the button. 3. Pull the straps through the D-rings. MSA 9011 (L) Rev. 0 - 10104243... -
Page 5: Removing The Lens Rings And Lens
Use a flat head screw driver to pry the lens rings apart. Carefully rock the screw driver up and down until you can remove either half by hand. 3. Remove and discard the o-ring. MSA 9011 (L) Rev. 0 - 10104243... - Page 6 6. Lift and continue turning to remove the adapter. 7. Remove the locking button. Be careful not to 11. Gently pull the inhalation valve from the post. lose the springs 8. Remove the exhalation-valve spring retainer. MSA 9011 (L) Rev. 0 - 10104243...
-
Page 7: Removing The Exhalation-Valve Housing
5. Remove and discard the large O-ring. 2. Carefully push the bottom of the inlet housing to remove it. Disassembling the Nosecup 1. From inside, gently push the inlet check valves out of the nosecup. 3. Remove the nosecup. MSA 9011 (L) Rev. 0 - 10104243... -
Page 8: Reassembly
Installing the Exhalation Valve Housing and Nosecup U-Clip 10061996 1. Install the exhalation valve housing and nosecup. 3. Stretch the nosecup around the inlet-check valve seat. Ensure that the nosecup captures the inlet-check valve seat fully. MSA 9011 (L) Rev. 0 - 10104243... - Page 9 3. Turn the facepiece over and work the bottom of the 5. Hold the spring and retainer together while placing nosecup under the the other end of the facepiece seal. spring onto the valve. MSA 9011 (L) Rev. 0 - 10104243...
-
Page 10: Notch
12. Turn the component housing over. Press and 8. Install the button. rotate the adapter counter-clockwise until the notch (see detail) is at 9 o’clock. 9. Insert the adapter, press and rotate counter-clockwise until it drops into place. Notch MSA 9011 (L) Rev. 0 - 10104243... -
Page 11: Installing The Lens
Installing the Lens Single Port Lens, 4100-S 10084808 Single Port Lens, 4100-H 10074738 1. Check the groove for dirt or debris that could interfere 2. Install the top lens ring. with a good seal. MSA 9011 (L) Rev. 0 - 10104243... -
Page 12: Installing Buttons
2. Stretch the straps onto the buttons. 5. Use a Phillps screwdriver and alternate between the left and the right screws until gaps are closed. 3. Pass the bottom straps through the buckles as shown. MSA 9011 (L) Rev. 0 - 10104243... -
Page 13: Installing Adapter Clips And The Cloth Head Harness
7. Connect the buckle. 3. Pivot the buckle up to lock it in the clip. Installing Adapter Clips and the Cloth Head Harness Right Adapter 10028302 Left Adapter 10027774 Cloth Head Harness 10075903 MSA 9011 (L) Rev. 0 - 10104243... - Page 14 ADVANTAGE 4000 FACEPIECE 4. Install the harness and adapter clip. 5. Press the adapter clips onto the lens ring until they engage fully. MSA 9011 (L) Rev. 0 - 10104243...
Need help?
Do you have a question about the Advantage 4000 and is the answer not in the manual?
Questions and answers