
Related Manuals for Sabaj K-1 Rotolift


Summary of Contents for Sabaj K-1 Rotolift
- Page 1 K-ROTOLIFT RF Instrukcja montażu i obsługi/Assembly and operating manual Modele/Models: K-1 Rotolift K-2 Rotolift K-3 Rotolift YouTube link for installation manual...
-
Page 2: Table Of Contents
The shape of the back of the TV płaski itp.) (curved, flat, etc.) Miejsca montażu kabli audio/wideo z The audio/video cable mounting tyłu telewizora locations on the rear of the TV Wagę telewizora The TV's weight helpdesk@sabaj.pl... -
Page 3: Instrukcja Montażu I Obsługi
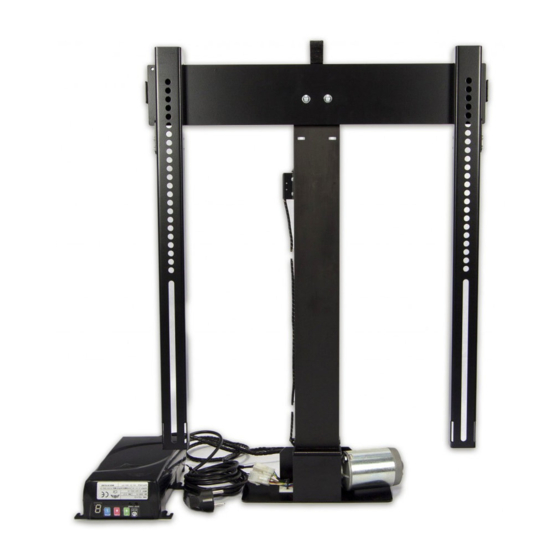
Uchwyt klapy 2 szt. Prowadniki 2 szt. Sterownik 1 szt. Pilot RF-Remote-4W 1 szt. Opaski kablowe 4 szt. Śruby ISO 4762 1 kpl. Śruby ISO 7045 4 szt. Śruby ISO 7380 1 kpl. Podkładki ISO 7089 4 szt. rozm. 4 www.rtv.sabaj.pl... -
Page 4: Montaż Podnośnika
20 szt. cieńszych niż 15mm!!!) Wymagane narzędzia dodatkowe: Nazwa narzędzia Rys. Śrubokręt krzyżakowy rozm. 10 Klucz nasadowy Klucz płaski rozm. 7 Montaż podnośnika 1. Montaż uchwytów klapy należy przeprowadzić zgodnie z rys. 1. Dodatkowe otwory umożliwiają regulację. rys. 1 helpdesk@sabaj.pl... - Page 5 Sterownik można umieścić w dowolnym miejscu, ale należy pamiętać o zachowaniu odpowiedniej odległości dla kabla – nie może zahaczyć o element podnośnika i telewizora. UWAGA: Pamiętaj, że sterownik powinien swobodnie zawisnąć. Nie używaj zbyt dużej siły podczas dokręcania go do konstrukcji. rys. 3 www.rtv.sabaj.pl...
- Page 6 Prowadniki powinny być mocowane ok. 150 mm od krawędzi wieka (rys. 4). Przed przykręceniem prowadników, docisnąć je do tylnej ścianki mebla 5. Podłącz sterownik do podnośnika (rys. 5a ) rys. 5a Po podłączeniu sterownika podnieś podnośnik za pomocą przycisku "UP", aby umożliwić komfortowe zawieszenie telewizora. helpdesk@sabaj.pl...
-
Page 7: Montaż Telewizora Do Podnośnika
TV). Belki powinny znajdować się ok. 2 cm poniżej górnej krawędzi ekranu. Możesz użyć dostarczonych podkładek, jeśli twój telewizor ich wymaga. rys. 6 7. Poluzuj dolne uchwyty belek pionowych (rys. 7) rys. 7 8. Zawieś TV z zamontowanymi belkami pionowymi na belce poziomej podnośnika (rys. 8) rys. 8 www.rtv.sabaj.pl... -
Page 8: Prowadzenie Kabli
11. Przeprowadź wszystkie kable telewizyjne przez oczko. Podłącz wszystkie kable za pomocą opasek kablowych (str. 3) do uchwytu (rys. 11) mocowanie kabli za pomocą opasek do uchwytu rys. 11 UWAGA: Pamiętaj, aby pozostawić optymalną rezerwę wszystkich kabli, umożliwiającą obrót podnośnika z telewizorem. Minimalny zapas wynosi 32 cm. helpdesk@sabaj.pl... -
Page 9: Informacje O Sterowniku
RJ-45, które pozwala na podłączenie dodatkowych akcesoriów dostarczanych przez firmę Sabaj-System. UWAGA: Tylko oryginalne akcesoria produkowane przez Sabaj-System będą kompatybilne z Twoim sterownikiem. Jeśli podejmiesz próbę modyfikacji lub podłączenia innych urządzeń przez port RJ-45, możesz uszkodzić lub zniszczyć sterownik - skutkuje to utratą gwarancji. -
Page 10: Obsługa Podnośnika - Sterowanie
Obsługa podnośnika – sterowanie Każdy sterownik z funkcją sterowania radiowego jest dostarczany z zaprogramowanym już pilotem radiowym. Tylko piloty dostarczane przez Sabaj-System mogą operować sterownikiem Sabaj. Przyciski na pilocie RF są zaprogramowanie fabrycznie i nie mogą być zmienione (rys. 13). góra dół... - Page 11 Uwaga: Zaprogramowane przyciski pilota będą jednocześnie aktywne dla dotychczas obsługiwanego tym pilotem urządzenia (rys. 14 – przykładowe ustawienia). Podnośnik nie może być obsługiwany przez więcej niż jeden pilot IR . Preferowane zakresy ruchów będą takie same dla wszystkich pilotów. rys. 14 www.rtv.sabaj.pl...
-
Page 12: Ustawienie Preferowanej Wysokości I Obrotu Urządzenia
(M1): dla ruchu odwrotnie do wskazówek zegara (M2): UWAGA: Można wybrać dowolne 2 preferowane kąty obrotu. Dla przykładu, możliwe jest ustawienie M1 jako obrót 30° w lewo oraz M2 jako obrót 100° również w lewo. helpdesk@sabaj.pl... - Page 13 Użyj tej opcji tylko jeśli masz pewność, że chcesz dolnego wyłacznika ustawić pozycję dolną wyżej niż standardowo krańcowego Ustaw ponownie pozycje górną i dolną. Zapamiętanie Próba zapisania pozycji takich ustawień może spowodować brak możliwości dolnej powyżej górnej ruchu podnośnika. www.rtv.sabaj.pl...
- Page 14 Silnik klapy podnośnika może byc zablokowany. Sprawdź również, czy podłączenia kabli nie są Brak impulsów z silnika rozpięte lub luźne. Z powodu mnogości czynników podnosnika przy tym błędzie najlepiej skontaktuj się z działem obsługi technicznej helpdesk@sabaj.pl Reset ustawień sterownika ------- helpdesk@sabaj.pl...
-
Page 15: Assembly And Operating Manual
Lid brackets 2 pcs. Guides 2 pcs. Control box 1 pc. RF-Remote-4W 1 pc. Cable ties 4 pcs. Screws ISO 4762 1 set Screws ISO 7045 4 pcs. Screws ISO 7380 1 set Pads ISO 7089 4 pcs. size 4 rtv.sabaj.pl/en/home/... -
Page 16: Lift Assembly
Required additional tools: Tool name Fig. Cross screwdriver Socket wrench size 10 size 7 Flat wrench Lift assembly 1. The assembly of the lid brackets should be carried out in accordance with the fig. 1. Additional holes allow adjustment. fig. 1 helpdesk@sabaj.pl... - Page 17 Driver can be placed anywhere, but remember to keep the right distance for the cable - it should not snag the the lift and TV elements. NOTE: Remember that the controller should hang freely. Do not tighten the screws too tight to avoid breaking the control box. fig. 3 rtv.sabaj.pl/en/home/...
- Page 18 4 5. Connect the control box to the lift (fig. 5a ). fig. 5a After connecting the control box, move the lift up using the „UP” button to allow the TV to be comfortably hanged. helpdesk@sabaj.pl...
-
Page 19: Mounting The Tv To The Lift
You can use the provided washers if needed. fig. 6 7. Loosen the lower brackets on the vertical beams (fig. 7) fig. 7 8. Hang the TV with mounted vertical beams on the lift horizontal beam (fig. 8) fig. 8 rtv.sabaj.pl/en/home/... -
Page 20: Cable Management
11. Lead all the TV cables through the cable entry. Fasten the cables with cable ties (page 15) to the self-adhesive holders (fig. 11). Attach all cables using cable ties to the cable holder fig. 11 NOTE: Make sure to leave necessary lenght to ensure that TV rotation will be unaffected. Optimal supply is 32 cm. helpdesk@sabaj.pl... -
Page 21: Device Operating
It does not require any calibration, which is done automatically. After detecting an obstacle the lift stops and moves up a few centimeters. The safety system works only during the down movement. When the safety rtv.sabaj.pl/en/home/... -
Page 22: Lift Operating - Control
Please note that Power Guard socket can power devices up to 1000W only Lift operating – control Every control box with RF function is delivered with a pre-progammed RF Remote. Only Sabaj RF remotes can operate with Sabaj control boxes. The buttons on the RF remote control are pre- programmed and cannot be changed. - Page 23 – not using the IR receiver. Please be advised, that you will need the IR-EYE Sabaj Accessory connected to the controller via the RJ-45 socket to operate your lift with an IR remote. To start acquiring the IR remote: a.
-
Page 24: Setting Favorite Position And Rotation Angles
After you are done with all the settings, simply leave the SETUP mode by pressing & holding the SETUP button for about 2 seconds, until the red SETUP LED light will go off. The preferred positions are now set and the controller is in normal operation mode. helpdesk@sabaj.pl... - Page 25 Attempt on setting UP VP Re-set the UP/DOWN settings. This might make lower than DOWN VP. the lift unable to move up or down. Down VP Memory approved ------- UP VP Memory approved ------- rtv.sabaj.pl/en/home/...
- Page 26 The LIFT motor might be blocked mechanically, unable to start moving. Cables No impulses from LIFT's Motor might be loose. Many reasons to this error – please contact Sabaj support, providing photos of the installation. Full motion reset ------- helpdesk@sabaj.pl...
Need help?
Do you have a question about the K-1 Rotolift and is the answer not in the manual?
Questions and answers