
Related Manuals for Truma Caravan Mover


Summary of Contents for Truma Caravan Mover
- Page 1 Caravan Mover® Operating instructions Page 2 Installation instructions Page 7 To be kept in the vehicle! Sales and warranty UK and Southern Ireland only...
-
Page 2: Table Of Contents
Caravan Mover® Table of contents Safety instructions – Practice operating the Caravan Mover® in Symbols used ................2 Safety instructions ............2 an open area before using for the first time. General instructions ............3 This is to fully familiarise yourself with Batteries ................ -
Page 3: General Instructions
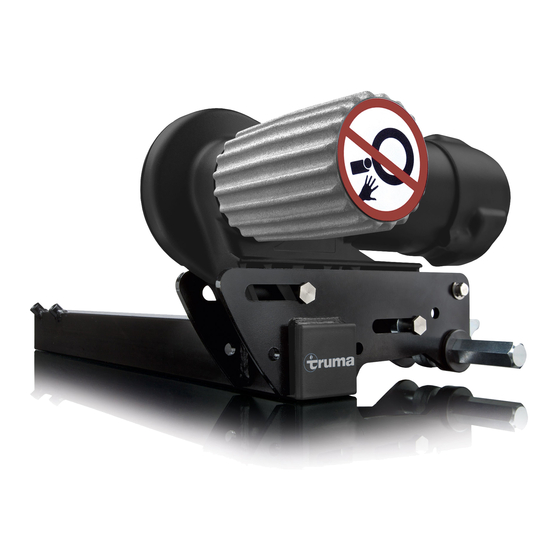
(see “Instal- Gel / AGM min. 70 Ah lation of the drive units”). – Do not use the Caravan Mover® as a support Lead-acid battery (liquid electrolyte) min. 80 Ah when jacking up the caravan, since this may damage the drive unit. -
Page 4: Operating Instructions
If the buttons are released or the radio signal is interfered with or becomes too weak, the caravan stops. Your LED “On” and no acoustic signal Caravan Mover® cannot be activated by radio devices or other System is ready for operation Mover® remote controls. -
Page 5: Coupling To A Towing Vehicle
It is possible to position the caravan’s coupling to a stationary car tow ball using the Caravan Mover®, but take some care. The remote control and the control unit are synchronised Use the instructions above as your guide. Use the button con- with each other in the factory. -
Page 6: Declaration Of Conformity
– for gas pressure regulation systems as a result of damage by foreign substances (e.g. oils, plasticisers) in the gas, 3.1 R&TTE directive (1999/5/EC) – as a consequence of failure to comply with Truma instruc- 3.2 EMC directive (2004/108/EC) tions for installation and use, 3.3 Radio Interference in Vehicles 72/245/EEC... -
Page 7: Installation Instructions
Any modifications to the unit, or the use of spare parts and accessories that are important to the operation of the system that are not original Truma parts and failure to follow the in- stallation and operating instructions will cancel the warranty and indemnify Truma from any liability claims. -
Page 8: Special Accessory Installation
125 mm, part no. 60030-37600. Fig. 14 9. Caravan Mover® mounting set for Eriba-Touring, part no. 60030-09000. Installation is not possible in some cases because of attachments to the underbody.Contact your dealer if necessary. -
Page 9: Choice Of Location
Choice of location The Caravan Mover® should preferably be installed in front of the axle, but can also be installed behind the axle under spe- cial circumstances (e.g. due to lack of space). Only the bolts that are provided must be used to secure the Mover®... - Page 10 48 Nm min. 110 mm Fig. 27 Fig. 24 Re-check that all 6 bolts have been tightened to the Truma can supply a spacer plate set for compensating for correct torque! height differences of up to 45 mm (part no. 60010-66000,...
-
Page 11: Installing The Cross Actuation Device
Installing the cross actuation device Secure cables to chassis and / or underbody using the sup- plied clips and screws. Please ensure that the drive rollers are not resting against the tyres (at both sides)! Seal hole in vehicle underbody using plastic body sealant. Slide the connecting tubes (1) into the middle tube (2) with Connecting diagram the holes facing the outside. -
Page 12: Connecting The Drive Motors
+ Control unit Check whether the battery is fully charged for operating the + Battery Caravan Mover® and that the isolating switch is in the “ON” position. Fig. 31 Park the caravan outside on an open, level surface and apply Connect battery connecting cables to the existing battery the handbrake. - Page 16 Should problems occur, please contact the Truma Service Centre or one of our authorised service partners (see www.truma.com). In order to avoid delays, please have the unit model and serial number ready (see type plate). Sales and Service in UK and Eire...
Need help?
Do you have a question about the Caravan Mover and is the answer not in the manual?
Questions and answers