Stihl RL-MM Instruction Manual
Hide thumbs
Also See for RL-MM:
- Instruction manual (28 pages) ,
- Instruction manual (12 pages) ,
- Instruction manual (20 pages)
Table of Contents
Advertisement
Quick Links
Advertisement
Table of Contents

Related Manuals for Stihl RL-MM


Summary of Contents for Stihl RL-MM
- Page 1 STIH) STIHL RL-MM Instruction Manual...
-
Page 2: Table Of Contents
MultiSystem ........2 Guide to Using this Manual ....2 Thank you for choosing a quality Safety Precautions ......3 engineered STIHL product. Using the Aerator ......9 This machine has been built using Permissible MultiEngines ....10 modern production techniques and Mounting the MultiTool .... -
Page 3: Multisystem
Note or hint on correct procedure in contain item numbers that appear in the order to avoid damage to the illustration. environment. In the STIHL MultiSystem the Example: MultiEngine can be combined with a Loosen the screw (1) number of different MultiTools to produce a power tool. -
Page 4: Safety Precautions
Always observe local safety regulations, contact your STIHL dealer for Only blades supplied by STIHL or standards and ordinances. assistance. expressly approved by STIHL for use If you have never used this power tool with your specific model are authorized. - Page 5 Transporting the Machine tool in any way since this can be hair (cap, hard hat, etc.). extremely dangerous and result in serious or fatal injury. STIHL cannot accept any liability for personal injury or Wear steel-toed safety damage to property caused by boots with non-slip soles.
- Page 6 The gearbox output shaft (1) must be – Never attempt to modify the controls below the drive tube (2) so that the or safety devices. MultiTool rotates in the direction of the – Keep the handles dry and clean for arrow (3). safe control. RL-MM...
- Page 7 See also chapter on "Starting the Engine" in the MultiEngine instruction To reduce the risk of injury from contact manual. with the blades, never operate a aerator without a properly mounted deflector. RL-MM...
- Page 8 If the blades still the ground. To reduce the risk of injury from contact rotate, have your STIHL dealer check – Check condition and tightness – with the blades, do not allow your power tool and make proper look for cracks.
- Page 9 MultiTool and MultiEngine instruction others. Protect it from unauthorized use "Storing the Machine". manuals. Have all other worked (e.g. by children). performed by your STIHL servicing dealer. Only use original STlHL replacement General Precautions parts for repairs to the machine. The use...
-
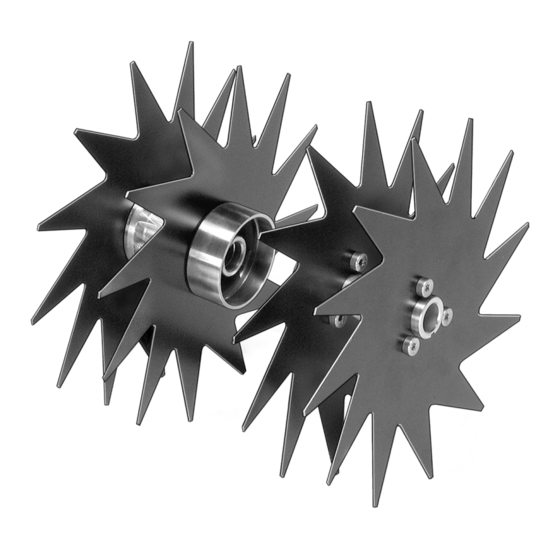
Page 10: Using The Aerator
The blades may only be mounted and operated in one position. Arrows on the Your RL-MM MultiTool is designed for Never work without the deflector! blades indicate the correct direction of aerating lawns to keep them in better rotation –... -
Page 11: Permissible Multiengines
Permissible MultiEngines Aerating the Lawn Cleaning the blades Only MultiEngines which have been supplied by STIHL or specially approved Start the engine. Pieces of grass or roots may become for use with this MultiTool may be used. tightly wound around the tool mounting Operate the aerator at no less than during aerating work. -
Page 12: Mounting The Multitool
(3). – Tighten first screw moderately. Also refer to chapter on "Mounting the – Tighten second screw moderately. MultiTool" in the instruction manual of – Tighten down first screw firmly. the other MultiTool. – Tighten down second screw firmly. RL-MM... -
Page 13: Starting / Stopping The Engine
Rotate the outer, right-hand blade attachments, always stand to the (5) on the shaft until it can be side of the power tool, never in front pushed into position – check the of or near the attachments. direction of rotation again (arrows). RL-MM... -
Page 14: Minimize Wear And Avoid Damage
The power tool must be operated, handlebar or frame. be performed by the owner, they should maintained and stored with the due care be performed by an authorized STIHL The starting procedure is now as and attention described in these servicing dealer. -
Page 15: Main Parts
Among other parts, this includes: – Blades – Mounting hardware – Deflector Outer right-hand blade Inner right-hand blader Inner left-hand blade Outer left-hand blade Hitch pin RL-MM... -
Page 16: Specifications
4106 When repairing the machine, only use replacement parts which have been conforms to the specifications of approved by STIHL for this power tool Directive 98/37/EC. or are technically equivalent. Only use The product has been developed and high-quality replacement parts in order... -
Page 17: Quality Certification
All STIHL products comply with the highest quality standards. An independent organization has certified that all products manufactured by STIHL meet the strict requirements of the ISO 9001 standard for quality management systems in terms of product development, materials purchasing, production, assembly, documentation and customer service. - Page 18 0458 482 0121 englisch / English...
Need help?
Do you have a question about the RL-MM and is the answer not in the manual?
Questions and answers