Table of Contents
Advertisement
Quick Links
FMD Pro 2.0
Thank you for choosing our product. Please read the instructions
carefully before operation. Follow these instructions to ensure that the
product is functioning properly. The images shown in this manual are for
illustrative purposes only.
For further details, please visit our Company's website
www.zkteco.com.
User Manual and Installation Guide
Contents 1
Advertisement
Table of Contents

Related Manuals for ZKTeco FMD Pro 2.0


Summary of Contents for ZKTeco FMD Pro 2.0
- Page 1 FMD Pro 2.0 User Manual and Installation Guide Thank you for choosing our product. Please read the instructions carefully before operation. Follow these instructions to ensure that the product is functioning properly. The images shown in this manual are for illustrative purposes only.
- Page 2 Copyright © 2022 ZKTECO CO., LTD. All rights reserved. Without the prior written consent of ZKTeco, no portion of this manual can be copied or forwarded in any way or form. All parts of this manual belong to ZKTeco and its subsidiaries (hereinafter the "Company" or "ZKTeco").
- Page 3 ZKTeco in no event shall be liable to the user or any third party for any incidental, consequential, indirect, special, or exemplary damages, including, without limitation,...
- Page 4 FMD Pro 2.0 User Manual and Installation Guide ZKTeco shall in no way be responsible (i) in case the machine/unit/equipment malfunctions due to any non-compliance of the instructions contained in this manual (ii) in case of operation of the machine/unit/equipment beyond the rate limits (iii) in case of operation of the machine and equipment in conditions different from the prescribed conditions of the manual.
- Page 5 FMD Pro 2.0 User Manual and Installation Guide About the Company ZKTeco is one of the world’s largest manufacturers of RFID and Biometric (Fingerprint, Facial, and Finger-vein) readers. Product offerings include Access Control readers and panels, Near & Far-range Facial Recognition Cameras,...
-
Page 6: Table Of Contents
TEPS DETECTION ZONES ..................16 OPERATIONAL PROCEDURE ................17 MAIN MENU .....................18 ADJUSTING SENSITIVITY ................19 SECURITY LEVEL SETTING ..............20 APPLICATION AREA SETTING ..............21 ALARM SETTINGS ................... 21 AUTOTEST ....................23 P a g e Copyright©2022 ZKTECO CO., LTD. All rights reserved. - Page 7 SYSTEM INFO ...................29 4.11 COMMUNICATION ...................29 4.11.1 ...................... 30 ETWORK ETTINGS 4.11.2 PC C ......................31 ONNECTION 4.11.3 ......................32 IRELESS ETWORK 4.11.4 ....................34 LOUD ERVER ETTING PACKING LIST ......................36 P a g e Copyright©2022 ZKTECO CO., LTD. All rights reserved.
-
Page 8: Overview
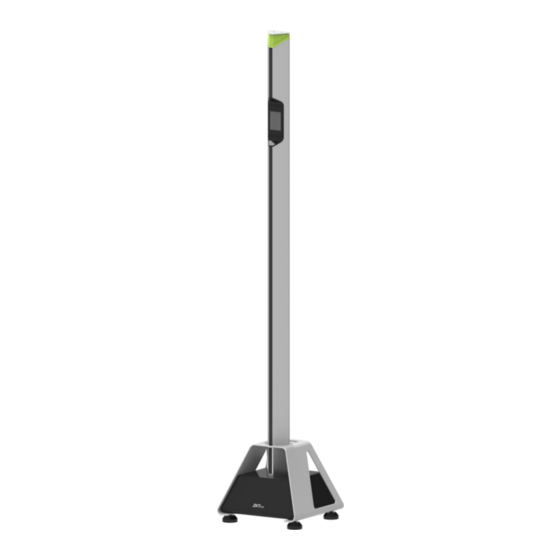
User Manual and Installation Guide Overview Introduction FMD Pro 2.0 is a metal detection pole that offers a checkpoint specific solution to airports, bus terminals, conferences, customs, docks, and railway stations. FMD Pro 2.0 can detect concealed metal objects, smartphones, and smartwatches on a person's body. -
Page 9: Dimensions
FMD Pro 2.0 User Manual and Installation Guide Dimensions P a g e Copyright©2022 ZKTECO CO., LTD. All rights reserved. -
Page 10: Specifications
8Hrs to be fully charged Embedded Rechargeable Battery Supports 28Hrs of operation Battery Capacity 10000mAh Input Voltage Operating Current 260mA Operating Power 3.9W Housing Material Aluminum Alloy Protection Level IPX5 P a g e Copyright©2022 ZKTECO CO., LTD. All rights reserved. -
Page 11: Performance And Technical Features
Harmless: With no radiation emitted, the detector is safe for pregnant women, people who implanted pacemakers. Easy to install: The detector has an integrated design which makes it easy to assemble and disassemble. P a g e | 10 Copyright©2022 ZKTECO CO., LTD. All rights reserved. -
Page 12: Detection Distance
Please refer to the actual detection location for the detection distance. Object Distance Keys 30cm Smartwatch 60cm Utility knife 70cm Smartphone 80cm Screwdriver 120cm P a g e | 11 Copyright©2022 ZKTECO CO., LTD. All rights reserved. -
Page 13: Components
User Manual and Installation Guide Components 1. Indicator 2. Speaker 3. 3.5-inch Touch Screen 4. Alarm Zone LED 5. Power Button 6. Foot Cup 7. Magnetic Sensor 8. Interface 9. Base P a g e | 12 Copyright©2022 ZKTECO CO., LTD. All rights reserved. -
Page 14: Installation Setup
1 meter from the sources of electromagnetic radiation or electromagnetic interference. The parameters that define the distance are determined by the installation environment and the parameters vary for different installation environments. P a g e | 13 Copyright©2022 ZKTECO CO., LTD. All rights reserved. -
Page 15: Installation Steps
If you want to open the chassis, you should contact the agent for permission. Otherwise, you will bear any consequence resulting from your actions. Install on the base Insert the pole into the hexagonal slot of the base. P a g e | 14 Copyright©2022 ZKTECO CO., LTD. All rights reserved. - Page 16 Fix the back plates on the wall according to the pole position using wall mounting screws; Attach the pole to the back plates. Note: The detector's sensor needs to point to the North Pole. P a g e | 15 Copyright©2022 ZKTECO CO., LTD. All rights reserved.
-
Page 17: Detection Zones
FMD Pro 2.0 User Manual and Installation Guide Detection Zones The FMD Pro 2.0 detector can detect a wide range of threat objects/weapons composed of magnetic. The three detection zones and accurate detection ensures that if the metal composition reaches or exceeds the preset value, the alarm LED of the specific zone where the material is hidden will glow and an alarm will be triggered. -
Page 18: Operational Procedure
Connect the power supply to the detector. Press the power button, and after 5 seconds of initialization, you can perform the following operations. Press on the home screen and input the password to set the sensitivity quickly. P a g e | 17 Copyright©2022 ZKTECO CO., LTD. All rights reserved. -
Page 19: Main Menu
Security Level application area. There are three modes: "High", "Medium", and "Low". It is recommended to use the default level of "Medium". P a g e | 18 Copyright©2022 ZKTECO CO., LTD. All rights reserved. -
Page 20: Adjusting Sensitivity
There are three zones, to set the sensitivity of detection. The larger the value, the more sensitive the system would be. Click Sensitivity on the main menu. P a g e | 19 Copyright©2022 ZKTECO CO., LTD. All rights reserved. -
Page 21: Security Level Setting
Here, the metal detection level can be set to different security levels according to the real-time application area. Click Security Level on the main menu to set the metal detection level. P a g e | 20 Copyright©2022 ZKTECO CO., LTD. All rights reserved. -
Page 22: Application Area Setting
Alarm Settings The Alarm Settings are used to set the volume, alarm count, tone of the alarm and relay delay. Click Alarm Settings on the main menu. P a g e | 21 Copyright©2022 ZKTECO CO., LTD. All rights reserved. - Page 23 FMD Pro 2.0 User Manual and Installation Guide P a g e | 22 Copyright©2022 ZKTECO CO., LTD. All rights reserved.
-
Page 24: Autotest
0 to 10. Autotest The Autotest option is used to automatically test whether each module functions properly, including Zone, LED, and Speaker. Click Autotest on the main menu. P a g e | 23 Copyright©2022 ZKTECO CO., LTD. All rights reserved. - Page 25 When a metal is placed in the zone, the detector will alarm. Automatically tests whether the Red and Green LED LED Test indicators light up. P a g e | 24 Copyright©2022 ZKTECO CO., LTD. All rights reserved.
-
Page 26: System Password
When a person passes through the detector, the details will be saved in the device. This function allows the user to search for a detection record. Click Record Query on the main menu. P a g e | 25 Copyright©2022 ZKTECO CO., LTD. All rights reserved. -
Page 27: System Settings
System Settings You may customize the screen sleep, time, language and reset the device. Click System Settings on the main menu. P a g e | 26 Copyright©2022 ZKTECO CO., LTD. All rights reserved. -
Page 28: Sleep Mode
You can disable this function or set the value to 5s, 10s, 20s, 40s, 60s or 120s. 4.9.2 Time Settings Click Time Settings on the System Settings interface. P a g e | 27 Copyright©2022 ZKTECO CO., LTD. All rights reserved. -
Page 29: Language
Click Language on the System Settings interface to select the language of the device. To select the language of the device. 4.9.4 Reset Click Reset on the System Settings interface. P a g e | 28 Copyright©2022 ZKTECO CO., LTD. All rights reserved. -
Page 30: System Info
MCU version information. 4.11 Communication Click COMM. on the main menu to set the relevant parameters of Network, PC Connection, Wireless Network and Cloud Server. P a g e | 29 Copyright©2022 ZKTECO CO., LTD. All rights reserved. -
Page 31: Network Settings
The default IP address is 192.168.1.201. It can be IP Address modified according to the network availability. The default Subnet Mask is 255.255.255.0. It can be Subnet Mask modified according to the network availability. P a g e | 30 Copyright©2022 ZKTECO CO., LTD. All rights reserved. -
Page 32: Pc Connection
Click PC Connection on the COMM. interface. Menu Descriptions The default password is 0 and can be changed. Comm Key The Comm Key can contain 1-6 digits. P a g e | 31 Copyright©2022 ZKTECO CO., LTD. All rights reserved. -
Page 33: Wireless Network
Connect to WIFI (OK). Adding WIFI Network Manually The WIFI can also be added manually if the required WIFI does not show on the list. P a g e | 32 Copyright©2022 ZKTECO CO., LTD. All rights reserved. - Page 34 On this interface, enter the WIFI network parameters. (The added network must exist.) Advanced Setting On the Wireless Network interface, tap on Advanced to set the relevant parameters as required. P a g e | 33 Copyright©2022 ZKTECO CO., LTD. All rights reserved.
-
Page 35: Cloud Server Setting
The Default Gateway address is 0.0.0.0. It can be Gateway modified according to the network availability. 4.11.4 Cloud Server Setting Click Cloud Server Setting on the COMM. interface. P a g e | 34 Copyright©2022 ZKTECO CO., LTD. All rights reserved. - Page 36 Port used by the ADMS server. The IP address and the port number Enable Proxy Server of the proxy server is set manually when the proxy is enabled. P a g e | 35 Copyright©2022 ZKTECO CO., LTD. All rights reserved.
-
Page 37: Packing List
User Manual and Installation Guide Packing List The package consists of the following items: S.No Component Quantity Pole Base Plates Screw Plastic Plug User Manual Adapter Power Cord Caster Wheel P a g e | 36 Copyright©2022 ZKTECO CO., LTD. All rights reserved. - Page 38 Copyright@2022 ZKTECO CO., LTD. All rights reserved.
Need help?
Do you have a question about the FMD Pro 2.0 and is the answer not in the manual?
Questions and answers