Table of Contents
Advertisement
Available languages
Available languages
Quick Links
Advertisement
Chapters
Table of Contents

Subscribe to Our Youtube Channel
Related Manuals for Gastroback DESIGN ADVANCED PLUS 42440


Summary of Contents for Gastroback DESIGN ADVANCED PLUS 42440
- Page 1 DESIGN TEE AUTOMAT ADVANCED PLUS BEDIENUNGSANLEITUNG Art.- Nr. 42440 »Design Tee Automat Advanced Plus« Deutsch GEBRAUCHSANLEITUNG LESEN UND English BEACHTEN! ANWEISUNGEN BEFOLGEN! www.gastroback.de Modell- und Zubehöränderungen vorbehalten!
-
Page 2: Table Of Contents
Wir legen viel Wert auf Ihre Sicherheit. Deshalb bitten wir Sie, alle Hinweise und Anleitungen, die mit dem Gerät geliefert werden, sorgfältig und vollständig durch- Voreinstellungen ..................29 zulesen, bevor Sie das Gerät in Betrieb nehmen. Dadurch lernen Sie auch alle Funktionen und Eigenschaften Ihres Gerätes kennen. - Page 3 Mit Ihrem neuen DESIGN TEE AUTOMAT ADVANCED PLUS müssen Sie auch in hektischen Momenten nicht auf den perfekten Teegenuss verzichten. Das Gerät heizt Alle Produkte von GASTROBACK® sind für die Verarbeitung von Nahrungs- und Lebens- Wasser auf eine individuell einstellbare Temperatur von 50 °C bis 100 °C (kochen) mitteln vorgesehen.
-
Page 4: Sicherheitshinweise
Ziehen Sie immer den Netzstecker aus der Steckdose, wenn werkstätten durchgeführt werden (siehe: ‚Gewährleistung / Garantie‘). Sie das Gerät nicht verwenden. Fragen zum Gerät beantwortet: GASTROBACK GmbH, Gewerbestr. 20, Überprüfen Sie regelmäßig die Bauteile und Zubehöre sowie das D-21279 Hollenstedt, Telefon: (04165) 22250. - Page 5 Die Arbeitsfläche muss ausreichend groß, gut zugänglich, fest, hori- ser in den Kessel. Verwenden Sie zum Entkalken nur die in diesem • zontal, eben, sauber, trocken und beständig gegen Feuchtigkeit und Heft empfohlenen Entkalkungsmittel. Füllen Sie niemals andere Flüs- Hitze sein. Wischen Sie übergelaufene Flüssigkeiten sofort ab. Ach- sigkeiten oder Lebensmittel in den Kessel, um Verletzungen und Schä- ten Sie darauf, dass das Gerät immer ausreichend Abstand zur Kante den durch Feuer, Elektrizität und hohe Temperaturen zu vermeiden.
-
Page 6: Vorsichtsmaßnahmen Beim Umgang Mit Elektrizität
Entkalken Sie den Kessel regelmäßig, abhängig von der Verwendung • Wickeln Sie das Netzkabel zum Betrieb des Gerätes immer voll- • ständig ab, um eine Gefährdung durch Überhitzung, Feuer und und der Härte des verwendeten Wassers. Eine starke Verkalkung des Kessels führt zu einem erhöhten Energieverbrauch und kann im Extrem- Stromschlag zu vermeiden. -
Page 7: Hohe Temperaturen - Verbrennungsgefahr
HOHE TEMPERATUREN – VERBRENNUNGSGEFAHR BEWEGLICHE BAUTEILE Der Hebelarm des Gerätes wird automatisch betätigt und fährt über dem WARNUNG Der Tee Automat ist mit elektrischen Heizelementen aus- – Kessel hoch und runter. Vermeiden Sie es, den Hebelarm manuell zu gerüstet und erhitzt Trinkwasser. Das Gerät kann deshalb bei unsachgemäßer bewegen. -
Page 8: Ihren Neuen Tee Automaten Kennen Lernen
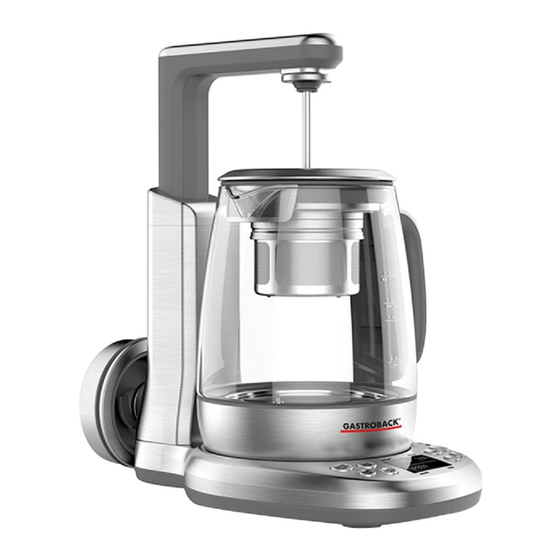
IHREN NEUEN TEE AUTOMATEN KENNEN LERNEN DECKELRING MIT FILTERSIEB VOR DER TÜLLE: hält beim Ausgießen feine Partikel zurück. DECKEL – damit verschließen Sie den Kessel, wenn Sie das Filtersystem herausgenommen haben. TEESIEB: füllen Sie in diesen Teil des Filtersystems die Zutaten für den Tee ein. SIEBDECKEL MIT MAGNETHALTER UND STEMPEL: damit wird das Teesieb im Kessel eingehängt, abgesenkt KESSEL MIT GLASKÖRPER: die Tülle zum Ausgießen KESSELBODEN AUS EDELSTAHL: enthält die Heizplatte und den Temperatursensor. -
Page 9: Eigenschaften Ihres Neuen Tee Automaten
EIGENSCHAFTEN IHRES NEUEN TEE AUTOMATEN Der DESIGN TEE AUTOMAT ADVANCED PLUS erhitzt Trinkwasser bis zur eingestell- Taste leuchtet während des Betriebes auf der rechten Seite der Bedienungsele- ten Temperatur im Bereich von 50°C bis zur Siedetemperatur (100°C) und hält die- mente (siehe: ‚Bedienung / Ein Programm abbrechen‘). -
Page 10: Empfohlene Verwendung Der Programme
symbol (rechte Hälfte des Displays) markiert die Startzeit der Autostart-Funktion WICHTIG - Wenn die Warmhaltefunktion aktiviert ist, dann wird die Warmhalte- und erscheint, wenn die Autostart-Funktion aktiviert ist. funktion nach dem Ende der Brühzeit automatisch gestartet und die Warmhalte- Anzeige KEEP WARM leuchtet auf (siehe: ‚Warmhaltefunktion‘). •... -
Page 11: Wasser Erhitzen
Wasser erhitzen Programm Temperatur Brühzeit Geeignet für … Zum Erhitzen von Wasser können Sie die Temperatur des Wassers im gesamten GRUEN Grüner Tee, manche Kräuterteesorten. 75°C 3 Minuten möglichen Temperaturbereich des Gerätes wählen (50°C bis 100°C). Dadurch (GREEN) lässt sich diese Funktion für manuelle Extraktionsvorgänge nutzen, bei denen Sie die Viele Mischungen von Assam- und Cey- SCHWARZ Zutaten Ihres Tees selbst in das Wasser eintauchen und herausnehmen. -
Page 12: Manuelle Bedienung
Stempel ausgerüstet und ermöglicht einen automatischen Extraktionsvorgang. Mit HINWEIS anderen Filtersystemen kann die automatische Extraktion nicht arbeiten. Der Magnet- Auch die manuelle Bedienung ist einfacher, wenn Sie das mitgelieferte Filtersystem halter passt perfekt in den Deckelring des Kessels und schließt den Kessel dadurch verwenden. -
Page 13: Automatische Abschaltung
ändert weiter. Wenn Sie den Kessel wieder auf die Basis zurückstellen, wird das Zur Einstellung der Autostart-Funktion gehört auch die richtige Uhrzeit. Andernfalls Wasser weiter bis zur Warmhaltetemperatur erwärmt. kann die Autostart-Funktion die gewünschte Startzeit nicht richtig bestimmen. Wenn Sie das Wasser oder den Tee nicht weiter warmhalten wollen oder der WICHTIG - Vergewissern Sie sich, bevor Sie die Autostart-Funktion aktivieren, dass Füllstand im Kessel unter den Mindest-Füllstand gesunken ist (ca. -
Page 14: Tipps Für Beste Ergebnisse
TIPPS FÜR BESTE ERGEBNISSE VOR DER ERSTEN VERWENDUNG Außer der verwendeten Teesorte haben auch die Dosierung sowie die Brühtem- WARNUNG – Niemals kleine Kinder mit dem Gerät oder den Bauteilen peratur und Brühzeit Ihres Tees einen starken Einfluss auf den Geschmack und die des Gerätes oder dem Verpackungsmaterial spielen lassen! Der Kessel ist aus Glas Inhaltsstoffe. -
Page 15: Voreinstellungen
VOREINSTELLUNGEN Sie können das Gerät durch verschiedene Einstellungen im Einstellungsmenü „MENU“ WICHTIG - Wenn Sie das Gerät an die Stromversorgung anschließen, dann wird an Ihre Wünsche anpassen. zunächst eine Initialisierung durchgeführt. Dabei kann sich der Hebelarm bewe- gen. Diese Bewegung ist für eine korrekte Funktion des Motorantriebs erforderlich. Achten Sie deshalb darauf, dass die Bewegung des Hebelarms nicht durch Fremd- DAS EINSTELLUNGSMENÜ... -
Page 16: Die Sprache Auswählen
7. Wenn Sie die Einstellungen beenden wollen, dann halten Sie die Stelltasten + nicht versehentlich ausgeschüttet oder umgestoßen wird. Die Außenseiten des Kes- oder – ca. 2 Sekunden gleichzeitig gedrückt oder warten Sie einfach 20 Sekun- sels, das Filtersystem und der Deckel können beim Betrieb heiß werden. Berühren Sie den. -
Page 17: Das Gerät Zum Betrieb Vorbereiten
den Seiten darf zwischen Deckelring und Kessel kein Spalt offen bleiben. Drehen HINWEIS Sie bei Bedarf das Filtersieb des Deckelrings vor die Tülle des Kessels, so dass Dosieren Sie die Teeblätter nach Ihrem Geschmack. Wir empfehlen 5 bis 7 g Tee- sich der Deckelring ohne Gewaltanwendung ganz nach unten drücken lässt. -
Page 18: Ein Programm Auswählen Und Einstellen
EIN PROGRAMM AUSWÄHLEN UND EINSTELLEN HINWEIS 9. Wählen Sie das gewünschte Programm (siehe: ‚Eigenschaften Ihres neuen Tee Vor dem Start eines Programms können Sie die Werte (Auto-Steep-Funktion, Tem- Automaten / Empfohlene Verwendung der Programme‘).Wasser kochen: Für peratur und Brühzeit) innerhalb des möglichen Bereichs beliebig ändern. Das diese Aufgabe müssen Sie kein Programm wählen. - Page 19 HINWEIS HINWEIS Wenn Sie den Kessel während des Aufheizvorgangs von der Basis nehmen, Wenn Sie Ihren Tee noch etwas dunkler haben wollen, können Sie das Teesieb wird das laufende Programm automatisch abgebrochen und das Gerät schaltet in nach der Brühzeit manuell wieder in das Wasser eintauchen und herausziehen. den Standby-Modus zurück (siehe: ‚Ein Programm abbrechen’).
-
Page 20: Die Brühzeit Während Des Brühvorganges Verlängern Oder Verkürzen
Start/Stopp-Taste TEA. Das Gerät kehrt dadurch sofort in den Standby-Modus WARNUNG – Die Teile des Filtersystems können beim Betrieb des Kessels zurück. Wenn die Warmhaltefunktion bis zum Ende durchgelaufen ist (angezeigt heiß werden. Fassen Sie den Stempel des Filtersystems nur an der Stempelplatte durch ein akustisches Signal, die Kontrollleuchte „KEEP WARM“... -
Page 21: Klares Wasser Erhitzen
tion ab. Drücken Sie dazu die WATER-Taste und ziehen Sie dann den Netzste- WARNUNG – Die Außenseiten des Kessels werden während des cker aus der Steckdose (siehe: ‚Ein Programm abbrechen‘). Betriebes heiß! Fassen Sie den Kessel und den Deckel nur an den dafür vorgese- henen Griffen an. -
Page 22: Wasser Während Des Betriebes Nachfüllen
WASSER WÄHREND DES BETRIEBES NACHFÜLLEN WICHTIG - Die Uhrzeit erscheint auf dem Display links, die Startzeit der Autostart- Funktion ist rechts. Die Zeiten werden im voreingestellten Format der Zeitanzeige ACHTUNG – Niemals kaltes Wasser am Rand des Kessels herunter gie- angezeigt und eingestellt (siehe: ‚Voreinstellungen‘). -
Page 23: Ein Programm Abbrechen
8. Nachdem die Autostart-Funktion das Programm gestartet hat, können Sie das DEN HEBELARM IN DIE PARK-POSITION BRINGEN Programm abbrechen, indem Sie leuchtende Start/Stopp-Taste drücken. Andern- WICHTIG - Vermeiden Sie es, den Hebelarm gewaltsam manuell zu bewegen, um falls läuft das Programm ganz normal mit den eingestellten Werten (siehe: den Antrieb des Hebelarms nicht zu überlasten. -
Page 24: Hilfe Bei Problemen
Mitte des Kessels (siehe: .‚Bedienung / Wasser Dichtring am Rand des Deckels vorhanden und unbeschä- während des Betriebes nachfüllen‘). digt ist. Wenden Sie sich bei Bedarf an GASTROBACK®, Der Trockengehschutz Ziehen Sie den Netzstecker aus der Steckdose, leeren Tel. - Page 25 Versuchen Sie es dann erneut. Wenn das Problem bestehen Wasser oder Tee haben Ein abgestandener oder Bereiten Sie den Kessel zum Betrieb vor, wie im Kapitel bleibt, dann wenden Sie sich an den GASTROBACK® Kun- einen unangenehmen künstlicher Geruch/ ‚Vor der ersten Verwendung‘ beschrieben wird. Wenn das dendienst, Tel.
-
Page 26: Fehlermeldungen
Betrieb nehmen, schaltet es nach einer Initialisierung automatisch in den Problem bestehen bleibt, dann wenden Sie sich an den Standby-Modus. Wenden Sie sich bei Bedarf an: GASTROBACK® Kundenservice, GASTROBACK® Kundendienst, Tel. 04165/2225-0 oder Tel.: 04165/2225-0 oder per E-Mail: info@gastroback.de . -
Page 27: Pflege Und Reinigung
PFLEGE UND REINIGUNG WARNUNG Fehlermeldung Bedeutung Abhilfe – Achten Sie immer darauf, dass alle Teile des Gerätes für kleine Kinder unerreichbar sind. Schalten Sie das Gerät immer zuerst AUS (beide Der Motor des Hebelarms Falls möglich, nehmen Sie den Kessel kurz von der Basis, Start/Stopp-Tasten TEA und WATER sind dunkel), ziehen Sie den Netzstecker aus steckt fest. -
Page 28: Die Basis Reinigen
Premium Entkalker von GASTROBACK® (Art.-Nr.: 98175). Dieser Entkalker enthält 5. Reinigen Sie die Innenseiten des Kessels vorsichtig mit handwarmer Spülmittel- spezielle Pflegemittel, die perfekt auf die Geräte von GASTROBACK® abgestimmt sind lösung und einer weichen Spülbürste. Wenn sich eingetrocknete Ablagerungen und dadurch eine lange Lebensdauer und korrekte Funktionsweise unterstützen. -
Page 29: Aufbewahrung
Taste. Schalten Sie das Gerät nach dem Aufheizvorgang und dem ersten akusti- Bewahren Sie das Gerät und alle Bauteile an einem trocknen, sauberen Ort auf, an schen Signal aus (WATER-Taste drücken) und lassen Sie die Lösung danach ca. dem die Bauteile vor übermäßigen Belastungen (Beispiel: Stoß, Schlag, Kurzschluss, Feuchtigkeit, Hitze, Frost, direktes Sonnenlicht) geschützt und für kleine Kinder und 1 Stunde mit geschlossenem Deckel im Kessel abkühlen. -
Page 30: Entsorgungshinweise
Kunden aus Deutschland und Österreich: Für die Reparatur- und Serviceabwicklung Wenden Sie sich mit Problemen, Fragen und Wünschen gegebenenfalls an: möchten wir Sie bitten, GASTROBACK® Produkte an folgende Anschrift zu senden: GASTROBACK GmbH, Gewerbestr. 20, D - 21279 Hollenstedt, Deutschland. - Page 31 DESIGN TEA MAKER ADVANCED PLUS OPERATING INSTRUCTIONS Art.- No. 42440 » Design Tea Maker Advanced Plus « Deutsch READ AND OBSERVE INSTRUCTIONS English FOR USE! FOLLOW INSTRUCTIONS! www.gastroback.de Model and attachments are subject to change!
- Page 32 We attach a certain importance to your safety. Thus, we ask you to read all provided instructions and information in this booklet carefully and completely, before you start Preferences .................... 88 running the appliance. This will help you to know all functions and properties of your new appliance.
- Page 33 The information in this booklet will easily and quickly inform you on the helpful bene- If you have any questions about GASTROBACK® products, if your unit is not wor- fits of your new DESIGN TEA MAKER ADVANCED PLUS.
-
Page 34: Important Safeguards
IMPORTANT SAFEGUARDS ensure that the appliance is out of reach of young children and ani- Carefully read all instructions, before operating this appliance and save for further reference. Do not attempt to use this appli- mals. DO NOT leave the appliance switched on and/or the power base connected to the power supply uselessly. -
Page 35: Important Safeguards For Electrical Appliances
• Inflammable liquids (e.g. alcohol) may evaporate when heated objects (e.g. curtains) to avoid damage due to hot steam and water, and catch fire when coming in contact with electrical appliances. overheating, and fire. Do not heat alcoholic liquids (e.g. grog, mulled wine) via the appli- •... -
Page 36: High Temperature-Risk Of Burns
• In various foreign countries, the specifications for power supplies are again. When parts of the appliance are leaking during operation and/ subject to incompatible norms. Therefore, it is possible that power sup- or liquids accumulate under the power base or run down on the exterior plies in foreign countries do not meet the requirements for safe opera- of the appliance or any part of it, immediately unplug the appliance. -
Page 37: Moving Parts
MOVING PARTS The cantilever of the appliance is agitated via the programs of the appli- ance and moves up and down automatically. Additionally, when plug- ging in the appliance an initialisation is performed, which could move the cantilever. Always avoid moving the cantilever manually, because this results in excessive load to the mechanics of the appliance. -
Page 38: Knowing Your New Tea Maker
KNOWING YOUR NEW TEA MAKER LID RING EQUIPPED WITH A POURING SIEVE: withholding small particles during pouring. LID for covering the glass kettle after removing the filter system. TEA INFUSER: fill the ingredients of your tea in this basket. INFUSER COVER WITH MAGNET HOLDER and pusher plate at the top of the pusher rod. KETTLE WITH GLASS BODY: the thermal insulated handle and the pouring spout ensure secure handling and pouring. -
Page 39: Properties Of Your New Tea Maker
PROPERTIES OF YOUR NEW TEA MAKER The DESIGN TEA MAKER ADVANCED PLUS is intended for heating drinking water • Via the glass body of the kettle you can easily monitor the steeping process of to a selectable temperature in the range from 50°C to the boiling temperature your tea and check for the colour at a glance without opening the lid. -
Page 40: Recommended Usage Of The Programs
time is counted down (see: ‘Keep Warm Function’). You can select the tempe- • When the appliance is idle (standby mode: no program running, no entries) rature unit (°C or °F) via the setting mode (see: ‘Special Settings’). the appliance shuts off automatically and the display gets completely dark (see: ‘Automatic Shut-Off’). -
Page 41: Pre-Defined Tea Programs
NOTE NOTE Even after the automatic shut-off or when disconnecting the appliance from the The maximum keep warm temperature is limited to 90°C (194°F). power supply, the user-defined values will be kept (see: ‘Automatic Shut-Off’). Pre-Defined Tea Programs Therefore, there is no reason for keeping the appliance live, when it is not in use. The appliance offers 5 pre-defined tea programs with optimized temperature and IMPORTANT - When entering new values, any former settings will be lost, and steeping time for the dedicated types of tea (see the following table). -
Page 42: Manual Operation
MANUAL OPERATION WARM”) get dark (see: ‘Automatic Shut-Off’). NOTE NOTE For manual operation you should activate the keep warm function within the set- When removing the kettle from the power base, before reaching the set tempe- rature, the appliance cancels the running program at once and returns to standby tings menu (see: ‘Preferences’). -
Page 43: The Auto Start Function
THE AUTO START FUNCTION When overheating occurs, the kettle automatically switches off and the error mes- sage “E2” illuminates. Remove the kettle from the power base and pour out any resi- NOTE dues. Then leave the kettle cool down by waiting at least 30 minutes with the lid left open. -
Page 44: Before First Use
BEFORE FIRST USE 4. Ensure, that there are no obstacles blocking the cantilever or pillar. Connect the WARNING – DO NOT let young children play with the appliance or any power plug directly to a suitable wall power outlet and wait until the display part of it or the packaging! The kettle is made of glass and fragile. -
Page 45: Preferences
PREFERENCES The appliance can be adapted to your requirements via several individual settings. SELECTING THE LANGUAGE For this, the settings menu (“MENU”) is provided. When the appliance has been delivered with the original settings, the language of the display is English. Immediately after selecting another language, the display DISPLAYING THE SETTINGS MENU AND SELECTING THE VALUES switches to the new language. -
Page 46: Preparing The Filter System
power base connected to the power supply, when it is not in use. Do not leave the PREPARING THE APPLIANCE FOR OPERATION appliance operate unattended, when intervention in the case of any danger or NOTE hazard is impossible, or when young children or animals may get access to the appliance! To avoid overheating, before operation, always fill at least 500ml (“0.5L After preparing another type of tea, you should wash the interior of the kettle, / MIN”) of clear drinking water into the kettle. -
Page 47: Selecting Or Setting Up A Program
7. Ensure that the exterior of the kettle is clean and dry. Then place the kettle onto 11. Press the AUTO STEEP button for activating or deactivating automatic steeping the power base. The appliance is now ready for operation (standby mode). (see: ‘Properties of Your New Tea Maker / Automatic Extraction’). - Page 48 NOTE CAUTION – Do not attempt to remove or replace the kettle, while the can- tilever is moving. Wait, until the keep warm indicator is illuminated or “BASKET” When removing the kettle from the power base during heating, the program is is shown on the display.
-
Page 49: Increasing Or Decreasing The Steeping Time During Steeping
4. Start the program via the WATER button. Wait until the set temperature is rea- NOTE ched and the signal sounds. The keep warm function is started and the keep For saving energy, you should not leave the keep warm function running uselessly. warm time is counted down on the display, beginning with the maximum keep Cancel the running program via the TEA button, if you do not need this function warm time. -
Page 50: Adding Water During Operation
You start the WATER function via the WATER button. This function does not perform water stops boiling. With the lid set closed firmly and correctly, it will not fall any steeping cycle. You can set up the desired temperature before starting the func- during pouring. -
Page 51: Cancelling Operation
2. Select the desired program and adjust the values (see: ‘Selecting or Setting Up 8. After the auto start function started the program, you can cancel the program via a Program’). the illuminated start/stop button. Otherwise, the program keeps running quite as usual using the set values (see: ‘Properties of Your New Tea Maker / Display 3. -
Page 52: Special Functions
See below: ‘Error Messages’. If the problem persists, contact array of the display illuminates shortly. Thereafter, with the exception of the lan- error message is shown the GASTROBACK® Customer Care Center by phone: +49 guage, any user-defined settings are overwritten and the original factory settings on the display. - Page 53 ‘Before First Use’. If the problem persists, fill the kettle the GASTROBACK® Customer Care Center by phone: +49 that are used only rarely. with 1500ml of water and add two teaspoons of baking (0)4165/22 25-0 or e-mail info@gastroback.de.
-
Page 54: Error Messages
For technical support, please damaged. approx. 1cm. Take care during cleaning to avoid damage. contact GASTROBACK® Customer Care Center by phone: +49 (0)4165/22 25-0 Contact your vendor for examination and repair. or e-mail: info@gastroback.de. -
Page 55: Care And Cleaning
Error Message Reason The Solution Error Message Reason The Solution The filling level in the Remove the kettle from the power base and leave the The rod of the filter sys- If possible, shortly remove the kettle from the power kettle dropped below the kettle cool down (at least 30 minutes). -
Page 56: Cleaning The Power Base
5. If required, clean the interior of the kettle using a soft nylon brush and lukewarm dishwater. Then, rinse the interior of the kettle thoroughly with clear tap water. 1. When using the GASTROBACK® Premium Descaler, prepare 1500ml (1.5 litres) Stubborn stains of tea may be removed carefully via a plastic pad, ensuring to of the descaling solution according to the instructions on the pack. -
Page 57: Storage
5. Repeat the steps 1 to 4, if there is still any scale left. 2. For storage, you may wind the power cord around the cord storage at the bot- tom of the power base. 6. With the scale removed completely, fill the kettle to the “1.5L / MAX WATER” filling level (1500ml) with clear tap water and bring the water to the boil (set 3. -
Page 58: Notes For Disposal
Please check www.gastroback.de for further information. Gewerbestr. 20, D-21279 Hollenstedt, Germany. For technical support, please contact GASTROBACK® Customer Care Center by phone: Customers from other countries: Please contact your dealer. Please agree that we +49 (0)4165/22 25-0 or e-mail info@gastroback.de. - Page 59 GASTROBACK GmbH Gewerbestraße 20 21279 Hollenstedt / Germany • Telefon + 49 (0) 41 65 / 22 25 - 0 Telefax + 49 (0) 41 65 / 22 25 -29 • info@gastroback.de www.gastroback.de •...
Need help?
Do you have a question about the DESIGN ADVANCED PLUS 42440 and is the answer not in the manual?
Questions and answers