
Related Manuals for SawStop CTS-120A60


Summary of Contents for SawStop CTS-120A60
- Page 1 Models CTS-120A60 and CTS-230A50I COMPACT TABLE SAW Owner’s Manual ™ SawStop.com...
- Page 2 Published, August 2022 Updates of this manual may be available at www.SawStop.com SawStop, the SawStop blade logo, and the configuration of this product are either registered trademarks or trademarks of SawStop, LLC. Software copyright by SawStop, LLC. All rights reserved. Protected by one or more of the following U.S.
-
Page 3: Table Of Contents
SawStop, shipping any portion of the saw is modified without the prior prepaid, with proof of purchase and within the written permission of SawStop, LLC, or if the saw is warranty period. located or has been operated outside of the country... -
Page 4: General Power Tool Safety Warnings
56) if you have questions about other accessories. cases there will be no injury or only a small nick. See page 13 for the optional stand. However, you may incur a serious injury on a SawStop Wood Dust saw depending on factors such as the speed and direction your hand is moving when it contacts the blade and the type of blade you are using. - Page 5 Keep cutting tools sharp and clean. Properly reduce personal injuries. maintained cutting tools with sharp cutting edges are less likely to bind and are easier to control. SawStop Compact Table Saw ®...
-
Page 6: Safety Instructions For Table Saws
Feed workpiece at an even pace. Do not bend or twist the workpiece. If jamming occurs, turn the tool off immediately, unplug the tool then clear the jam. Jamming the saw blade by the workpiece can SawStop Compact Table Saw ®... - Page 7 The table saw must be secured. A table saw that is not properly secured may move or tip over. f) Remove tools, wood scraps, etc. from the table before the table saw is turned on. Distraction or a potential jam can be dangerous. SawStop Compact Table Saw ®...
-
Page 8: Additional Safety Warnings
Use only 3-wire extension cords that have 3-prong grounding plugs and 3-pole receptacles that accept the saw’s plug (see page 31). Repair or replace a damaged or worn cord immediately. SawStop Compact Table Saw ®... -
Page 9: The Sawstop Safety System
5) Blades: You can use any standard 10-inch saw blade, but not a Dado set, with your SawStop Compact Table Saw (see page 30). The following precautions should be observed: a) Never attempt to use a blade other than a single 10-inch blade. - Page 10 The SawStop safety system is designed for 8) Never touch the arbor, arbor nut or arbor use with standard 10-inch blades with kerfs washer when the blade is spinning because from 3/32 inch to 3/16 inch. Blades with kerfs you may receive a serious injury.
-
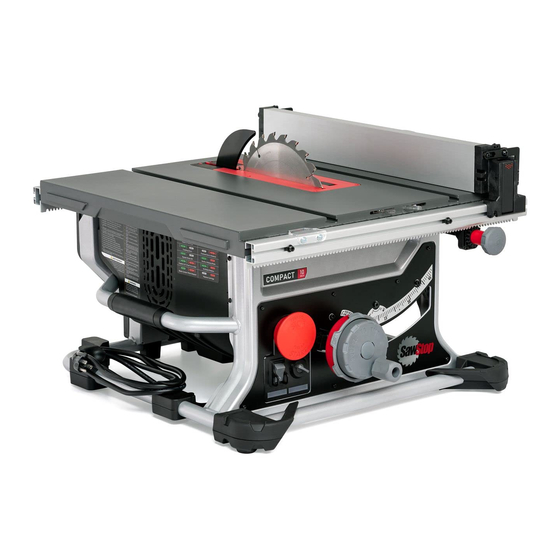
Page 11: Get To Know Your Saw
M. Shelf and Low Fence E. Rip Width Control N. Fence Rail, Front Carry Handle O. Fence Rail, Rear G. Power Cord P. Position Indicator Lens H. Power Controls Q. Dust Collection Connection Bevel and Elevation SawStop Compact Table Saw ®... - Page 12 (C) (see page 56) and keep in the and suitability on packaging.) Previous versions storage compartment (the extra brake cartridge of the brake cartridge are not compatible with is shown as-stored in the accessory storage the Compact Table Saw. compartment). SawStop Compact Table Saw ®...
- Page 13 Stand (Optional) Lockout Place a padlock through the lockout slots to prevent You can mount the saw on the optional SawStop the saw from being turned on. folding stand (part number CTS - FS; to order see page 56). To learn how to mount the saw on the stand see the instructions included with the stand.
- Page 14 Use the low fence (see page 17) for thin cuts and narrow cuts. The micro guard helps prevent contact with the blade. The anti-kickback pawls help reduce the likelihood of kickback. SawStop Compact Table Saw ®...
- Page 15 With the bevel wheel in the middle position, turn the wheel to fine-tune the bevel, as needed (E). Squeeze and hold to unlock the bevel control (C), and then set the bevel (D). Push the wheel to lock the bevel (F). SawStop Compact Table Saw ®...
-
Page 16: Prepare Your Saw For Use
(See page 4). • Fully lower the blade. • Wind the power cord (C). • Make sure the bevel control is locked (D). • Make sure the rip-width control is locked (E). SawStop Compact Table Saw ®... - Page 17 In this situation, take extra care that you do not cause the rip fence to contact the blade, which will result in an activation. SawStop Compact Table Saw ®...
- Page 18 • Always use sharp, high-quality blades. A dull or imprecise blade is more likely to grab and throw a workpiece. A dull blade is a dangerous blade. SawStop Compact Table Saw ®...
- Page 19 5. Fit the two holes in the spreader over the mounting pins (A). 6. Pivot the handle down to close the clamp. See page 41 to learn how to adjust clamping force. SawStop Compact Table Saw ®...
- Page 20 You can attach it to the outer diameter or inner diameter of the port. The outer diameter (A) is 2.5" (65 mm). The inner diameter (B) is 2.3" (58 mm). Always use a dust collection system when making SawStop Compact Table Saw ®...
-
Page 21: Use Your Compact Table Saw
Use Bypass Mode only to test a material Cycle power and cut material more slowly. Call for conductivity and to cut conductive materials. SawStop Technical Support if issue persists (see page Use extra caution in Bypass Mode. 56). Replace Cartridge... - Page 22 Both lights flash slowly together (synchronized). This code indicates an error with the electrical system. How to Use the Ruler The error is not user-serviceable—contact SawStop Service for assistance (see page 56). When you mount the rip fence on the lugs closest to...
- Page 23 1. Make sure the table top is clear and that nothing is touching the blade. 2. Turn on the power switch (A). 2. Place the two position screws (B) next to the low fence position (the upper slots) (C) on the rip fence. SawStop Compact Table Saw ®...
- Page 24 Always unplug the saw when performing way to the stop and hold in that position. maintenance on the saw. The red status light (D) should flash once. Do not release the switch - continue to hold. SawStop Compact Table Saw ®...
-
Page 25: Cut Types
Contact will activate the brake system. Use the low shelf (see page 17) when making narrow cuts and to cut workpieces that are 2. Place a lock through the hole in the switch shaft. thinner than 2 mm. SawStop Compact Table Saw ®... - Page 26 Make sure the workpiece is not touching blade when starting motor. 2. Place the miter gauge in the right-hand miter slot for bevel cuts (see page 27), or in either the right-hand or left-hand miter slots for non-bevel cuts. SawStop Compact Table Saw ®...
- Page 27 Remove the rip fence when making cross cuts. Molding head cutting is not permitted. Dado cutting is not permitted. Tapered cuts are permissible, but are only to be performed with the proper fixture. SawStop Compact Table Saw ®...
- Page 28 Push the workpiece slowly and smoothly toward and past the blade. Use a push stick or push block to safely cut the workpiece. 3. Finish the cut, as needed. SawStop Compact Table Saw ®...
- Page 29 Plunge Cut section. using the same method. Use extra caution when not using the blade guard. SawStop Compact Table Saw ®...
-
Page 30: Specifications And Requirements
Max. Depth of Cut, Blade at 0° 3 1 /8" (79.5 mm) Spreader Gap (F) (4-8 mm) Max. Depth of Cut, Blade at 45° 2 1 /8" (54 mm) See callout references on images. Max. Rip Capacity 24 1 /2" (622 mm) SawStop Compact Table Saw ®... - Page 31 • Do not expose saw to wet or damp conditions. • Keep power cord away from anything that could damage cord (e.g., heat, sharp objects, etc.). SawStop Compact Table Saw ®...
- Page 32 • Combination square—use to help align the blade, and to align the head of the miter gauge • Hex-key wrench, 5 mm—use to help adjust blade alignment • 10 mm socket or wrench—use to help adjust blade SawStop Compact Table Saw ®...
-
Page 33: Care For Your Saw
• Marker pen—use to assist with blade alignment an original replacement cord available from SawStop (see page 56). • Vacuum—use to remove debris from the saw internal areas How to Replace the Power Cord •... - Page 34 6. Squeeze and hold the locking tab on the connector, and then unplug from the switch box. The locking tab faces the front of the saw. 10. Install the ground cover and the two screws. SawStop Compact Table Saw ®...
- Page 35 (see page 33). If the system does not initialize properly, contact the SawStop Service department (see page 56). Inspect the Blade Guard How to Cut a Slot in a Check the blade guard before each use. Keep the...
- Page 36 In this example, the screws at the front edge of the insert (A) need to be turned counterclockwise to lower that end of the insert. In this case, both screws were turned an equal amount. 7. Fully lower the blade (G). SawStop Compact Table Saw ®...
- Page 37 Your compact table saw came with a brake cartridge designed to work with a regular 10" blade (see page 30). The brake cartridge contains no serviceable parts—never open the housing of the brake cartridge. Replace the brake cartridge as a unit, as necessary. SawStop Compact Table Saw ®...
- Page 38 This is an activation. This also means you must replace both the cartridge and the blade. 4. Remove the cartridge key. Always turn off and unplug the saw when working on or maintaining the saw. SawStop Compact Table Saw ®...
- Page 39 Your input will be used in our ongoing research and development. You can also send the activated cartridge to SawStop and we will read the data stored in the cartridge. If the data indicate that the activation was caused by skin contact then we will send you a free replacement cartridge.
- Page 40 0.20 mm (0.008"). This means the clamp has shifted to the right. 7. Use the included 4 mm hex-key wrench to turn each screw (A) a small and equal amount clockwise. 0.20 mm (0.008”) SawStop Compact Table Saw ®...
- Page 41 Always turn off and unplug the saw when working on or maintaining the saw. 2. Push and hold the clamp handle and the clamp bracket to the left to expose the head (A) of the SawStop Compact Table Saw ®...
- Page 42 4. Tighten the locking knob on the combination square. 9. Use the 5 mm hex-key wrench to turn the 5. Rotate the blade so that the marked tooth is at the alignment adjustment bolt a small amount. front of the blade. SawStop Compact Table Saw ®...
- Page 43 • 4 mm hex-key wrench There are three sets of mounting lugs (A) (B) (C) on the front and rear rails. Begin by checking the right- hand lugs (A). 1. Mount the rip fence on the right-hand lugs. SawStop Compact Table Saw ®...
- Page 44 1. Set the bevel to 0 ° (A), and then turn the micro- bevel wheel counterclockwise until you feel a hard stop (B). Push the wheel in to lock the bevel (C). SawStop Compact Table Saw ®...
- Page 45 • Combination square 9. Shift the indicator to align with 0 ° on the bevel scale. 1. Loosen the locking knob. 10. Tighten the screw for the indicator. 2. Loosen the screw for the pointer. SawStop Compact Table Saw ®...
- Page 46 5. While holding the miter gauge and square firmly, tighten the locking knob. 6. Pivot the pointer so that it is aligned with the 90 ° mark on the miter scale. 7. Hold the pointer firmly, and then tighten the screw. SawStop Compact Table Saw ®...
-
Page 47: Troubleshooting
TROUBLESHOOTING See the following table for troubleshooting information. If are not able to find a given problem and solution contact SawStop Service (see page 56). PROBLEM POSSIBLE CAUSE(S) RECOMMENDATION There is no power to the saw. Make sure the electrical supply to the saw is on and that the correct voltage is being supplied. - Page 48 Make sure the pins and mounting holes mounting pins, or in the cartridge are clean and free of obstructions. mounting holes. The blade is interfering with the Use only a 10" blade (see page 30). brake pawl. SawStop Compact Table Saw ®...
- Page 49 DO NOT START the saw Arbor Washer in the saw before all parts have been removed. Leaving parts in the saw body might mechanism damage the product or trigger and unintended activation. SawStop Compact Table Saw ®...
-
Page 50: Work Helpers
• Do not use when cutting with the miter gauge Your Compact Table Saw comes with a push stick but you can also construct a replacement. The stock push stick is available for purchase from SawStop as well (see page 56). 60˚... - Page 51 (139.7 mm) (127 mm) 2” (51 mm) ” (13 mm) 10” (254 mm) ” ” (89 mm) (12.7 mm) 2” (51 mm) 6 ” 2” ” (51 mm) (152.4 mm) (12.7 mm) ” (13 mm) SawStop Compact Table Saw ®...
-
Page 52: Index
See Keep Motor Housing & Trunnion Housing Lock Saw See Lockout Clean Coating See Blade Requirements Logo See Labels 24 - Low Fence Conductive Materials See also Bypass Mode Conductivity See Conductive Materials Low Fence, How to Use Cross Cut SawStop Compact Table Saw ®... - Page 53 See Splitter See Kickback, Anti-Kickback Features & Precautions Zero-Clearance Insert Ruler, How to Use Safety Safety System, About See SawStop Safety System SawStop Safety System Scale See Ruler, How to Use Serviceable Parts See User-Replaceable Parts Service Questions See How to Get Help...
- Page 54 Notes SawStop Compact Table Saw ®...
- Page 55 Notes SawStop Compact Table Saw ®...
-
Page 56: Contact
CONTACT US: Main 503.570.3200 or 1.866.729.7867 info@sawstop . c om Technical Support 503.582.9934 service@sawstop . c om (Service) Parts 503.486.6923 parts@sawstop . c om Sales 503.595.2665 sales@sawstop . c om Our technical support team is standing by Monday-Friday, 7am-5pm Pacific Time to help with whatever you need.
Need help?
Do you have a question about the CTS-120A60 and is the answer not in the manual?
Questions and answers