Advertisement
Quick Links
ULTRA WIDE BAND IMPULSE RADAR TECHNOLOGY
ULTRA WIDE BAND IMPULSE RADAR TECHNOLOGY
TIME-OF-FLIGHT INDOOR DETECTOR
TIME-OF-FLIGHT INDOOR DETECTOR
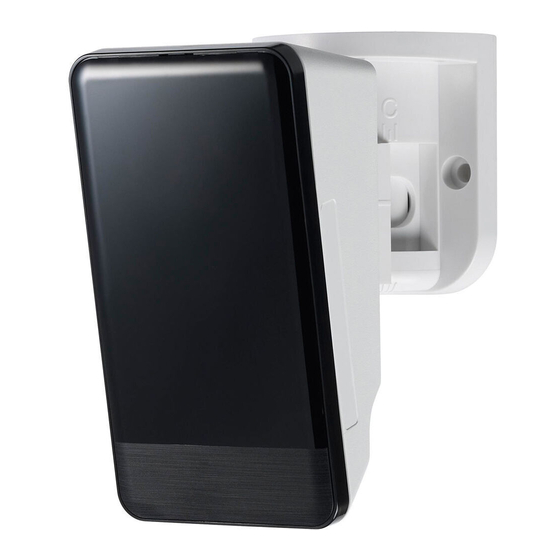
URX-P01
URX-P01
URX-P01WH : WHITE LENS MODEL
URX-P01BL : BLACK LENS MODEL
Features
• Ultra Wide Band technology detector using 9 Ghz frequency band.
• Low false alarm risk by installed temperature fluctuations.
• Easy range selector up to 10 m/ 33 ft detection range
• Bracket included for easy angle setting.
• Self-Check function (Output when failure conditions)
Failure to follow the instructions provided with this indication and
Warning
improper handling may cause death or serious injury.
Failure to follow the instructions provided with this indication and
Caution
improper handling may cause injury and/or property damage.
Warning
1
PARTS IDENTIFICATION
Wall/Ceiling
Bracket
Lens
Range selector
Do not
rotary switch
remove!
LED
2
INSTALLATION HINTS
Basic installation
Install at a place detection area
is directed to the route of intrusion.
Note>>
Adjust detection range if the site is
smaller than 10 m x 10 m (33 ft x 33 ft).
If detection area is set too wide,
it may detect movements outside
of the target area, which may
cause false alarms.
Adjust the detection area
according to target area.
All manuals and user guides at all-guides.com
No. 59-2412-0
INSTALLATION INSTRUCTIONS
Caution
The nix
sign indicates prohibition.
Included in the box
Terminals
[Main unit]
[Back case]
[Screws x2]
[Bracket]
[Cover key]
4 x 30L
Ø
The nix
sign indicates prohibition.
Doorway
Intrusion
route
URX-P01
Caution
3
DETECTION AREA
TOP VIEW
5 m
5 m
SIDE VIEW
0 m
1.8 m
2.4 m
3.0 m
Note>>
Please refer to " 6 SETTINGS" for range adjustment.
4
INSTALLATION
STEP 1
Separate the main unit and the back case.
* When taking out of a box.
Cover Key
STEP 2
Assemble the back case and the bracket.
[Ceiling installation]
1
Wire the cable.
2
Assemble with the back case.
STEP 3
Wire to the terminals.
Note>>
Please refer to " 8 TERMINALS" for details.
STEP 4
Assemble the main unit and the back case.
1. Hook the top.
URX-P01
2. Groove the bottom
- 1 -
0
10
20
30
35 ft
15 ft
10
1
3
4
5
6
7
8
9 10
0
0
10
15 ft
10 m
0
5 m
10 m
(16.4 ft)
(32.8 ft)
[Main unit] [Back case]
[Wall installation]
2.
1.
0 ft
6 ft
8 ft
10 ft
Advertisement

Related Manuals for Optex URX-P01


Summary of Contents for Optex URX-P01
- Page 1 35 ft ULTRA WIDE BAND IMPULSE RADAR TECHNOLOGY ULTRA WIDE BAND IMPULSE RADAR TECHNOLOGY 15 ft TIME-OF-FLIGHT INDOOR DETECTOR TIME-OF-FLIGHT INDOOR DETECTOR URX-P01 URX-P01 9 10 URX-P01WH : WHITE LENS MODEL URX-P01BL : BLACK LENS MODEL Features • Ultra Wide Band technology detector using 9 Ghz frequency band.
- Page 2 URL: http://www.optex.net/ OPTEX INC. (U.S.) Note>> URL: http://www.optexamerica.com/ Conduct a walk test at least once a year. ▪ OPTEX DO BRASIL LTDA. (Brazil) To operate self-check function correctly, leave the detector ON for 5 minutes. ▪ URL: http://www.optex.net/br/es/sec/ - 2 -...
Need help?
Do you have a question about the URX-P01 and is the answer not in the manual?
Questions and answers