
Related Manuals for GE LOGIQ C Series


Summary of Contents for GE LOGIQ C Series
- Page 1 GE Healthcare Technical Publications Direction 5401576-100 Rev. 1 LOGIQ C Series Quick Guide Copyright 2010 By General Electric Co. Operating Documentation...
-
Page 2: Regulatory Requirement
Regulatory Requirement LOGIQ C Series complies with regulatory requirements of the following European Directive 93/42/EEC concerning medical devices. Manufacturer GE Medical Systems (China) Co., Ltd. No. 19 Changjiang Road Wuxi National Hi-Tech Development Zone Jiangsu, P.R.China 214028 Tel: +86 510 85225888; Fax: +86 510 85226688... -
Page 3: Revision History
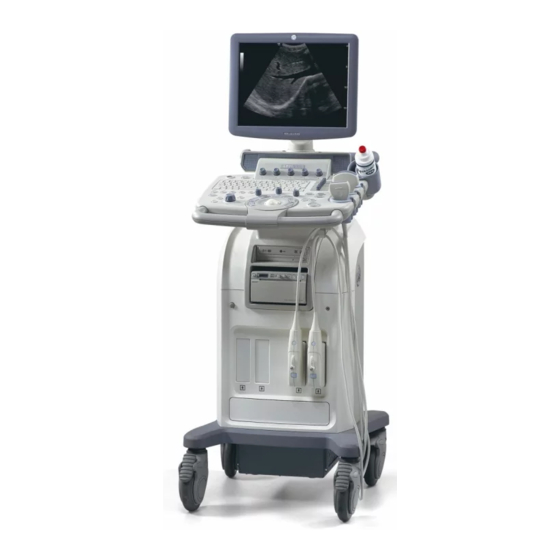
Please verify that you are using the latest revision of this document. Information pertaining to this document is maintained on MyWorkshop/ ePDM (GE Healthcare electronic Product Data Management). If you need to know the latest revision, contact your distributor, local GE Sales... - Page 4 LOGIQ C Series Quick Guide Direction 5401576-100 Rev. 1 LOGIQ C2/C2PRO Control Panel Tour 13. Left, Right Key:activate the Left or Right displayed image. Power On/Off Switch 14. Freeze. Press Freeze to freeze the image or 2. Probe Key:switch the probes return to scanning.
- Page 5 LOGIQ C Series Quick Guide Direction 5401576-100 Rev. 1 LOGIQ C3/C3PRO Control Panel Tour 20. Power On/Off Switch 32. Left, Right Key:activate the Left or Right displayed image. 21. Probe Key:switch the probes 33. Freeze. Press Freeze to freeze the image or 22.
- Page 6 LOGIQ C Series Quick Guide Direction 5401576-100 Rev. 1 LOGIQ C5/C5PRO Control Panel Tour 39. Power On/Off Switch 51. Left, Right Key:activate the Left or Right displayed image. 40. Probe Key:switch the probes 52. Freeze. Press Freeze to freeze the image or 41.
- Page 7 LOGIQ C Series Quick Guide Direction 5401576-100 Rev. 1 LOGIQ C Series Keys Top/Sub Menu Key Tour Function Keys - Programmable Keys How to Program your hot keys • F1 = Help (Enter Online Help / User Manual) <Utility> - <Admin> - <Function Key>, <Hot Key>...
- Page 8 LOGIQ C Series Quick Guide Direction 5401576-100 Rev. 1 LOGIQ C Series Monitor Display Tour 1. Institution/Hospital Name, Date, Time, Operator 11. Measurement Results Window. 21. Card iconTrackball Functionality Status: Scroll, Identification, system status (real-time of M&A (Measurement and Analysis), Position, 12.
-
Page 9: System Power
LOGIQ C Series Quick Guide Direction 5401576-100 Rev. 1 System Power Power On 3. Unwrap the power cable. Make sure to allow LEDs sufficient slack in the cable so that the plug is To connect the system to the electrical supply: not pulled out of the wall if the system is moved 1. -
Page 10: Power Off
LOGIQ C Series Quick Guide Direction 5401576-100 Rev. 1 Power Off Starting an Exam To power down the system: You need to select a pre-configured dataflow that sets up the ultrasound system to work according to 1. Press the Power On/Off switch at the front of the services associated to the dataflow. -
Page 11: Patient Entry Menu
LOGIQ C Series Quick Guide Direction 5401576-100 Rev. 1 Starting an Exam New Patient Patient Entry Menu To start a new patient’s exam, Image Management Window [1] EZBackup, EZMove [3] 1. Press Patient. Press the New Patient button on Access to this patient’s exam history and image One-step method to backup (move and delete the Patient menu. -
Page 12: B/M Mode Image Optimize
LOGIQ C Series Quick Guide Direction 5401576-100 Rev. 1 B/M Mode Image Optimize B Mode Control Panel Controls Power Output Frame Average Auto Optimize Optimizes image quality and allows user to reduce Temporal filter that averages frames together. This Automatic Tissue Optimization optimizes the image beam intensity. -
Page 13: B/M Mode Scanning Hints
LOGIQ C Series Quick Guide Direction 5401576-100 Rev. 1 B/M Mode Image Optimize (continued) B/M Mode Scanning Hints Auto Optimize. Improves imaging performance while reducing optimization time. Frequency. Changes system parameters to best optimize for a particular patient type. Maps. There is an inter-dependency between gray maps, gain, and dynamic range. - Page 14 LOGIQ C Series Quick Guide Direction 5401576-100 Rev. 1 Color Flow/Doppler Image Optimize Doppler Display Formats 2. Decrease the PRF. 3. Increase the Power Output. NOTE: Doppler Image is only for LOGIQ C3/ Display layout can be preset to have B-Mode and 4.
- Page 15 LOGIQ C Series Quick Guide Direction 5401576-100 Rev. 1 Color Flow/Doppler Image Optimize (continued) Figure 13. PWD Top/Sub Menu Controls Figure 12. CFM Top/Sub Menu Controls...
-
Page 16: Basic Measurements
LOGIQ C Series Quick Guide Direction 5401576-100 Rev. 1 Basic Measurements NOTE: The following instructions assume that you Circumference/Area (Ellipse) Measurement Circumference/Area (Trace) Measurement first scan the patient and then press Freeze. 1. Press Measure once; an active caliper 1. Press Measure twice; a trace caliper displays. -
Page 17: Time Interval Measurement
LOGIQ C Series Quick Guide Direction 5401576-100 Rev. 1 Volume Velocity Measurement Worksheets 1. To make a volume calculation, do one of the 1. Press Measure; an active caliper with a vertical Measurement/Calculation worksheets are available following: dotted line displays. -
Page 18: Using Probes
DO NOT use a keyboard. 1. Ensure the LOGIQ C Series is in freeze mode. transducer which appears damaged until 4. Ensure the cable is free. If necessary, press the Freeze key. - Page 19 LOGIQ C Series Quick Guide Direction 5401576-100 Rev. 1 Probe Application Table 1: Probe Indications for Use Probe Application E7C-RC E6C-RS 6.5C--RS 4C-RS 3.8C-RC 7.5L-RC 7L-RC 3S-RC Abdomen Small Parts Obstetrics Gynecology Pediatrics Neonatal Urology Cardiac Endocavity Transcranial Intraoperative Vascular...
-
Page 20: Probe Features
LOGIQ C Series Quick Guide Direction 5401576-100 Rev. 1 Probe Features Table 2: LOGIQ C5/C5 PRO Probe Features Probe Feature E7C-RC E6C-RS 6.5C--RS 4C-RS 3.8C-RC 7.5L-RC 7L-RC 3S-RC LOGIQ View Virtual Convex Virtual Apex Easy 3D Tru Access NOTE: 3S-RC is only available for LOGIQ C3/C3PRO/C5/C5PRO... -
Page 21: Specification
LOGIQ C Series Quick Guide Direction 5401576-100 Rev. 1 Specification Table 5: System Probe Definitions Doppler Frequency (MHz) Center Image Probe Designation Frequency (MHz) Normal Penetration E7C-RC 6.5 + 10% E6C-RC 6.5 + 10% 6.5C-RC 6.5 + 10% 4C-RC 3.75+10% 3.8C-RC... - Page 22 • DO NOT kink, tightly coil, or apply excessive force on the probe cable. Insulation failure may result. • Electrical leakage checks should be performed on a routine basis by GE Service or qualified hospital personnel. Refer to the service manual for leakage check procedures.
-
Page 23: Probe Disinfection, After Each Use
LOGIQ C Series Quick Guide Direction 5401576-100 Rev. 1 Probe Cleaning, After Each Use Probe Immersion Levels Probe Disinfection Agents 1. Disconnect probe from ultrasound console and Ultrasound probes can be disinfected using liquid remove all coupling gel from probe by wiping chemical germicides. -
Page 24: Image Management
If the patient name is on the patient record list, Trackball to the patient’s name to highlight the Connectivity on the LOGIQ C Series is based on Select the image on the clipboard, then press the name, (or perform a search to locate the the Dataflow concept. -
Page 25: Configuring Connectivity
LOGIQ C Series Quick Guide Direction 5401576-100 Rev. 1 Configuring Connectivity Login as Administrator. Press the right Utility tab. Device Services (better known as Destinations) Select the Connectivity tab. Configure the menus from left to right, starting with TCP/IP first. - Page 26 LOGIQ C Series Quick Guide Direction 5401576-100 Rev. 1 Services (cont’d) Verify a Service (Jdicom Image Storage) Buttons Select the service, press verify button You can assign print buttons to a device or to a e. In the Services drop-down menu, select dataflow.
- Page 27 LOGIQ C Series Quick Guide Direction 5401576-100 Rev. 1 Dataflow DICOM Status Creates a Dataflow, (‘WL-LA-DServ -- Worklist, To check the status of all DICOM jobs or redirect Local Archive, DICOM* Server, for example). DICOM jobs, press F4 to open the spooler.
-
Page 28: Using Cine
LOGIQ C Series Quick Guide Direction 5401576-100 Rev. 1 Using CINE Activating CINE Start Frame/End Frame Press Freeze, then roll the Trackball to activate Press the Start Frame Softkey to move to the Adjusting the CINE Loop Playback Speed CINE. To start CINE Loop playback, press Run/ beginning of the CINE Loop. - Page 29 LOGIQ C Series Quick Guide Direction 5401576-100 Rev. 1 Easy 3D Acquiring a 3D Scan Manipulating the 3D Scan Performing a Surface Render 1. Optimize the B-Mode image. Ensure even gel Imagine you are able to manipulate the 3D volume From the 3D Touch Panel, press 3D, then press coverage.
- Page 30 Home Page. Select ‘Operator’ in option of User Level, enter correct password ‘uls’, then press Okay. Figure 22. Service Login Window 2. Now user can enter Global Service User interface. Choose Diagnostics, and then we Figure 23. Service Screen enter LOGIQ C Series Diagnostics menu.
- Page 31 LOGIQ C Series Quick Guide Direction 5401576-100 Rev.1 Precaution Levels Icon description Various levels of safety precautions may be found on the equipment and different levels of concern are identified by one of the following flag words and icons which precede the precautionary statement.
-
Page 32: Hazard Symbols - Icon Description
LOGIQ C Series Quick Guide Direction 5401576-100 Rev.1 Hazard Symbols - Icon Description Potential hazards are indicated by the following icons: Table 5: Potential Hazards Icon Potential Hazard Usage Source Biological • Patient/user infection due to contaminated equipment. • Cleaning and care instructions ISO 7000 •... -
Page 33: Important Safety Considerations
Applications training is available through the local GE representative. Added confidence in the equipment operation can be gained by establishing a quality assurance program. -
Page 34: Mechanical Hazards
See the Bioeffects section of the Acoustic Output chapter in the Advanced Reference Manual for more information. Training It is recommended that all users receive proper training in applications before performing them in a clinical setting. Please contact the local GE representative for training assistance. -
Page 35: Equipment And Personnel Safety
Only approved and recommended peripherals and accessories should be used. All peripherals and accessories must be securely WARNING connected to the LOGIQ C Series. The concerns listed below can seriously affect the safety of equipment and personnel during a diagnostic ultrasound examination. - Page 36 Refer to package labeling to determine latex content and FDA’s March 29, 1991 Medical Alert on latex products. Archived data is managed at the individual sites. Performing data backup (to any device) is recommended. CAUTION Do not use high-frequency surgical equipment with LOGIQ C Series system. CAUTION...
- Page 37 LOGIQ C Series Quick Guide Direction 5401576-100 Rev.1 Device Labels Label Icon Description The following table describes the purpose and location of safety labels and other important information provided on the equipment Table 6: Label Icons Label/Icon Purpose/Meaning Location Identification and Rating Plate Manufacture’s name and address...
- Page 38 LOGIQ C Series Quick Guide Direction 5401576-100 Rev.1 Table 6: Label Icons Label/Icon Purpose/Meaning Location Type CF Defib-Proof Applied Part (heart in the box with paddle) symbol is in accordance with IEC 60878-02- ECG Module This symbol indicates that waste electrical and electronic equipment must not be disposed of as unsorted Bottom municipal waste and must be collected seperately.
- Page 39 LOGIQ C Series Quick Guide Direction 5401576-100 Rev.1 Table 6: Label Icons Label/Icon Purpose/Meaning Location There is a pinch point on the LCD monitor. Take care to avoid injuring hands of fingers when flipping down the On the back of LCD LCD monitor.
- Page 40 LOGIQ C Series Quick Guide Direction 5401576-100 Rev.1 Classifications Type of protection against electric shock LOGIQ C Series console is Class I Equipment (*1) Degree of protection against electric shock Type BF Applied part (*3) (for Probes marked with BF symbol)
- Page 41 LOGIQ C Series Quick Guide Direction 5401576-100 Rev.1 *4. Type CF Applied Part TYPE CF APPLIED PART providing a degree of protection higher than that for Type BF Applied Part against electric shock particularly regarding allowable LEAKAGE CURRENTS. Table 8: Type CF Equipment...
- Page 42 LOGIQ C Series Quick Guide Direction 5401576-100 Rev.1 EMC (Electromagnetic Compatibility) NOTE: This equipment generates, uses and can radiate radio frequency energy. The equipment may cause radio frequency interference to other medical and non- medical devices and radio communications. To provide reasonable protection against such interference, this product complies with emissions limits for a Group 1, Class A Medical Devices Directive as stated in EN 60601-1-2.
-
Page 43: Emc Performance
LOGIQ C Series Quick Guide Direction 5401576-100 Rev.1 EMC Performance All types of electronic equipment may characteristically cause electromagnetic interference with other equipment, either transmitted through air or connecting cables. The term EMC (Electromagnetic Compatibility) indicates the capability of equipment to curb electromagnetic influence from other equipment and at the same time not affect other equipment with similar electromagnetic radiation from itself. -
Page 44: Notice Upon Installation Of Product
2. Locate the equipment as far away as possible from other electronic equipment. 3. Be sure to use only the cables provided by or designated by GE Medical Systems. Connect these cables following the installation procedures (i.e. wire power cables separately from signal cables). -
Page 45: General Notice
LOGIQ C Series Quick Guide Direction 5401576-100 Rev.1 General Notice 1. Designation of Peripheral Equipment Connectable to This Product. The equipment indicated on Chapter 3 of the Basic User Manual can be hooked up to the product without compromising its EMC performance. -
Page 46: Peripheral Update For Ec Countries
Direction 5401576-100 Rev.1 Peripheral Update for EC countries The following is intended to provide the users in EC countries with updated information concerning the connection of the LOGIQ C Series to image recording and other devices or communication networks. Peripherals Used in the Patient Environment The LOGIQ C Series has been verified for overall safety, compatibility and compliance with the following on-board image recording device: •... -
Page 47: Declaration Of Emissions
LOGIQ C Series Quick Guide Direction 5401576-100 Rev.1 Peripheral Update for EC countries (continued) Declaration of Emissions This system is suitable for use in the following environment. The user must assure that it is used only in the electromagnetic environment as specified. -
Page 48: Declaration Of Immunity
LOGIQ C Series Quick Guide Direction 5401576-100 Rev.1 Declaration of Immunity This system is suitable for use in the following environment. The user must assure that the system is used according to the specified guidance and only in the electromagnetic environment listed. -
Page 49: Patient Environmental Devices
LOGIQ C Series Quick Guide Direction 5401576-100 Rev.1 Patient Environmental Devices Left side: 1 USB port - Peripheral devices, B/W Printer, Officejet Printer, Memory Stick, Footswitch, USB HDD, ECG,Color Printer Right side: Probe holder Rear panel: • 2 USB Ports - Peripheral... -
Page 50: Acceptable Devices
If devices are connected without the approval of GE, the warranty will be INVALID. Any device connected to the LOGIQ C Series must conform to one or more of the requirements listed below: 1. IEC standard or equivalent standards appropriate to devices. -
Page 51: Acoustic Output
LOGIQ C Series Quick Guide Direction 5401576-100 Rev.1 Acoustic Output Located on the upper right section of the system display monitor, the acoustic output display provides the operator with a real-time indication of acoustic levels being generated by the system. See the Acoustic Output chapter in the Advanced Reference Manual for more information. This display is based on NEMA/AIUM Standards for Real-time Display of Thermal and Mechanic Acoustic Output Indices on Diagnostic Ultrasound Equipment. -
Page 52: Best Practices While Scanning
Acoustic Output Default Levels In order to ensure that an exam does not start at a high output level, the LOGIQ C Series initiates scanning at a reduced default output level. This reduced level is a programmable preset and depends upon the exam category and probe selected. It takes effect when the system is powered on or New Patient is selected. - Page 53 LOGIQ C Series Quick Guide Direction 5401576-100 Rev.1 Warning Label Locations Console Labels Figure 25. Label Location 1. "Consult accompanying document” is intended to alert the user to refer to the operator manual or other instructions when complete information cannot be provided on the label 2.
- Page 54 LOGIQ C Series Quick Guide Direction 5401576-100 Rev.1 Console Labels (continued) Figure 26. LOGIQ C2/C2PRO Rating Plate Label Location (For 100V-120V AC) Safety...
- Page 55 LOGIQ C Series Quick Guide Direction 5401576-100 Rev.1 Console Labels (continued) Figure 27. LOGIQ C2/C2PRO Rating Plate Label Location (For 220V-240V AC)
- Page 56 LOGIQ C Series Quick Guide Direction 5401576-100 Rev.1 Console Labels (continued) Figure 28. LOGIQ C2/C2PRO Rating Plate Label Location (China only) Safety...
- Page 57 LOGIQ C Series Quick Guide Direction 5401576-100 Rev.1 Console Labels (continued) Figure 29. LOGIQ C2/C2PRO Rating Plate Label Location (CKD Version, India only)...
- Page 58 LOGIQ C Series Quick Guide Direction 5401576-100 Rev.1 Console Labels (continued) Figure30. LOGIQ C3/C3PRO Rating Plate Label Location (For 100V-120V AC) Safety...
- Page 59 LOGIQ C Series Quick Guide Direction 5401576-100 Rev.1 Console Labels (continued) Figure 31. LOGIQ C3/C3PRO Rating Plate Label Location (For 220V-240V AC)
- Page 60 LOGIQ C Series Quick Guide Direction 5401576-100 Rev.1 Console Labels (continued) Figure 32. LOGIQ C3/C3PRO Rating Plate Label Location (China only) Safety...
- Page 61 LOGIQ C Series Quick Guide Direction 5401576-100 Rev.1 Console Labels (continued) Figure 33. LOGIQ C3/C3PRO Rating Plate Label Location (Korea only)
- Page 62 LOGIQ C Series Quick Guide Direction 5401576-100 Rev.1 Console Labels (continued) Figure 34. LOGIQ C3/C3PRO Rating Plate Label Location (CKD Version, India only) Safety...
- Page 63 LOGIQ C Series Quick Guide Direction 5401576-100 Rev.1 Console Labels (continued) Figure 39. LOGIQ C5/C5PRO Rating Plate Label Location (For 100V-120V AC)
- Page 64 LOGIQ C Series Quick Guide Direction 5401576-100 Rev.1 Console Labels (continued) Figure 40. LOGIQ C5/C5PRO Rating Plate Label Location (For 220V-240V AC) Safety...
- Page 65 LOGIQ C Series Quick Guide Direction 5401576-100 Rev.1 Console Labels (continued) Figure 41. LOGIQ C5/C5PRO Rating Plate Label Location (China only)...
- Page 66 LOGIQ C Series Quick Guide Direction 5401576-100 Rev.1 Console Labels (continued) Figure 42. LOGIQ C5/C5PRO Rating Plate Label Location (Korea only) Safety...
- Page 67 LOGIQ C Series Quick Guide Direction 5401576-100 Rev. 1 Fax Back Form You can order printed documentation by faxing this form to Coakley-Tech. Customer Name Telephone Number Mailing Address Fax To: Fax Number: Attention: Coakley-Tech (414) 389-9130 Norm Keene In the publications list below, please select only those printed manuals required.
Need help?
Do you have a question about the LOGIQ C Series and is the answer not in the manual?
Questions and answers