Table of Contents
Advertisement
Advertisement
Table of Contents

Subscribe to Our Youtube Channel
Related Manuals for Huvitz HNT-1 / 1P


Summary of Contents for Huvitz HNT-1 / 1P
- Page 1 Service Manual Non-Contact Tonometer HNT-1 / 1P...
- Page 2 © 2016 - 2017 Huvitz Co., Ltd. 38, Burim-ro 170beon-gil, Dongan-gu, Anyang-si, Gyeonggi-do, 14055, Republic of Korea Huvitz has the copyright to this document. Parts or all of this user manual cannot be duplicated without Huvitz’s permission in accordance to the copyright law.
-
Page 3: Table Of Contents
Non-Contact Tonometer HNT-1/1P ------------------------------------------------------------------------------------------------ Contents 1. Important Notice ........................3 2. Safety Information ........................ 4 3. Product Outline ........................15 3-1. Main Parts ......................... 15 3-2. Optical System ......................18 3-3. Electrical System ...................... 21 3-4. Measurement Flow ....................26 4. -
Page 4: Important Notice
Huvitz reserves the right to make changes in its products or product specifications at any time and without prior notice, and is not required to update this documentation to reflect... -
Page 5: Safety Information
Non-Contact Tonometer HNT-1/1P ------------------------------------------------------------------------------------------------ 2. Safety Information 2.1. Introduction Safety is everyone’s responsibility. The safe use of this equipment is largely dependent upon the installer, user, operator, and maintainer. It is imperative that personnel study and become familiar with this entire manual before attempting to install use, clean, service or adjust this equipment and any associated accessories. - Page 6 -------------------------------------------------------------------------------------------------- Non-Contact Tonometer HNT-1/1P 2.2. Symbol Explanation 2.2.1. Safety Symbol and Indication The International Electrotechnical Commission (IEC) has established a set of symbols for medical electronic equipment which classify a connection or warn of any potential hazards. The classifications and symbols are shown below. Symbol Indication This symbol identifies a safety note.
- Page 7 Non-Contact Tonometer HNT-1/1P ------------------------------------------------------------------------------------------------ CE Mark (Marque CE) Use no hook (N'utilisez aucun crochet) WEEE Symbol – EU only Disposal of your old appliance When this crossed-out wheeled bin symbol is attached to a product it means the product is covered by the European Directive 2002/96/EC.
- Page 8 -------------------------------------------------------------------------------------------------- Non-Contact Tonometer HNT-1/1P Input power & FUSE rating (Puissance d'entrée et indice FUSE) Consult instructions for use (Consulter les instructions d'utilisation) Type B Isolated patient connection (Type B Connexion patient isolée.) Warning: Crushing or insert of hand (Attention: écrasement ou insertion de la main) QR code (QR code) Alternating Current...
- Page 9 Non-Contact Tonometer HNT-1/1P ------------------------------------------------------------------------------------------------ 2.2.2. Safety Symbol location [Front View of HNT-1(P)] [Bottom side of HNT-1(P)] [Package Box]...
- Page 10 A place where the equipment can be exposed to chemical substances or flammable gas. Watch out for dust, especially metal pieces from entering the equipment. Do not disassemble the product. Huvitz will not be held responsible for any negligence regarding such action.
- Page 11 Non-Contact Tonometer HNT-1/1P ------------------------------------------------------------------------------------------------ Do not close the thermal ventilation outlet Do not connect the AC power adapter before all parts are fully assembled. It can lead to a malfunction. Always pull the power cord holding the plug and not the cord. For the normal operation of the machine, please keep the ambient temperature is 10℃...
- Page 12 If the device cannot be used appropriately or any problem cannot be solved, Stop using the devcie immediately, and contact Huvitz or your authoirzed distributor Do not touch directley if an operator has a hand injury or a significant allergic reaction to the material used in the operaton contact part.
- Page 13 The equipment may only be used together with accessories supplied by Huvitz’s. If the customer makes use of other accessories, use them only if there are usability under technical safety aspects has been proved and confirmed by Huvitz or the manufacturer of the accessory.
- Page 14 -------------------------------------------------------------------------------------------------- Non-Contact Tonometer HNT-1/1P and maintenance can access easily any time. Do not force cable connections. If a cable does not connect easily, be sure that the connector (plug) is appropriate for the receptacle (socket). If you cause any damage to a cable connector(s) or receptacle(s), let the damage(s) be repaired by an authorized service technician.
- Page 15 Non-Contact Tonometer HNT-1/1P ------------------------------------------------------------------------------------------------ CAUTION For use of equipment in rated voltage less than 125Vac,minimum 6A,Type SJT or SVT , 18/3AWG,10A, max 3.0m long : One end with Hospital Grade Type, NEMA 5-15P Other end with appliance coupler. For use of equipment in rated voltage less than 250Vac,minimum 6A,Type SJT or SVT , 18/3AWG,10A, max 3.0m long : One end terminated with blade attachment plug(HAR) Type, NEMA 6-15P.
-
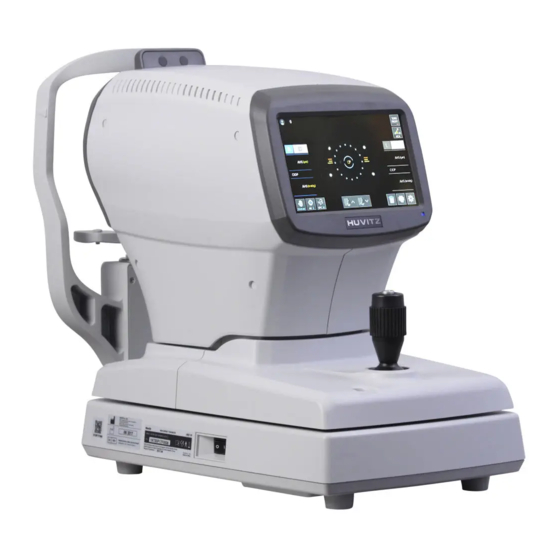
Page 16: Product Outline
-------------------------------------------------------------------------------------------------- Non-Contact Tonometer HNT-1/1P 3. Product Outline 3-1. Main Parts 1. LCD Touch Screen: Selectiong for measurement and function parts 2. Operation Lamp: Indicates whether or not the electric power is on 3. Printer: Printing the measured results 4. Measurement Button: A button pressed on to measure 5. - Page 17 Non-Contact Tonometer HNT-1/1P ------------------------------------------------------------------------------------------------ 1. Forehead Rest: Preventing the vibration by fixing the forehead. 2. Air Nozzle: Measuring the intraocular pressure on eyes. 3. Object lens for Pachy: Object lens for measuring the cornea thickness of examinees. (only in HNT-1P) 4.
- Page 18 -------------------------------------------------------------------------------------------------- Non-Contact Tonometer HNT-1/1P 1. Power Supply Socket: A socket connecting to exterior power plug 2. Serial Interface Connector: A terminal connecting to the exterior equipment.
-
Page 19: Optical System
Non-Contact Tonometer HNT-1/1P ------------------------------------------------------------------------------------------------ 3-2. Optical System ① ③④⑤ ② ○ ○ ⑤ ④ ○ ○ ○ ○ ○ ④ ○ ○ ○ ○ ○ ○ ○ ○ HNT-1 ○ ○ ○ ○ ○ ② ③... - Page 20 -------------------------------------------------------------------------------------------------- Non-Contact Tonometer HNT-1/1P ○ ○ ○ 3-2-1. List of Optical Components Name Function ○ Ext. LED To illuminate eye for Observation Channel ○ App. LED To measure the working distance(Z axis) To measure the IOP ○ Aiming LED To illuminate eye for detecting of eye center ○...
- Page 21 Non-Contact Tonometer HNT-1/1P ------------------------------------------------------------------------------------------------ ○ Fix. Lens To deliver the Fixation LED to the Eye ○ Pachy. Ill. Lens The lens for illuminate the Pachy. LED to the eye ○ Pachy. Slit To make slit beam with the Pachy. LED ○...
-
Page 22: Electrical System
-------------------------------------------------------------------------------------------------- Non-Contact Tonometer HNT-1/1P 3-3. Electrical System 3-3-1. Electrical construction diagram 3-3-1-1. System functional block diagram LCD Interface Camera Interface Touch Interface Z,CR,X,Y Motor Printer Interface SMPS IN DC12V... - Page 23 Non-Contact Tonometer HNT-1/1P ------------------------------------------------------------------------------------------------ 3-3-1-2. Power input electrical block diagram...
- Page 24 -------------------------------------------------------------------------------------------------- Non-Contact Tonometer HNT-1/1P 3-3-2-2. Description of wire harness connection of Main Board Connect Description (Connector number) Target connector Not used Not connect HARNESS(M2_OBS CMOS) OBS Camera HARNESS(M2_MB TO PACHY CMOS) Pachy Camera HANRESS(M2_SMPS TO MB) SMPS...
- Page 25 Non-Contact Tonometer HNT-1/1P ------------------------------------------------------------------------------------------------ HARNESS(M2_MB TO LCD 30P10P) TFT LCD HARNESS(M2_READY LED TO BD) Ready LED CN10 HARNESS(M2_Joy_Encoder) Joystick , Encoder CN11 HARNESS(M2_SAFTY PI) SAFTY PI CN13 HARNESS(M2_X_MOTOR) X Axis DC Motor CN14 HARNESS(M2_Z_MOTOR) Z Axis DC Motor CN15 HARNESS(M2_Y_MOTOR) Y Axis DC Motor CN16 R01_O_A3_HAR_HRKACrMotorBd_AB...
- Page 26 -------------------------------------------------------------------------------------------------- Non-Contact Tonometer HNT-1/1P 3-3-3. Layout diagrams for PCB 3-3-3-1. Layout of Main Board 3-3-3-2.Description of IC components of Main Board Ref No. Part Name Description AM1808BZWT4 TI ARM MCU XC6SLX25-2FGG484C XILINX FPGA (Logic Array) SST39VF3201 NAND Flash Memory U5, U25 K4T51163QQ SDRAM U17,U19...
-
Page 27: Measurement Flow
Non-Contact Tonometer HNT-1/1P ------------------------------------------------------------------------------------------------ 3-4. Measurement Flow 3-4-1. Operation Flow Turn-on the power switch SELF TEST Trouble? Displayed error message Move to center Displayed initial screen Search for position of focus Move to position of measurement Pachy IOP or Pachy or Measure the Pachy Measure the IOP IOP &... - Page 28 -------------------------------------------------------------------------------------------------- Non-Contact Tonometer HNT-1/1P Stand by user input PRINTER USER SETUP MEASURE RESULT Print the result of measurement Display the result of measurement Change the user setup Save/Exit 3-4-2. Pachy measurement Flow Enable the Pachy LED Measure the Pachy Capture pachy image Calculation of Pachy data Displayed output of measurement Disable the Pachy LED...
- Page 29 Non-Contact Tonometer HNT-1/1P ------------------------------------------------------------------------------------------------ 3-4-3. IOP measurement Flow Measure the IOP Control of SOLENOID Detect the signal of applanation Detect the pressure of inner part Displayed output of measurement Conversion of IOP...
-
Page 30: Repair Standard
-------------------------------------------------------------------------------------------------- Non-Contact Tonometer HNT-1/1P 4. Repair Standard 4-1. Checking and Control 4-1-1. Engineer Setup Mode Turn on HNT-1/1P and pressing PRINT button -> R button -> L button -> Setup button until the measure mode screen is displayed. Then you could enter the engineer setup mode. - Page 31 Non-Contact Tonometer HNT-1/1P ------------------------------------------------------------------------------------------------ (8) Touch Calibration - Calibrate touch screen. (9) Focus Align Test - Test to find focus LED(Ext.LED & Aim.LED) and distance. Long Run Test (10) - Test for motor aging. IQC Test (11) - Test for IQC. Log Mode (12) - Log view mode for H/W initial functions...
- Page 32 -------------------------------------------------------------------------------------------------- Non-Contact Tonometer HNT-1/1P [Menu] (1) SEARCH OBS CAM WHITE DEAD PIXEL(HIDE) - Search for white dead pixels in OBS cameras and display their location. (2) SEARCH OBS CAM BLACK DEAD PIXEL(OPEN) - Search for black dead pixels in OBS cameras and display their location. (3) SHOW OBS CAM DEAD PIXEL - Displays the position of all dead pixels of the OBS camera on the screen.
- Page 33 Non-Contact Tonometer HNT-1/1P ------------------------------------------------------------------------------------------------ The “+” button is incremented by 1. The “-“ button is decremented by 1. The “+++” button is quickly incremented by 10(current) or 50(time). iii. The “+++” button is quickly decremented by 10(current) or 50(time). (6) In the graphic mode, you can see the pressure results of the parameters set through the test.
- Page 34 -------------------------------------------------------------------------------------------------- Non-Contact Tonometer HNT-1/1P [Preparation] (1) REF Model Eye (2) Model Eye Stand [LED Brightness Adjustment] (1) Enter the Focus Led Setup Mode at Engineer Mode (2) In case of necessary, change LED Duty values at below Pachy LED(only HNT-1P) : Pachymetry LED duty Fixation LED : Fixation LED duty...
- Page 35 Non-Contact Tonometer HNT-1/1P ------------------------------------------------------------------------------------------------ [Preparation] (1) IOP Model eyes(IOP 20, 30, 40, 50, 60) in SETUP kit (2) Stand Model Eye for each shooting mode. [Setup Procedure] (1) Enter the IOP Measure Setup Mode at Engineer Mode (2) There are 4 modes(SPC30, M30, SPC60, M60) and IOP offset settings. (3) Press the table space to start IOP measurement setup.
- Page 36 -------------------------------------------------------------------------------------------------- Non-Contact Tonometer HNT-1/1P (8) Check the result after measurement of model eye. APPLANATION : APP 1st peak place of graph : APP 1st peak value of graph iii. : APP 1st peak size of graph : Pressure value on 1st peak PRESSURE : Peak place of pressure graph : Peak value of pressure graph...
- Page 37 Non-Contact Tonometer HNT-1/1P ------------------------------------------------------------------------------------------------ 4-1-6. Track Motor Setup [Purpose] Adjust the PWM duty of X, Y, Z motor and center positon for auto focus movement. [Setup Procedure] (1) Enter into Track Motor Setup Mode at Engineer Mode. (2) Select an PWM BASE of each direction, which decides base pulse width modulation of Auto Focus motor.
- Page 38 -------------------------------------------------------------------------------------------------- Non-Contact Tonometer HNT-1/1P C. PWM BASE(Y-UP) : up side on Y-axis. D. PWM BASE(Y-DN) : down side on Y-axis. E. PWM BASE(Z-FR) : front side on Z-axis. F. PWM BASE(Z-RR) : rear side on Z-axis. (3) Select an DIST CONST of each direction, which decides deceleration range of Auto Focus motor speed.
- Page 39 Non-Contact Tonometer HNT-1/1P ------------------------------------------------------------------------------------------------ (3) For manual mode, change the following items. MA – TARGET DIST(X) : x direction MA – TARGET DIST(Y) : y direction C. MA – TARGET DIST(ZF) : front side on z direction D. MA – TARGET DIST(ZR) : rear side on z direction (4) For Auto Focus mode, change the following items.
- Page 40 -------------------------------------------------------------------------------------------------- Non-Contact Tonometer HNT-1/1P Pachy Cam Gain : Pachy Camera Gain control PachLED : Pachy LED brightness control iii. S.G INFO : Pachy LED size and gray information Ant.Edge Shift : Anterior Edge Shift CCT Setup : CCT Calibration R Setup : R Calibration (3) Press the SG.INFO text to show the information of the pachy LED average gray value and size...
- Page 41 Non-Contact Tonometer HNT-1/1P ------------------------------------------------------------------------------------------------ (5) Press the “Start” button to automatically measure the target. (6) Then it will start automatically to measure 5 times and display 5 results. (7) Finally, the result of the CCT calibration is output at the bottom. (8) If you press the “Check”...
- Page 42 -------------------------------------------------------------------------------------------------- Non-Contact Tonometer HNT-1/1P (15) To restore the value of setting, choose “Clear” on the screen. To save the current value of setting, choose “Save” on the screen. (16) 4-1-9. Touch Calibration [Purpose] The touch screen is calibrated for correct touch operation. [Setup Procedure] (1) Enter the Touch Calibration Mode at Engineer Mode or Press joystick button when the screen shows start logo and boot messages on the screen just after...
- Page 43 Non-Contact Tonometer HNT-1/1P ------------------------------------------------------------------------------------------------ as pen. When finish touching one cross shape, the next cross shapes are displayed. (4) When done, press “OK” button and the result values(calibrated position of X, Y) will be output. 4-1-10. Focus Align Test [Purpose] Test the focus LED, track motor setup and track dist setup.
- Page 44 -------------------------------------------------------------------------------------------------- Non-Contact Tonometer HNT-1/1P RUSP : Right Up Spot Point of X, Y RUSZ : Right Up Spot Size RUOF : Right Up Offset RDSP : Right Down Spot Point of X, Y RDSZ : Right Down Spot Size RDOF : Right Down Offset Psd_Anode0 : Anode0 Value of PSD sensor...
- Page 45 Non-Contact Tonometer HNT-1/1P ------------------------------------------------------------------------------------------------ (2) Adjust test operation count and motor’s duty through “+”, “-“, “++”, “- -“ buttons. (3) Touch the button to set the test area X-HEAD ON, OFF : left, right direction(Head) Y-HEAD ON, OFF : up, down direction(Head) Z-HEAD ON, OFF : front, rear direction(Head) C-REST ON, OFF...
- Page 46 -------------------------------------------------------------------------------------------------- Non-Contact Tonometer HNT-1/1P (2) Press each item to test the item. (3) Select “Pass” or “Fail” button for each item. (4) Press the “Print” button to print the test results. (5) The “Reset” button initializes all items. 4-1-13. Log Mode [Purpose] To check logs written.
- Page 47 Non-Contact Tonometer HNT-1/1P ------------------------------------------------------------------------------------------------ Index: The sequence of logs written Cat: Category. This number shows which operation mode when the log written. iii. Time: Time with format YY/MM/DD hh:mm:ss. Func#: The function number. This number indicates specific internal function code. Ret: The return value of the function.
- Page 48 -------------------------------------------------------------------------------------------------- Non-Contact Tonometer HNT-1/1P ④ IOP MSR SETUP : iop measure setting value ⑤ TRACK MOTOR SETUP : track motor setting value ⑥ TARGET DIST SETUP : target distance setting value ⑦ P MSR SETUP : pachy measure setting value ⑧...
- Page 49 Non-Contact Tonometer HNT-1/1P ------------------------------------------------------------------------------------------------ 4-1-18. How to upgrade OS program (1) Turn off HNT-1/1P. (2) Start DNW program, set your PC’s COM port number, 115200 Bps. (3) Connect PC to HNT-1/1P with serial cable. (4) Pressing the button of joystick, then turn on HNT-1/1P (5) DNW program will show the following screen.
-
Page 50: Disassembly And Assembly Procedure
-------------------------------------------------------------------------------------------------- Non-Contact Tonometer HNT-1/1P (8) After downloading, turn off and on the HNT-1/1P. Confirm the changed SW version on boot screen. 4-2. Disassembly and Assembly Procedure 4-2-1. Removing Head rest A’ssy (1) Remove the screws (2) and then separate Head rest A’ssy (1). (2) Remove the bolt caps (10, 8ea), remove the screws (9, 8ea) and then separate Side cover (5,6) (3) Remove the screws (rear, 4ea) and then separate Rear cover (8) - Page 51 Non-Contact Tonometer HNT-1/1P ------------------------------------------------------------------------------------------------ 4-2-2. Removing the Optical System A’ssy (1) Remove the screws (2, 4ea) and then separate Optical System A’ssy (1).
- Page 52 -------------------------------------------------------------------------------------------------- Non-Contact Tonometer HNT-1/1P 4-2-2-1. Removing the Pachy Camera A’ssy. (1) Remove the screws &pin (2, 3) and then separate Pachy Camera A’ssy (1).
- Page 53 Non-Contact Tonometer HNT-1/1P ------------------------------------------------------------------------------------------------ 4-2-2-2. Removing the Solenoid A’ssy. (1) Remove the screws (6, 7) and then separate Piston Rubber (3). (2) Remove the screws &washer &damper (2, 4, 5) and then separate Solenoid (1).
- Page 54 -------------------------------------------------------------------------------------------------- Non-Contact Tonometer HNT-1/1P 4-2-3. Removing the XYZ and Moving base A’ssy. (1) Remove the screws (4, 4ea) and then separate Moving base frame (2). (2) Remove the screws &spring washer &nut (5,6,7) and then separate XYZ A’ssy (3).
- Page 55 Non-Contact Tonometer HNT-1/1P ------------------------------------------------------------------------------------------------ 4-2-4. Removing the XZ M A’ssy (1) Remove the screws (3) and then separate XZ M A’ssy (2).
- Page 56 -------------------------------------------------------------------------------------------------- Non-Contact Tonometer HNT-1/1P 4-2-5. Removing the Locking Module A’ssy. (1) Remove the screws (3) and then separate Locking Stopper A’ssy (1) (2) Remove the screws(8,4ea) and then separate Locking Module A’ssy (6)
- Page 57 Non-Contact Tonometer HNT-1/1P ------------------------------------------------------------------------------------------------ 4-2-6. Removing the XZ RAIL A’ssy (1) Remove the screws (2) and then separate XZ RAIL A’ssy (1)
- Page 58 -------------------------------------------------------------------------------------------------- Non-Contact Tonometer HNT-1/1P 4-2-7. Removing the Connector Main Brkt A’ssy (1) Remove the screws (7) and then separate Connector Main Brkt (1) (2) Remove the screws (5) and then separate INLET (4) (3) Remove the pcb support & nut (8,9) and then separate RS232 (3)
-
Page 59: Troubleshooting
Non-Contact Tonometer HNT-1/1P ------------------------------------------------------------------------------------------------ 5. Troubleshooting ) Troubles related with electricity The power lamp does not light on. The monitor is not bright enough. (2) Troubles related with LCD Monitor Nothing is displayed. The screen is moving. ... - Page 60 -------------------------------------------------------------------------------------------------- Non-Contact Tonometer HNT-1/1P Phenomenon 1 : When Power is On, there is no action Phenomenon 2 : LCD monitor display nothing(But other functions works)
- Page 61 Non-Contact Tonometer HNT-1/1P ------------------------------------------------------------------------------------------------ Phenomenon 3 : Key does not work...
- Page 62 -------------------------------------------------------------------------------------------------- Non-Contact Tonometer HNT-1/1P Phenomenon 4 : When printing out, there is some unclean side, especially end of paper Phenomenon 5 : When printing paper is not fed correctly Phenomenon 6 : Cannot see the eye fixation target...
- Page 63 Non-Contact Tonometer HNT-1/1P ------------------------------------------------------------------------------------------------ Phenomenon 7 : Auto Focus movement is unstable or not working Phenomenon 8 : Chin rest movement is not working...
Need help?
Do you have a question about the HNT-1 / 1P and is the answer not in the manual?
Questions and answers