Huvitz HNT-1 Tutorial
Hide thumbs
Also See for HNT-1:
- User manual (82 pages) ,
- Troubleshooting manual (63 pages) ,
- Service manual (60 pages)

Related Manuals for Huvitz HNT-1


Summary of Contents for Huvitz HNT-1
- Page 1 HNT-1/1P Training Tutorial HUVITZ Copyright © 2009 Huvitz, Co. Ltd, All rights reserved.
-
Page 2: Table Of Contents
• 3. HNT-1 / 1P Outline • 4. Optical system configuration & Light Path • 5. Main UI • 6. Sub UI • 7. User Setup Mode • 8. Engineer Setup Mode HUVITZ Copyright © 2009 Huvitz, Co. Ltd, All rights reserved. -
Page 3: New Features
60 mmHg SPC 60 50 mmHg 40 mmHg • Therefore, The patient’s 30 mmHg feelings of discomfort and 20 mmHg stress are minimized. 10 mmHg Pressure curve change of IOP HUVITZ Copyright © 2009 Huvitz, Co. Ltd, All rights reserved. - Page 4 1. New features – CCT measurement and visualization CCT(Central Cornea Thickness) measurement function and IOP compensation function using Scheimpflug Method visualization function 샤임풀러그 HUVITZ Copyright © 2009 Huvitz, Co. Ltd, All rights reserved.
- Page 5 1. New features – ACA Function ACA(Anterior Chamber Angle) Capture function Measure angle by touching the screen HUVITZ Copyright © 2009 Huvitz, Co. Ltd, All rights reserved.
-
Page 6: Specifications
TFT LCD Color IPS Touch Panel of 7” (800x480) Electrical Power AC100 ~ 240V, 50/60Hz Electrical Power AC100 ~ 240V, 50/60Hz Current Current External I/O RS-232C (in/out) External I/O RS-232C (in/out) HUVITZ Copyright © 2009 Huvitz, Co. Ltd, All rights reserved. -
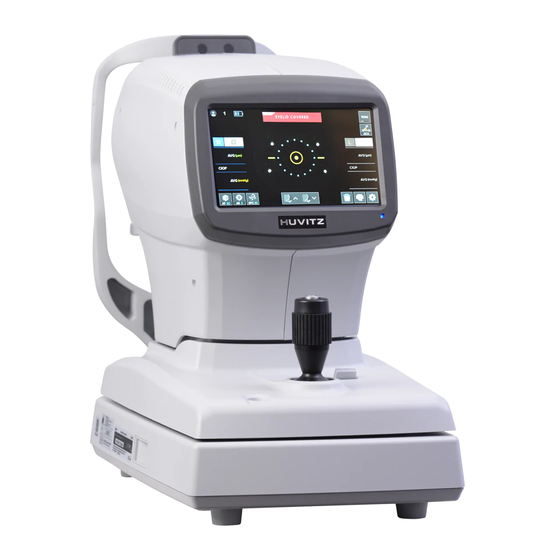
Page 7: Hnt-1 / 1P Outline
⑥ Stage Fixation lever : - A lever for fixation stage ⑦ Safety Button : - Safety distance establishment between patient and device - Mechanical and electrical control HUVITZ Copyright © 2009 Huvitz, Co. Ltd, All rights reserved. - Page 8 - Switch for power on / off ① Power Socket : - A socket connecting to exterior power plug ② Serial Interface(RS-232C) Connector : - A terminal connection to the exterior equipment. HUVITZ Copyright © 2009 Huvitz, Co. Ltd, All rights reserved.
-
Page 9: Optical System Configuration & Light Path
4. Optical system configuration & Light path 1. Observation : 2. Aiming light : 3. Fixation 4. Z axis align. 5. Measurement : 6. Pachymeter HUVITZ Copyright © 2009 Huvitz, Co. Ltd, All rights reserved. -
Page 10: Main Ui
X, Y and Z Motors are ⑥ [Print Button] - Print measurement result go to the initialization position (each center) by themselves. ⑦ [Setting Button] - Into the User Setup mode HUVITZ Copyright © 2009 Huvitz, Co. Ltd, All rights reserved. - Page 11 -Display all measurement data on the Result screen ⑨ [Compensation mode Button of CCT] -CIOP(Compensated IOP function on / off ⑩ [CCT input button] - Display CCT input dialog box [CCT input dialog box] HUVITZ Copyright © 2009 Huvitz, Co. Ltd, All rights reserved.
- Page 12 - Display Pachy Image enlarged Screen - It displayed the last measured image. ③ [ACA Mode Button] - Display ACA(Anterior Chamber Angle) mode screen ④ [Pachy + IOP Measurement Data] HUVITZ Copyright © 2009 Huvitz, Co. Ltd, All rights reserved.
- Page 13 Optimal state Move the joystick lever to the patient side to move the main body close to the patient’s eye Too far from the patient’s eye HUVITZ Copyright © 2009 Huvitz, Co. Ltd, All rights reserved.
- Page 14 Move up by rotating the joystick lever to the clockwise Move down by rotating the joystick lever to the counter clockwise Move the joystick lever to the left Move the joystick lever to the right HUVITZ Copyright © 2009 Huvitz, Co. Ltd, All rights reserved.
- Page 15 In case of HNT-1P, Data list are divided into each of the measurement mode as Tono, Pachy and Tono-Pachy. Measured data at each measurement mode is entered separately. It can be confirmed by pushing mode items on the left side. HUVITZ Copyright © 2009 Huvitz, Co. Ltd, All rights reserved.
-
Page 16: Sub Ui
② [Back Button] - Return the the Pachy image screen ③ [Send Button] - Send the pachy image to PC ④ [Fitting Button] - Display detected edge of the cornea HUVITZ Copyright © 2009 Huvitz, Co. Ltd, All rights reserved. - Page 17 - Measure angel by touching the screen with 3 points ④ [Send Button] - Send the pachy image to PC It is a reference image to help to your judgement. HUVITZ Copyright © 2009 Huvitz, Co. Ltd, All rights reserved.
- Page 18 - Has a closed or narrow angle between the iris and cornea - Develops very quickly - Has symptoms and damage that are usually very noticeable - Demands immediate medical attention It is also called acute glaucoma or narrow-angle glaucoma HUVITZ Copyright © 2009 Huvitz, Co. Ltd, All rights reserved.
- Page 19 HNT-1(P) has Semi Automatic tracking system that - MS : Manual shot by measurement button operates near the patient’s eyes. - AS1 : 1 time auto shot - AS3 : 3 times consecutive auto shot HUVITZ Copyright © 2009 Huvitz, Co. Ltd, All rights reserved.
- Page 20 - Select a start measurement mode when Turn ON ② [Mode Button Toggle] - Differently display measurement mode button on the Main Screen - On : Appear only one toggle button - Off : Appear Three buttons HUVITZ Copyright © 2009 Huvitz, Co. Ltd, All rights reserved.
- Page 21 - CIOP = Measured IOP data + C factor - Pachy data - HNT-1 : Input data - HNT-1P : Measured data ④ [Cornea Thickness] - Input data of Cornea Thickness HUVITZ Copyright © 2009 Huvitz, Co. Ltd, All rights reserved.
- Page 22 7. User Setup Mode – Data 2 Page ① [IOP Offset] - Set the IOP offset value HUVITZ Copyright © 2009 Huvitz, Co. Ltd, All rights reserved.
-
Page 23: User Setup Mode
- In Auto Mode - Print out the measured data automatically after both side measurements ③ [COM Out] - Setup of transmission ON / OFF - Communication to other devices HUVITZ Copyright © 2009 Huvitz, Co. Ltd, All rights reserved. - Page 24 - Set of indication sequence of Year / Month / Data ② [Data Set] - Set of Year / Month / Date ③ [Time Set] - Set of Time(Hour / Minute / Second) HUVITZ Copyright © 2009 Huvitz, Co. Ltd, All rights reserved.
- Page 25 - Be occurred when the touch button is pressed and the measurement button is pressed ④ [Beep Volume] -Set the beep sound volume ① [Sleep Time] - Set the sleep time for power saving HUVITZ Copyright © 2009 Huvitz, Co. Ltd, All rights reserved.
- Page 26 : Erase of text ③ : Change of line ④ : Upper case / Lower case ⑤ : Number and special Character ⑥ : Save ⑦ : Exit without save HUVITZ Copyright © 2009 Huvitz, Co. Ltd, All rights reserved.
-
Page 27: Engineer Setup Mode
① [How to into the Engineer Setup Mode] - Press PRINT R L SETUP button on the main screen ② [How to into the wanted Mode] - Push the wanted mode on the screen HUVITZ Copyright © 2009 Huvitz, Co. Ltd, All rights reserved. - Page 28 ⑬ [Move to Packing Pos] - Move the head to the packing position ⑭ [Save factory settings] - Backup the engineer settings ⑮ [Restore factory settings] - Return to the backup settings HUVITZ Copyright © 2009 Huvitz, Co. Ltd, All rights reserved.
- Page 29 ② [SEARCH OBS CAM BLACK DEAD PIXEL(OPEN)] - Search for Black dead pixel(dead pixel) in OBS camera and display their location ③ [SHOW OBS CAM DEAD PIXEL] - Displays the position of all dead pixel HUVITZ Copyright © 2009 Huvitz, Co. Ltd, All rights reserved.
- Page 30 - Pres1 : pressure value of 1 peak - Appl_idx2 : 2 peak position of the applanation signal - Val : 2 peak value of the applanation signal - Pres2 : pressure vale of 2 peak HUVITZ Copyright © 2009 Huvitz, Co. Ltd, All rights reserved.
- Page 31 - PD LED duty ⑦ Use “+”, “-”, “++”, “- -” buttons to change value ⑧ Also, You can adjust the brightness of LEDs using VR on the Main Board(Next page) HUVITZ Copyright © 2009 Huvitz, Co. Ltd, All rights reserved.
- Page 32 8. Engineer Setup Mode – Focus LED Setup Ext. LED R&L Fix LED App LED Pachy LED Aiming LED HUVITZ Copyright © 2009 Huvitz, Co. Ltd, All rights reserved.
- Page 33 ③ Press the left side “Start” button to automatically track the target ④ Press the measuring button on the joystick or right side “Start” button ⑤ Shot the solenoid 5 times and display 5 results HUVITZ Copyright © 2009 Huvitz, Co. Ltd, All rights reserved.
- Page 34 Solenoid Control Mode ① In case of the “NG”(left image), increase the Cur2 value to 165 and check again - NG : Peak to Valley < 2 lines HUVITZ Copyright © 2009 Huvitz, Co. Ltd, All rights reserved.
- Page 35 - OK : Peak to Valley <= 2 lines ⑤ Set the pressure value using VR in the Main Board - Minimum value : 200 VR9 - Maximum value : 600 VR8 600(±10) 200(±10) HUVITZ Copyright © 2009 Huvitz, Co. Ltd, All rights reserved.
- Page 36 Ex) SPC-30 mode Ex) SPC-60 mode with version(Over V1.03.04A) Puffing pressure Measured IOP Puffing pressure Measured IOP => => => => => => => => IOP Over!!! => => => => HUVITZ Copyright © 2009 Huvitz, Co. Ltd, All rights reserved.
- Page 37 8. Engineer Setup Mode – IOP Measure Setup : New SPC Function But, HNT-1 / 1P has a real active SPC function. Automatically adjusts the puffing pressure according to the patient’s eye pressure at every measurement. Also adjust the puffing pressure continuously without step.
- Page 38 8. Engineer Setup Mode – IOP Measure Setup : New SPC Function Also, The Air puffing time has dramatically reduced. HNT – 1(20 ms) HNT–7000(100 ms) 0ne time 0ne time HUVITZ Copyright © 2009 Huvitz, Co. Ltd, All rights reserved.
- Page 39 - Range of Auto Focus Motor speed - If it is increased, Auto focus movement is more slow. ③ This area is the optimized area. It is not recommended to adjust. HUVITZ Copyright © 2009 Huvitz, Co. Ltd, All rights reserved.
- Page 40 - AF-TARGET DIST(Y) : range of y axis - AF-TARGET DIST(ZF) : range of front side on z axis - AF-TARGET DIST(ZR) : range of rear side on z axis HUVITZ Copyright © 2009 Huvitz, Co. Ltd, All rights reserved.
- Page 41 - Not necessary in field market Perform pachy setup and inspection in a darkened room. If it can’t be performed in a darkened room, cover the pachy JIG and device with a black cloth. HUVITZ Copyright © 2009 Huvitz, Co. Ltd, All rights reserved.
- Page 42 Adjust the real model eye value(Red Box) Press the “Start” for calibration Set up the next Model eye Press the “Exit” for return to previous screen If set up is done, you have to press “Save” HUVITZ Copyright © 2009 Huvitz, Co. Ltd, All rights reserved.
- Page 43 3. Press “Red box” for return to previous screen Press “Red box” Press the “Check” We will supply three Pachy model eyes. Check within 5 um of the setup value (400, 600 and 800 um) If not, Recalibration. HUVITZ Copyright © 2009 Huvitz, Co. Ltd, All rights reserved.
- Page 44 ② Touch the cross shape shown on the screen ③ When finish touching one cross shape, the nest cross shapes are displayed ④ When done, Press “OK” button and result value will be output HUVITZ Copyright © 2009 Huvitz, Co. Ltd, All rights reserved.
- Page 45 : Anode0 Value of PSD sensor Psd_Anode1 : Anode1 Value of PSD sensor z-ratio : z-axis ratio Pres ADC : pressure base ADC value Appl ADC : applanation base ADC value HUVITZ Copyright © 2009 Huvitz, Co. Ltd, All rights reserved.
- Page 46 Y-HEAD ON, OFF : up, down direction(Head) Z-HEAD ON, OFF : front, rear direction(Head) C-REST ON, OFF : chin rest up, down LR Measure Start : test all procedures for measurement HUVITZ Copyright © 2009 Huvitz, Co. Ltd, All rights reserved.
- Page 47 ① Press each item to test ② Select “pass” or “Fail” button for each item ③ Press the “Print” button to print the test results ④ The “Reset” button initializes all items HUVITZ Copyright © 2009 Huvitz, Co. Ltd, All rights reserved.
- Page 48 ③ Pressing the button of joystick, then turn on HNT- 1/1P ④ Select “Serial Port” “Transmit” menu ⑤ Choose “HNT-1 / 1P **.bin” file, then press OK button ⑥ After downloading, turn off and on the HNT-1/1P HUVITZ Copyright © 2009 Huvitz, Co. Ltd, All rights reserved.
Need help?
Do you have a question about the HNT-1 and is the answer not in the manual?
Questions and answers