Huvitz HNT-7000 Service Manual
Auto tonometer
Hide thumbs
Also See for HNT-7000:
- User manual (58 pages) ,
- Manual (17 pages) ,
- Software upgrade (11 pages)
Table of Contents
Advertisement
Advertisement
Table of Contents

Related Manuals for Huvitz HNT-7000


Summary of Contents for Huvitz HNT-7000
- Page 1 Service Manual Auto Tonometer HNT-7000...
- Page 2 HUVITZ reserves the right to make changes in its products or product specifications at any time and without prior notice, and is not required to update this documentation to reflect such...
- Page 3 HUVITZ reserves the right to make changes in its products or product specifications at any time and without prior notice, and is not required to update this documentation to reflect such changes.
-
Page 4: Table Of Contents
-------------------------------------------------------------------------------------------------------------- Auto Tonometer HNT-7000 Contents I. Important Notice ................. 4 II. Safety Information ................59 1. Introduction ................59 2. Safety Symbols ................6 3. Environment Factors ..............7 4. Safety Precautions ............... 9 III. Product Outline ................11 1. Nomenclature ................11 2. -
Page 5: Important Notice
Huvitz reserves the right to make changes in its products or product specifications at any time and without prior notice, and is not required to update this documentation to reflect... -
Page 6: Safety Information
-------------------------------------------------------------------------------------------------------------- Auto Tonometer HNT-7000 2.Safety Information 2.1.Introduction Safety is everyone’s responsibility. The safe use of this equipment is largely dependent upon the installer, user, operator, and maintainer. It is imperative that personnel study and become familiar with this entire manual before attempting to install use, clean, service or adjust this equipment and any associated accessories. -
Page 7: Safety Symbols
Auto Tonometer HNT-7000 ---------------------------------------------------------------------------------------------------------------- 2.2.Safety Symbol The International Electro technical Commission (IEC) has established a set of symbols for medical electronic equipment, which classify a connection or warn of any potential hazards. The classifications and symbols are shown below. I and O on power switch represent ON and OFF respectively. - Page 8 -------------------------------------------------------------------------------------------------------------- Auto Tonometer HNT-7000 2.3.Environmental Considerations Please avoid the environment below for the operation and storage of the equipment Where equipment Where the machine can exposed to water vapor. exposed chemical or flammable Don’t operate the equipment substances. with wet hands.
- Page 9 Auto Tonometer HNT-7000 ---------------------------------------------------------------------------------------------------------------- For the normal operation of the machine, please keep the ambient temperature is 10℃ ~ 35℃, humidity is 30% ~ 75% and atmospheric pressure is 800 ~ 1060hpa. For the Transformation of the machine, please keep the ambient temperature is -40℃ ~ 70℃, humidity is 10% ~ 95% and atmospheric pressure is 500 ~ 1060hpa.
-
Page 10: Safety Precautions
The manufacturer is not liable for damage caused by unauthorized tampering with the device(s). Such tampering will forfeit any rights to claim under warranty. The equipment may only be used together with accessories supplied by Huvitz’s. If the customer makes use of other accessories, use them only if there are usability under... - Page 11 Auto Tonometer HNT-7000 ---------------------------------------------------------------------------------------------------------------- technical safety aspects has been proved and confirmed by Huvitz or the manufacturer of the accessory. Only persons who have undergone proper training and instructions are authorized to install, use, operate, and maintain this equipment. 10. User’s manual or service manual should be kept in the place where the persons in chare of operation and maintenance can access easily any time.
-
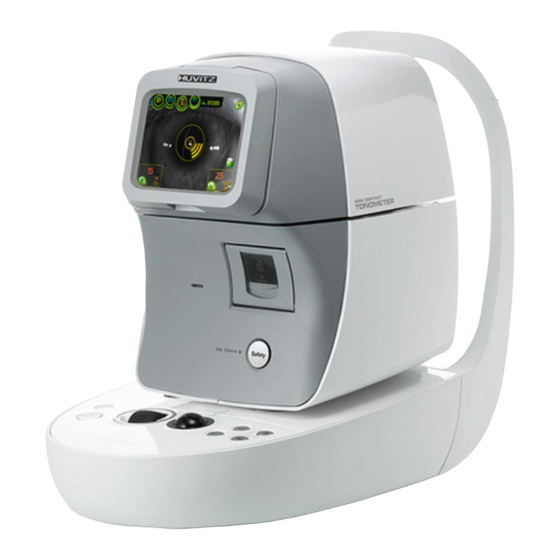
Page 12: Product Outline
-------------------------------------------------------------------------------------------------------------- Auto Tonometer HNT-7000 3.Product Outline 3-1. Nomenclature 1. LCD TOUCH SCREEN : Selection for measurement and function parts 2. Operating Lamp : Indicates whether or not the electric power is on 3. Printer : Printing the measured results 4. SAFETY Button : Safety distance establishment between patient and device 5. - Page 13 Auto Tonometer HNT-7000 ---------------------------------------------------------------------------------------------------------------- 1. Forehead Rest : Preventing the vibration by fixing the forehead. 2. Air Nozzle : Measuring the intraocular pressure on eyes. 3. Chinrest : Preventing the vibration by fixing the chin. 4. Power Switch : Switch for power on/off...
- Page 14 -------------------------------------------------------------------------------------------------------------- Auto Tonometer HNT-7000 1. Power Supply Socket : A socket connecting to exterior power plug 2. Serial Interface Connector : A terminal connecting to the exterior equipment.
-
Page 15: Optical System
Auto Tonometer HNT-7000 ---------------------------------------------------------------------------------------------------------------- 3-2.Optical System... - Page 16 -------------------------------------------------------------------------------------------------------------- Auto Tonometer HNT-7000 3-2-1.List of Optical Components 1 : patient’s eye 2-1, -2 : LED for lightening cornea 3 : nozzle cap 4 : App LED ; measure LED 5 : Null mirror 6 : PD sensor 7 : PD mirror...
- Page 17 Auto Tonometer HNT-7000 ---------------------------------------------------------------------------------------------------------------- 3-2-2.Light Paths of the System A : External illumination ( 2- 1, 2- 2 1) B : Corneal sensing system (App L E D & PD s e n s or ) ( 4 1 7 6) C...
-
Page 18: Electrical System
-------------------------------------------------------------------------------------------------------------- Auto Tonometer HNT-7000 3-3.Electrical System 3-3-1.Electrical construction diagram 3-3-1-1.System functional block diagram... - Page 19 Auto Tonometer HNT-7000 ---------------------------------------------------------------------------------------------------------------- 3-3-1-2.Power input electrical block diagram...
- Page 20 -------------------------------------------------------------------------------------------------------------- Auto Tonometer HNT-7000 3-3-2.Electrical wiring 3-3-2-1.Main Board...
- Page 21 Auto Tonometer HNT-7000 ---------------------------------------------------------------------------------------------------------------- 3-3-2-2.Description of wire harness connection of Main Board Connect Description Target connector Main power connector Interface B/D J15 UART0(COM1) For Debugging Not used Not connect LCD CONNECTOR Not used Not connect Sensor B/D interface connector Sensor B/D JP8...
- Page 22 -------------------------------------------------------------------------------------------------------------- Auto Tonometer HNT-7000 3-3-2-3.Interface Board...
- Page 23 Auto Tonometer HNT-7000 ---------------------------------------------------------------------------------------------------------------- 3-3-2-4.Description of wire harness connection of Interface Board Connect No. Description Target connector X down motor DC motor X up motor DC motor Motor control connector Main B/D CN8 Y motor DC motor Z motor DC motor UART0 Ext.
- Page 24 -------------------------------------------------------------------------------------------------------------- Auto Tonometer HNT-7000 3-3-2-5.Sensor Board 3-3-2-6.Description of wire harness connection of Sensor Board Connect No. Description Target connector Measure LED connector ME LED assy Fixation LED connector FIX LED assy Aiming LED connector AIM LED assy External LED(R) connector...
- Page 25 Auto Tonometer HNT-7000 ---------------------------------------------------------------------------------------------------------------- 3-3-3.Layout diagrams for PCB 3-3-3-1.Layout of Main Board 3-3-3-2.Description of IC components of Main Board Ref No. Part name Description A U2 CPU S3C44B0X MPU (Main Controller Unit) B U11 FPGA A3P250 PQ208 FPGA (Logic Array)
-
Page 26: Mode Setting
3-4.Mode Setting Turn-on the system with pressing button as following content of table Start Key Description [S/W Upgrade Mode] Download OS program into ROM via serial port (ex. DEMO_KEY COM) permanently. After downloading, always HNT-7000 will start with new OS program. -
Page 27: Measurement Algorithm
Auto Tonometer HNT-7000 ---------------------------------------------------------------------------------------------------------------- 3-5. Measurement Algorithm 3-5-1.Algorithm A. Auto Focus The external LED is illuminated to measurement ocular and the spot signal of external LED is detected in camera image. The ocular center is calculated by its position. Using distance from the center positions of ocular (x, y) and display (x, y), focusing to x, y directions is performed. - Page 28 -------------------------------------------------------------------------------------------------------------- Auto Tonometer HNT-7000 3-5-2.Operation Flow Turn-on the power switch SELF TEST Displayed error message Trouble ? Move to center of Motor Encoder 중심 위치 이동 Displayed initial screen Search for position of focus Move to position of measurement Measure the IOP...
- Page 29 Auto Tonometer HNT-7000 ---------------------------------------------------------------------------------------------------------------- Stand by user input PRINTER USER SETUP MEASURE RESULT Print the result of measurement Change the user setup Display the result of measurement Save/Exit Apply the CCT...
-
Page 30: Repair Standard
-------------------------------------------------------------------------------------------------------------- Auto Tonometer HNT-7000 4.Repair Standard 4-1.Checking and Control 4-1-1. Engineer Setup Mode Turn on HNT-7000 and pressing PRINT key until the measure mode screen is displayed. And press DEMO key, then you could enter the engineer setup mode. When you touch any item in the screen of Engineer Setup Mode, Engineering setup menus are the followings. - Page 31 Auto Tonometer HNT-7000 ---------------------------------------------------------------------------------------------------------------- (8) EXIT TO MEASURE - Return to measure mode screen. 4-1-2.Touch Screen Setup [Purpose] The touch screen is calibrated for correct touch operation. You could calibrate touch screen as the following steps. [Setup Procedure] (1) Enter the TOUCH SCREEN SETUP.
- Page 32 -------------------------------------------------------------------------------------------------------------- Auto Tonometer HNT-7000 4-1-3.Optical System Alignment - EXT/AIM LED [Purpose] Alignment for judgment of focus condition. EXT LED : To verify X/Y position of Target in long distance AIM LED : To verify X/Y position of Target in short distance...
- Page 33 Auto Tonometer HNT-7000 ---------------------------------------------------------------------------------------------------------------- (2) Check values as below in EXT LED mode A. LSP : X/Y coordinates of left EXT spot B. LSZ : Size of left EXT spot. (average brightness) C. LOF : X/Y variation between left EXT spot and Aiming spot D.
- Page 34 -------------------------------------------------------------------------------------------------------------- Auto Tonometer HNT-7000 D. The Size and Brightness of AIM spot ASZ Size : within 20 ~ 25, Brightness : over 230 (2) If it is out of inspection standard above, adjust EXT_L VR(Variable Resistor), EXT_R VR, FIX VR inside of Sensor Board. In case of difficulty with adjustment Variable resistors, control PWM duty of LED for minute adjustment 4-1-4.Optical System Alignment - PSD LED...
- Page 35 Auto Tonometer HNT-7000 ---------------------------------------------------------------------------------------------------------------- [LED Duty Adjustment] (1) Enter the FOCUS CONTROL SETUP at Engineer Mode (2) In case of necessary, change LED Duty values at below PWM-PSD : PSD LED duty (3) To restore the initial value of LED duty, Choose CLEAR DATA on the screen...
- Page 36 -------------------------------------------------------------------------------------------------------------- Auto Tonometer HNT-7000 4-1-5.Solenoid Setup [Purpose] Control the gain of Internal Pressure sensor, for the better measuring graph of pressure [Setup Procedure] (1) Enter the FOCUS ALIGN TEST at Engineer Mode (2) Press PSD LED and PRESS on the screen to enter PRESS mode...
- Page 37 Auto Tonometer HNT-7000 ---------------------------------------------------------------------------------------------------------------- (4) Enter IOP MEASURE TEST at Engineer Mode (5) Set S_Duty and S_Time values of SOLENOID as below, And press DEMO button for Air puffing S_Duty : 200 S_Time : 12.0 (6) Press GRAPH button to check the internal pressure graph...
- Page 38 -------------------------------------------------------------------------------------------------------------- Auto Tonometer HNT-7000 4-1-6.Optical System Alignment - APP LED and Camera [Purpose] Adjust the gain of APP LED to control shape of Applanation graph [Preparation] (1) IOP Model Eye(IOP 20, 30, 40, 60). (2) Model Eye Stand. [LED Duty Adjustment]...
- Page 39 Auto Tonometer HNT-7000 ---------------------------------------------------------------------------------------------------------------- S_Duty : 200 S_Time : 13.0 (IOP 40), 18.0 (IOP 60) (5) Press GRAPH button, check the 1st peak condition of APP graph (Red) (6) Place Aiming spot on the right side from center of focus ring(X coordinates of...
- Page 40 -------------------------------------------------------------------------------------------------------------- Auto Tonometer HNT-7000 4-1-7.IOP Measurement Setup [Purpose] Set the table to change internal pressure to IOP [Preparation] (3) IOP Model Eye(IOP 20, 30, 40, 50, 60) (4) Model Eye Stand. [Solenoid Time Adjustment] (1) Enter IOP MEASURE TEST at Engineer Mode (2) Set model eyes (IOP 20, 30, 40, 50, 60) on chinrest, set them on focus (3) Set Duty and Time of Solenoid as below, Press DEMO Button for air puffing.
- Page 41 Auto Tonometer HNT-7000 ---------------------------------------------------------------------------------------------------------------- 16.0(IOP 50), 18.0(IOP 60) (4) Press GRAPH Button, check peak value of APP graph (Red) (5) Repeat (2) ~(4) 2 ~ 3 times, If the 1st peak value of APP graph is not correct (for example peak value is small size, rough shape or significant changes in every air puffing), adjust Time of Solenoid : set time within ±0.5...
- Page 42 -------------------------------------------------------------------------------------------------------------- Auto Tonometer HNT-7000 (2) Select SPC range for setup (3) Input Duty and Time of Solenoid to selected SPC range. Time of Solenoid uses adjusted Time after check peak of model eye which has the highest IOP value in SPC range (4) Check necessary model eye in selected SPC range, select START SETUP.
- Page 43 Auto Tonometer HNT-7000 ---------------------------------------------------------------------------------------------------------------- (7) Press START button, air puffing will start automatically. Air puffing measure model eye 5 times after 3 times of test measurement Measurement will stop automatically when focus is out of model eye (8) Check SETUP result after measurement of model eye A.
- Page 44 -------------------------------------------------------------------------------------------------------------- Auto Tonometer HNT-7000 : Peak place of pressure graph : Peak value of pressure graph iii. : Peak size of pressure graph : Base value of pressure graph (9) If SETUP error message displays, select BACK to try model eye setup again.
- Page 45 Auto Tonometer HNT-7000 ---------------------------------------------------------------------------------------------------------------- 4-1-8.Tracking Motor Setup [Purpose] Adjust the PWM duty of X, Y, Z motor and center positon [Motor Setup] (1) Enter TRACK MOTOR SETUP at Engineer Mode (2) Available motors for setup are below A. X-HEAD : X axis motor of optical head B.
- Page 46 (7) As above way, Align X-BASE, Y-BASE, Z-HEAD motors on center point 4-1-9. How to upgrade OS program (1) Turn off HNT-7000. (2) Start DNW program, set your PC’s COM port number, 115200 Bps. (3) Connect PC to HNT-7000 with serial cable.
- Page 47 Auto Tonometer HNT-7000 ---------------------------------------------------------------------------------------------------------------- (4) Pressing the DEMO key, then turn on HNT-7000 (5) DNW program will show the following screen. (6) Select Serial Port => Transmit menu, then File Dialog box pops up. (7) Choose HNT7000D_z.bin file, then press OK button...
- Page 48 -------------------------------------------------------------------------------------------------------------- Auto Tonometer HNT-7000 (8) After downloading, turn off and on the HNT-7000. (9) Confirm the changed SW version on boot screen...
-
Page 49: Disassembly And Assembly Procedure
Auto Tonometer HNT-7000 ---------------------------------------------------------------------------------------------------------------- 4-2.Disassembly and Assembly Procedure 4-2-1.Removing the Cover & Head rest A’ssy (1) Remove BOLTCAP (8),the screws (5) of the Bottom body and then separate the Head rest A’ssy(9). (2) Remove the screws (4) and then separate MIDDLE COVERS (3). - Page 50 -------------------------------------------------------------------------------------------------------------- Auto Tonometer HNT-7000 (5) Remove the screws (2) and then separate TOP BACK COVER(1). (6) Remove the screws (4) and then separate TOP FRONT COVER(3). (7) Remove the screws (6) and then separate LCD CABLE COVER(5). (8) Remove the screws (8) and then separate MIDDLE FRONT CASE ASSY(7)
- Page 51 Auto Tonometer HNT-7000 ---------------------------------------------------------------------------------------------------------------- (10) Remove BOLTCAP (3),the screws (4) and then separate X SLIDER COVERS(5). 4-2-2.Removing the OPTICAL SYSTEM TOTAL ASSY 1 (1) Remove the screws (2) and then separate OPTICASL SYSTEM TOTAL ASSY(1).
- Page 52 -------------------------------------------------------------------------------------------------------------- Auto Tonometer HNT-7000 4-2-3.Removing the Optical System Total Ass’y 2 (1) Remove the screws (8) and then separate MAIN PCB(26) (2) Remove the screws (5) and then separate OPTICAL COVER(4). (3) Remove the screws and then separate FRONT CASE GUIDE(2 ) from OH CASE FRONT FRAME ASSY(20).
- Page 53 Auto Tonometer HNT-7000 ---------------------------------------------------------------------------------------------------------------- 4-2-4.Removing the TOTAL STAGE ASSY and Y TOTAL ASSY (1) Remove the screws(6) and then separate TOTAL STAGE ASSY(13) (2) Remove the screws (3) and then separate Y TOTAL ASSY(14).
- Page 54 -------------------------------------------------------------------------------------------------------------- Auto Tonometer HNT-7000 4-2-5.Removing the TOTAL STAGE ASSY (1) Remove the screws(8) and then separate OPTICAL BOTTOM BLOCK(3) (2) Remove the screws and then separate HEAD CABLE GUIDE(2) (3) Remove the screws and then separate Z ENCODER ASSY(14) (4) Remove the screws and then separate Z SLIT ASSY(15)
- Page 55 Auto Tonometer HNT-7000 ---------------------------------------------------------------------------------------------------------------- 4-2-6.Removing the XZ STAGE ASSY (1) Remove the screws(8) and then separate SHAFT(3,4,5,6) (2) Remove the screws(7) and then separate X MOTOR ASSY(9)
- Page 56 -------------------------------------------------------------------------------------------------------------- Auto Tonometer HNT-7000 4-2-7.Removing the X SLIDER ASSY (1) Remove the screws(7) and then separate Z MOTOR ASSY(9) (2) Remove the screws(5) and then separate Z SUB(4) (3) Remove the screws(6) and then separate Z SPRING GUIDE(2) (4) Remove the set-screws(8) and then separate LM6UU(1)
- Page 57 Auto Tonometer HNT-7000 ---------------------------------------------------------------------------------------------------------------- 4-2-8.Removing the Y TOTAL ASSY (1) Remove the screws(10) and then separate Y MOTOR ASSY(22) (2) Remove the screws(13) and then separate BALL TRANSFER(6) (3) Remove the screws(12) and then separate Y AXIS ASSY(21) (4) Remove the screws(11) and then separate MOVING BLOCK CONNECTOR(4)
- Page 58 -------------------------------------------------------------------------------------------------------------- Auto Tonometer HNT-7000 4-2-9.Removing the TOTAL STAGE ASSY and Y TOTAL ASSY (1) Remove the screws(8) and then separate FOOT(18) (2) Remove the screws and then separate BOTTOM(20) (3) Remove the screws and then separate SMPS(1) (4) Remove the screws(13) and then separate XL PULLY ASSY(27)
- Page 59 Auto Tonometer HNT-7000 ---------------------------------------------------------------------------------------------------------------- 4-2-10.Removing the TOTAL STAGE ASSY and Y TOTAL ASSY (1) Remove the screws(5) and then separate LCD BACK CASE(11) (2) Remove the screws(6) and then separate TOUCH PCB(3) (3) Remove the screws(8) and then separate LCD CASE(12)
-
Page 60: Troubleshooting
-------------------------------------------------------------------------------------------------------------- Auto Tonometer HNT-7000 5.Troubleshooting ) Troubles related with electricity The power lamp does not light on. The monitor is not bright enough. (2) Troubles related with LCD Monitor Nothing is displayed. The screen is moving. - Page 61 Auto Tonometer HNT-7000 ---------------------------------------------------------------------------------------------------------------- Phenomenon 1 : When Power is On, there is no action Phenomenon 2 : LCD monitor display nothing(But other functions works)
- Page 62 -------------------------------------------------------------------------------------------------------------- Auto Tonometer HNT-7000 Phenomenon 3 : Key does not work...
- Page 63 Auto Tonometer HNT-7000 ---------------------------------------------------------------------------------------------------------------- Phenomenon 4 : When printing out, there is some unclean side, especially end of paper Phenomenon 5 : When printing paper is not fed correctly Phenomenon 6 : Cannot see the eye fixation target...
- Page 64 -------------------------------------------------------------------------------------------------------------- Auto Tonometer HNT-7000 Phenomenon 7 : Auto Focus movement is unstable or not working Phenomenon 8 : Chin rest movement is not working...
Need help?
Do you have a question about the HNT-7000 and is the answer not in the manual?
Questions and answers
The Hnt 7000 non contact Tonometer is showing us searching motor Hx error there by making the machine not to move to left and right side of the machine to enable the user to do his or her test to the patient. Pls how do we solve this issue