
Related Manuals for pyroscience MUX2


Summary of Contents for pyroscience MUX2
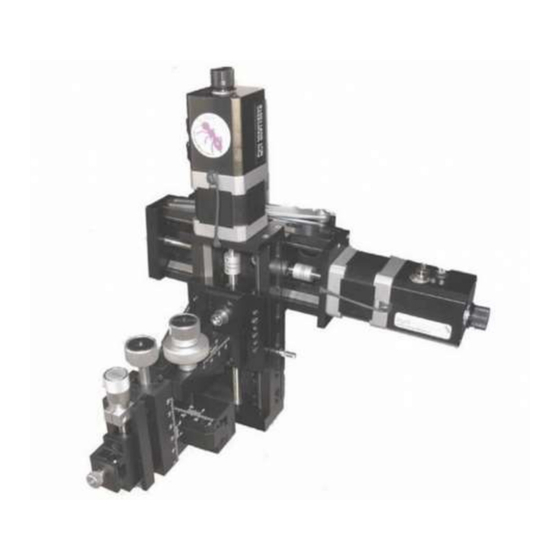
- Page 1 Micromanipulator MUX2 Micromanipulator with motorized x- and z-axis USER MANUAL www.pyroscience.com...
- Page 2 MUX2 | User Manual Micromanipulator MUX2 Micromanipulator with motorized x- and z-axis Document Version 1.4 The MUX2 is provided by: PyroScience GmbH Hubertusstrasse 35 52064 Aachen Germany Phone +49 (0)241 5183 2210 +49 (0)241 5183 2299 Email info@pyroscience.com www.pyroscience.com Registered: Aachen HRB 17329, Germany...
-
Page 3: Table Of Contents
MUX2 | User Manual TABLE OF CONTENT Introduction ............................. 4 1.1 Packing List ............................4 1.2 Overview ............................5 Safety Guidelines ..........................6 Installation and Operation ......................8 3.1 Assembly and Mounting ....................... 8 3.2 Power Supply and Manual Motor Control ................11 3.3 Computer-Controlled Operation ..................... -
Page 4: Introduction
MUX2 | User Manual INTRODUCTION The Micromanipulator MUX2 has been developed within the last decade in close cooperation with leading scientists, who are specialized in microsensor measurements. Please read carefully this manual before starting to use the device. Packing List Please check that all following items are included in your package: •... -
Page 5: Overview
For best operation conditions, the micromanipulator MUX2 should be mounted on the Heavy Stand HS1 from PyroScience. Alternatively, it can be mounted on any flat surface providing a M6 mounting hole. © PyroScience GmbH... -
Page 6: Safety Guidelines
MUX2 | User Manual SAFETY GUIDELINES PLEASE READ THESE INSTRUCTIONS CAREFULLY BEFORE STARTING TO WORK WITH THIS DEVICE • Before connecting the device to the mains voltage, please ensure that the operating voltage stated on the power supply corresponds to the mains voltage. - Page 7 MUX2 | User Manual THIS DEVICE MAY ONLY BE OPERATED BY QUALIFIED PERSONAL: This device is only intended for use in the laboratory by qualified personal according to this instruction manual and these safety guidelines! Keep this device out of the reach of children!
-
Page 8: Installation And Operation
Handle with care! Assembly and Mounting Please follow these steps for assembling the Micromanipulator MUX2: 1. Position the 4 mounting holes of the micromanipulator head on top of the 4 mounting threads (red circles) in the micromanipulator base. - Page 9 MUX2 | User Manual 3. Release the tilting screws and open the tilting mechanism. Screw the mounting screw carefully into the mounting nut of the Heavy Stand (if the spring-loaded mounting nut is not exactly centred within the groove, move it back into position with your fingers).
- Page 10 MUX2 | User Manual 6. Microsensors with diameters from 6.5 mm to 12 mm can be mounted directly to the sensor mount. 7. For mounting microsensors with diameters from 0.5 mm up to 3 mm use the included adapter for thin microsensors.
-
Page 11: Power Supply And Manual Motor Control
MUX2 | User Manual Power Supply and Manual Motor Control 1. Connect all cables as shown in the image. 2. Ensure that the manual control knobs for both x- and z-axis!) are in their centre positions (feel the slight "click"!). Otherwise the motor might start moving, when the power supply is plugged in. - Page 12 MUX2 | User Manual 4. Choose the right mains plug according to your country, and connect it to the mains supply. Now the green LED on on both motor housings of the Micromanipulator MUX2 should light up, indicating proper power supply.
-
Page 13: Computer-Controlled Operation
Profix is available by download from the PyroScience homepage (https://www.pyroscience.com). For further instructions, please refer to the installation guidelines and manuals of Profix. IMPORTANT: Before connecting the USB-plug for the first time to the USB-port of your computer, first install the control software Profix! -
Page 14: Maintenance
MUX2 | User Manual MAINTENANCE PRECAUTION: The performance of the MUX2 depends strongly on the conditions of its precision mechanics. Ensure that its parts are kept free from dirt, dust, liquids and other contaminants! Be aware, that aquariums aerated with bubble stones will deposit a fine spray of water drops in the surrounding. - Page 15 Under humid conditions you should leave the power supply connected (green LED on) even if you do not perform any measurements. That way the motor will provide a constant heating within the housing of the MUX2, lowering the risk of water condensation.
-
Page 16: Technical Specifications
MUX2 | User Manual TECHNICAL SPECIFICATIONS Feature Specification Dimensions 275 mm x 95 mm x ca. 220 mm Weight 1.9 kg Travel range x-axis (manual) 25 mm Travel range y-axis (manual) 20 mm Travel range z-axis (manual) 37 mm + 10 mm fine adjustment... - Page 17 MUX2 | User Manual Control software Freeware download Profix: https://www.pyroscience.com Mounting adapter M6 screw, 10 mm length Sensor mount Clamp for microsensors from 6.5 mm to 12 mm Adapter for thin sensors Clamp for two microsensors from 0.5 mm to 3 mm...
- Page 18 MUX2 | User Manual CONTACT PyroScience GmbH Tel.: +49 (0)241 5183 2210 Hubertusstraße 35 Fax: +49 (0)241 5183 2299 52064 Aachen info@pyroscience.com Deutschland www.pyroscience.com www.pyroscience.com...
Need help?
Do you have a question about the MUX2 and is the answer not in the manual?
Questions and answers