
Related Manuals for MSA OptimAir MM PAPR


Summary of Contents for MSA OptimAir MM PAPR
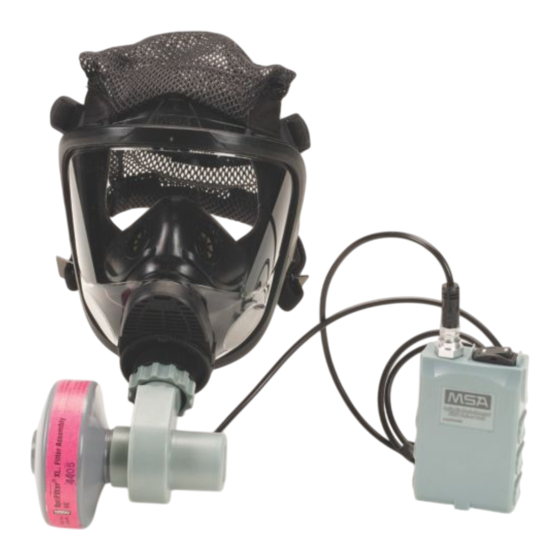
- Page 1 Operating Manual OptimAir MM PAPR Mask-Mounted Powered Air-Purifying Respirator Order No.: 10090982/6 Print Spec: 10000005389 (F) CR: 800000052214 MSA safety .com...
- Page 2 The warranties made by MSA with respect to the product are voided if the product is not installed and used in accordance with the instructions in this manual. Please protect yourself and your employees by following the instructions.
-
Page 3: Table Of Contents
Removing the Respirator Maintaining the Respirator Filter and Battery Pack Cleaning and Disinfecting Respirator Storage Test Method for the OptimAir MM PAPR Testing the Battery Pack Testing the Motor Blower Accessories Installing the Nosecup for Ultravue / Ultra Elite Facepiece... -
Page 4: Introduction
1 Introduction Introduction Cautions and Limitations A — Not for use in atmospheres containing less than 19.5 percent oxygen. B — Not for use in atmospheres immediately dangerous to life or health. C — Do not exceed maximum use concentrations established by regulatory standards. Do not use powered air-purifying respirators if airflow is less than four cfm (115 lpm) for tight fitting facepieces or six cfm F —... -
Page 5: Limitations
Limitations The OptimAir MM PAPR with OptiFilter Type HE filter cartridge, or Type HE particulate filter, are approved as high efficiency particulate air filter for powered air-purifying respirators. Filter does not remove gases or vapors from the air supply. No filter is designed for all substances, Therefore, you must know what the contaminant is, as well as its concentration, before selecting a respirator. - Page 6 1 Introduction – Dizziness or other distress occurs. – You taste or smell contaminant. – You experience eye, nose or throat irritation. • Use strictly in accordance with instructions, labels and limitations pertaining to this device. • This respirator may not provide a satisfactory seal with certain facial characteristics, such a beards or large sideburns, that prevent direct contact between the skin and the sealing surface of the facepiece.
-
Page 7: Description
(IDLH). The OptimAir MM PAPR is used with the facepiece, which is available in small, medium or large sizes. If needed, Advantage® 4100, Ultravue® and Ultra Elite® Facepieces may be equipped with an integral welder’s lens or clip-on welder’s adapter (only used with Ultravue Facepieces). -
Page 8: Exposure Limits
National Institute for Occupational Safety and Health (NIOSH) • American Industrial Hygiene Association (AIHA) Contact MSA at 1-800-MSA-2222 for information. 2.3.1 Exposure Limits for Mixtures The American Conference of Governmental Industrial Hygienists (ACGIH) publishes the following information to determine the TLV of a mixture. -
Page 9: Charging The Battery Pack
• Do not drop the OptimAir MM PAPR. The battery pack can be damaged by impact. The case can be cracked and could allow water into the pack. If the unit is dropped, inspect the case for cracks. If the motor blower no longer operates from the compromised battery pack, the battery pack must be replaced. - Page 10 3 Charging the Battery Pack Line up the key in the charger cable plug with the slot in the female connector on the battery pack. Push the plug into the female connector and turn the ring to secure it. Plug the charger into a 115-120 V, 50, 60 Hz (standard AC) outlet. The charger can be used internationally with the appropriate adapter.
-
Page 11: Respirator Assembly
When the APR adapter is installed correctly and the facepiece is held in the as-worn position, the MSA logo is aligned horizontally. Pull on the APR adapter to make sure that it is attached tightly to the facepiece. - Page 12 4 Respirator Assembly Thread the motor-blower coupling nut into the facepiece until resistance is encountered. NOTE: Continue tightening the coupling nut an additional 60 degrees (the distance of two notches on the coupling nut) into the facepiece. If attached, unthread the filter from the motor-blower assembly. Check that there is a gasket in the motor-blower housing.
-
Page 13: Using The Respirator
5 Using the Respirator Line up the key on the battery cable plug with the slot in the female connector on motor-blower. Push the plug into female connector and turn to secure. Using the Respirator WARNING! • Do not enter any atmosphere with this respirator unless you know that: a) You have read, understood, and followed all instructions and warnings pertaining to the respirator. -
Page 14: Donning The Facepiece
5 Using the Respirator 5.1.1 Connecting the Battery Pack Line up the key on battery cable plug with the slot in female connector on battery pack. Push the plug into female connector and turn to secure. Turn the switch located on the battery pack on. Attach the retaining clip to your shirt or belt to secure the power cable. - Page 15 5 Using the Respirator Tighten the side (temple) straps. If needed, adjust the forehead strap to position the lens for best vision. 5.2.2 Donning the Advantage 3000 Model 3100 Single Port or Advantage 4000 Model 4100 Single Port with Rubber Harness WARNING! When using the Advantage 4000 Facepiece, ensure the inhalation valve disc is laying flat against the adapter orifice.
-
Page 16: Donning The Respirator With G1 Facepiece
5 Using the Respirator 5.2.3 Donning the Respirator with Plastic Advantage 3000 (Model 3100 Single Port) Harness NOTE: There are two recommended donning procedures. Donning Procedure A Completely loosen the two bottom straps. Spread the straps of the head harness with both hands and place chin into the mask. -
Page 17: Testing The Negative Pressure Seal (Face-To-Facepiece Seal)
5 Using the Respirator Put the chin into the chin cup. Pull the head straps over your head. Make sure the harness is in the correct position and is not twisted. Adjust the facepiece. Tighten the straps firmly and evenly. Testing the Negative Pressure Seal (Face-to-Facepiece Seal) To test facepieces for leakage using a negative pressure method: Block the filter opening. -
Page 18: Decontamination
Failure to follow these cautions can result in minor or moderate injury. Decontamination The OptimAir MM PAPR may be used in some applications which may require decontamination of personal and respiratory equipment before the respirator may be removed. One such application is asbestos exposure decontamination. -
Page 19: Maintaining The Respirator
See the appropriate parts lists for correct replacement part numbers. WARNING! Only MSA repair technicians are to maintain the respirator. Use only genuine MSA parts. Do not make repairs or design modifications other than as recommended by MSA or NIOSH certification will be voided. - Page 20 6 Maintaining the Respirator WARNING! Do not remove the filter in a contaminated area. Return to a safe atmosphere and remove any contaminant from the surface. Do not remove the filter while the motor blower is running. With the filter removed, contamination from the surfaces of the respirator can be drawn into the facepiece.
-
Page 21: Cleaning And Disinfecting
Push the plug into the female connector and turn the ring to secure it. Cleaning and Disinfecting Confidence Plus® Germicidal Cleaner (P/N 10009971) from MSA is recommended. Refer to the label for use instructions. A solution as effective as Confidence Plus Cleaning Solution and compatible with MSA respirator components may be substituted. -
Page 22: Respirator Storage
Test Method for the OptimAir MM PAPR The test method should only be used if any one of the OptimAir MM PAPR components (charger, battery pack, or motor- blower) is not functioning properly. This method will outline the steps needed to evaluate the proper electrical functions of each of the components of the MM PAPR. -
Page 23: Testing The Battery Pack
7 Test Method for the OptimAir MM PAPR Testing the Battery Pack The electrical function of the battery pack can be measured by using a multimeter and measuring voltage and resistance across the pins of the connector. Before Testing Examine the battery pack for cracks or other physical damage. If any of these conditions exists, replace the battery pack. -
Page 24: Testing The Motor Blower
Testing the Motor Blower The function of the motor-blower can be tested by using an MSA flowmeter and a multimeter. (MSA adapter P/N 491046 and flow check meter P/N 487995 are required to run the flow test) Before Testing Examine the motor-blower for cracks or other physical damage. - Page 25 7 Test Method for the OptimAir MM PAPR Set the multimeter to measure resistance. Place the positive probe on pin 2 and the negative probe on pin 3. The resistance should be less than 10W. Quick Reference Chart - Battery Tests...
- Page 26 7 Test Method for the OptimAir MM PAPR OptimAir® MM PAPR...
-
Page 27: Accessories
Spectacle kits are available for the Ultravue (P/N 454819), Ultra Elite (P/N 804638), Advantage 3000/4000 (P/N 10029298), and G1 (P/N 10144230) Facepieces. The kit includes the support assembly, a rubber block, and the spectacle frame. Prescription lenses can be obtained locally or through MSA. Adjusting the Spectacles To move the spectacles closer to your face, pull the frame prongs out of the rubber block. - Page 28 8 Accessories Failure to follow this warning can result in serious personal injury or death. Turn the head harness over the front of the facepiece so the harness covers the lens of the facepiece. This will open up the faceblank to make it easier to install the spectacle kit.
-
Page 29: Parts
8 Accessories Make sure the end of the wire frame is in position in the small pockets in the faceblank on the edge of the lens. Do Steps (4) and (5) on the opposite side. Don the facepiece. Adjust the lens frame up/down and in/out to optimize fit and visibility. -
Page 30: Exploded Views And Parts Lists
9 Exploded Views and Parts Lists Exploded Views and Parts Lists G1 Facepiece Item Quantity Description Part Number Faceblank Small 10149577-SP Faceblank Medium 10149578-SP Faceblank Large 10149579-SP G1 Nose Cup Small 10149572-SP G1 Nose Cup Medium 10149573-SP G1 Nose Cup Large 10149574-SP Harness, 5 Pt Adjustable 10144216-SP Harness, Rubber 10144214-SP... - Page 31 9 Exploded Views and Parts Lists Item Quantity Description Part Number Harness, 4 Pt Adjustable, Polyester 10182346 Harness, 4 Pt Adjustable, Kevlar 10144215-SP Neck Strap, Cloth 10144220-SP Neck Strap, Rubber 10159699-SP Component Housing Assembly 10144184-SP Lens 10144194-SP Lens Ring, Upper 10144195-SP Lens Ring, Lower 10144196-SP...
-
Page 32: Ultravue Demand Facepiece
9 Exploded Views and Parts Lists Item Quantity Description Part Number Retainer, Exhalation Valve 10144177-SP Snoop Leak Detector 600920 Ultravue Demand Facepiece Ultravue Facepiece Assemblies Part No. Description Part No. Description 471218 Small, Hycar 480251 Small, Silicone 457126 Medium, Hycar 480247 Medium, Silicone 471230... -
Page 33: Ultra Elite Demand Facepiece
9 Exploded Views and Parts Lists Ultravue Facepiece Components Item No. Part No. Description 471249 Small Lens Ring, (Gray) 464358 Medium Lens Ring (Black) 471250 Large Lens Ring (Gold) 458173 Harness 96662 Buckle (3 Req'd) 457190 Buckle with D-ring (2 Req'd) 458212 Clamp 488609... - Page 34 9 Exploded Views and Parts Lists Ultra Elite Facepiece Components Item No. Part No. Description 491028 Small, Faceblank, Hycar 490138 Medium, Faceblank, Hycar 491039 Large, Faceblank, Hycar 491388 Small, Faceblank, Silicone 491387 Medium, Faceblank, Silicone 491389 Large, Faceblank, Silicone 804830 Rubber Harness (with buckles) 804828 Buckle Assembly (3 Req'd)
-
Page 35: Advantage 3000 Model 3100 Single Port
9 Exploded Views and Parts Lists Ultra Elite Facepiece Components Item No. Part No. Description 804832 Exhalation Valve 804813 Inlet Disc 805011 Valve Spider 804812 Component Housing Ring Screw 804811 Component Housing Ring 804820 Cover, Component Housing 804831 Ring, Component Housing 10116528 Door, Component Housing, ClearCommand 804821... - Page 36 9 Exploded Views and Parts Lists Advantage 3100 Facepiece Components Item No. Part No. Description 10025280 Small, Faceblank, Silicone 10025258 Medium, Faceblank, Silicone 10025259 Large, Faceblank, Silicone -Kit- 10030785 Lens Ring Kit 1 - Upper Lens Ring 1 - Lower Lens Ring 2 - Lens Ring Screw 10025282 Single Port Lens...
-
Page 37: Advantage 4000
9 Exploded Views and Parts Lists Advantage 3100 Facepiece Components Item No. Part No. Description 10025291 Cover -Kit- 10030794 Classic, Rubber Harness Kit 1 - Rubber Harness 2 - Slide 4 - Harness Button 2 - Buckle 10030797 Slide for Classic Rubber Harness, 6 per package 10030795 Harness Button, 12 per package 10030796... - Page 38 9 Exploded Views and Parts Lists Advantage 4000 Facepiece Components Item No. Part No. Qty Req'd Description 10073455 Small, Faceblank, Hycar 10073457 Large, Faceblank, Hycar 10073459 Medium, Faceblank, Hycar 10083926 Small, Faceblank, Silicone 10083927 Large, Faceblank, Silicone 10083925 Medium, Faceblank, Silicone 10074738 Lens, Single Port, 4100-H 10084808...
- Page 39 9 Exploded Views and Parts Lists Advantage 4000 Facepiece Components Item No. Part No. Qty Req'd Description 10026562 Screw, SST, 4m X 25mm Lg, Phil Pan HD 10025288 Button, Head Harness 465008 Bag, Drawstring 10029294 Cover,Lens Not Shown 10075903 Cloth Head Harness Assembly 10075901 Rubber Head Harness Nosecup Assembly Components (Item 8)
- Page 40 For local MSA contacts, please visit us at MSAsafety.com...
Need help?
Do you have a question about the OptimAir MM PAPR and is the answer not in the manual?
Questions and answers