
Related Manuals for MSA G1 PAPR


Summary of Contents for MSA G1 PAPR
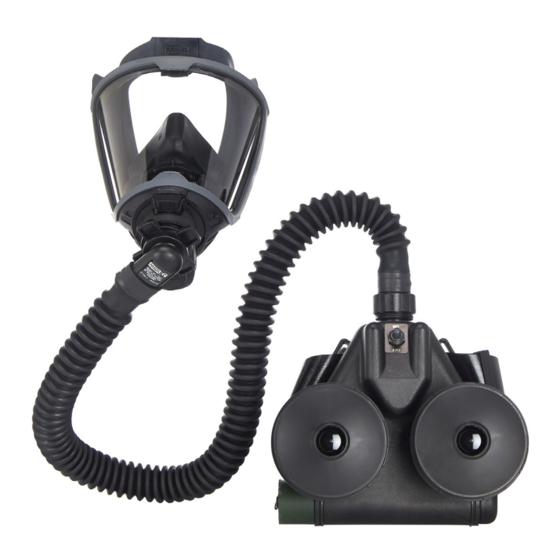
- Page 1 Operating Manual G1 Powered Air-Purifying Respirator (PAPR) Full Facepiece Respirator Order No.: 10192450/02 Print spec.: 10000005389(F) CR 800000041171 MSAsafety.com...
- Page 2 The warranties made by MSA with respect to the product are voided if the product is not installed and used in accordance with the instructions in this manual. Please protect yourself and your employees by following the instructions.
-
Page 3: Table Of Contents
Contents Safety Regulations ..............NIOSH Approval Information . - Page 4 Installing Air Filtration Cartridges/Canisters ..........24 Airflow Testing with Air Filtration Cartridges/Canisters .
-
Page 5: Safety Regulations
Safety Regulations Safety Regulations This respirator complies with the National Institute for Occupational Safety and Health (NIOSH) regu- lation under 42 CFR Part 84. NIOSH Approval Information WARNING! Read and obey all NIOSH approval limitations. Failure to obey this warning can result in serious injury or death. -
Page 6: Important Notice For Respirator Users And Respiratory Protection Program Administrators
Examine the respirator regularly and maintain it according to the instructions in this manual. Only MSA trained repair technicians can do repairs. If the respirator does not operate as specified in this manual, remove it from service and return it ... - Page 7 Safety Regulations Do NOT use this device if: - The identity of the contaminant is unknown. - The concentration of the contaminant is unknown. - The permissible exposure limit (PEL), recommended exposure limit (REL), and/or threshold limit value (TLV) of the contaminant is unknown. An approved professional must supply an applicable change-out schedule for air filtration ...
- Page 8 Safety Regulations Refer to the Centers for Disease Control and Prevention (CDC) at www.cdc.gov for guidance about the use of respirators to help decrease exposure to the H1N1 virus or other airborne biological agents in community, home, and occupational settings. The CDC recommends fit testing, medical evaluations, and training for optimal effectiveness when a respirator is used in a nonoccupational setting.
-
Page 9: Cbrn Applications
Safety Regulations CBRN Applications WARNING! Do NOT use this device without the correct training and a complete understanding of its limitations. Misuse can prevent the respirator from supplying the necessary protection. This respirator supplies LIMITED protection. The device is approved by NIOSH for respiratory ... -
Page 10: Contact Information
It is expressly agreed that the Purchaser’s sole and exclusive remedy for breach of the above warranty, for any tortious conduct of MSA, or for any other cause of action, shall be the repair and/or replacement, at MSA’s option, of any equipment or parts thereof, that after examination by MSA are proven to be defective. -
Page 11: Description
Exhaled air is released through the exhalation valve. For information about approved configurations, refer to the G1 PAPR Approval Insert (PN 10192481). NOTE: The rubber neck strap (Model Number 7-2830-1) is not approved for use with the 4-point black cloth head harness (Model Number 7-3104-1). -
Page 12: C420 Respirator
Single-use and rechargeable batteries are available. The single-use batteries are 6-volt lithium-sulfur dioxide (Li-SO ). The rechargeable batteries are 4.8-volt rechargeable nickel metal hydride (NiMH). An MSA battery charger is included with the NiMH rechargeable battery. The airflow indicator shows that the minimum airflow for safe usage is available. -
Page 13: G1 Spectacle Kit (Optional)
Size Selection G1 Spectacle Kit (Optional) The G1 spectacle kit lets users mount eyeglasses inside the facepiece. Individuals who wear eyeglasses must use the G1 spectacle kit to guarantee a correct fit. Eyeglasses cannot be worn under the facepiece without the G1 spec- tacle kit. -
Page 14: Qualitative Test
If the respirator shows any of the conditions listed in Section 4 "Visual Examinations", remove the respirator from service and return it to an MSA trained repair technician. Do NOT substitute, modify, add, or omit parts. Use only exact replacement parts in the configura- ... -
Page 15: C420 Respirator
The rubber neck strap (Model Number 7-2830-1) is not approved for use with the 4-point black cloth head harness (Model Number 7-3104-1). Do not exceed the maximum use concentrations set by regulatory standards. Users must comply with the following MSA respirator use limitations. Do not exceed the following maximum use concentrations during use: •... -
Page 16: Exposure Limits
National Institute for Occupational Safety and Health (NIOSH) • American Industrial Hygiene Association (AIHA) Contact MSA at 1-800-MSA-2222 for information. Mixtures of Contaminants WARNING! If any one contaminant in a mixture is the same as or more than the IDLH concentration, the entire mixture is IDLH. -
Page 17: Exposure Limits For Mixtures
Make sure that the device is in an approved configuration. For information about approved configura- tions, refer to the G1 PAPR Approval Insert (PN 10192481). Make sure that the head harness is in an approved configuration. -
Page 18: Installing The Waist Belt
Preparing for Use Installing the Waist Belt WARNING! Make sure that the waist belt is tight around your waist to keep the device in position during use. Failure to obey this warning can result in serious injury or death. Put the belt through the male end of the buckle. Remove the male end of the buckle from the belt. -
Page 19: Installing The Battery
Preparing for Use Install the keeper loop on the belt. Install the male buckle on the belt. Installing the Battery WARNING! Do NOT use any battery that shows signs of damage, bulging, swelling, disfigurement, or liquid in the plastic wrap. Failure to obey this warning can result in serious injury or death. -
Page 20: Rechargeable (Nimh) Batteries
Preparing for Use 6.2.2 Rechargeable (NiMH) Batteries WARNING! Do NOT let rechargeable (NiMH) batteries fall to the ground or be damaged in any way that can cause a rupture. If the battery is damaged, remove it. Obey the instructions in Section 11.3 "Discarding Rechargeable (NiMH) Batteries"... -
Page 21: Installing The Battery In The Blower Assembly
Push the APR adapter inward until you hear a click when it engages correctly in the facepiece. When the APR adapter is installed correctly and the facepiece is held in the as-worn position, the MSA logo is aligned horizontally. G1 Powered Air-Purifying Respirator (PAPR) -
Page 22: Installing The Breathing Tube On The Blower Assembly
Preparing for Use Pull on the APR adapter to make sure that it is attached tightly to the facepiece. Installing the Breathing Tube on the Blower Assembly Remove the green protective plug from the inlet port of the breathing tube. Keep the protective plug to use during storage. -
Page 23: Airflow Testing Without Air Filtration Cartridges/Canisters
Preparing for Use Airflow Testing without Air Filtration Cartridges/Canisters WARNING! Failure to make sure that airflow from the blower assembly is sufficient can result in decreased perfor- mance of the device. Failure to obey this warning can result in serious injury or death. Make sure that an O-ring in good condition is installed on the airflow indicator. -
Page 24: Installing Air Filtration Cartridges/Canisters
Failure to obey these warnings can result in serious injury or death. Install two new MSA air filtration cartridges/canisters of the same type and part number before each use. Use only approved cartridges/canisters. For information about approved configurations, refer to the G1 PAPR Approval Insert (PN 10192481). -
Page 25: Airflow Testing With Air Filtration Cartridges/Canisters
Preparing for Use Obey the change-out schedule for air filtration cartridges/canisters. Use air filtration cartridges/canisters immediately after removal from the packaging. Remove the air filtration cartridge/canister from the packaging. Make sure that the air filtration cartridge/canister is not damaged. If the air filtration cartridge/ canister is damaged, discard it according to the applicable authorities. - Page 26 Preparing for Use Make sure that a new single-use (Li-SO ) or fully charged rechargeable (NiMH) battery is installed in the blower assembly. Tilt the airflow indicator from side to side, and make sure that the red ball moves freely from one end of the air column to the other.
-
Page 27: Donning
Make sure that the correct nosecup is installed in the facepiece. For information about approved configurations, refer to the G1 PAPR Approval Insert (PN 10192481). Individuals who wear eyeglasses must use the G1 spectacle kit to guarantee a correct fit. Ordinary ... -
Page 28: Donning In Normal Weather
Donning Donning in Normal Weather WARNING! Make sure that the top of the facepiece seal is in direct contact with your forehead. Make sure that there is no hair between the facepiece seal and your skin. Make sure that the breathing tube is not too tight or too loose. If the breathing tube is too tight, normal movement of the head and neck can be restricted. - Page 29 Donning If necessary, adjust the position of the blower assembly on the waist, or install a breathing tube with a different length to make or remove slack in the breathing tube. Hold the facepiece, and loosen all of the head harness straps to within ¼...
- Page 30 Donning (13) Hold the respirator while you put the top of the nosecup in position on the bridge of your nose. • Make sure that the nosecup is centered on your face. • Make sure that the nosecup does not prevent you from seeing clearly.
-
Page 31: Donning In Cold Weather
- The negative pressure seal test is unsuccessful. - The respirator is damaged. - Correct servicing/maintenance has not been done. - Genuine MSA replacement parts have not been used. Go out of a contaminated area immediately if: - Breathing becomes difficult. -
Page 32: In-Use Airflow Test
During Use - The respirator does not operate according to the instructions or training. - Airflow decreases or stops. Return to a safe atmosphere immediately if discoloration, crazing, blistering, cracking, or other deterioration of the facepiece lens material occurs. This respiratory protective device does not supply oxygen. -
Page 33: Cold Weather Operation
During Use Push the airflow indicator into the outlet port of the blower assembly until the airflow indicator touches the bottom of the outlet port. Move the power switch to the "ON" position. Make sure that the red ball goes above the line on the outside of the airflow indicator. -
Page 34: After Use
After Use Water inside the facepiece, APR adapter, breathing tube, blower assembly, or air filtration cartridges/ canisters can freeze into ice and restrict airflow. Make sure that moisture does NOT go into the facepiece, APR adapter, breathing tube, blower assembly, or air filtration cartridges/canisters when they are not in use. -
Page 35: Cleaning And Disinfecting
ANSI standards recommend that users be trained in the cleaning procedure. MSA recommends the use of Confidence Plus Germicidal Cleaner (PN 10009971), which cleans and disinfects components in one operation; retains its germicidal efficiency in hard water to inhibit the growth of bacteria;... - Page 36 Cleaning and Disinfecting If the device has heavy smoke residue or dirt accumulation, use a sponge soaked with a mild soap solution or a soft/medium bristle brush to remove deposits that can interfere with operation of the PAPR. If the Confidence Plus Germicidal Cleaner is not used, wash components in a mild cleaning solution and make sure to rinse them fully.
-
Page 37: G1 Facepiece
Cleaning and Disinfecting Remove the APR adapter from the facepiece. Clean and disinfect the facepiece. Refer to Section 10.1 "G1 Facepiece" for instructions. Clean and disinfect the APR adapter. Refer to Section 10.2 "APR Adapter" for instructions. (10) Use a cloth or sponge soaked with a solution of Confi- dence Plus Germicidal Cleaner to clean the breathing tube and blower assembly. - Page 38 Cleaning and Disinfecting Use the instructions on the label to prepare a solution of Confidence Plus Germicidal Cleaner (PN 10009971) in a bucket or sink. NOTE: The head harness can be cleaned as part of the facepiece or removed to be cleaned sepa- rately.
-
Page 39: Apr Adapter
Cleaning and Disinfecting 10.2 APR Adapter WARNING! Do NOT use cleaning products that contain hydrocarbons or solvents such as nitro-thinner. Do NOT use radiant heat such as the sun or radiators to dry cleaned parts. When a drying cabinet is used, make sure that the temperature is not more than 140°F (60°C). ... -
Page 40: Batteries
Batteries Install the adapter cover. Make sure that the APR adapter connects to the facepiece correctly. Refer to Section 6.3 "Installing the APR Adapter on the Facepiece" for instructions. (10) Do a negative pressure seal test before returning the facepiece to service. Refer to Section 7.3 "Testing the Negative Pressure Seal"... -
Page 41: Charging Rechargeable (Nimh) Batteries
11.2 Charging Rechargeable (NiMH) Batteries WARNING! Use ONLY an MSA battery charger to charge the rechargeable (NiMH) batteries. The positive and negative battery terminals are on the opposite end from the charging receptacle. To prevent a short circuit in the battery, do NOT connect the positive and negative battery terminals through any conductive element (including but not limited to conductive metals and liquids) without sufficient electrical load/resistance. -
Page 42: Discarding Rechargeable (Nimh) Batteries
11.3 Discarding Rechargeable (NiMH) Batteries The NiMH cells in the MSA rechargeable battery are classified by the federal government as nonhaz- ardous waste and are safe for disposal as municipal waste. The NiMH cells in the MSA rechargeable battery contain recyclable materials. -
Page 43: G1 Spectacle Kit
G1 Spectacle Kit G1 Spectacle Kit WARNING! Before using a spectacle kit, an optometrist must examine the spectacle kit and prescribe the correct lenses to fit into the lens frame on the spectacle kit. Failure to obey this warning can result in serious personal injury or death. Turn the head harness over the front of the facepiece so the harness covers the lens of the facepiece. -
Page 44: Maintenance And Recertification
Adjust the lens frame up/down and in/out to optimize fit and visibility. Maintenance and Recertification MSA recommends that the G1 PAPR be recertified by MSA every 3 years. Recertification includes inspection of the blower assembly, replacement of the main seal and filter gasket, and verification of system performance. -
Page 45: Safekeeping And Storage
Keep the facepiece in a pouch or container. Do not distort the facepiece during storage. MSA rubber products are protected by an anti-aging agent that can become visible as a light coating. This coating is harmless and can be removed during cleaning. -
Page 46: Air Filtration Cartridges/Canisters
Safekeeping and Storage 14.3 Air Filtration Cartridges/Canisters WARNING! Do NOT keep air filtration cartridges/canisters in a storage area with temperatures that are more than 120°F (49°C). Failure to obey this warning can change the performance of the air filtration cartridges/canisters and result in serious injury or death. -
Page 47: Ordering Information
Ordering Information Ordering Information G1 Powered Air-Purifying Respirator (PAPR) - Page 48 Ordering Information Item Quantity Description Part Number Faceblank Small 10149577-SP Faceblank Medium 10149578-SP Faceblank Large 10149579-SP G1 Nose Cup Small 10149572-SP G1 Nose Cup Medium 10149573-SP G1 Nose Cup Large 10149574-SP Harness, 5 Pt Adjustable 10144216-SP Harness, Rubber 10144214-SP Buckle D-Ring 10149551-SP Buckle 10144217-SP...
- Page 49 Breathing Tube, G1, 36" 10193957 GME Cartridge 10072237 Not Pictured: Snoop Leak Detector 600920 Carrying Case, G1 PAPR, Molded Plastic B-10079-001 Kit, Rapid Charger with 2 NIMH Batteries B-20040-001 Contains Rapid Battery Charger, NIMH, 100-240 Vac B-20090-001 Cap, NIMH Rechargeable Battery...
- Page 50 S-30021 Breathing Tube, G1, 36" 10193957 Li-SO Single-Use Battery M-20020 Filter Adapter Assembly 10144231-SP User Instructions Kit, G1 PAPR, 30" Tube, NIMH Battery with Adapter 10204813 Contains Blower Assembly, C420 M-60031 Airflow Indicator S-30020 Belt Assembly, Decon, 70" S-30021 Breathing Tube, G1, 30"...
- Page 51 S-30020 Belt Assembly, Decon, 70" S-30021 Breathing Tube, G1, 36" 10193957 Li-SO Single-Use Battery M-20020 User Instructions Kit, G1 PAPR, 30" Tube, NIMH Battery 10204817 Contains Blower Assembly, C420 M-60031 Airflow Indicator S-30020 Belt Assembly, Decon, 70" S-30021 Breathing Tube, G1, 30"...
- Page 52 For local MSA contacts, please visit us at MSAsafety.com...
Need help?
Do you have a question about the G1 PAPR and is the answer not in the manual?
Questions and answers