
Subscribe to Our Youtube Channel
Related Manuals for MSA OptimAir TL PAPR


Summary of Contents for MSA OptimAir TL PAPR
- Page 1 Operating Manual OptimAir TL PAPR Order No.: 10077289/14 Print Spec: 10000005389 (R) CR: 800000042077 MSA safety .com...
- Page 2 The warranties made by MSA with respect to the product are voided if the product is not installed and used in accordance with the instructions in this manual. Please protect yourself and your employees by following the instructions.
-
Page 3: Table Of Contents
Exposure Limits (References) 2.4.1 Exposure Limits for Mixtures 2.4.2 Technical Information 2.4.3 Battery Pack 2.4.4 Contents Preparing the OptimAir TL PAPR for Use Checkpoints Before Use Charging the Battery Pack 3.2.1 Standard Battery 3.2.2 Extended Life Battery Installing the Battery Pack into the Battery Compartment of the Blower Assembly... - Page 4 Cleaning and Disinfecting Inspection Storage Storing the Respirator Storing the Batteries Cartridge and Battery Disposal Cartridge Disposal Battery Disposal 8.2.1 Disposing of the Standard Battery 8.2.2 Disposing of Extended Life Battery Accessories and Reorder Information Troubleshooting Warranty OptimAir TL PAPR...
-
Page 5: Introduction
S—Special or Critical User's Instructions During use of the OptimAir TL PAPR, the atmosphere must be monitored for the level of contamination and a means of escape must be provided in the event that the contamination level increases to immediately dangerous to life and health (IDLH) levels. - Page 6 If you cannot determine that the filter canister/cartridge(s) used with this device is designed for the contaminant, or if you do not know the identity of the contaminant, do not use this device. Call MSA Customer Service, 1-800-MSA-2222 (1-800-672-2222) for more information.
- Page 7 Failure to follow these warnings can result in serious personal injury or death. The tight-fitting OptimAir TL PAPR must be properly prepared for use, properly donned, and a negative pressure leak test must be conducted in an area known to be free of contaminants before it can be used.
- Page 8 1 Introduction NOTE: It is recommended that the OptimAir TL PAPR be used in environments where the temperature is between 32°F (0°C) and 110°F (43°C). Operation in environments where the temperature is below 32°F (0°C) or above 110°F (43°C) could negatively affect battery and blower performance.
-
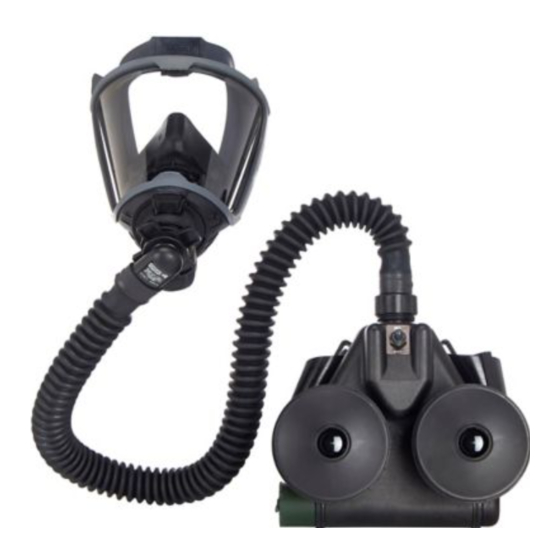
Page 9: General Description
(i.e. facepiece, hood, etc). The OptimAir TL PAPR is NIOSH approved for use with MSA hoods and tight fitting facepieces noted in this user’s instruction manual. Refer to the separate NIOSH Approval Label (P/N 10078677) for a complete list of approved part numbers and limitations. -
Page 10: Niosh Approval Information
Particulate, High Efficiency Cartridge, HE Particulate, High Efficiency Exposure Limits (References) A listing of acceptable exposure limits from the following sources is provided in MSA’s Response® Guide. Contact MSA at 1- 800-MSA-2222 for information. • American Conference of Governmental Industrial Hygienists (ACGIH) •... -
Page 11: Technical Information
See MSA’s Response® Respirator Guide for additional information. 2.4.2 Technical Information Airflow: When used with the MSA battery pack, the OptimAir TL PAPR provides a constant filtered airflow of a minimum of 170 lpm to the hood, and 115 lpm to the tight fitting facepiece. - Page 12 2 General Description Loose Fitting Kit with Extended Life Battery, Hood, and Filter • OptimAir TL PAPR Blower Assembly • Breathing Tube Assembly - Hood • Decon Belt Assembly (Side Release) • Extended Life Battery Pack • Extended Life Battery Charger •...
-
Page 13: Preparing The Optimair Tl Papr For Use
Charging the Battery Pack The battery pack must be fully charged before the respirator is first used. Use only MSA P/N 10076110 battery charger for the standard battery pack and P/N 10076017 battery charger for the extended life battery pack. Other chargers can damage the battery due to internal wiring differences or incorrect charging rates. -
Page 14: Extended Life Battery
3 Preparing the OptimAir TL PAPR for Use Charger LED Indications Condition Indication Rapid Charge Charge Complete Green Charge Pending Amber Charge Failure Red Flash No AC or No Battery When the battery is charging, the LED will be red. -
Page 15: Installing The Battery Pack Into The Battery Compartment Of The Blower Assembly
Slide the fixed tab end of the battery into the slot and push the contact end in until it snaps into place. The OptimAir TL PAPR will not operate properly if the battery is not installed correctly. Installing the Protective Cover NOTE: For use with decon waist belts only. -
Page 16: Installing The Cartridges
Ensure the optional cartridge receptacle plugs are removed. WARNING! Two new MSA cartridges of the same type must be installed before each use. Refer to the NIOSH Approval Label for approval information. Failure to follow this warning can result in serious personal injury or death. -
Page 17: Optional Accessory
3 Preparing the OptimAir TL PAPR for Use Inspect the cartridges to be sure that they are not damaged and the gaskets are present. To ensure proper attachment and prevent cross threading, carefully attach both cartridges by using the following procedure:... -
Page 18: Installing The Waistbelt And Optional Shoulder Strap
3 Preparing the OptimAir TL PAPR for Use Grasp the outside of the cartridge, and twist and push on the spark cover. The spark cover will snap in place. To remove the spark cover, gently squeeze the outside of the cover, twist, and pull the spark cover off. -
Page 19: Installing The Breathing Tube
3 Preparing the OptimAir TL PAPR for Use Installing the Breathing Tube 3.8.1 Attaching the Breathing Tube Assembly to the Blower Inspect the o-ring in the breathing tube inlet. If the o-ring is damaged, missing, or the breathing tube is difficult to install, replace the o-ring. Reorder PN 10085084 (Pack of 10). - Page 20 3 Preparing the OptimAir TL PAPR for Use Using the Locking Clamp Method Note the smooth, gray section at the end of the breathing tube. This is the part of the breathing tube that the locking clamp will be attached to.
- Page 21 3 Preparing the OptimAir TL PAPR for Use Using the Threaded Connector Method Remove the gray locking nut (shown above) that is screwed onto the end of the hose. It will not be needed for use with loose fitting hoods. This nut is used for attaching the hose to the Low Profile Hood.
-
Page 22: Attaching The Breathing Tube To The Low Profile Hood
3 Preparing the OptimAir TL PAPR for Use The threaded hood connection is designed to swivel. Adjust the orientation of the breathing tube so that it will not twist or kink the hood during use. 3.8.3 Attaching the Breathing Tube to the Low Profile Hood Remove the gray locking nut from the threaded end of the hose. -
Page 23: Donning And Use
Flow Indicator The OptimAir TL PAPR continuously monitors the RPM of the motor. RPM is indicative of the airflow generated by the blower. If the RPM is too low or too high the user is warned by an audible (single continuous beep) and visible alarm. The unit will continue to alarm until the issue is addressed or the unit is shut off. -
Page 24: Donning The Blower Assembly
Turn the unit off by pressing and holding the ON/OFF button for 3-4 seconds. Don the waistbelt and the blower assembly with the OptimAir TL PAPR blower outlet located at the top of the unit. The unit may be worn on the hip or the small of the back. -
Page 25: Donning The Papr Hood
Pull the hood over the head. As the hood is pulled down, ensure the suspension sits on the head, if the hood with suspension is being worn. NOTE: MSA recommends use of a buddy system to check for proper hood donning. OptimAir TL PAPR... -
Page 26: Adjusting The Hood Suspension (When Applicable)
Remove the suspension from the hood by taking apart the Velcro material at the three attachment points. Adjust the crown strap by undoing the Velcro material on the strap and reconnecting it either tighter or looser. Try on the suspension. OptimAir TL PAPR... -
Page 27: Adjusting The Headband
To loosen the headband, squeeze the 1Touch® buckle and slide the headband apart. To tighten the headband, squeeze the two tabs together to slide the headband together. Once the headband is adjusted to the proper size, replace in the hood. OptimAir TL PAPR... -
Page 28: Installing The Suspension (When Applicable)
NOTE: The V-Gard Cap may be used as the suspension for PAPR hoods that require a suspension. The V-Gard Cap must be used with the OptimAir TL Hood with V-Gard Fastener Kit (P/N 10089665) Remove the standard suspension from the PAPR hood and set aside. OptimAir TL PAPR... - Page 29 Once the hood is donned, use a buddy to check the hood inlet to make sure it is straight and not twisted. There should be no kinks in the hood inlet when the breathing tube is connected. NOTE: When properly installed, the PAPR Hood with the VGard cap will function similarly to the PAPR hood with standard suspension. OptimAir TL PAPR...
-
Page 30: Donning The Low Profile Papr Hood
Ensure the hose inlet is seated at the base of the user's skull. Ensure the top of the hood is fully inflated and air is flowing over the user's head. NOTE: MSA recommends use of a buddy system to check for proper hood donning. 4.1.8 Donning the Tight-fitting Facepiece Refer to the facepiece user instructions for facepiece donning and negative pressure seal test instructions. - Page 31 Leave the motor blower on. Do not breathe through the respirator for long periods of time with the motor-blower shut off. With the blower off, carbon dioxide can concentrate in the hood Failure to follow these warnings can result in serious personal injury or death. OptimAir TL PAPR...
-
Page 32: Removing The Respirator
Press the lock button on the side of the battery and lift the battery out of its slot. Rechargeable batteries can be recharged according to the instructions on the battery label and the Charging the Battery Pack section of these user instructions. OptimAir TL PAPR... - Page 33 5 Removing the Respirator WARNING! The standard rechargeable battery can be charged by MSA battery charger P/N 10076110 ONLY. Extended life batteries can be charged by MSA battery charger P/N 10076107 ONLY. Failure to follow this warning can result in serious personal injury or death.
-
Page 34: Cleaning And Inspection
All components must be thoroughly cleaned after each use. Clean the OptimAir TL with Confidence Plus® Cleaner (P/N 10009971) from MSA. Refer to the label for use instructions. A solution as effective as Confidence Plus Cleaning Solution and compatible with MSA respirator components may be substituted. -
Page 35: Inspection
10 (P/N 10083618). Inspect the hose for tears or holes. Correct any deficiencies immediately or tag the respirator as in need of repair and remove it from service. Ensure that the unit is working properly before storage. OptimAir TL PAPR... -
Page 36: Storage
Store only undamaged respirators and breathing tubes for further use. When not in use, store the respirator in cool, dry, and clean ambient air. • The cartridge receptacles may be plugged with MSA’s cartridge receptacle plugs (optional). NOTE: Tape can be placed over the hose ends to keep out contaminants during storage. -
Page 37: Cartridge And Battery Disposal
Failure to follow this warning can result in serious personal injury or death. 8.2.1 Disposing of the Standard Battery NOTE: NiMH cells contained in the MSA Standard battery pack are classified by the federal government as a nonhazardous waste and are safe for disposal as municipal waste. -
Page 38: Accessories And Reorder Information
Accessories and Reorder Information Reorder Ship Weight Item Part Quantity Photo (estimated) Number OptimAir TL PAPR Kit 10081116 4.1 lbs. Loose Fitting, Standard Battery (Blower, Battery Standard, Charger Standard, Hood Hose, Decon Belt With Cam Buckle, Instruction Manual) Cartridges not... - Page 39 Hood, HE Filters OptimAir TL Blower Only 10088150 1.3 lbs. OptiFilter (TL) 10080454 6.3 lbs. OV/AG/HE/HF OptiFilter (TL) 10080456 7.7 lbs. AM/FM/AG/HE/HF OptiFilter (TL) HE 10080455 3.0 lbs. Hood, Tychem Material SL, 10083385 3.8 lbs. Single Bib, Locking Clamp OptimAir TL PAPR...
- Page 40 9 Accessories and Reorder Information Reorder Ship Weight Item Part Quantity Photo (estimated) Number Hood, Tychem Material SL, 10083381 4.7 lbs. Single Bib, Threaded Hose Connection Hood, Tychem Material SL, 10083386 4.2 lbs. Double Bib, Locking Clamp OptimAir TL PAPR...
- Page 41 9 Accessories and Reorder Information Reorder Ship Weight Item Part Quantity Photo (estimated) Number Hood, Tychem Material SL, 10083382 3.8 lbs. Double Bib, Threaded Hose Connection Hood, Single Bib, Locking 10083383 3.7 lbs. Clamp OptimAir TL PAPR...
- Page 42 9 Accessories and Reorder Information Reorder Ship Weight Item Part Quantity Photo (estimated) Number Hood, Single Bib, Threaded 10083329 4.4 lbs. Hose Connection Hood, Double Bib, Locking 10083384 3.8 lbs. Clamp OptimAir TL PAPR...
- Page 43 10094878 4.4 lbs. w/o Suspension, Threaded Connector Hood, Double Bib, w/o 10083388 4.4 lbs. Suspension, Threaded Connector Hood, Double Bib, w/o 10083392 4.2 lbs. Suspension, Locking Clamp Hood, Double Bib, Yellow, 10094879 4.4 lbs. w/o Suspension, Threaded OptimAir TL PAPR...
- Page 44 Fastener Kit, OptimAir TL 10089665 0.2 lbs. Hood with V-Gard Hood, Low Profile, Yellow 10215117 0.2 lbs. Hood, Low Profile, White 10215118 0.2 lbs. Facepiece, Advantage 3100, Sm: 10028999 1.6 lbs. Rubber Harness Md: 10028998 Lg: 10029000 OptimAir TL PAPR...
- Page 45 Lg: 10083803 RD40 Inlet Assembly 10065330 0.2 lbs. Facepiece, Ultra Elite, Black Sm: 493072 1.9 lbs. Silicone Md: 493028 Lg: 493116 Facepiece, Ultra Elite, Black Sm: 493064 1.9 lbs. Hycar Rubber Md: 493020 Lg: 493108 OptimAir TL PAPR...
- Page 46 1.1 lbs. Faceshield or Hood Battery, Standard 10076108 1.1 lbs. Battery Charger, Standard 10076110 0.4 lbs. Battery, Extended Life 10076109 1.2 lbs. Charger, Extended Life 10076107 0.4 lbs. Comfort Belt 10049623 0.5 lbs. Shoulder Strap 10059112 1.3 oz. OptimAir TL PAPR...
- Page 47 Decon Belt with Side - 10078201 0.4 lbs. Release Buckle Spark Cover 10068152 1.5 lbs. Hood Suspension 10078469 2.0 oz. Hood Sweatbands 10083618 1.4 oz. Hood Hose Clamps 10083843 1.0 oz. Hose o-ring (Blower end of 10085084 0.2 oz. hose OptimAir TL PAPR...
- Page 48 9 Accessories and Reorder Information Reorder Ship Weight Item Part Quantity Photo (estimated) Number Cartridge Receptacle Plugs 10081414 0.7 oz. (2 recommended) Instruction Manual 10077289 0.3 lbs. OptimAir TL PAPR...
-
Page 49: Troubleshooting
Ensure the battery is fully charged and the contact pins and pads are free from contaminants. The battery charge can be checked by removing it from the unit and connecting it to the battery charger. • Press the on/off switch and hold for 1 – 2 seconds. OptimAir TL PAPR... -
Page 50: Warranty
(1) year such as cartridges. Replacement parts and repairs are warranted for ninety (90) days from the date of repair of the product or sale of the replacement part, whichever occurs first. MSA shall be released from all obligations under this warranty in the event repairs or modifications are made by persons other than its own or authorized service personnel or if the warranty claim results from misuse of the product. - Page 51 OptimAir TL PAPR...
- Page 52 OptimAir TL PAPR...
Need help?
Do you have a question about the OptimAir TL PAPR and is the answer not in the manual?
Questions and answers