Table of Contents
Advertisement
Quick Links
Advertisement
Table of Contents

Related Manuals for EcoFlow WAVE


Summary of Contents for EcoFlow WAVE
- Page 1 EcoFlow WAVE User Manual...
- Page 3 Users take full responsibility for all usage and operations. Familiarize yourself with the related regulations in your area. You are solely responsible for being aware of all relevant regulations and using EcoFlow products in a way that is compliant.
-
Page 4: Table Of Contents
Contents: 1. Specifications 2. Safety Guidelines 3. Getting Started 3.1 Description of Appearance 3.2 Icons on the LCD Screen 3.3 Using the Product 3.4 AC Power Supply 3.5 Solar Charging 3.6 Car Charging 3.7 Connecting the Add-On Battery 3.8 Using the App 3.9 Installation 3.10 Use Scenarios 4. -
Page 5: Specifications
Max cooling power 600W Noise <55dB No-Drain Function Supported Shut Down When Full Function Supported Other Specifications EcoFlow Wave Add-On Battery Supported EcoFlow DELTA Max Supported EcoFlow DELTA Max Extra Battery Supported EcoFlow DELTA Pro Supported EcoFlow DELTA Pro Extra Battery Supported This device contains a radio transmission module with type approval code CMIIT ID:2021DP3313. -
Page 6: Safety Guidelines
4. It is prohibited to use wires or other metal objects to cause this product to short circuit. 5. Do not use unofficial components or accessories. If replacements are necessary, please visit EcoFlow's official sales channel for the relevant purchase information. -
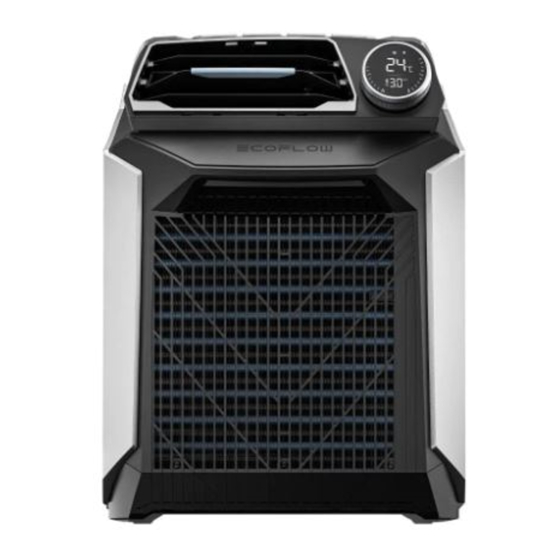
Page 7: Getting Started
3. Getting Started 3.1 Description of Appearance Mode Button Temperature Button Timer Button Power Button LCD Screen Cold-End Air Outlet Air Outlet Air Inlet Cold-End Air Inlet Solar/Car Charging Input Port Add-On Battery Port Hot-End Air Outlet Solar/Car Charging Input Hot-End Air Inlet Port Add-On Battery Port... -
Page 8: Icons On The Lcd Screen
3.2 Icons on the LCD Screen Cooling Mode Fan Mode Bluetooth Connection Status WiFi Connection Status Temperature Setting Status Temperature Display Temperature Unit Battery Level Indicator Air Volume Setting Display Temperature Setting Display Timer Status Timer and Charging Time Display 3.3 Using the Product Short press the main power button to power on the device Press and hold the main power button to switch off the device... - Page 9 Setting the Timer Short press the timer button. The timer icon and time will flash to indicate that you have entered the timer adjustment interface. Turn the dial to adjust the time — turn clockwise to increase the time or counter-clockwise to decrease the time.
- Page 10 Press and hold the temperature button for three seconds to toggle the temperature between Fahrenheit and Celsius. Intelligent power distribution function: Extends the run time of the machine when connected only to the Add-On Battery/EcoFlow Power Station and when the remaining charge is limited. Celsius Degrees fahrenheit...
-
Page 11: Ac Power Supply
Short press the Mode button to switch to Cooling Mode; short press again to switch to Fan Mode (Fan Mode is only available in Car Charging or Solar Charging Mode) Air supply mode Refrigeration mode No-Drain Function This product has a self-evaporating, drain-free system that sprays condensation water from the evaporator to the condenser for heat dissipation and evaporation, eliminating the need for frequent drainage in environments with low humidity. -
Page 12: Solar Charging
3.5 Solar Charging Solar charging cable The product can be powered by solar energy. If a battery is connected when the product is in Standby Mode, the battery can be charged at a maximum rate of 200W. The operating state is limited by the power of the port and can only be operated in Fan Mode when powered separately. -
Page 13: Connecting The Add-On Battery
Then, insert the battery plug into the battery connector of the air conditioner. (See battery pack instructions for further details) Wave supports the following batteries: EcoFlow Wave Add-On Battery, DELTA Max, DELTA Max Extra Battery, DELTA Pro, DELTA Pro Extra Battery. (If using a portable power station such as DELTA Max) Take the DELTA Max cable and connect it to the air conditioner;... -
Page 14: Using The App
By using EcoFlow Products, Applications and Services, you consent to the EcoFlow Term of Use and Privacy Policy, which you can access via the “About” section of the “User” page on the EcoFlow App or on the official EcoFlow website at https://www.ecoflow.com/policy/terms-of-use and https://www.ecoflow.com/policy/privacy-policy... - Page 15 Installing ventilation ducts Installing the hot-end fan shroud and duct...
- Page 16 Installing the drainage tube Pull the plug upward Insert the drainage tube...
-
Page 17: Use Scenarios
3.10 Use Scenarios Tent 1. Place in an opening in the tent zipper with the cold end inside the tent and the hot end outside the tent 2. Place outside the tent with the cold air vent directed into the tent 3. - Page 18 Indoors/kitchen...
-
Page 19: Frequently Asked Questions
4. Frequently Asked Questions Question Analysis of cause Troubleshooting category ① The machine is not powered ① Check the power supply or connection, power on The air outlet does on or it is not switched on; properly and switch on the machine; ②... - Page 20 6. The power cable provided by EcoFlow should be used as the AC power cable for the air conditioner. The power plug should be plugged in firmly and not be loose, as this will result in poor contact and damage the air conditioner.
-
Page 21: Troubleshooting
5. Troubleshooting Fault code Fault name Solution Disconnect the power supply (including the battery) and Wireless module failure restart the machine Disconnect the power supply (including the battery) and 10-12 Electric drive board fault restart the machine. If the problem persists, upgrade the system via the app and ensure it has the latest firmware version Disconnect the power supply (including the battery pack) 20-35... -
Page 22: What's In The Box
6. What's In the Box Air conditioning unit User Manual & Warranty Card Cold-end outlet shroud & App Quick Guide Hot-end outlet shroud Air duct (diameter 6.3 in, length 39.37 in) Air duct (diameter 5.12 in, Drainage tube (diameter length 39.37 in) 0.71 in, length 39.37 in) 7.
Need help?
Do you have a question about the WAVE and is the answer not in the manual?
Questions and answers