
Related Manuals for Apera Instruments EC400


Summary of Contents for Apera Instruments EC400
- Page 1 EC400 Portable Conductivity Meter Instruction Manual PH400 Portable pH Meter EC400 Portable Conductivity Meter PC400 Portable pH/Conductivity Meter APERA INSTRUMENTS (Europe) GmbH www.aperainst.de v4.2 - 1 -...
-
Page 2: Table Of Contents
Features and Functions ......................- 3 - Features in pH Measurement (for PH400 and PC400) ............- 3 - Features in Conductivity Measurement (for EC400 and PC400) ..........- 3 - Technical Specifications ........................ - 4 - Parameter Specifications ....................... - 4 - Other Specifications ...................... -
Page 3: Brief Introduction
For technical support, please contact us at info@aperainst.de Apera Instruments reserves the right to update the content of this manual without giving prior notices. Measuring Parameters Measuring Parameters... -
Page 4: Technical Specifications
(20.0 to 199.9) mS/cm Range TDS: (0 to 100) g/L, including 5 ranges: (0.00 to 9.99) mg/L, (10.0 to 99.9) mg/L, (100 to 999) mg/L, (1.00 to 9.99) g/L, (10.0 to 100.0) g/L EC400 Conductivity PC400 Resolution 0.01/0.1/1 μS/cm, 0.01/0.1 mS/cm Accuracy ±1.0% F.S ±1 digit... -
Page 5: Other Specifications
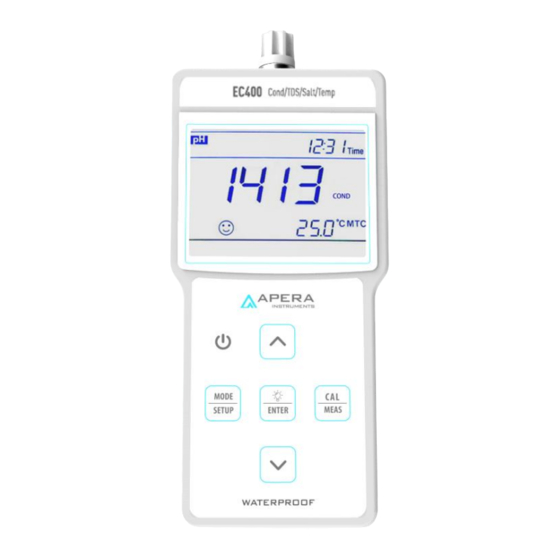
Other Specifications Power Supply AA Batteries *4 (1.5V*4) IP Rating IP57 Waterproof and Dustproof Dimensions and Meter: 86×196×33 mm/ 0.335 kg Weight With case: 360×275×80 mm/ 1.6 kg INSTRUMENT DESCRI PTION LCD Display ① — Measuring parameters ② — Measuring value ③... -
Page 6: Keypad
Keypad Operation Functions Short Press Power on/off Choose measuring mode: PH400 pH Meter: → Short Press EC400 Conductivity Meter: → PC400 pH/Cond. Meter: → → → Long Press Enter parameter setting Short Press Cancel any operation and enter measurement mode ... -
Page 7: Connectors
Connectors The meter adopts 8-pin connector, into which pH, ORP, and conductivity electrode can be connected. When connected, the meter will automatically switch to the correspondent measurement mode. Display Mode 3.4.1 Stable Reading Display Mode When the measuring value is stable, the screen displays as shown in Figure-2. - Page 8 Table-2 pH Standard Calibration Solution Series Calibration Icons USA Series NIST Series 4.00 pH 4.01 pH 3-point 7.00 pH 6.86 pH calibration 10.01pH 9.18 pH 4.2.2 pH Calibration Modes The instrument has 1 to 3 points auto calibration mode. The 1 point must be 7.00 pH (or 6.86 if using NIST).
-
Page 9: Ph Calibration (Take 3-Point Calibration As An Example)
pH Calibration (Take 3-point calibration as an example) 4.3.1 Press to enter calibration mode. CAL1 icon will flash in the upper right corner of the LCD. 7.00 pH will flash in the lower right corner of the LCD, reminding you to use pH 7.00 buffer to conduct 1 point of calibration. -
Page 10: Sample Measurement
Sample Measurement 4.4.1 Rinse the pH electrode in distilled water, dry it, and dip it into sample solution. Stir the solution gently and let it stand still in the sample solution until icon appears and stays on LCD, get the pH reading, which is pH value of sample solution, please refer to Figure-5 for calibration and measurement process of the pH meter. -
Page 11: Maintenance Of The Ph Electrode
4.4.3 pH isothermal measurement principle According to the pH isothermal measurement principle, the closer the test sample’s temperature is to the calibration solution’s, the higher the accuracy of the measurement. So this principle is recommended to follow when conducting tests. 4.4.4 Restore to factory default The instrument has a function to return to factory default setting, which can be set up in P1.2 (refer to section 7.3). -
Page 12: Mv Measurement
For serious passivation, dip the bulb in 4% HF (hydrofluoric acid) for 3-5 seconds, and wash it in distilled water, then soak it in the 3M KCL storage solution (SKU: AI1107) for 24 hours to renew it. 4.5.5 Clean contaminated glass bulb and junction (please refer to Table-5) Table-5 Clean contaminated glass bulb and junction Contamination Cleaning Solutions... -
Page 13: Conductivity Measurement
Table-6 °C 5.2.2 Clean and activate ORP electrode After the electrode has been used over a long period of time, the platinum surface will get polluted which causes inaccurate measurement and slow response. Please refer to the following methods to clean and activate ORP electrode: (a) For inorganic pollutant, soak the electrode in 0.1mol/L dilute hydrochloric acid for 30 minutes, then wash it in distilled water, then soak it in the 3M KCL storage solution for 6 hours. -
Page 14: Information Regarding Conductivity Calibration
connected, the meter will automatically switch to conductivity mode (no need to switch manually). Please do not pull the cable in case of poor contact. Make sure the connector is clean and dry. See more information regarding the conductivity electrode’s maintenance in section 6.6. Information regarding Conductivity Calibration 6.2.1 Conductivity Standard Calibration Solutions The meter uses conductivity standard solution of 84 μS/cm, 1413 μS/cm, 12.88 mS/cm and 111.8 mS/cm. -
Page 15: Conductivity Calibration
Table – 9 Temperature compensation coefficient of special solutions Solution Temperature compensation coefficient NaCl solution 2.12%/°C 5% NaOH solution 1.72%/°C Dilute ammonia solution 1.88%/°C 10% hydrochloric acid solution 1.32%/°C 5% sulfuric acid solution 0.96%/°C 6.2.5 Precaution for calibration solution’s contamination Conductivity standard solution has no buffer. -
Page 16: Tds & Conductivity
TDS & Conductivity 6.4.1. TDS and conductivity is linear related. The conversion factor is 0.40-1.00. Adjust the factor from parameter P2.6. The factory default setting is 0.71 and please refer to section 7.4. The meter only needs to be calibrated in Conductivity mode, then after calibration of conductivity, the meter can switch from conductivity to TDS. -
Page 17: Maintenance Of The Conductivity Electrode
6.5.4. Factory default setting For factory default setting, please refer to parameter setting P2.7 (Section 7.4). With this function, all calibration data is deleted and the meter restores to the theory value. Some functions restore to the original value (refer to appendix -1). When calibration or measurement fails, please restore the meter to factory default setting and then perform re-calibration or measurement. -
Page 18: Ph Setting Submenu
Main Menu pH Setting Submenu P1.1 Select pH buffers P1.2 Restore to factory default Conductivity Setting Submenu P2.1 Select electrode’s constant P2.2 Select reference temp. P2.3 Adjust temp. coefficient P2.4 Adjust TDS factor P2.5 Restore to factory default Basic Parameter Setup Submenu P4.1 Select temp. - Page 19 pH Setting Sub-Menu P1.1 — Select pH buffer series (USA—NIST) 1) In measurement mode, long press to enter P1.0, press to enter P1.1 2) Press , “USA” flashes; Press to choose USA→NIST; Press confirm. USA—USA NIS—NIST 3) Press to enter P1.2, or press to return to measurement mode.
-
Page 20: Basic Parameter Setting Sub-Menu
COMPLETE KI T Content Quantity PH400 EC400 PC400 PH400 Portable pH Meter √ EC400 Portable Conductivity Meter √ PC400 Portable pH/Conductivity Meter √ 201T-S Plastic 3-in-1 Combination pH Electrode √ √ 2301T-S Plastic Combination Conductivity Electrode √... -
Page 21: Appendix 1: Table Of Parameter Setting And Factory Default Setting
APPENDIX 1: TABLE OF PAR AM ETER SE TTI NG AND FACTORY DEFAULT SETTI NG Symbo Factory Mode Parameter Abbreviation Content Default - P1.1 Select Buffer Series USA-NIST P1.0 Restore to factory default P1.2 No-Yes settings P2.1 Select electrode’s constant 1.0-10.0-0.1 P2.2 Select reference temperature... -
Page 22: 11 Appendix 3: Ico Ns And Abbrevi Ati On
We warrant this instrument to be free from defects in material and workmanship and agree to repair or replace free of charge, at option of APERA INSTRUMENTS (Europe) GmbH, any malfunctioned or damaged product attributable to responsibility of APERA INSTRUMENTS (Europe) GmbH for a period of TWO YEARS (SIX MONTHS for the probes) from the delivery.
Need help?
Do you have a question about the EC400 and is the answer not in the manual?
Questions and answers