
Related Manuals for Apera Instruments 950 Series


Summary of Contents for Apera Instruments 950 Series
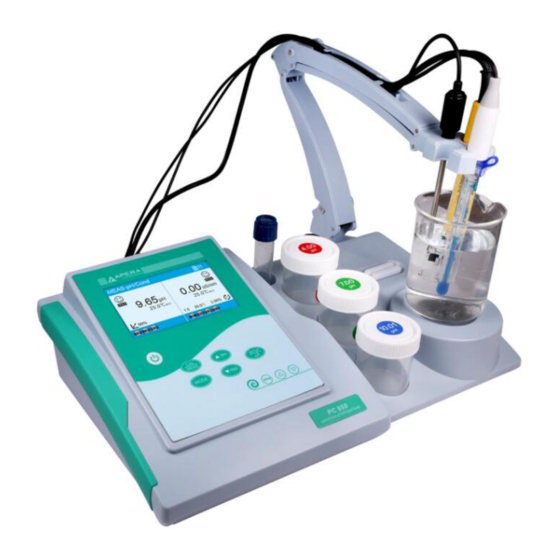
- Page 1 950 Series Benchtop pH/Conductivity Meter User Manual PH950 Benchtop pH Meter EC950 Benchtop Cond. Meter PC950 Benchtop pH/Cond. Meter APERA INSTRUMENTS, LLC aperainst.com - 1 -...
-
Page 2: Table Of Contents
Table of Contents Introduction ........................... - 4 - Measuring Parameters ......................- 4 - Basic Features ........................- 4 - pH measurement features ..................... - 4 - Conductivity Measurement Features ..................- 4 - Configuration ..........................- 5 - Specifications ..........................- 6 - Technical Parameters ...................... - Page 3 Conductivity meter calibration (take 1413μS/cm calibration as an example) ...... - 26 - User-defined calibration (take 10μS/cm standard solution as an example) ......- 27 - Self-diagnosis information ....................- 28 - Solution measurement ......................- 29 - Conductivity electrode maintenance ..................- 30 - Parameter setting ........................
-
Page 4: Introduction
Introduction Thank you for purchasing the 950 Series Benchtop pH/Cond. Meter. Before using this meter, please read this manual carefully to help you use and maintain it properly. 1.1 Measuring Parameters Parameter and configuration! PH950 EC950 PC950 pH/mV !" "... -
Page 5: Configuration
Configuration Description Quantity PH950 EC950 PC950 PH950 pH meter !" EC950 conductivity meter PC950 pH/conductivity meter 606 multi-function stirrer (includes flexible electrode holder) LabSen211 glass pH combination electrode " !" MP500 temperature probe 2401T-F conductivity electrode (ATC, K=1.0) 1 bottle pH buffer solution (4.00/7.00/10.01pH/50mL) each Conductivity standard solution... -
Page 6: Specifications
Specifications 3.1 Technical Parameters Technical Parameters Model Measuring Range pH 0.00 – 14.00 Resolution 0.1/0.01 pH Accuracy ± 0.01 pH ± 1 digit Temp. Compensation 32 – 212 ˚F (0 – 100) ˚C (Auto. or Manual) Range PH950 PC950 Calibration point 1 –... -
Page 7: Instrument Description
Instrument Description 4.1 LCD Display #$pH measurement %$pH measuring value and unit &$Temperature measuring value pH measurement interface '$pH electrode slope ($Calibration solution indication icon )$Used data storage *$Temperature compensation icon, MTC-manual temperature compensation ATC-auto. temperature compensation +$Auto. Hold ,$Stable reading icon -$Date and time $Auto. -
Page 8: Keypad Functions
TDS measurement interface Salinity measurement interface #$TDS measurement $$TDS factor 0.71 Salinity factor 0.5 mV measurement interface pH/Cond. measurement interface Keypad functions Diagram-1 Keypad operation mode — Short press Press key <2s, buzzer makes a beep; — Long press Press key >2s, buzzer makes a beep. - 8 -... - Page 9 Table -1 Keypad operations and functions Keypad ! Operations ! ! Functions ! l Power on/off! Short press!! Press key to select measurement mode: l PH950: pH→mV Short press! l EC950: Cond→TDS→Salt l PC950: pH→mV→Cond→TDS→Salt→pH/Cond l Press key to enter temperature adjustment mode (for manual temperature Long press compensation) Long press...
-
Page 10: Meter Sockets
4.3 Meter Sockets Model Meter sockets ⑦ ① ② ③ ⑥ PH950 ⑦ ④ ⑤ ⑥ EC950 ⑦ ① ② ③ ④ ⑤ ⑥ PC950 Diagram-2 Meter Sockets Information Socket Type Information ① Connect pH or ORP combination electrode ② Connect temperature sensor (for pH) BNC+RCA connect pH/ATC 3-in-1 combination electrode... -
Page 11: Display Mode
4.4 Display Mode 2021-01-19 2020-01-18 16:26:42 4.4.1 Reading stable display mode 16:26:42 When the measuring value is stable, smiley icon appears and stays on LCD screen, see Diagram – 3. If the smiley icon does not appear or flash, please do not get readings or make calibration until the measuring value is stable. -
Page 12: Manually Adjust Temperature
one set of data will be stored and the storage number will be automatically increased. Press again to stop auto. data logger. In this mode, the manual data logging is invalid. 4.5.2 Data recall Press key, meter will display stored 6 groups measuring value, see Diagram – 5(b), press key to turn page. -
Page 13: Install Meter With Multi-Function Test Bench
4.7 Install Meter with Multi-function Test Bench After installing Before installing Mulit-function test bench Meter Connection bar Stirrer connection cable 4.8 Installation of Flexible Electrode Holder Aim hole to shaft and press down 4.9 Multi-function Test Bench a) Combo mode (b) Separate use (maximum distance 35cm) - 13 -... -
Page 14: Ph Measurement
pH Measurement Default Electrodes Information The meter comes with a LabSen 211 pH combination electrode and MP500 temperature probe, which enables the automatic temperature compensation. The LabSen pH electrodes are made with proprietary sensor technologies and premium materials from Switzerland. LabSen 211 pH electrode is designed for high-precision lab and field pH measurement of general water solutions. - Page 15 5.1.4 How to use Insert the blue BNC connector of the electrode to the BNC socket of your pH meter while twisting clockwise until it`s locked, plug the RCA connector into the “TEMP” sockets. Please note not to pull the cables in case of poor contact.
-
Page 16: Ph Calibration Related Information
5.2 pH Calibration Related Information 5.2.1 Standard buffer solution The instrument adopts three series standard buffer solution, USA, NIST and CH series, and also user- defined solution. Please see Table – 2 for the three series of standard buffer solution. The detail of user- defined solution, see clause 5.4. - Page 17 5.2.3 Calibration information display 2020-01-18 1. Automatically display electrode slope in measurement 16:26:42 interface l Display average slope after two or three point calibration l Does not display slope after one point calibration 2. Display last calibration data in pH submenu clause 1.3 5.2.4 Calibration frequency The frequency that you need to calibrate your meter depends on the tested samples, condition of electrodes, and the requirement of the accuracy.
-
Page 18: Ph Meter Calibration (Take Three-Point Calibration As An Example)
5.3 pH meter calibration (take three-point calibration as an example) Long press key to enter calibration mode, as shown in left graph. Rinse pH electrode in purified water, remove excess water by shaking or filter paper. Press key to confirm. Submerge electrode in pH7.00 buffer solution. -
Page 19: User-Defined Calibration (Take Ph 2.00 And Ph 7.30 Calibration Solution As An Example)
Submerge electrode in pH10.01 buffer solution. Stir the solution briefly and allow it to stay in the buffer solution until appears and stays. Press key to finish calibration. 2020-01-18 16:26:42 Calibration completed, instrument goes back to measurement mode. 5.4 User-defined calibration (take pH 2.00 and pH 7.30 calibration solution as an example) 1. - Page 20 3. Submerge electrode in pH2.00 buffer solution. Stir the solution briefly and allow it to stay in the buffer solution until appears and stays. Press key to adjust the value to 2.00 pH. Press key to finish calibration. 4. Rinse pH electrode in purified water, remove excess water by shaking or filter paper.
-
Page 21: Self-Diagnosis Information
(c) The pH value of user-defined solution is a value at a certain temperature. Users should perform calibration and measurement at the same temperature to avoid error. (d) In manual temperature compensation mode, the temperature value should be adjusted before conducting calibration. -
Page 22: Sample Measurement
5.6 Sample measurement 5.6.1 Rinse pH electrode in purified water, allow it to dry, and submerge it in sample solution. Stir the solution briefly and allow it to stay in the tested solution until icon appears on LCD and a stable reading is reached. -
Page 23: Mv Measurement
mV Measurement 6.1 ORP measurement Press key, and switch the meter to mV measurement mode. Connect ORP electrode (need to purchase it separately) and dip it in sample solution, stir the solution briefly and allow it to stay in the solution until icon appears and stays. -
Page 24: Conductivity Measurement
Conductivity Measurement 7.1 Conductivity electrode information 7.1.1 Using conductivity electrode The meter includes one glass conductivity electrode (Model 2401T-F, K=1.0). With built-in temperature sensor, the meter can achieve automatic temperature compensation. BNC plug of the electrode is connected to the meter’s conductivity socket while RCA plug is connected to the Temp socket. When the electrode is submerged in solution, stir the solution briefly to eliminate the air bubbles. - Page 25 7.2.2 Calibration frequency (a) The meter is calibrated before leaving the factory and can generally be used right out of the box. (b) Normally, performing calibration once a month is recommended. (c) For high accuracy measurement or larger temperature deviation from the reference temperature (25°C), performing calibration once a week is recommended.
-
Page 26: Conductivity Meter Calibration (Take 1413Μs/Cm Calibration As An Example)
7.3 Conductivity meter calibration (take 1413μS/cm calibration as an example) 1. Long press key to enter calibration mode, as shown in left graph. Rinse pH electrode in purified water, remove excess water by shaking or filter paper. Press key to confirm. -
Page 27: User-Defined Calibration (Take 10Μs/Cm Standard Solution As An Example)
7.4 User-defined calibration (take 10μS/cm standard solution as an example) 1. Select User in parameter setting clause 2.2, press key to return to measurement mode. 2. Long press key to enter calibration mode, as shown in left graph. Rinse electrode in purified water, remove excess water by shaking or filter paper. -
Page 28: Self-Diagnosis Information
7.5 Self-diagnosis information During the process of calibration, the meter has a self-diagnosis function, see Diagram-9, Table – 8 for detailed information. Diagram-9 Table -8 Self-diagnostic information of conductivity measurement mode Self-diagnostic Description Check up information 1. Check if conductivity solution is correct. Wrong conductivity calibration 2. -
Page 29: Solution Measurement
7.6 Solution measurement 7.6.1 Rinse conductivity electrode in purified water, allow it to dry, and submerge it in the sample solution. Stir the solution briefly and allow it to stay in the sample solution until a stable reading is reached and icon appears and stays on LCD screen. -
Page 30: Conductivity Electrode Maintenance
7.6.2 Relationship of TDS, salinity and conductivity The conversion factor between TDS and conductivity is 0.40–1.00 which can be adjusted in parameter setting clause 2.6. Factory default setting is 0.71. The conversion coefficient between salinity and conductivity is 0.5. So the meter only needs to be calibrated in conductivity mode, then switch to TDS and salinity mode. -
Page 31: Parameter Setting
Parameter setting 8.1 Main menu and submenu pH submenu Main menu Conductivity/TDS submenu Setting submenu Diagram-12 - 31 -... -
Page 32: Operation
8.2 Operation Press key to open main menu → press key to select main menu items → Press key to open main menu item (submenu) → press key to select submenu items(parameter) → press key to open parameter → press key to select parameter items or parameter value →... -
Page 33: Stirrer
Stirrer 9.1 Operation 9.1.1 Insert two ends of stirrer connection cable to the socket of meter and stirrer. 9.1.2 Press key to turn on, icon appears in the bottom right corner of LCD screen. At this time the rotation speed is zero. Press key to increase or decrease rotation speed. -
Page 34: Usb Communication
10 USB communication 10.1 Install Software This instrument uses the PC-Link 950 communication software, and the communication port is USB. Copy the PC-Link 950 program files to the computer from the flash drive, connect the USB communication cable to the PC socket of the meter and the computer’s USB port. The software will be automatically open. -
Page 35: Recommended Ph Electrodes For Specific Applications
11 Recommended pH Electrodes for Specific Applications Application Ideal Apera pH Electrodes to Use General water solutions LabSen 211 Beverage, beer, or wine analysis LabSen 211 Cosmetics and other viscous liquid LabSen 851-S, LabSen 851-H Dairy products (milk, cream, yogurt, mayo, etc.) LabSen 821 High-Temperature liquid LabSen 861... -
Page 36: Warranty
13 Warranty We warrant this instrument to be free from defects in material and workmanship and agree to repair or APERA INSTRUMENTS, Co., Ltd replace free of charge, at the option of , any malfunctioned or APERA INSTRUMENTS, Co., Ltd...
Need help?
Do you have a question about the 950 Series and is the answer not in the manual?
Questions and answers