Kyocera TASKalfa 6003i Operation Manual
Hide thumbs
Also See for TASKalfa 6003i:
- Quick manual (29 pages) ,
- Hardware installation and reference manual (267 pages)
Table of Contents
Advertisement
Quick Links
Advertisement
Table of Contents
Troubleshooting

Related Manuals for Kyocera TASKalfa 6003i


Summary of Contents for Kyocera TASKalfa 6003i
- Page 1 PRINT COPY SCAN OPERATION GUIDE TASKalfa 6003i TASKalfa 5003i...
- Page 2 > Preface Preface Thank you for purchasing this machine. This Operation Guide is intended to help you operate the machine correctly, perform routine maintenance, and take simple troubleshooting measures as needed so that the machine can always be used in the optimum condition. Please read this Operation Guide before using the machine.
-
Page 3: Table Of Contents
Contents Preface ............................. i Contents ..........................ii Overview ..........................xii Machine Features ........................ xiii Color and Image Quality Functions ................... xix Basic Color Modes ...................... xix Adjusting Image Quality and Color................xx Guides Provided with the Machine ..................xxi About the Operation Guide (this Guide) ................. xxiii Structure of the guide .................... - Page 4 Display for Device Information ................2-18 Display Setting Screen .................... 2-18 Functions Key ......................2-19 Using the Screen ..................... 2-19 Display of Keys That Cannot Be Set ............... 2-20 Original Preview ...................... 2-20 Entering Numbers ....................2-23 Using the Enter Key ....................2-24 Using the Quick No.
- Page 5 Loading in Cassette 2 ....................3-7 Loading Envelopes or Cardstock in the Cassettes ..........3-10 Loading in the Large Capacity Feeder ..............3-14 Loading in the Side Feeder ..................3-16 Precautions for Outputting Paper .................. 3-18 Paper Stopper ......................3-18 Envelope Stack Guide .....................
- Page 6 Operation on the Machine ................ 5-1 Loading Originals ......................5-2 Placing Originals on the Platen ................. 5-2 Loading Originals in the Document Processor ............5-4 Loading Paper in the Multipurpose Tray ................. 5-6 Program ..........................5-10 Registering Programs ..................... 5-11 Recalling Programs ....................
- Page 7 Choosing from the One Touch Key ................. 5-45 Choosing from the Speed Dial ................5-45 Choosing from the Destination History ..............5-46 Checking and Editing Destinations ................. 5-47 Confirmation Screen of Destinations ............... 5-48 Recall ........................5-49 How to use the FAX Function ..................5-50 Using Document Boxes ....................
- Page 8 EcoPrint ........................6-34 Color Selection ......................6-35 Sharpness ....................... 6-36 Contrast ........................6-36 Background Density Adj. (Background Density Adjustment) ........6-37 Prevent Bleed-thru ....................6-37 Erase Colors ......................6-37 Zoom ........................6-38 Combine ........................6-41 Margin/Centering, Margin, Centering ..............6-43 Border Erase, Border Erase/Full Scan ..............
- Page 9 Canceling of Jobs ....................7-11 Priority Override for Waiting Jobs ................7-11 Reordering Print Jobs ..................... 7-12 Device/Communication ....................7-13 Checking the Remaining Amount of Toner and Paper (Paper/Supplies) ....7-14 Setup and Registration (System Menu) ..........8-1 System Menu ........................8-2 Operation Method .....................
- Page 10 Enabling Job Accounting ....................9-34 Job Accounting Access ................... 9-35 Job Accounting (Local) ....................9-36 Adding an Account ....................9-36 Restricting the Use of the Machine ................. 9-37 Editing an Account ....................9-38 Deleting an Account ....................9-39 Job Accounting for Printing ..................9-40 Job Accounting for Scan Using TWAIN ..............
- Page 11 Remove any jammed paper in Cassette 5 (Side Feeder) ........10-73 Remove any jammed paper in the Multipurpose Tray .......... 10-75 Remove any jammed paper in Right Cover 1 ............10-76 Remove any jammed paper in Right Cover 2 (500-sheet×2) ........ 10-80 Remove any jammed paper in Right Cover 2 (1,500-sheet×2) ......
- Page 12 Folding Unit (For 100-sheet Staple Finisher) ............11-31 Job Separator Tray ....................11-32 Banner Tray ......................11-32 Glossary ......................... 11-33 Index ..........................Index-1...
-
Page 13: Overview
> Overview Overview Input Data Security You can apply the various machine security Original Electronic data USB drive Fax data levels to your specific needs. Strengthen security (page xvi) Application You can expand the machine functions Operations from your PC according to your needs. -
Page 14: Machine Features
> Machine Features Machine Features The machine is equipped with many useful functions. Using Various Functions (page 6-1) Here are some examples. Optimize your office workflow Access to frequently used Interrupt other running jobs and Check the finishing before copying functions with just one touch execute your copy job immediately a large number of sheets... - Page 15 > Machine Features Optimize your office workflow Save frequently used documents Recover from low power mode or in the machine (Custom Box) sleep mode automatically (Motion Sensor) You can save the frequently used document in the machine and print it This model detects that the person is when needed.
- Page 16 > Machine Features Create attractive documents Prevent image bleed-through Erase the extra shaded area Create a booklet (Booklet) (Prevent Bleed-through) (Erase Shadowed Areas) It is useful when preparing handout. When scanning with the document You can create a magazine, processor or original cover open, pamphlet, or other booklet from sheet erase the extra shaded area.
- Page 17 > Machine Features Strengthen security Password-protect a PDF file Protect data on the hard disk/SSD Prevent loss of finished (PDF Encryption Functions) (Encryption / Overwrite) documents (Private Print) Use the PDF format's password You can overwrite the unnecessary Temporarily saving print jobs in the security options to restrict document data that remains on the hard disk/ main unit document box and...
- Page 18 > Machine Features Use functions more efficiently Expand functions as necessary Display file size before sending / Install the machine without (Application) storing a job concerning the network cables (File Size Confirmation) (Wireless Network) 1 MB The functionality of the machine can be expanded by installing You can check the file size before If there is a wireless LAN...
- Page 19 > Machine Features Use functions more efficiently Skip the error job Perform remote operation (Job Skip Functions) (Command Center RX) When paper empty error occurs at You can access to the machine the cassette by specifying the special remotely to print, send or download paper size or type, the machine skips data.
-
Page 20: Color And Image Quality Functions
> Color and Image Quality Functions Color and Image Quality Functions The machine is equipped with various color and image quality functions. You can adjust the scanned image as desired. Basic Color Modes The basic color modes are as follows. Reference image Reference Color mode... -
Page 21: Adjusting Image Quality And Color
> Color and Image Quality Functions Adjusting Image Quality and Color To adjust the image quality or color of an image, use the following functions. Sample image I want to... Function Page Before After Easily adjust the image quality to match your own image Remove dark background or Program page 5-10... -
Page 22: Guides Provided With The Machine
Provides safety and cautionary information for installation environment and use of the machine. Be sure to read this guide before using the machine. For safe use of the Safety Guide (TASKalfa 5003i/TASKalfa 6003i) machine Indicates the space required for machine installation, and describes the cautionary labels and other safety information. - Page 23 Print data from a computer Explains how to install the printer driver and use the printer function. KYOCERA Net Direct Print Operation Guide Directly print a PDF file Explains how to print PDF files without launching Adobe Acrobat or Reader.
-
Page 24: About The Operation Guide (This Guide)
> About the Operation Guide (this Guide) About the Operation Guide (this Guide) Structure of the guide The Operation Guide contains the following chapters. Chapter Contents Legal and Safety Information Provides precautions regarding use of the machine and trademark information. Installing and Setting up the Explains part names, cable connections, installation of the software, login, Machine... -
Page 25: Conventions Used In This Guide
> About the Operation Guide (this Guide) Conventions Used in This Guide Adobe Reader XI is used as an example in the explanations below. Click an item in the Table of Click to move from the current page to the previously Contents to jump to the displayed page. - Page 26 > About the Operation Guide (this Guide) Conventions Used in Procedures for Operating the Machine In this Operation Guide, continuous operation of the keys on the touch panel is as follows: Actual procedure Procedure indicated in this guide Select the [System Menu/Counter] key. [System Menu/Counter] key >...
- Page 27 > About the Operation Guide (this Guide) Size and Orientation of Originals and Paper Original sizes and paper sizes such as A4, B5, and Letter can be used in both the horizontal and vertical orientations. To distinguish the orientations when these sizes are used, "R" is added to sizes used in the horizontal orientation. In addition, the following icons are used to indicate original and paper placement orientations on the touch panel.
-
Page 28: Menu Map
> Menu Map Menu Map This is a list of menus displayed on the touch panel. Depending on the settings, some menus may not be displayed. Some menu names may differ from their reference titles. Copy Org./Paper/Finishing Original Size (page 6-18) Paper Selection (page... - Page 29 > Menu Map Layout/Edit Zoom (page 6-38) Combine (page 6-41) Margin/Centering (page 6-41) Border Erase (page 6-44) Booklet (page 6-46) Duplex (page 6-49) Form Overlay (page 6-53) Erase Shadowed Area (page 6-54) Page # (page 6-55) Cover (page 6-52) Insert Sheets/Chapters (page 6-57) Image Repeat...
- Page 30 > Menu Map Send Destination Address Book (page 5-43) E-mail Addr Entry (page 5-23) Folder Path Entry (page 5-24, page 5-27) FAX Server (page 5-40) FAX No. Entry (refer to FAX Operation Guide) i-FAX Address Entry (refer to FAX Operation Guide) WSD Scan (page 5-32) / DSM Scan...
- Page 31 > Menu Map Advanced Setup Zoom (page 6-38) Centering (page 6-41) Border Erase/Full Scan (page 6-44) FAX Delayed Transmission (refer to FAX Operation Guide) Continuous Scan (page 6-67) Job Finish Notice (page 6-68) Erase Shadowed Area (page 6-54) File Name Entry (page 6-69) i-FAX Subject/Body (refer to FAX Operation Guide)
- Page 32 > Menu Map Custom Box Custom Box Store File Functions Original Size (page 6-18) Mixed Size Originals (page 6-21) 2-sided/Book Original, Book Original (page 6-72) Original Orientation (page 6-24) Storing Size (page 6-82) Prevent Bleed-thru (page 6-37) Density (page 6-32) Original Image (page 6-33)
- Page 33 > Menu Map Custom Box Open Print Functions Paper Selection (page 6-19) Collate/Offset (page 6-26) Staple/Punch Staple (page 6-27) (page 6-27) Punch (page 6-29) Paper Output (page 6-31) Combine (page 6-41) Margin/Centering (page 6-43) Booklet (page 6-46) Duplex (page 6-49) Cover (page 6-52)
- Page 34 > Menu Map Custom Box Open Send Destination (page 5-43) Functions Sending Size (page 6-73) File Format (page 6-74) FAX TX Resolution (refer to FAX Operation Guide) Centering (page 6-41) FAX Delayed Transmission (refer to FAX Operation Guide) Job Finish Notice (page 6-68) File Name Entry...
- Page 35 > Menu Map Custom Box Open Join (page 5-66) Move/Copy (page 5-63) Delete (page 5-65) Store File (page 5-58) Search(Name) (page 5-52) Page Selection (page 5-52) Detail (page 5-52) Preview (page 5-55) Search(Name) (page 5-52) Search(No.) (page 5-52) Add/Edit Box (page 5-56) xxxiv...
- Page 36 > Menu Map Job Box Job Box Private Print/Stored Job (page 4-19, page 4-20) Quick Copy/Proof and Hold (page 4-21, page 4-22) Repeat Copy (page 6-70) Form for Form Overlay (page 5-66) xxxv...
- Page 37 > Menu Map USB Drive USB Drive Print Functions Paper Selection (page 6-19) Collate/Offset (page 6-26) Staple/Punch (page 6-27) Staple (page 6-27) Punch (page 6-29) Paper Output (page 6-31) Margin (page 6-43) Duplex (page 6-49) Job Finish Notice (page 6-68) Priority Override (page 6-69)
- Page 38 > Menu Map USB Drive Store File Functions Original Size (page 6-18) Mixed Size Originals (page 6-21) 2-sided/Book Original, Book Original (page 6-72) Original Orientation (page 6-24) Storing Size (page 6-82) Prevent Bleed-thru (page 6-37) Density (page 6-32) Original Image (page 6-33) Scan Resolution...
- Page 39 > Menu Map Status/ Job Cancel Status/ Job Cancel Printing Jobs (page 7-3) Sending Jobs (page 7-5) Storing Jobs (page 7-6) Device/Communication (page 7-13) Paper/Supplies (page 7-14) xxxviii...
- Page 40 > Menu Map System Menu /Counter System Menu Quick Setup Wizard FAX Setup (page 2-43) E-mail Setup (page 2-43) Network Setup (page 2-43) Energy Saver Setup (page 2-44) Counter (page 2-59) Cassette/MP Tray Settings Cassette 1 (page 8-7) Cassette 2 (page 8-7) Cassette 3...
- Page 41 > Menu Map Common Settings Error Handling Duplexing Error (page 8-16) Finishing Error (page 8-16) No Staple Error (page 8-16) Finished Pages Exceeded (page 8-16) Punch Waste Full Error (page 8-16) Paper Mismatch Error (page 8-16) Wrong Size Paper Loaded (page 8-16) Paper Jam before Staple...
- Page 42 > Menu Map Common Settings Function Defaults Color TIFF Compression (page 8-20) Image Quality (File Format) (page 8-20) Collate/Offset (page 8-20) JPEG/TIFF Print (page 8-21) XPS Fit to Page (page 8-21) PDF/A (page 8-21) File Name Entry (page 8-21) E-mail Subject/Body (page 8-21) i-FAX Subject/Body...
- Page 43 > Menu Map Common Settings Customize Status Display (page 8-31) Message Board Settings (page 8-32) Remote Printing (page 8-32) Numeric Keypad Settings (page 8-33) Prevent Light Reflection (page 8-33) Function Key Assignment (page 8-33) Show Power Off Message (page 8-33) Clear Set.
- Page 44 > Menu Map Document Box/USB Drive Custom Box (page 5-51) FAX Box (refer to FAX Operation Guide) Job Box Quick Copy Job Retention (page 8-41) Repeat Copy Job Retention (page 8-41) Deletion of Job Retention (page 8-41) Polling Box (refer to FAX Operation Guide) FAX Memory RX Box (refer to FAX Operation Guide) Quick Setup Registration (page...
- Page 45 > Menu Map Report Print Report Status Page (page 8-45) Font List (page 8-45) Network Status (page 8-45) Service Status (page 8-45) Optional Network Status (page 8-46) Configuration List (page 8-46) Data Sanitization Report (page 8-46) Admin Report Outgoing FAX Report (refer to FAX Operation Guide) Settings Incoming FAX Report (refer to FAX Operation Guide) Result Report...
- Page 46 > Menu Map System/Network Network Host Name (page 8-51) Wi-Fi Direct Settings Wi-Fi Direct (page 8-51) Device Name (page 8-51) IP Address (page 8-51) Auto Disconnect (page 8-51) Persistent Group (page 8-52) Wi-Fi Settings Wi-Fi (page 8-52) Setup (page 8-52) TCP/IP Setting (page 8-54)
- Page 47 > Menu Map System/Network Network Protocol Settings Enhanced WSD (page 8-61) Enhanced WSD over SSL (page 8-61) eSCL (page 8-61) eSCL over SSL (page 8-61) VNC (RFB) (page 8-62) VNC (RFB) over SSL (page 8-62) Enhanced VNC over SSL (page 8-62) REST (page...
- Page 48 > Menu Map System/Network FAX Server Settings (page 8-72) Optional Function (page 8-73) Bluetooth Settings (page 8-73) Restart Entire Device (page 8-73) Remote Services Settings (page 8-73) (page 8-73) Remote Operation (page 8-74) Motion Sensor (page 8-74) Edit Destination Address Book (page 3-35) One Touch Key...
- Page 49 > Menu Map User Login/Job Accounting Job Accounting Job Accounting (page 9-34) Setting Job Accounting Access (page 9-35) Job Accounting Print Accounting Report (Local) (page 9-48) Total Job Accounting (page 9-47) Each Job Accounting (page 9-47) Accounting List (page 9-36) Default Setting (page 9-44)
- Page 50 > Menu Map Adjustment/Maintenance Density Adjustment Copy (page 8-80) Send/Box (page 8-80) FAX (refer to FAX Operation Guide) Background Density Copy (Auto) (page 8-80) Adj. Send/Box (Auto) (page 8-80) Sharpness Copy (page 8-80) Adjustment Send/Box (page 8-80) Drum Heater (page 8-80) Drum Refresh (page...
-
Page 51: Legal And Safety Information
Legal and Safety Information Please read this information before using your machine. This chapter provides information on the following topics. Notice ................................. 1-2 Safety Conventions in This Guide ......................1-2 Environment ............................. 1-3 Precautions for Use ..........................1-4 Laser Safety (Europe) ..........................1-5 SAFETY OF LASER BEAM (USA) ...................... -
Page 52: Notice
Legal and Safety Information > Notice Notice Safety Conventions in This Guide The sections of this guide and parts of the machine marked with symbols are safety warnings meant to protect the user, other individuals and surrounding objects, and ensure correct and safe usage of the machine. The symbols and their meanings are indicated below. -
Page 53: Environment
Legal and Safety Information > Notice Environment The service environmental conditions are as follows: Temperature 50 to 90.5 °F (10 to 32.5 °C) (But humidity should be 70% or less when temperature is 90.5 °F (32.5 °C).) Humidity 10 to 80% (But temperature should be 86 °F (30 °C) or less when humidity is 80%.) Avoid the following locations when selecting a site for the machine. -
Page 54: Precautions For Use
Legal and Safety Information > Notice Precautions for Use Cautions when handling consumables CAUTION Do not attempt to incinerate parts which contain toner. Dangerous sparks may cause burns. Keep parts which contain toner out of the reach of children. If toner happens to spill from parts which contain toner, avoid inhalation and ingestion, as well as contact with your eyes and skin. -
Page 55: Laser Safety (Europe)
Legal and Safety Information > Notice Laser Safety (Europe) Laser radiation could be hazardous to the human body. For this reason, laser radiation emitted inside this machine is hermetically sealed within the protective housing and external cover. In the normal operation of the product by user, no radiation can leak from the machine. -
Page 56: Safety Of Laser Beam (Usa)
Legal and Safety Information > Notice SAFETY OF LASER BEAM (USA) 1. Safety of laser beam This machine has been certified by the manufacturer to Class 1 level under the radiation performance standards established by the U.S.DHHS (Department of Health and Human Services) in 1968. This indicates that the product is safe to use during normal operation and maintenance. -
Page 57: Safety Instructions Regarding The Disconnection Of Power
Compliance and Conformity Hereby, KYOCERA Document Solutions Inc. declares that the radio equipment type TASKalfa 5003i and TASKalfa 6003i are in compliance with Directive 2014/53/EU. -
Page 58: Radio Tag Technology
Legal and Safety Information > Notice Radio Tag Technology In some countries the radio tag technology used in this equipment to identify the toner container may be subject to authorization and the use of this equipment may consequently be restricted. Other precautions (for users in California, the United States) Perchlorate Material - special handling may apply. -
Page 59: Limited Use Of This Product (If Equipped)
Legal and Safety Information > Notice Secretly Viewing Communication Contents A third person with malicious objectives may intentionally monitor radio waves and gain unauthorized access to the following communication contents. • Personal information including ID, passwords, and credit card numbers •... -
Page 60: Legal Information
Legal and Safety Information > Notice Legal Information Copying or other reproduction of all or part of this guide without the prior written consent of KYOCERA Document Solutions Inc. is prohibited. Regarding Trade Names • PRESCRIBE is registered trademark of Kyocera Corporation. - Page 61 Legal and Safety Information > Notice GPL/LGPL This product contains GPL (http://www.gnu.org/licenses/gpl.html) and/or LGPL (http://www.gnu.org/licenses/lgpl.html) software as part of its firmware. You can get the source code, and you are permitted to copy, redistribute and modify it under the terms of GPL/LGPL. For further information including availability of the source code, visit http://www.kyoceradocumentsolutions.com/gpl/.
- Page 62 Legal and Safety Information > Notice 1. Redistributions of source code must retain the copyright notice, this list of conditions and the following disclaimer. 2. Redistributions in binary form must reproduce the above copyright notice, this list of conditions and the following disclaimer in the documentation and/or other materials provided with the distribution.
- Page 63 Legal and Safety Information > Notice 10 You shall not sublicense, sell, lease, or otherwise transfer the Software and/or Typefaces without the prior written consent of Monotype Imaging. 11 Use, duplication or disclosure by the Government is subject to restrictions as set forth in the Rights in Technical Data and Computer Software clause at FAR 252-227-7013, subdivision (b)(3)(ii) or subparagraph (c)(1)(ii), as appropriate.
- Page 64 Legal and Safety Information > Notice "Object" form shall mean any form resulting from mechanical transformation or translation of a Source form, including but not limited to compiled object code, generated documentation, and conversions to other media types. "Work" shall mean the work of authorship, whether in Source or Object form, made available under the License, as indicated by a copyright notice that is included in or attached to the work (an example is provided in the Appendix below).
- Page 65 Legal and Safety Information > Notice 5. Submission of Contributions. Unless You explicitly state otherwise, any Contribution intentionally submitted for inclusion in the Work by You to the Licensor shall be under the terms and conditions of this License, without any additional terms or conditions.
-
Page 66: Energy Saving Control Function
Legal and Safety Information > Notice Energy Saving Control Function The device comes equipped with a Low Power Mode where energy consumption is reduced after a certain amount of time elapses since the device was last used, as well as a Sleep where printer and fax functions remain in a waiting state but power consumption is still reduced to a minimum when there is no activity with the device within a set amount of time. -
Page 67: Installing And Setting Up The Machine
Installing and Setting up the Machine This chapter provides information for the administrator of this machine, such as part names, cable connection, and software installation. Part Names (Machine Exterior) ..... 2-2 Energy Saver Function ....... 2-40 Part Names (Connectors/Interior) ....2-4 Low Power Mode ...... -
Page 68: Part Names (Machine Exterior)
Installing and Setting up the Machine > Part Names (Machine Exterior) Part Names (Machine Exterior) 1 Document Processor 12 Original Table 13 Original Width Guides 2 Operation Panel 3 Power Switch 14 Slit Glass 4 Waste Toner Box Cover 15 Paper Stopper 5 Cassette 1 16 Inner Tray 6 Cassette 2... - Page 69 Installing and Setting up the Machine > Part Names (Machine Exterior) 23 24 22 Paper Length Guide 26 Multipurpose Tray 23 Paper Width Guide 27 Paper Width Guide 24 Paper Width Adjusting Tab 28 Right Cover 1 Lever 25 Support Tray Section of the Multipurpose Tray 29 Right Cover 1...
-
Page 70: Part Names (Connectors/Interior)
Installing and Setting up the Machine > Part Names (Connectors/Interior) Part Names (Connectors/Interior) 1 Option Interface Slot 5 Toner Container (Black) 2 USB Port 6 Toner Container Cover 3 Network Interface Connector 7 Waste Toner Box 4 USB Interface Connector 8 Waste Toner Box Cover... -
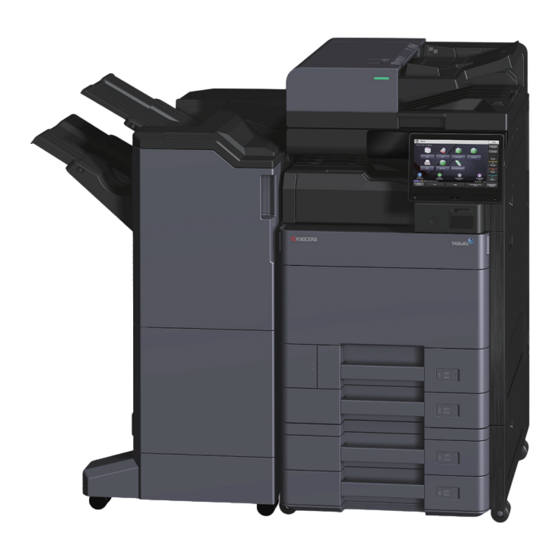
Page 71: Part Names (With Optional Equipments Attached)
Installing and Setting up the Machine > Part Names (With Optional Equipments Attached) Part Names (With Optional Equipments Attached) 1 Tray 1 to 7 (tray 1 is the top tray) 7 Cassette 4 2 Tray A 8 Cassette 5 3 Tray B 9 Finisher Tray 4 Job Separator Tray 10 Job Separator Tray... -
Page 72: Connecting The Machine And Other Devices
Installing and Setting up the Machine > Connecting the Machine and Other Devices Connecting the Machine and Other Devices Prepare the cables necessary to suit the environment and purpose of the machine use. When Connecting the Machine to the PC via USB When Connecting the Machine to the PC or Tablet by network cable, Wi-Fi, or Wi-Fi direct Network cable connection... -
Page 73: Connecting Cables
Installing and Setting up the Machine > Connecting Cables Connecting Cables Connecting LAN Cable IMPORTANT Make sure that the power to the machine is turned off. Power Off (page 2-9) Connect the cable to the machine. Connect the LAN cable to the network interface connector. Connect the other end of the cable to the hub or the PC. -
Page 74: Connecting Usb Cable
Installing and Setting up the Machine > Connecting Cables Connecting USB Cable IMPORTANT Make sure that the power to the machine is turned off. Power Off (page 2-9) Connect the cable to the machine. Connect the USB cable to the USB interface connector located on the right side of the body. -
Page 75: Power On/Off
Installing and Setting up the Machine > Power On/Off Power On/Off Power On Turn the power switch on. Power Off Turn the power switch off. The confirmation message for power supply off is displayed. Show Power Off Message (page 8-33) It takes about 3 minutes for power off. -
Page 76: Using The Operation Panel
Installing and Setting up the Machine > Using the Operation Panel Using the Operation Panel Operation Panel Keys 1 [Home] ( ) key: Displays the Home screen. 2 [Job Separator] ( ) indicator: Lights when there is paper in the job separator tray. 3 [Data] ( ) indicator: Blinks while the machine is printing or sending/receiving, or accessing the hard disk/SSD. -
Page 77: Touch Panel
Installing and Setting up the Machine > Touch Panel Touch Panel Using the Touch Panel Keys for performing basic operations are displayed on the lower and right side of the touch panel. Authentic./ Admin Logout Select the function. System Menu /Counter Interrupt Copy... -
Page 78: Home Screen
Installing and Setting up the Machine > Touch Panel Home Screen This screen is displayed by selecting the [Home] ( ) key on the operation panel. Touching an icon will display the corresponding screen. You can change the icons to display on the Home screen as well as its background. Editing the Home Screen (page 2-13) Admin Select the function. - Page 79 Model Name Login User Name Login Password TASKalfa 5003i 5000 5000 TASKalfa 6003i 6000 6000 Configure the settings. The available settings are shown below. Item Description Customize Specify the function icons to display on the desktop.
- Page 80 Installing and Setting up the Machine > Touch Panel Available Functions to Display on Desktop Function Icon Description Reference page Copy Displays the Copy screen. page 5-18 Send Displays the Send screen. page 5-22 FAX Server Displays the FAX Server screen. page 5-40 Displays the FAX screen.
- Page 81 Installing and Setting up the Machine > Touch Panel *4 The icon of the application appears. Available Functions to Display on Taskbar Function Icon Description Reference page Status/Job Displays the Status screen. If an ― Cancel error occurs, the icon will show "!". Once the error clears, the display will return to normal.
-
Page 82: Assigning Functions To Function Keys
Model Name Login User Name Login Password TASKalfa 5003i 5000 5000 TASKalfa 6003i 6000 6000 Configure the settings. Select [Change] to enable the function key to be set. Select the function to be assigned. Function... - Page 83 Installing and Setting up the Machine > Touch Panel Function Description Reference page Send to Me (E-mail) Displays the Send screen. The E-mail page 5-39 address of the logged-in user is set as the destination. Send to Me from Box Displays the Custom Box screen.
-
Page 84: Display For Device Information
Installing and Setting up the Machine > Touch Panel Display for Device Information Shows device information. Allows you to check system and network information, as well as options that are used. [Home] ( ) key > [Device Information] Check the device information. Description Identification/Wired You can check ID information such as the model name,... -
Page 85: Functions Key
Installing and Setting up the Machine > Touch Panel Functions Key To configure the settings for functions, select the tab and press the function key. Copies Preview Original Paper Mixed Size Original Size Selection Originals Orientation Function key Fold Collate/ Staple Paper Output Offset... -
Page 86: Display Of Keys That Cannot Be Set
Installing and Setting up the Machine > Touch Panel Display of Keys That Cannot Be Set Keys of features that cannot be used due to feature combination restrictions or non-installation of options are in a non- selectable state. Normal Grayed out Hidden Combine Staple... - Page 87 Installing and Setting up the Machine > Touch Panel Display a preview image. Select [Preview]. The machine starts scanning the original. When scanning is completed, the preview image appears on the panel. Copies ID Card Copy Preview Auto 100% Normal 0 Paper Zoom Density...
- Page 88 Installing and Setting up the Machine > Touch Panel Duplex Printing Settings for duplex printing appear. Preview: 2015101010574501 When printing duplex, it is 100% possible to switch between the front side and the reverse side. Size Density : Normal 0 Side : Front Page Binding...
-
Page 89: Entering Numbers
Installing and Setting up the Machine > Touch Panel Entering Numbers When entering numbers, numeric keys appear on the touch panel if you select the [Numeric Keypad] key on the touch panel or select the area in which the number is entered. 1 Enter numbers and symbols. -
Page 90: Using The Enter Key
Installing and Setting up the Machine > Touch Panel Example: When searching for an address number Address Book Address Book Address Book Name Address Book Name Addr Book Sort Addr Book Sort Dest. Type Name Detail Dest. Type Name Detail 0001 ABCD abcd@efg.com... -
Page 91: Help Screen
Installing and Setting up the Machine > Touch Panel Help Screen If you have difficulty operating the machine, you can check how to operate it using the touch panel. To show the Help screen for a function, select [Help] on the panel of the setting screen of that function. The Help screen shows explanations of functions and how to use them. -
Page 92: Accessibility Functions (Magnifying The View)
Installing and Setting up the Machine > Touch Panel Accessibility Functions (Magnifying the View) You can magnify the text and keys displayed on the touch panel. You can also select items and move to the next screen using the numeric keys. NOTE •... -
Page 93: Login/Logout
Login Password TASKalfa 5003i 5000 5000 TASKalfa 6003i 6000 6000 You will be unable to login if you forget your login user name or login password. In this event, login with administrator privileges and change your login user name or login password. -
Page 94: Logout
Installing and Setting up the Machine > Login/Logout Simple Login Select the user to login. Keyboard Login lg0601 Status If this screen is displayed during operations, select a user and log in. NOTE If a user password is required, an input screen will be displayed. Simple Login Settings (page 9-27) Logout Authentic./... -
Page 95: Default Settings Of The Machine
Installing and Setting up the Machine > Default Settings of the Machine Default Settings of the Machine The default settings of the machine can be changed in System Menu. Before using this machine, configure such settings as date and time, network configuration, and energy saving functions as needed. NOTE For settings that are configurable from System Menu, refer to the following: Setup and Registration (System Menu) (page 8-1) -
Page 96: Network Setup
If user login administration is disabled, the user authentication screen appears. Enter a login user name and password, and select [Login]. The factory default login user name and login password are set as shown below. Model Name Login User Name Login Password TASKalfa 5003i 5000 5000 TASKalfa 6003i 6000 6000 2-30... - Page 97 Installing and Setting up the Machine > Network Setup IPv4 setting Display the screen. [System Menu/Counter] key > [System/Network] > "Network" [Next] > "Wired Network Settings" [Next] > "TCP/IP Setting" [Next] > "IPv4" [Change] Configure the settings. When using DHCP server [DHCP]: Set to [On].
-
Page 98: Configuring The Wireless Network
Installing and Setting up the Machine > Network Setup Configuring the Wireless Network When the Wireless Network Interface Kit (IB-35 and IB-51) is installed on the machine and the connection settings are configured, it is possible to print or send in a wireless network (wireless LAN) environment. The configuration methods are as follows: Configuration Method Description... - Page 99 Installing and Setting up the Machine > Network Setup Wired Connection by Using LAN Cable Connect the machine with a computer Connect the machine with a computer via LAN cable when the machine is powered on. Turn on the computer. IP address (link local address) of the machine and computer is generated automatically.
- Page 100 Installing and Setting up the Machine > Network Setup Configure the settings. [Do not use automatic configuration] > [Next] > [Next] [Use LAN cable] > [Next] > [Next] [Easy setup] > [Next] The machine is detected. NOTE • Only one machine can be searched using Wi-Fi Setup Tool. It may take times to search the machine.
- Page 101 Installing and Setting up the Machine > Network Setup NOTE • Installation on Windows must be done by a user logged on with administrator privileges. • If the "Welcome to the Found New Hardware Wizard" dialog box displays, select [Cancel]. •...
-
Page 102: Setting Wi-Fi Direct
Installing and Setting up the Machine > Network Setup Setting Wi-Fi Direct Setting Wi-Fi Direct enables you to print from the Wi-Fi Direct environment. The configuration methods are as follows: NOTE To use Wi-Fi Direct, Wireless Network Interface Kit (IB-35) must be installed in the machine. The Wireless Network Interface Kit (IB-35) is an option for some models. - Page 103 Installing and Setting up the Machine > Network Setup [Home] ( ) key > [Wi-Fi Direct] Note the network name (SSID), IP address, and password. Configure the handheld device. [Settings] > [Wi-Fi] Select the network name (SSID) appeared in step 5 from the list. Enter the password that was provided in step 5 >...
-
Page 104: Configuring Nfc
Installing and Setting up the Machine > Network Setup Configuring NFC NFC (Near Field Communication) is the internal standard for near field communication in which the data communication distance is limited to approximately 10 cm. Establishing data communication simply requires you to show the handheld device supporting NFC to this machine. -
Page 105: Motion Sensor
Installing and Setting up the Machine > Motion Sensor Motion Sensor This model detects that the person is approaching and recover from low power mode or sleep mode automatically. The range of detection of the Motion Sensor can be switched using the lever on the front. For more information on Motion Sensor settings, refer to the following: Motion Sensor (page 8-74) 2-39... -
Page 106: Energy Saver Function
Installing and Setting up the Machine > Energy Saver Function Energy Saver Function If a certain period of time elapses after the machine is last used, the machine automatically enters Low Power Mode to reduce power consumption. If a further period of time elapses without the machine being used, the machine automatically enters Sleep Mode, which minimizes power consumption. -
Page 107: Sleep
Installing and Setting up the Machine > Energy Saver Function Sleep To enter Sleep, select the [Energy Saver] key. Touch panel and all indicators on the operation panel will go out to save a maximum amount of power except the Energy Saver indicator. This status is referred to as Sleep. Energy Saver indicator If print data is received during Sleep, the machine automatically wakes up and starts printing. -
Page 108: Sleep Level (Energy Saver) (Models Except For Europe)
Installing and Setting up the Machine > Energy Saver Function Sleep Level (Energy Saver) (models except for Europe) This mode reduces power consumption even more than normal Sleep Mode, and allows Sleep Mode to be set separately for each function. Printing from a computer connected with a USB cable is not available while the machine is asleep. -
Page 109: Quick Setup Wizard
Installing and Setting up the Machine > Quick Setup Wizard Quick Setup Wizard For FAX functions, paper settings, Energy Saver functions and network settings, the following settings can be configured in a wizard-style screen. FAX Setup Configures basic fax settings. This function is displayed when the optional FAX Kit is installed. - Page 110 The factory default login user name and login password are set as shown below. Model Name Login User Name Login Password TASKalfa 5003i 5000 5000 TASKalfa 6003i 6000 6000 Display the screen. [System Menu/Counter] key > [Quick Setup Wizard] 2-44...
- Page 111 Installing and Setting up the Machine > Quick Setup Wizard Select a function. Configure the settings. Start the wizard. Follow the instructions on the screen to configure settings. NOTE If you experience difficulty configuring the settings, refer to the following: Help Screen (page 2-25) Control Description...
-
Page 112: Installing Software
File Management Utility This makes it possible to send and save a scanned document to a ― specified network folder. KYOCERA Net Direct Print This makes it possible to print a PDF file without starting Adobe ― Acrobat/Reader. FONTS These are display fonts that enable the machine's built-in fonts to be used in a software application. -
Page 113: Installing Software In Windows
Installing and Setting up the Machine > Installing Software Installing Software in Windows Express Install The following procedure is an example for installing the software in Windows 8.1 using [Express Install]. For details on Custom Installation, refer to the following: Custom Install (page 2-49) Insert the DVD. - Page 114 Installing and Setting up the Machine > Installing Software Install the software. You can also select [Use host name for port name] and set to use the host name of the standard TCP/IP port. (A USB connection cannot be used.) When you click [Install], a screen asking for your cooperation with data collection will be displayed.
- Page 115 Installing and Setting up the Machine > Installing Software When "Your software is ready to use" appears, you can use the software. To print a test page, click the "Print a test page" checkbox and select the machine. Click [Finish] to exit the wizard. If a system restart message appears, restart the computer by following the screen prompts.
- Page 116 Installing and Setting up the Machine > Installing Software Select [Custom Install]. Install the software. Select the device to be installed. IMPORTANT If Wi-Fi or Wi-Fi Direct is enabled, be sure to specify the IP address for the port name. Installation may fail if the host name is specified. NOTE •...
- Page 117 Installing and Setting up the Machine > Installing Software Click [Utility] tab and select the utility to be installed. Click [Install]. When you click [Install], a screen asking for your cooperation with data collection will be displayed. Select one of the answer choices and click [OK]. NOTE To install Status Monitor on Windows versions preceding Windows 8.1, it is necessary to install Microsoft .NET Framework 4.0 beforehand.
- Page 118 Installing and Setting up the Machine > Installing Software Finish the installation. When "Your software is ready to use" appears, you can use the software. To print a test page, click the "Print a test page" checkbox and select the machine. Click [Finish] to exit the wizard.
-
Page 119: Uninstalling The Software
Uninstallation on Windows must be done by a user logged on with administrator privileges. Display the screen. Click [Search] in charms, and enter "Uninstall Kyocera Product Library" in the search box. Select [Uninstall Kyocera Product Library] in the search list. -
Page 120: Installing Software In Mac Computer
Insert the DVD. Double-click the [Kyocera] icon. Display the screen. Double-click [Kyocera OS X x.x] depending on your Mac OS version. Install the Printer Driver. Install the printer driver as directed by the instructions in the installation software. This completes the printer driver installation. - Page 121 Installing and Setting up the Machine > Installing Software Configure the printer. Open System Preferences and add the printer. Select [Default] and click the item that appears in "Name" and then select the driver in "Use". NOTE When using an IP connection, click the IP icon for an IP connection and then enter the host name or IP address.
-
Page 122: Setting Twain Driver
Click [Search] in charms, and enter "TWAIN Driver Setting" in the search box. Select [TWAIN Driver Setting] in the search list. NOTE In Windows 7, select [Start] button on the Windows, [All Programs], [Kyocera] and then [TWAIN Driver Setting]. TWAIN Driver screen appears. Click [Add]. - Page 123 Installing and Setting up the Machine > Installing Software Finish registering. NOTE Click [Delete] to delete the added machine. Click [Edit] to change names. 2-57...
-
Page 124: Setting Wia Driver
Installing and Setting up the Machine > Installing Software Setting WIA Driver Register this machine to the WIA Driver. Instructions are based on interface elements as they appear in Windows 8.1. Display the screen. Click [Search] in charms, and enter "View scanners and cameras" in the search box. Select [View scanners and cameras] in the search list then the Scanners and Cameras screen appears. -
Page 125: Checking The Counter
Installing and Setting up the Machine > Checking the Counter Checking the Counter Check the number of sheets printed and scanned. Display the screen. [System Menu/Counter] key > [Counter] Check the counter. 2-59... -
Page 126: Additional Preparations For The Administrator
Installing and Setting up the Machine > Additional Preparations for the Administrator Additional Preparations for the Administrator In addition to the information provided in this chapter, the administrator of this machine should check the following, and configure the settings as needed. Sending Documents to a PC To Send to a Shared Folder (Send to Folder (SMB)) To send a document that has been loaded, you need to create a shared folder to receive the document on your... - Page 127 Installing and Setting up the Machine > Additional Preparations for the Administrator I want to... Function Reference page Prevent another user from handling the Custom Box page 5-51 documents stored in the machine. Remote Printing Output the document stored in the page 8-32 machine at the time when user operates the device via operation panel.
-
Page 128: Command Center Rx
Installing and Setting up the Machine > Command Center RX Command Center RX If the machine is connected to the network, you can configure various settings using Command Center RX. This section explains how to access Command Center RX, and how to change security settings and the host name. Command Center RX User Guide NOTE To fully access the features of the Command Center RX pages, enter the User Name and Password and click [Login]. -
Page 129: Accessing Command Center Rx
Installing and Setting up the Machine > Command Center RX Accessing Command Center RX Display the screen. Launch your Web browser. In the address or location bar, enter the machine's IP address or the host name. Click in the following order to check the machine's IP address and the host name. [Device Information] in the home screen >... -
Page 130: Changing Security Settings
Installing and Setting up the Machine > Command Center RX Changing Security Settings Display the screen. Launch your Web browser. In the address or location bar, enter the machine's IP address or the host name. Click in the following order to check the machine's IP address and the host name. [Device Information] in the home screen >... -
Page 131: Changing Device Information
Installing and Setting up the Machine > Command Center RX Changing Device Information Display the screen. Launch your Web browser. In the address or location bar, enter the machine's IP address or the host name. Click in the following order to check the machine's IP address and the host name. [Device Information] in the home screen >... -
Page 132: E-Mail Settings
Installing and Setting up the Machine > Command Center RX E-mail Settings By configuring the SMTP settings, it is possible to send the images scanned by the machine as E-mail attachments and to send E-mail notices when jobs have been completed. To use this function, this machine must be connected to a mail server using the SMTP protocol. - Page 133 Installing and Setting up the Machine > Command Center RX Configure the settings. Set "SMTP (E-mail TX)" to [On] in the "Send Protocols". Display the screen. Display the E-mail Settings screen. From the [Function Settings] menu, click [E-mail]. 2-67...
- Page 134 Installing and Setting up the Machine > Command Center RX Configure the settings. Enter "SMTP" and "E-mail Send Settings" items. Setting Description SMTP Set to send e-mail from the machine. SMTP Protocol Displays the SMTP protocol settings. Check that "SMTP Protocol" is set to [On].
-
Page 135: Registering Destinations
Installing and Setting up the Machine > Command Center RX Registering Destinations Display the screen. Launch your Web browser. In the address or location bar, enter the machine's IP address or the host name. Click in the following order to check the machine's IP address and the host name. [Device Information] in the home screen >... -
Page 136: Creating A New Custom Box
Installing and Setting up the Machine > Command Center RX Creating a New Custom Box Display the screen. Launch your Web browser. In the address or location bar, enter the machine's IP address or the host name. Click in the following order to check the machine's IP address and the host name. [Device Information] in the home screen >... -
Page 137: Printing A Document Stored In A Custom Box
Installing and Setting up the Machine > Command Center RX Printing a document stored in a Custom Box Display the screen. Launch your Web browser. In the address or location bar, enter the machine's IP address or the host name. Click in the following order to check the machine's IP address and the host name. -
Page 138: Transferring Data From Our Other Products
This section explains how to transfer data between our products. Migrating the Address Book The Address Book registered on the machine can be backed up or migrated using the KYOCERA Net Viewer on the included DVD. For details on operating the KYOCERA Net Viewer, refer to the following:... - Page 139 Installing and Setting up the Machine > Transferring Data from Our Other Products Select destination device group and click [Next]. Select [Device Address Book] and click [Next]. Select [Create from device] and remove the checkmark from [Overwrite settings on target device], and then click [Next]. 2-73...
- Page 140 Installing and Setting up the Machine > Transferring Data from Our Other Products Select the model you want to back up, and click [Next]. NOTE If the "Admin Login" screen appears, enter the "Admin Login" and "Login Password", and then click [OK]. The default settings are as follows (Upper case and lower case letters are distinguished (case sensitive)).
- Page 141 Please note that selecting [Finish] will write the data to the machine's Address Book. Writing Address Book Data to the Machine Launch the KYOCERA Net Viewer. Load the Address Book data. Right-click on the model name to which you want to transfer the Address Book, and select [Advanced] - [Set multiple devices].
- Page 142 Installing and Setting up the Machine > Transferring Data from Our Other Products Select destination device group and click [Next]. Select [Device Address Book] and click [Next]. Select [Create from file] and remove the checkmark from [Overwrite settings on target device], and then click [Next].
- Page 143 Installing and Setting up the Machine > Transferring Data from Our Other Products Click [Browse] and select the backup Address Book file, and then click [Next]. Click [Finish]. The write process of the Address Book data starts. Once the write process is complete, click [Close]. 2-77...
-
Page 144: Preparation Before Use
Preparation before This chapter explains the following operations. Loading Paper ..............................3-2 Precaution for Loading Paper ........................3-2 Selecting the Paper Feeder Units ......................3-3 Loading in Cassette 1 ..........................3-4 Loading in Cassette 2 ..........................3-7 Loading Envelopes or Cardstock in the Cassettes ................3-10 Loading in the Large Capacity Feeder .................... -
Page 145: Loading Paper
Preparation before Use > Loading Paper Loading Paper Precaution for Loading Paper When you open a new package of paper, fan the sheets to separate them slightly prior to loading in the following steps. Fan the paper, then tap it on a level surface. In addition, note the following points. -
Page 146: Selecting The Paper Feeder Units
Preparation before Use > Loading Paper Selecting the Paper Feeder Units Select the paper feeder units according to the size and type of paper. Name Paper Size Paper Type Capacity Page Cassette 1 A4-R, A4, A5-R, A5, A6-R, B5-R, B5, B6-R, Plain, Rough, 500 sheets page 3-4... -
Page 147: Loading In Cassette 1
Preparation before Use > Loading Paper Loading in Cassette 1 Pull the cassette completely out of the machine. NOTE Do not pull out more than one cassette at a time. Adjust the paper length guide to the paper size required. NOTE When using Legal size paper, move the paper length guide to the extreme left and lay it down. - Page 148 Preparation before Use > Loading Paper Adjust the position of the paper width guides located on the left and right sides of the cassette. Load paper. IMPORTANT • Load the paper with the print side facing up. • After removing new paper from its packaging, fan the paper before loading it in the cassette.
- Page 149 Preparation before Use > Loading Paper Gently push the cassette back in. Insert the indication on the sheet so as to match the size and type of paper to be placed. Display the screen. [System Menu/Counter] > [Cassette/MP Tray Settings] > "Cassette 1" [Next] Configure the function.
-
Page 150: Loading In Cassette 2
Preparation before Use > Loading Paper Loading in Cassette 2 Pull the cassette completely out of the machine. NOTE Do not pull out more than one cassette at a time. Adjust the paper length guide to the paper size required. NOTE When using 12×18"... - Page 151 Preparation before Use > Loading Paper Adjust the position of the paper width guides located on the left and right sides of the cassette. NOTE When using SRA3/12×18", A3, or Ledger paper, adjust the auxiliary guide accordingly. Load paper. IMPORTANT •...
- Page 152 Preparation before Use > Loading Paper Be sure that the paper length and width guides rest securely against the paper. If there is a gap, readjust the guides to fit the paper. Gently push the cassette back in. Insert the indication on the sheet so as to match the size and type of paper to be placed.
-
Page 153: Loading Envelopes Or Cardstock In The Cassettes
Preparation before Use > Loading Paper Loading Envelopes or Cardstock in the Cassettes Load envelope or cardstock in the cassettes. Here, we'll explain the procedures for cassette 1, as an example. Pull Cassette 1 completely out of the machine. NOTE Do not pull out more than one cassette at a time. - Page 154 Preparation before Use > Loading Paper Attach the envelope feed guide as shown in the illustration. The illustration below shows that the lever of the envelope feed guide is expanded. Adjust the paper length guide to the paper size required. Adjust the position of the paper width guides located on the left and right sides of the cassette.
- Page 155 Preparation before Use > Loading Paper Load the envelope with the print side facing up. Example: When printing the address. IMPORTANT • How to load envelopes (orientation and facing) will differ depending on the type of envelope. Be sure to load it in correctly, otherwise printing may be done in the wrong direction or on the wrong face.
- Page 156 Preparation before Use > Loading Paper Gently push Cassette 1 back in. Display the screen. [System Menu/Counter] > [Cassette/MP Tray Settings] > "Cassette 1" [Next] Configure the function. Select the paper size and type of envelope. Cassette 1 (to 5) (page 8-7) Set by using the printer driver on the PC.
-
Page 157: Loading In The Large Capacity Feeder
Preparation before Use > Loading Paper Loading in the Large Capacity Feeder The procedures here represent the cassette 3. Pull the cassette completely out of the machine. Load paper. IMPORTANT • Load the paper with the print side facing up. •... - Page 158 Preparation before Use > Loading Paper Insert the indication on the sheet so as to match the size and type of paper to be placed. Display the screen. [System Menu/Counter] > [Cassette/MP Tray Settings] > "Cassette 3" [Next] > "Media Type"...
-
Page 159: Loading In The Side Feeder
Preparation before Use > Loading Paper Loading in the Side Feeder Pull the cassette completely out of the machine. Load paper. IMPORTANT • Load the paper with the print side facing down. • After removing new paper from its packaging, fan the paper before loading it in the cassette. - Page 160 Preparation before Use > Loading Paper Gently push the cassette back in. Insert the indication on the sheet so as to match the size and type of paper to be placed. Display the screen. [System Menu/Counter] > [Cassette/MP Tray Settings] > "Cassette 5" [Next] > "Media Type"...
-
Page 161: Precautions For Outputting Paper
Preparation before Use > Precautions for Outputting Paper Precautions for Outputting Paper Paper Stopper When using paper A3/Ledger or larger, open the paper stopper shown in the figure. NOTE When using the Job Separator for output, you can if needed open the paper stopper on the Job Separator. Envelope Stack Guide To use an envelope, open the Envelope Stack Guide as shown below. -
Page 162: Stack Level Adjuster
Preparation before Use > Precautions for Outputting Paper Stack Level Adjuster If the paper output to the Job Separator is significantly curled, you can extend the Stack Level Adjuster as described in the figure. Extending the Stack Level Adjuster Restoring the Stack Level Adjuster 3-19... -
Page 163: Folding Unit (For 4,000-Sheet Finisher)
Preparation before Use > Precautions for Outputting Paper Folding Unit (For 4,000-sheet Finisher) In case of ejecting number of sets exceeding the storage limit in the folding unit, detach the folding tray. NOTE Refer to the following for maximum number for storage of folding unit. Folding Unit (For 4,000-sheet Finisher) (page 11-30) In case of ejecting to the folding tray In case of ejecting more than the limit of the folding tray... -
Page 164: Folding Unit (For 100-Sheet Staple Finisher)
Preparation before Use > Precautions for Outputting Paper Folding Unit (For 100-sheet Staple Finisher) In case of ejecting nunmber of sets exceeding the storage limit in the folding unit, store them in the sub tray. NOTE Refer to the following for maximum number for storage of folding unit. Folding Unit (For 100-sheet Staple Finisher) (page 11-31) In case of ejecting to the folding tray In case of ejecting more than the limit of the folding tray... -
Page 165: Preparation For Sending A Document To A Shared Folder In A Pc
Preparation before Use > Preparation for Sending a Document to a Shared Folder in a PC Preparation for Sending a Document to a Shared Folder in a PC Check the information that needs to be set on the machine and create a folder to receive the document on your computer. - Page 166 Preparation before Use > Preparation for Sending a Document to a Shared Folder in a PC Check the domain name and user name. At the Command Prompt, enter "net config workstation" and then press [Enter]. Check the user name and domain name. Screen example: User Name: james.smith...
-
Page 167: Creating A Shared Folder, Making A Note Of A Shared Folder
Preparation before Use > Preparation for Sending a Document to a Shared Folder in a PC Creating a Shared Folder, Making a Note of a Shared Folder Create a shared folder to receive the document in the destination computer. NOTE If there is a workgroup in System Properties, configure the settings below to limit folder access to a specific user or group. - Page 168 Preparation before Use > Preparation for Sending a Document to a Shared Folder in a PC Right-click the "scannerdata" folder, select [Property], and click [Sharing] and [Advanced Sharing]. Configure permission settings. Select the [Share this folder] checkbox and click the [Permissions] button. Make a note of the [ Share name Click the [Add] button.
- Page 169 Preparation before Use > Preparation for Sending a Document to a Shared Folder in a PC Specify the location. 1 If the computer name that you made a note of on page is the same as the domain name: If the computer name is not shown in "From this location", click the [Locations] button, select the computer name, and click the [OK] button.
-
Page 170: Configuring Windows Firewall
Preparation before Use > Preparation for Sending a Document to a Shared Folder in a PC 1 Select the [Security] tab. 2 Select the user you entered. If the user does not appear on "Group or user names", click [Edit] button to add user in a similar way of "configuration of permission settings". - Page 171 Preparation before Use > Preparation for Sending a Document to a Shared Folder in a PC Select the [File and Printer Sharing] checkbox. Add a port. In charms on Desktop, click [Settings], [Control Panel], [System and Security], and [Check firewall status]. Select [Advanced settings].
- Page 172 Preparation before Use > Preparation for Sending a Document to a Shared Folder in a PC Select [New Rules]. Select [Port]. Select [TCP] as the port to apply the rule to. Then select [Specific local ports] and enter "445" then click [Next]. 3-29...
- Page 173 Preparation before Use > Preparation for Sending a Document to a Shared Folder in a PC Select [Allow the connection] and click the [Next] button. Make sure all checkboxes are selected and click the [Next] button. Enter "Scan to SMB" in "Name" and click [Finish]. 3-30...
-
Page 174: Scan To Folder Setup Tool For Smb
Preparation before Use > Preparation for Sending a Document to a Shared Folder in a PC In Windows 7 In Windows 7, from [Start] button on the Windows, select [Control Panel], [System and Security], and then [Allow a program through Windows Firewall]. If the User Account Control dialog box appears, click the [Continue] button. - Page 175 Preparation before Use > Preparation for Sending a Document to a Shared Folder in a PC Display the screen. 1 Click [View License Agreement] and read the License Agreement. 2 Click [Accept]. After clicking [Accept] in the license dialog box, depending on your region, a message about resource and energy conservation may appear.
- Page 176 Preparation before Use > Preparation for Sending a Document to a Shared Folder in a PC NOTE • The machine cannot be detected unless it is on. If the computer fails to detect the machine, verify that it is connected to the computer via a network cable and that it is turned on and click [ Refresh].
- Page 177 Preparation before Use > Preparation for Sending a Document to a Shared Folder in a PC Enter the information requested to register the address. 1 Enter the name for display in the address book. 2 Display the folder name and path to the shared folder. 3 Shared folders can be selected from a PC on the network.
-
Page 178: Registering Destinations In The Address Book
Preparation before Use > Registering Destinations in the Address Book Registering Destinations in the Address Book Save frequently used destinations to the Address Book or One Touch Keys. The saved destinations can be changed. The destinations are available for Send as E-mail, Send to Folder, and Fax Transmission (Only on products with the fax function installed). - Page 179 Preparation before Use > Registering Destinations in the Address Book Select "Name" [Change]. Enter the destination name (up to 32 characters) to be displayed on the Address Book and select [OK]. The screen shown in step 1 reappears. NOTE Refer to the following for details on entering characters. Character Entry Method (page 11-10) Add the address.
- Page 180 Preparation before Use > Registering Destinations in the Address Book The Folder (SMB) Address "Host Name", "Path", "Login User Name" and "Login Password" [Change] > Enter the information > [OK] NOTE For the computer name, share name, domain name, and user name, enter the information that you noted when you created the shared folder.
- Page 181 Preparation before Use > Registering Destinations in the Address Book NOTE • Refer to the following for details on entering characters. Character Entry Method (page 11-10) • Select [Connection Test] to check the connection to the server you chose. If the connection fails, check the entries you made.
- Page 182 Preparation before Use > Registering Destinations in the Address Book Add the group Compile two or more contacts into a group. Designations in the group can be added at the same time. When adding a group, a maximum of 500 groups can be added in the Address Book. NOTE To add a group, you need individually added destinations.
- Page 183 Preparation before Use > Registering Destinations in the Address Book Check if the selected destination was added to the group > [Save] The group is added to the Address Book. To register the registered address in a one-touch key, select [Save] > [Yes] NOTE Refer to the following for registering the One Touch Key.
- Page 184 Preparation before Use > Registering Destinations in the Address Book Deleting Address Book Entries Delete the destinations (contacts) you added to the Address Book. Display the screen. [System Menu/Counter] key> [Edit Destination] > "Address Book" [Add/Edit] Select a destination or group to delete. NOTE Destinations can be sorted or searched by destination name or address number.
-
Page 185: Adding A Destination On One Touch Key (One Touch Key)
Preparation before Use > Registering Destinations in the Address Book Adding a Destination on One Touch Key (One Touch Key) Assign a new destination (contact or group) to an one touch key. A maximum of 1,000 destinations can be registered. NOTE •... - Page 186 Preparation before Use > Registering Destinations in the Address Book Select a destination (contact or group) to add to the One Touch Key number > [Next] Selecting [Detail] shows the detailed information of the selected destination. NOTE Destinations can be sorted or searched by destination name or address number. Specifying Destination (page 5-43) Select [Save].
-
Page 187: Printing From Pc
Printing from PC This chapter explains the following topics: Printer Driver Properties Screen ........................4-2 Displaying the Printer Driver Help ......................4-3 Changing the Default Printer Driver Settings (Windows 8.1) ..............4-3 Printing from PC ..............................4-4 Printing on Standard Sized Paper ......................4-4 Printing on Non-standard Sized Paper .................... -
Page 188: Printer Driver Properties Screen
Printing from PC > Printer Driver Properties Screen The printer driver properties screen allows you to configure a variety of print-related settings. Printer Driver User Guide Description [Quick Print] tab Provides icons that can be used to easily configure frequently used functions. Each time you click an icon, it changes to an image resembling the print results and applies the settings. -
Page 189: Displaying The Printer Driver Help
Printing from PC > Description [Profiles] Printer driver settings can be saved as a profile. Saved profiles can be recalled at any time, so it's a convenient practice to save frequently used settings. [Reset] Click to revert settings to their initial values. Displaying the Printer Driver Help The printer driver includes Help. -
Page 190: Printing From Pc
Printing from PC > Printing from PC Printing from PC This section provides the printing method using the KX DRIVER. NOTE • To print the document from applications, install the printer driver on your computer from the supplied DVD (Product Library). •... - Page 191 Printing from PC > Printing from PC Click "Print size" menu and select the paper size to use for printing. To load the paper of size that is not included in print sizes of the machine such as cardstock or envelopes, the paper size needs to be registered. Printing on Non-standard Sized Paper (page 4-6) To print on the special paper such as thick paper or transparency, click "Media type"...
-
Page 192: Printing On Non-Standard Sized Paper
Printing from PC > Printing from PC Printing on Non-standard Sized Paper If you loaded a paper size that is not included in the print sizes of the machine, register the paper size in the [Basic] tab of the print settings screen of the printer driver. The registered size can be selected from the "Print size"... - Page 193 Printing from PC > Printing from PC Enter the name of the paper. Click the [Save] button. Click the [OK] button. Click the [OK] button. Display the print settings screen. Click [File] and select [Print] in the application. Select the paper size and type of non-standard size paper. Select the machine from the "Printer"...
- Page 194 Printing from PC > Printing from PC Click "Print size" menu and select the paper size registered in step 2. To print on the special paper such as thick paper or transparency, click "Media type" menu and select the media type. NOTE If you loaded a postcard or envelope, select [Cardstock] or [Envelope] in the "Media type"...
-
Page 195: Banner Printing
Printing from PC > Printing from PC Banner Printing When a document length from 488.1 mm (19.22") to a maximum of 1,220 mm (48.03") is specified for printing, the print job is treated as banner printing. Max. number of sheets 1 sheet (manual feed), 10 sheets (when optional banner tray is attached Paper width 210 mm to 304.8 mm (8.26"... - Page 196 Printing from PC > Printing from PC Register the paper size. Click the [New] button. Enter the length (488.1 mm (19.22") or longer), and width of the custom paper size being registered. Enter the name of the paper. Click the [Add] button. Click the [OK] button.
- Page 197 Printing from PC > Printing from PC Start printing. Click the [OK] button. When you execute printing in this case, a message appears on the machine's operation panel. Place the paper in the multipurpose tray, continue to support it so that it does not fall, and select [Continue].
- Page 198 Printing from PC > Printing from PC Using the Banner Tray (Option) When the banner tray (option) is used, up to 10 sheets of banner paper can be fed continuously. The operation procedure for setting the banner paper by using the printer driver is the same as that of using the multipurpose tray.
- Page 199 Printing from PC > Printing from PC Load paper. Open the paper width guides on the multipurpose tray to the maximum width. Make sure that the banner tray is attached so that the paper width guides on the banner tray are outside the paper width guides on the multipurpose tray. Load banner paper so that it passes under the paper clamp bar.
- Page 200 Printing from PC > Printing from PC Adjust the paper width guides to the width of the paper. IMPORTANT If there is a gap between the paper and the paper width guides, readjust the guides to fit the paper in order to prevent skewed feeding and paper jams. Adjust the paper width guides on the banner tray to the same width as the paper width guides on the multipurpose tray and lock.
-
Page 201: Canceling Printing From A Computer
Printing from PC > Printing from PC Canceling Printing from a Computer To cancel a print job executed using the printer driver before the printer begins printing, do the following: NOTE When canceling printing from this machine, refer to the following: Canceling Jobs (page 5-21) Double-click the printer icon ( ) displayed on the taskbar at... -
Page 202: Printing From The Handheld Device
Printing from PC > Printing from the Handheld Device Printing from the Handheld Device This machine supports the AirPrint, Google Cloud Print and Mopria. According to the supported OS and application, you can print the job from any handheld device or computer without installing a printer driver. Printing by AirPrint AirPrint is a printing function that is included standard in iOS 4.2 and later products, and Mac OS X 10.7 and later products. -
Page 203: Printing With Nfc
Printing from PC > Printing from the Handheld Device Printing with NFC When the Wi-Fi and Wi-Fi Direct has been configured in advance, the network between this machine and handheld device will be configured by simply tapping an NFC tag. Configuring the Wireless Network (page 2-32) Setting Wi-Fi Direct (page 2-36) 4-17... -
Page 204: Printing Data Saved In The Printer
Printing from PC > Printing Data Saved in the Printer Printing Data Saved in the Printer You can save the print job into the Job Box of this device and print it as necessary. If you configure settings in the [Job] tab of the printer driver and then print, the print job will be saved in the Job Box and printing can be executed at the machine. -
Page 205: Printing Documents From Private Print Box
Printing from PC > Printing Data Saved in the Printer Printing Documents from Private Print Box In Private Printing, you can specify that a job is not to be printed until you operate the machine. When sending the job from the application software, specify a password in the printer driver. The job is released for printing by entering the password on the operation panel, ensuring confidentiality of the print job. -
Page 206: Printing Document From Stored Job Box
Printing from PC > Printing Data Saved in the Printer Printing Document from Stored Job Box In Stored Job, the print data sent from the application is saved to the machine. You can set up a password as necessary. If you set up a password, enter the password when printing. Print data will be stored in the Stored Job Box after printing. This will allow printing of the same print data repeatedly. -
Page 207: Printing Document From Quick Copy Box
Printing from PC > Printing Data Saved in the Printer Printing Document from Quick Copy Box Quick Copy feature facilitates additional prints of a document already printed. Activating Quick Copy and printing a document using the printer driver allow the print data to be stored in the Quick Copy Job Box. When additional copies are required, you can reprint the required number of copies from the touch panel. -
Page 208: Printing Document From Proof And Hold Box
Printing from PC > Printing Data Saved in the Printer Printing Document from Proof and Hold Box The Proof and Hold feature produces only a single proof print of multiple-print job and holds printing of the remaining copies. Printing a multiple-print job in Proof and Hold using the printer driver allows only a single copy to be printed while maintaining the document data in the Job Box. -
Page 209: Monitoring The Printer Status (Status Monitor)
Printing from PC > Monitoring the Printer Status (Status Monitor) Monitoring the Printer Status (Status Monitor) The Status Monitor monitors the printer status and provides an ongoing reporting function. NOTE When you activate Status Monitor, check the status below. • KX DRIVER is installed. •... -
Page 210: Printing Progress Tab
Printing from PC > Monitoring the Printer Status (Status Monitor) Printing Progress Tab The status of the print jobs is displayed. 1 Status icon 2 Job list Select a job on the job list and it can be canceled using the menu displayed with a right-click. Paper Tray Status Tab Information is displayed about the paper in the printer and about the amount of paper remaining. -
Page 211: Alert Tab
Printing from PC > Monitoring the Printer Status (Status Monitor) Alert Tab If an error occurs, a notice is displayed using a 3D image and a message. Status Monitor Context Menu The following menu is displayed when the settings icon is clicked. •... -
Page 212: Status Monitor Notification Settings
Printing from PC > Monitoring the Printer Status (Status Monitor) Status Monitor Notification Settings The Status Monitor settings and event list details are displayed. Select whether notification is performed when an error in the event list occurs. Select Enable event notification. If this setting is set to Off, then the Status Monitor will not start up even when printing is executed. -
Page 213: Operation On The Machine
Operation on the Machine This chapter explains the following topics: Loading Originals ..........5-2 Send to Me (E-mail) ......... 5-39 Placing Originals on the Platen ..... 5-2 Configuring Settings before Sending ..... 5-39 Loading Originals in the Document Processor 5-4 Sending a Document to the Mail Address Loading Paper in the Multipurpose Tray .... -
Page 214: Loading Originals
Operation on the Machine > Loading Originals Loading Originals Load the originals on the platen or document processor, depending on the original size, type, volume, and function. • Platen: Place the sheet, book, postcards, and envelopes. • Document Processor: Place the multiple originals. You can also place the two sided originals. Placing Originals on the Platen You may place books or magazines on the platen in addition to ordinary sheet originals. - Page 215 Operation on the Machine > Loading Originals NOTE • When you wish to copy the booklet which is smaller than Letter-R, align the gutter (center of booklet) to the Statement-R of the original size indicator plates, and select [Letter-R] on Original Size. When you wish to copy the booklet which is larger than Letter-R, align the gutter (center of booklet) to the Letter of the original size indicator plates, and select [Ledger] on Original Size.
-
Page 216: Loading Originals In The Document Processor
Operation on the Machine > Loading Originals Loading Originals in the Document Processor The document processor automatically scans each sheet of multiple originals. Both sides of two-sided originals are scanned. The document processor supports the following types of originals. Detail Document Processor (Automatic 2-Sided) Document Processor (Dual scan DP) Type... - Page 217 Operation on the Machine > Loading Originals Place the originals. Put the side to be scanned (or the first side of two-sided originals) face-up. Slide the leading edge into the document processor as far as it will go. The original loaded indicator lights when the original is placed correctly.
-
Page 218: Loading Paper In The Multipurpose Tray
Operation on the Machine > Loading Paper in the Multipurpose Tray Loading Paper in the Multipurpose Tray For details of the supported paper sizes, refer to the following: Choosing the Appropriate Paper (page 11-14) For the paper type setting, refer to the following: Media Type Setting (page 8-15) Be sure to use the multipurpose tray when you print on any special paper. - Page 219 Operation on the Machine > Loading Paper in the Multipurpose Tray Adjust the multipurpose tray size. Paper sizes are marked on the multipurpose tray. Load paper. Insert the paper along the paper width guides into the tray until it stops. After removing new paper from its packaging, fan the paper before loading it in the multipurpose tray.
- Page 220 Operation on the Machine > Loading Paper in the Multipurpose Tray Loading Envelopes or Cardstock in the Multipurpose Tray Load the paper with the print side facing down. For the procedure for printing, refer to the following: Printer Driver User Guide Example: When printing the address.
- Page 221 Operation on the Machine > Loading Paper in the Multipurpose Tray Loading Index Paper in the Multipurpose Tray Prepare paper. Sort the pages so that the 1st page is at the back. Orient the paper in the same orientation. Place the paper print side down, oriented so that the tabs are on the trailing side of the paper when it feeds in.
-
Page 222: Program
Operation on the Machine > Program Program By registering sets of frequently used functions as a single program, you can simply press the program number as needed to recall those functions. You can also name the programs for easy identification when recalling. The programs below have been preregistered. -
Page 223: Registering Programs
Operation on the Machine > Program Registering Programs The following procedure is an example of registering the copying function. Display the screen. [Home] ( ) key > [Copy] Select the [Program] tab while the copy mode is accessed. Register the program. [Add] >... -
Page 224: Editing Programs
Operation on the Machine > Program Editing Programs You can change program number and program name. Display the screen. [Home] ( ) key > [Program] Select [Edit]. Edit the program. Select the key(s) corresponding to the program number (01 to 50) to change. Select [Edit] to change the program number and program name. -
Page 225: Application
Model Name Login User Name Login Password TASKalfa 5003i 5000 5000 TASKalfa 6003i 6000 6000 • Select [Print Report] to print an application report. Install the application. [Add] > [OK] Insert the USB drive containing the application to be installed into the USB Memory Slot. -
Page 226: Activating Applications
Model Name Login User Name Login Password TASKalfa 5003i 5000 5000 TASKalfa 6003i 6000 6000 Activate the application. Select the desired application > [Activate] You can view detailed information on the selected application by selecting [Detail]. Enter the license key > [Official] Some applications do not require you to enter a license key. -
Page 227: Deactivating Applications
Model Name Login User Name Login Password TASKalfa 5003i 5000 5000 TASKalfa 6003i 6000 6000 Deactivate the application. Select the desired application to exit > [Deactivate] NOTE Select [x] on the screen if you want to exit the already activated application. -
Page 228: Registering Shortcuts (Copy, Send, And Document Box Settings)
Operation on the Machine > Registering Shortcuts (Copy, Send, and Document Box Settings) Registering Shortcuts (Copy, Send, and Document Box Settings) You can register shortcuts in the Quick Setup screen for easy access to the frequently used functions. The settings for the selected function can also be registered. -
Page 229: Editing Shortcuts
Operation on the Machine > Registering Shortcuts (Copy, Send, and Document Box Settings) Editing Shortcuts In the setup screen of each function, select [Add Shortcut] in the bottom of the screen. Edit the shortcut Select [Edit]. Select the shortcut key you want to edit. Select "Shortcut No"... -
Page 230: Copying
Operation on the Machine > Copying Copying The procedures here represent the basic copy operation and how to cancel the copy. Basic Operation [Home] ( ) key > [Copy] Place the originals. Place the originals. Loading Originals (page 5-2) Check the preview image. Check the Original, Zoom, and Paper settings. - Page 231 Operation on the Machine > Copying Use the numeric keys to enter the copy quantity. Select the [Numeric Keypad] key or the area for inputting the number of sheets to display the numeric keypad. Specify the desired number up to 9,999. Copies Preview ID Card Copy...
-
Page 232: Proof Copy
Operation on the Machine > Copying Proof Copy It is possible to copy one sheet before copying a large number of sheets. This enables you to check the contents and finishing and copy the desired number of sheets without scanning the original if you are satisfied with the result. If you want to make changes, you can change the settings and copy only one sheet again. -
Page 233: Interrupt Copy
Operation on the Machine > Copying Interrupt Copy This function allows you to pause the current jobs in progress when you need to make copies immediately. When the interruption copy ends, the machine resumes the paused print jobs. NOTE • If the machine is left unused for 60 seconds in interrupt copy mode, interrupt copying is automatically cancelled and printing resumes. -
Page 234: Frequently-Used Sending Method
Operation on the Machine > Frequently-Used Sending Method Frequently-Used Sending Method This machine can send a scanned image as an attachment of an E-mail message or to a PC linked to the network. In order to do this, it is necessary to register the sender and destination (recipient) address on the network. A network environment which enables the machine to connect to a mail server is required in order to send E-mail. -
Page 235: Sending Document Via E-Mail
Operation on the Machine > Sending Document via E-mail Sending Document via E-mail When transmitting using wireless LAN, select the interface dedicated to the send function in advance. Primary Network (Client) (page 8-68) Configuring Settings before Sending Before sending an E-mail, configure the SMTP and E-mail settings using the Command Center RX. E-mail Settings (page 2-66) Sending Scanned Document via E-mail [Home] (... -
Page 236: Sending Document To Desired Shared Folder On A Computer (Scan To Pc)
Operation on the Machine > Sending Document to Desired Shared Folder on a Computer (Scan to PC) Sending Document to Desired Shared Folder on a Computer (Scan to PC) You can store the scanned document into the desired shared folder on a computer. Configuring Settings before Sending Before sending a document, configure the following settings. - Page 237 Operation on the Machine > Sending Document to Desired Shared Folder on a Computer (Scan to PC) Select the key of each item > enter the destination data > [OK]. Character Entry Method (page 11-10) The table below lists the items to be set. Item Detail Max.
- Page 238 Operation on the Machine > Sending Document to Desired Shared Folder on a Computer (Scan to PC) Check the status. Check the information. Change the delay as required. Select [Connection Test] to check the connection. "Connected." appears when connection to the destination is correctly established. If "Cannot connect."...
-
Page 239: Sending Document To Folder On An Ftp Server (Scan To Ftp)
Operation on the Machine > Sending Document to Folder on an FTP Server (Scan to FTP) Sending Document to Folder on an FTP Server (Scan to FTP) Configuring Settings before Sending Before sending a document, configure the FTP Client (Transmission). Protocol Settings (page 8-58) Sending Document to Folder on an FTP Server When transmitting using wireless LAN, select the interface dedicated to the send function in advance. - Page 240 Operation on the Machine > Sending Document to Folder on an FTP Server (Scan to FTP) The table below lists the items to be set. Item Data to be entered Max. characters Host Name Host name or IP address of FTP server Up to 70 characters Path...
-
Page 241: Scanning Using Twain Or Wia
Operation on the Machine > Scanning using TWAIN or WIA Scanning using TWAIN or WIA When transmitting using wireless LAN, select the interface dedicated to the send function in advance. Primary Network (Client) (page 8-68) Configuring Settings before Sending Before sending a document, confirm that TWAIN/WIA driver is installed on a computer and the settings are configured. Setting TWAIN Driver (page 2-56) Setting WIA Driver (page 2-58) Scanning Document Using Application... -
Page 242: Scanning Document Stored In A Custom Box
Operation on the Machine > Scanning Document stored in a Custom Box Scanning Document stored in a Custom Box Follow the steps as below for scanning a document stored in a custom box using the TWAIN driver. When transmitting using wireless LAN, select the interface dedicated to the send function in advance. Primary Network (Client) (page 8-68) Configuring Settings before Sending Before sending a document, confirm that TWAIN driver is installed on a computer and the settings are configured. -
Page 243: Useful Sending Method
Operation on the Machine > Useful Sending Method Useful Sending Method You can specify the following useful scanning (sending) methods. • WSD Scan: Saves images of originals scanned on this machine as files on a WSD-compatible computer. WSD Scan (page 5-32) •... -
Page 244: Wsd Scan
Operation on the Machine > WSD Scan WSD Scan WSD Scan saves images of originals scanned on this machine as files on a WSD-compatible computer. NOTE • To use WSD Scan, confirm that the computer used for WSD scanning and the machine is network-connected, and "WSD Scan"... -
Page 245: Executing Wsd Scan
Operation on the Machine > WSD Scan Install the driver. Right-click the machine's icon and then click [Install]. NOTE If the "User Account Control" window appears, click [Continue]. If the "Found New Hardware" window appears, click [Cancel]. During the installation, double-click the icon shown on the task bar to display the "Driver Software Installation"... - Page 246 Operation on the Machine > WSD Scan Select the destination computer > [OK] Select [Reload] to reload the computer list. You can view information on the selected computer by selecting [Detail]. Set the type of original, file format, etc., as desired. Press the [Start] key.
-
Page 247: Dsm Scan
Operation on the Machine > DSM Scan DSM Scan A scanned document can be automatically saved in any format or sent to any destination by reading a scan process from Active Directory. This function only supports the computers installed Windows Server 2008 R2 or Windows Server 2012. - Page 248 Operation on the Machine > DSM Scan Display the screen. Select [WSD Scan/DSM Scan]. If WSD Scan is set to [Off] in the network settings, select [DSM Scan] and go to step 5. WSD Scan (page 8-59) [DSM Scan] > [Next] Select the scan process to be used >...
-
Page 249: Scanning With File Management Utility
Operation on the Machine > Scanning with File Management Utility Scanning with File Management Utility "FMU Connection" is installed on the machine as a standard application. FMU Connection can be used to scan an original according to the settings configured with "File Management Utility" on the provided DVD, and save the image data and scanning information on a specified server or in a specified folder. -
Page 250: Sending To Different Types Of Destinations (Multi Sending)
Operation on the Machine > Sending to Different Types of Destinations (Multi Sending) Sending to Different Types of Destinations (Multi Sending) You can specify destinations that combine E-mail addresses, folders (SMB or FTP), fax numbers and i-FAX. This is referred to as Multi Sending. This is useful for sending to different types of destination (E-mail addresses, folders, etc.) in a single operation. -
Page 251: Send To Me (E-Mail)
Operation on the Machine > Send to Me (E-mail) Send to Me (E-mail) When user login is enabled, the document is sent to the E-mail address of the logged in user. Configuring Settings before Sending To use this function, configure the followings. To use this function, the function icon must be displayed in the home screen. -
Page 252: Using A Fax Server To Send (Fax Server Send)
Operation on the Machine > Using a FAX Server to Send (FAX Server Send) Using a FAX Server to Send (FAX Server Send) You can send a scanned document via a FAX server. NOTE • A FAX server is required to use this function. For information about the FAX server, contact the applicable administrator. - Page 253 Operation on the Machine > Using a FAX Server to Send (FAX Server Send) Specify the destination > [OK] Choosing from the Address Book (page 5-43) Destinations can be changed later. Checking and Editing Destinations (page 5-47) Selecting from an External Address Book Select [Ext Address Book].
-
Page 254: Canceling Sending Jobs
Operation on the Machine > Canceling Sending Jobs Canceling Sending Jobs Select the [Stop] key with the send screen displayed. Cancel a job. When there is a job is being scanned Job Cancel appears. When there is a job sending or on standby Canceling job screen appears. -
Page 255: Handling Destination
Operation on the Machine > Handling Destination Handling Destination This section explains how to select and confirm the destination. Specifying Destination Select the destination using either of the following methods except entering address directly: • Choosing from the Address Book Choosing from the Address Book (page 5-43) •... - Page 256 Operation on the Machine > Handling Destination You can change the order in which the destinations are listed by selecting [Name] or [No.] from the "Sort". NOTE • To deselect, select the checkbox again and remove the checkmark. • If [Prohibit] is set to “Broadcast”, multiple destinations cannot be selected. This also applies to a group in which multiple destinations are registered.
-
Page 257: Choosing From The One Touch Key
Operation on the Machine > Handling Destination Choosing from the One Touch Key In the basic screen for sending, select the One Touch Keys where the destination is registered. NOTE If the One Touch Keys for the desired destination is hidden on the touch panel, select [ ] or [ ] to scroll and view next or previous One Touch Keys. -
Page 258: Choosing From The Destination History
Operation on the Machine > Handling Destination Choosing from the Destination History If you send a document with this machine, the address will be saved in the history. You can select an address from the Destination History. In the basic screen for sending, select [Dest. History]. Select the destinations. -
Page 259: Checking And Editing Destinations
Operation on the Machine > Handling Destination Checking and Editing Destinations Display the screen. Specify the destination. Specifying Destination (page 5-43) Check and edit the destination. Select a destination and select [Detail/Edit] to check it. The entered addresses can be edited if they have been specified. -
Page 260: Confirmation Screen Of Destinations
Operation on the Machine > Handling Destination Confirmation Screen of Destinations When selecting [On] for Destination Check before Send, the confirmation screen of destinations appears after pressing the [Start] key. Dest. Check before Send (page 8-36) Destination Check the destination list through the last page. After checking the list, press [Check] and then Start key. -
Page 261: Recall
Operation on the Machine > Handling Destination Recall Recall is a function allowing you to send the last entered destination once again. When you want to send the image to the same destination, select [Recall], and you can call the destination you sent on the destination list. Select [Recall]. -
Page 262: How To Use The Fax Function
Operation on the Machine > How to use the FAX Function How to use the FAX Function On products with a FAX function, it is possible to use the FAX function. The optional FAX Kit is required in order to make use of FAX functionality. -
Page 263: Using Document Boxes
Operation on the Machine > Using Document Boxes Using Document Boxes Document Box is a function for saving print data from a computer and sharing it with multiple users. The available Document Boxes are as follows: Custom Box, Job Box, USB Drive Box, and Fax Box. What is Custom Box? Custom Box is a component box which you can create within the Document Box and store data for later retrieval. -
Page 264: What Is Usb Drive Box
Operation on the Machine > Using Document Boxes What is USB Drive Box? A USB drive can be connected to the USB memory slot on the machine to print a saved file. You can print data directly from the USB drive without a PC. Image files scanned using this machine can also be saved to USB drive in the PDF, TIFF, JPEG, XPS, OpenXPS, high compression PDF, Word, Excel or PowerPoint format (Scan to USB). - Page 265 Operation on the Machine > Using Document Boxes Document List The document list is a list of the documents stored in the custom box. Documents can be listed either by name or as thumbnails. The list can be used as shown below. List 1 Switches between list display and thumbnail display.
- Page 266 Operation on the Machine > Using Document Boxes Viewing Box Details Select [Add/Edit Box] in the box list screen. Highlight the box whose box details you wish to check and select [Detail/Edit]. NOTE If a custom box is protected by a password, enter the correct password. Check the box details.
- Page 267 Operation on the Machine > Using Document Boxes Previewing Documents/Checking Document Details Select (highlight) a document to preview and then select [Preview] or [Detail]. Preview the document or check the document details. The operations available in the preview screen are shown below. 1 Zoom in.
-
Page 268: Creating A New Custom Box
Login User Name Login Password TASKalfa 5003i 5000 5000 TASKalfa 6003i 6000 6000 • If user login administration is enabled, log in with administrator privileges to perform the following operations. They cannot be performed with user privileges. - Creating a box - Deleting a box of which owner is another user. -
Page 269: Editing Custom Box
Operation on the Machine > Using Document Boxes Item Description Auto File Automatically deletes stored documents after a set period of time. Deletion Select [On] to enable automatic deletion and then use [+] and [-] or the numeric keys to enter the number of days for which documents are stored. -
Page 270: Deleting Custom Box
Operation on the Machine > Using Document Boxes Privileges Settings that can be changed User Box Name Box Password Permission Auto File Deletion Overwrite Setting Delete after Printed Creating a New Custom Box (page 5-56) [Save] > [Close] The display returns to the default Document Box screen. Deleting Custom Box Display the screen. -
Page 271: Printing Documents In Custom Box
Operation on the Machine > Using Document Boxes Printing Documents in Custom Box Display the screen. [Home] ( ) key > [Custom Box] Select the box containing the document you want to print. NOTE If a custom box is protected by a password, enter the correct password. Select [Open]. -
Page 272: Saving Scanned Documents To A Custom Box
Operation on the Machine > Using Document Boxes Saving Scanned Documents to a Custom Box Display the screen. [Home] ( ) key > [Custom Box] Place the originals. Loading Originals (page 5-2) Store the document. Select the box > [Store File] Select the functions. -
Page 273: Sending Documents In Custom Box To E-Mail Address Of Logged In User
Operation on the Machine > Using Document Boxes Send the document. Select the document you wish to send by checking the checkbox. The document is marked with a checkmark. NOTE You cannot select and send multiple documents. To deselect, press the checkbox again and remove the checkmark. Select [Send]. - Page 274 Operation on the Machine > Using Document Boxes Select [Home] ( ) key. Select [Send to Me from BOX (E-mail)]. NOTE When this function is used, functions other than transmission cannot be used. 5-62...
-
Page 275: Moving Documents In Custom Box
Operation on the Machine > Using Document Boxes Moving Documents in Custom Box Display the screen. [Home] ( ) key > [Custom Box] > Select the box > [Open] NOTE If a custom box is protected by a password, enter the correct password. Move the documents. -
Page 276: Copying Documents In Custom Box To Usb Drive
Operation on the Machine > Using Document Boxes Copying Documents in Custom Box to USB Drive Display the screen. [Home] ( ) key > [Custom Box] > Select the box > [Open] NOTE If a custom box is protected by a password, enter the correct password. Copy the documents. -
Page 277: Deleting Documents In Custom Box
Operation on the Machine > Using Document Boxes [Next] > [File Name] > Enter the file name for the joined document > [OK] NOTE Enter up to 64 characters as the file name. [Join] > [Yes] The documents are joined. NOTE After joining, the original documents are left unchanged. -
Page 278: Job Box
Operation on the Machine > Job Box Job Box This section explains the Repeat Copy Box and the Form for Form Overlay Box. For Private Print/Stored Job Box and Quick Copy/Proof and Hold Box, refer to the following: Printing Data Saved in the Printer (page 4-18) Outputting Repeat Copy Jobs Repeat Copy feature stores the copied original document data in the Job Box and allows you to print additional copies later. - Page 279 Operation on the Machine > Job Box Deleting a Form Stored You can delete the form stored in the job box Display the screen. [Home] ( ) key > [Job Box] [Form for Form Overlay] > [Open] Delete the forms. Select the form to delete >...
-
Page 280: Operating Using Removable Usb Drive
Operation on the Machine > Operating using Removable USB Drive Operating using Removable USB Drive Plugging USB drive directly into the machine enables you to quickly and easily print the files stored in the USB drive without having to use a computer. The following file types can be printed: •... - Page 281 Operation on the Machine > Operating using Removable USB Drive When the machine reads the USB drive, "USB Drive is recognized. Displaying files. Are you sure?" may appear. Select [Yes]. Displays the USB Drive screen. NOTE If the message does not appear, select [USB Drive] on the Home screen. Print the document.
-
Page 282: Saving Documents To Usb Drive (Scan To Usb)
Operation on the Machine > Operating using Removable USB Drive Saving Documents to USB Drive (Scan to USB) You can store scanned documents to a removal USB drive. NOTE The maximum number of the storable files is 1,000. Place the originals. Loading Originals (page 5-2) Plug the USB drive. -
Page 283: Check The Usb Drive Information
Operation on the Machine > Operating using Removable USB Drive Set the type of original, file format, etc., as desired. For the features that can be set, refer to the following: USB Drive (Store File, Printing Documents) (page 6-14) Check the storing image. Press the [Start] key. -
Page 284: Using The Internet Browser
Operation on the Machine > Using the Internet Browser Using the Internet Browser If the machine is connected to the network, you can browse the Internet on the touch panel. NOTE To use the internet browser, "Internet Browser Setting" must be set to [On] in Internet. Internet (page 8-83) Launching and Exiting the Browser Display the screen. -
Page 285: Using The Browser Screen
1 Title bar: Displays the page title. 2 Text box: Pressing the text box displays a keyboard that allows you to type text. KYOCERA Document Solutions | Solutions 3 Close: Closes the Internet browser and returns you to the application list screen. -
Page 286: Manual Staple
Operation on the Machine > Manual Staple Manual Staple You can staple copied paper manually without any print operation. It is useful when you have forgotten to set the staple sort mode before starting copying, or when you want to staple originals. NOTE •... - Page 287 Operation on the Machine > Manual Staple Set the staple position. Press the stapling position key to select the stapling position (Back / Front / 2 Points Operation is not possible while the stapling position lamps are blinking. Operate after the lamps light solidly.
-
Page 288: Using Various Functions
Using Various Functions This chapter explains the following topics: Bates Stamp ........6-64 Functions Available on the Machine ..... 6-2 About Functions Available on the Continuous Scan ....... 6-67 Machine ..........6-2 Auto Image Rotation ......6-67 How to Select Functions ..... 6-2 Negative Image ......... -
Page 289: Functions Available On The Machine
Using Various Functions > Functions Available on the Machine Functions Available on the Machine About Functions Available on the Machine This machine provides the various functions available. How to Select Functions To configure the settings for functions, select the tab and press the function key. Copies Preview Original... - Page 290 Using Various Functions > Functions Available on the Machine Reference Function key Description page Density Adjust density. page 6-32 Original Image Select original image type for best results. page 6-33 EcoPrint EcoPrint saves toner when printing. Use this page 6-34 function for test prints or any other occasion when high quality print is not required.
- Page 291 Using Various Functions > Functions Available on the Machine Reference Function key Description page Form Overlay Prints the original document overlaid with a form page 6-53 or image. Erase Shadowed When scanning with the document processor or page 6-54 Areas original cover open, erase the extra shaded area.
-
Page 292: Send
Using Various Functions > Functions Available on the Machine Send To configure the settings for functions, select the tab and press the function key. Destination Sending Image Original Mixed Size 2-sided/Book Original Size Originals Original Orientation Function key Sending Size File Format File Long... - Page 293 Using Various Functions > Functions Available on the Machine Function key Description Reference page Density Adjust density. page 6-32 Original Image Select original image type for best results. page 6-33 Scan Resolution Select fineness of scanning resolution. page 6-79 FAX TX Resolution Select fineness of images when sending FAX. Refer to the FAX Operation Guide.
- Page 294 Using Various Functions > Functions Available on the Machine Function key Description Reference page Zoom Adjust the zoom to reduce or enlarge the image. page 6-38 Centering Centers the original image on the paper when page 6-43 sending onto paper different from the original size.
-
Page 295: Custom Box (Store File, Printing, Send)
Using Various Functions > Functions Available on the Machine Custom Box (Store File, Printing, Send) To configure the settings for functions, select the tab and press the function key. Free Space 200.0MB Storing Image Original Mixed Size 2-sided/Book Original Size Originals Original Orientation... - Page 296 Using Various Functions > Functions Available on the Machine Reference Function key Description page Border Erase/Full Erases the black border that forms around the page 6-44 Scan image. Continuous Scan Scans a large number of originals in separate page 6-67 batches and then produce as one job.
- Page 297 Using Various Functions > Functions Available on the Machine Print Reference Function key Description page Paper Selection Select the cassette or multipurpose tray that page 6-19 contains the required paper size. Collate/Offset Offsets the output by page or set. page 6-26 Staple/Punch Staples or punches printed documents.
- Page 298 Using Various Functions > Functions Available on the Machine Reference Function key Description page Density Adjust density. page 6-32 Original Image Select original image type for best results. page 6-33 Sharpness Adjusts the sharpness of image outlines. page 6-36 Image Quality Background Removes dark background from originals, such page 6-37...
- Page 299 Using Various Functions > Functions Available on the Machine Send Reference Function key Description page Sending Size Select size of image to be sent. page 6-73 File Format Specify the image file format. Image quality level page 6-74 can also be adjusted. FAX TX Resolution Select fineness of images when sending FAX.
- Page 300 Using Various Functions > Functions Available on the Machine Reference Function key Description page Density Adjust density. page 6-32 Original Image Select original image type for best results. page 6-33 Resolution Select fineness of scanning resolution. page 6-79 Color Selection Select the color mode setting.
-
Page 301: Usb Drive (Store File, Printing Documents)
Using Various Functions > Functions Available on the Machine USB Drive (Store File, Printing Documents) To configure the settings for functions, select the tab and press the function key. Free Space 15.7GB Storing Image Original Mixed Size 2-sided/Book Original Size Originals Original Orientation... - Page 302 Using Various Functions > Functions Available on the Machine Reference Function key Description page Job Finish Notice Sends E-mail notice when a job is complete. It is page 6-68 also available that send a notice when a job is interrupted. File Name Entry Adds a file name.
- Page 303 Using Various Functions > Functions Available on the Machine Printing Documents Reference Function key Description page Paper Selection Select the cassette or multipurpose tray that page 6-19 contains the required paper size. Collate/Offset Offsets the output by page or set. page 6-26 Staple/Punch Staples or punches printed documents.
-
Page 304: Functions
Using Various Functions > Functions Functions On pages that explain a convenient function, the modes in which that function can be used are indicated by icons. Icon Description Access to the function is indicated by icons. Example: Select the [Org./Paper/Finishing] tab in the Org./Paper/ Copy Copy screen to use the function. -
Page 305: Original Size
Using Various Functions > Functions Original Size Org./Paper/ Org./Sending Functions Functions Custom Copy Send Drive Finishing Data Format Specify the original size to be scanned. Select [Standard Sizes 1], [Standard Sizes 2], [Others] or [Size Entry] to select the original size. Item Value Description... -
Page 306: Paper Selection
Using Various Functions > Functions Paper Selection Org./Paper/ Functions Functions Custom Copy Drive Finishing Select the cassette or multipurpose tray that contains the required paper size. If [Auto] is selected, the paper matching the size of the original is selected automatically. NOTE •... - Page 307 Using Various Functions > Functions *5 For instructions on how to specify the custom paper size, refer to the following: Custom Paper Size (page 8-12) *6 The input units can be changed in System Menu. For details, refer to the following: Measurement (page 8-15) *7 For instructions on how to specify the custom paper types 1 to 8, refer to the following: Media Type Setting (page 8-15)
-
Page 308: Mixed Size Originals
Using Various Functions > Functions Mixed Size Originals Org./Paper/ Org./Sending Functions Functions Custom Copy Send Drive Finishing Data Format Scan the documents of different sizes that are set in the document processor all at once. This function cannot be used if platen is used. Different Width is not displayed in inch models. Copying Metric Models Item... - Page 309 Using Various Functions > Functions Storing Item Value Description Mixed Size Originals Same Width Scans and stores multiple sheets of the same width using the document processor. Different Width Scans and stores multiple sheets of different width using the document processor.
- Page 310 Using Various Functions > Functions NOTE • Number of sheet that can be placed in the document processor: up to 30 sheets • When mixing the original sizes as using the following combination, make sure to set "Auto Detect Original Size" to [On] for "Folio".
-
Page 311: Original Orientation
Using Various Functions > Functions Original Orientation Org./Paper/ Org./Sending Functions Functions Custom Copy Send Drive Finishing Data Format Select the orientation of the original document top edge to scan correct direction. To use any of the following functions, the document's original orientation must be set. •... -
Page 312: Fold
Using Various Functions > Functions Fold Org./Paper/ Functions Functions Custom Copy Drive Finishing Folds the finished documents. Select the fold method. The following folding options and orientations are available. Original orientation Orientation: Landscape Orientation: Portrait Item Bi-Fold Saddle Stitch Tri-Fold Inside R to L/B to T L to R/T to B... -
Page 313: Collate/Offset
Using Various Functions > Functions Collate/Offset Org./Paper/ Functions Functions Custom Copy Drive Finishing Offsets the output by page or set. Item Image Description Collate Scans multiple originals and delivers complete sets of copies as required according to page number. Offset Without Document Finisher (Option) Printed copies are produced after rotating each set (or page... -
Page 314: Staple/Punch
Using Various Functions > Functions Staple/Punch Org./Paper/ Functions Functions Custom Copy Drive Finishing Staple NOTE This function requires the optional Document Finisher. Note also that saddle stitching (center stapling) requires the Folding Unit. For details on paper sizes and numbers of sheets that can be stapled, refer to the following: Inner Finisher (page 11-26) 1,000-sheet Finisher (page 11-27) 4,000-sheet Finisher (page 11-28) - Page 315 Using Various Functions > Functions Original Orientation and Staple Position 1,000-sheet Finisher, 4,000-sheet Finisher, 100-sheet Staple Finisher Original orientation Paper orientation Top Edge on Left Paper orientation Cassette paper load direction Cassette paper load direction Inner Finisher Original orientation Paper orientation Top Edge on Left Paper orientation Cassette paper load...
- Page 316 Using Various Functions > Functions Mixed Size Stapling Even with mixed paper sizes, if the sizes have the same width as shown in the combinations below, the output can be stapled. • A3 and A4 • B4 and B5 • Ledger and Letter Letter Ledger...
- Page 317 Using Various Functions > Functions Original Orientation and Punch Hole Position Image Original orientation Original Print results Glass platen Document processor NOTE The inch model provides two-hole and three-hole punching. The metric model provides two-hole and four-hole punching. 6-30...
-
Page 318: Paper Output
Using Various Functions > Functions Paper Output Org./Paper/ Functions Functions Custom Copy Drive Finishing Specify the output tray. with optional Job Separator Item Description Inner tray Outputs to the Inner Tray of the machine. Job Separator Tray Delivery to the Inner Job Separator. with optional 1,000-sheet Finisher Item Description... -
Page 319: Id Card Copy
Using Various Functions > Functions NOTE • This can be set when the optional Job Separator or Document Finisher (1,000-sheet Finisher, 4,000-sheet Finisher, or 100-sheet Staple Finisher) is installed. This cannot be set when the optional Inner Finisher is installed. •... -
Page 320: Original Image
Using Various Functions > Functions Original Image Image Quality Color/ Functions Image Quality Color/ Functions Custom Copy Send Drive Image Quality Image Quality Select original image type for best results. Copying Item Value Description Text+Photo Original Type Printer Output Best for mixed text and photo documents printed on this machine originally. -
Page 321: Ecoprint
Using Various Functions > Functions Sending/Printing/Storing Item Value Description Text+Photo Best for mixed text and photo documents. Highlighter Off, On (Normal), Select [On (Normal)] to reproduce the color of the text and Enhancement On (Bright) markings made with highlighter pen. If the colors are not bright enough, select [On (Bright)]. -
Page 322: Color Selection
Using Various Functions > Functions Color Selection Color/ Functions Color/ Functions Custom Send Drive Image Quality Image Quality Select the color mode setting. NOTE The default color mode for scanning documents is [Auto Color (Color/Gray)]. Item Description Auto Color (Color/Gray) Automatically recognizes whether the document is color or black and white, and scan color documents in Full Color and black and white documents in Grayscale. -
Page 323: Sharpness
Using Various Functions > Functions Sharpness Image Quality Color/ Functions Image Quality Color/ Functions Custom Copy Send Drive Image Quality Image Quality Adjusts the sharpness of image outlines. When copying penciled originals with rough or broken lines, clear copies can be taken by adjusting sharpness toward "Sharpen". -
Page 324: Background Density Adj. (Background Density Adjustment)
Using Various Functions > Functions Background Density Adj. (Background Density Adjustment) Image Quality Color/ Functions Image Quality Color/ Functions Custom Copy Send Drive Image Quality Image Quality Removes dark background from originals, such as newspapers. If the ground color is obtrusive, select [Auto]. If [Auto] does not remove the ground color, select [Manual] and adjust the density of the ground color. -
Page 325: Zoom
Using Various Functions > Functions Zoom Layout/Edit Advanced Functions Functions Custom Copy Send Drive Setup Adjust the zoom to reduce or enlarge the image. Copying The following zoom options are available. Standard Zoom Auto Adjusts the image to match the paper size. A3: 141% A5: 70% Standard Zoom... - Page 326 Using Various Functions > Functions Item Value Description Standard Zoom Metric Auto, Select a preset ratio. 400% Max., 200% A5>>A3, Select [Auto] to use 141% A4>>A3 B5>>B4, Auto Zoom. 127% Folio>>A3, Select [+] or [-] to 106% 11x15">>A3, change the displayed 100%, magnification as 90% Folio>>A4,...
- Page 327 Using Various Functions > Functions XY Zoom XY Zoom Select vertical and horizontal magnifications individually. Magnifications can be set in 1% increments between 25% and 400%. Item Value Description XY Zoom X: 25 to 400% Select vertical and horizontal (in 1% increments) magnifications individually.
-
Page 328: Combine
Using Various Functions > Functions Combine Layout/Edit Functions Custom Copy Combines 2 or 4 original sheets into 1 printed page. You can select the page layout and the type of boundary lines around the pages. The following types of the boundary lines are available. None Solid Line Dotted Line... - Page 329 Using Various Functions > Functions Layout image Item Image 2 in 1 L to R/T to B R to L/B to T 4 in 1 Right then Down Left then Down Down then Right Down then Left NOTE • The paper sizes supported in Combine mode: A3, A4-R, A4, A5-R, A5, B4, B5-R, B5, Folio, 216×340 mm, SRA3, Ledger, Letter-R, Letter, Legal, Statement-R, Oficio II, 8K, 16K-R and 16K.
-
Page 330: Margin/Centering, Margin, Centering
Using Various Functions > Functions Margin/Centering, Margin, Centering Layout/Edit Advanced Functions Functions Custom Copy Send Drive Setup Copying/Printing Add margins (white space). In addition, you can set the margin width and the back page margin. Centering: Centers the original image on the paper when copying onto paper different from the original size. NOTE The default setting for margin width can be changed. -
Page 331: Border Erase, Border Erase/Full Scan
Using Various Functions > Functions Sending/Storing When you have sent/stored the original after specifying the original size and sending/storing size, depending on these sizes, a margin is created at the bottom, left, or right side of paper. By using the Centering function, the image is placed with a margin equally created for all edges. - Page 332 Using Various Functions > Functions NOTE • [Full Scan] is not displayed when copying. • The default setting for border erase width can be changed. Border Erase Default (page 8-20) • The default width for back page can be changed. Border Erase to Back Page (page 8-20) Item Value...
-
Page 333: Booklet
Using Various Functions > Functions Booklet Layout/Edit Functions Custom Copy The Booklet option allows you to copy sheet originals and produce booklets such as small brochures or pamphlets. A booklet, such as a magazine, is made by folding at the center. You can print the cover page onto colored paper or thick paper. - Page 334 Using Various Functions > Functions Copying Item Value Description 1-sided >> Finishing Binding Left, Select the binding orientation of copies. Booklet Binding Right, Binding Top Cover Cover: Not Print, Select whether to add the cover. Select the Front Only, printing method for the cover to be Front Cover Back Only, Duplex inserted.
- Page 335 Using Various Functions > Functions Item Value Description Book >> Original Binding Left, Select the binding direction of originals. Booklet Binding Right Finishing Binding Left, Select the binding orientation of copies. Binding Right Cover Off, Cover Select whether to add the cover. Select [Cover] to select [Cover], and select [OK].
-
Page 336: Duplex
Using Various Functions > Functions Duplex Layout/Edit Functions Functions Custom Copy Drive Produces two-sided copies. You can also create single-sided copies from two-sided originals. The following modes are available. One-sided to Two-sided Produces two-sided copies from one-sided originals. In case of an odd number of originals, the back side of the last copy will be blank. - Page 337 Using Various Functions > Functions Book to One-sided Produces a 1-sided copy of a 2-sided or open book original. The following binding options are available. Binding Left: Originals with facing pages are copied from left to right. Binding Right: Originals with facing pages are copied from right to left. Original Copy NOTE...
- Page 338 Using Various Functions > Functions Item Value Description 2-sided >> Original Binding Left/Right, Binding Top Select the binding orientation of originals. 1-sided Original Top Edge on Top, Top Edge on Select the orientation of the original Orientation Left, Auto document top edge to scan correct direction.
-
Page 339: Cover
Using Various Functions > Functions Cover Layout/Edit Functions Custom Copy Adds a cover to the finished documents. You can print the first page and/or the last page onto colored paper or thick paper fed from the different paper source than the regular one. The following two options are available. Paper for the cover is supplied from the multipurpose tray. To feed the cover paper from the cassette, refer to the following: Paper Source for Cover (page 8-13) The printing method can be set for the covers. -
Page 340: Form Overlay
Using Various Functions > Functions Form Overlay Layout/Edit Functions Custom Copy Prints the original document overlaid with a form or image. Once you scan and register the form, the form is overlaid onto the original. You can also use a form that is already registered in the Document Box. -
Page 341: Erase Shadowed Areas
Using Various Functions > Functions Erase Shadowed Areas Layout/Edit Advanced Functions Functions Custom Copy Send Drive Setup When scanning with the document processor or original cover open, erase the extra shaded area. (Value: [Off] / [On]) NOTE In case the document processor or the original cover is not opened sufficiently, it might not be able to erase the shaded area. - Page 342 Using Various Functions > Functions Page # Layout/Edit Functions Custom Copy Adds page numbers to the finished documents. The available formats for numbering are [-1-], [P.1] and [1/n]. The format [1/n] prints the total number of pages in the place of "n". Original [-1-] [P.1]...
- Page 343 Using Various Functions > Functions Item Value Description -1-, P.1, Count Blank ― When a scanned document contains blank pages, add a Page check mark if you require blank pages to be numbered. Remove the check mark to skip blank pages. Last Page Auto, Manual (-10 to 0) If you do not want page numbering through to the last...
-
Page 344: Insert Sheets/Chapters
Using Various Functions > Functions Insert Sheets/Chapters Layout/Edit Copy Insert a separator sheet, or make the first page of the chapter the front page when performing duplex printing. The configured pages are displayed on the list. Item Value Description Separator Separator 1 to 998 Enter document page numbers where... -
Page 345: Memo Page
Using Various Functions > Functions Memo Page Layout/Edit Copy Delivers copies with a space for adding notes. You can also print two originals onto the same sheet with a space or add lines to indicate page boundaries. Select [Layout A] or [Layout B] and select the page layout from "Layout". NOTE The paper sizes supported in Memo mode: A3, A4-R, A4, A5-R, A5, B4, B5-R, B5, 216×340 mm, Ledger, Letter-R, Letter, Legal, Statement-R, Oficio II, Folio, 8K, 16K-R and 16K... - Page 346 Using Various Functions > Functions Item Value Description Layout B Layout Top L to R, Top R to L, Select how to lay out the pages of scanned Top L to B, Top R to B original. Border Line None, Solid Line, Dotted Line, Select the boundary line type.
-
Page 347: Image Repeat
Using Various Functions > Functions Image Repeat Layout/Edit Copy Tiles the 1 copied sheet with an original image. You can also specify the area of the original to repeat. Zoom Priority Repeat an image of specified zoom ratio. Original Copy Double Copy Copy two image. -
Page 348: Text Stamp
Using Various Functions > Functions Text Stamp Layout/Edit Advanced Functions Functions Custom Copy Send Drive Setup You can add a text stamp on the documents. Copying/Printing NOTE This cannot be set when Text Stamp is set in the system settings. Printing Jobs (page 8-24) Item Value... - Page 349 Using Various Functions > Functions Item Value Description Font Size Registered font sizes are Set the font size of text stamp. displayed. For details on registering font sizes, refer to the following: Font (Text Stamp) (page 8- Character Off, Circle, Rectangle, Set the character border and underline.
- Page 350 Using Various Functions > Functions Sending/Storing NOTE This cannot be set when Text Stamp is set in the system settings. Sending Jobs (page 8-26) Storing Jobs (page 8-28) Item Value Description Stamp Keyboard, Template 1 to 8 Select [Keyboard] and enter the text string to be printed, or select a text stamp from the displayed templates.
-
Page 351: Bates Stamp
Using Various Functions > Functions Bates Stamp Layout/Edit Advanced Functions Functions Custom Copy Send Drive Setup You can add a bates stamp on the documents. Copying/Printing NOTE This cannot be set when Bates Stamp is set in the system settings. Printing Jobs (page 8-24) Item Value... - Page 352 Using Various Functions > Functions Item Value Description Font Size Registered font sizes are Set the font size of bates stamp. displayed. For details on registering font sizes, refer to the following: Font (Bates Stamp) (page 8-23) Style None, Bold, Italic, Bold/Italic Set the font style of bates stamp.
- Page 353 Using Various Functions > Functions Sending/Storing NOTE This cannot be set when Bates Stamp is set in the system settings. Sending Jobs (page 8-27) Storing Jobs (page 8-28) Item Value Description Stamp Date, User Name, Serial Set the stamp to be printed. Number, Numbering, Text 1, When [Text 1] or [Text 2] is selected, press Text 2...
-
Page 354: Continuous Scan
Using Various Functions > Functions Continuous Scan Advanced Advanced Functions Functions Custom Copy Send Drive Setup Setup Scans a large number of originals in separate batches and then produce as one job. Originals will be scanned continuously until you select [Finish Scan]. Select [On] to use continuous scanning. -
Page 355: Negative Image
Using Various Functions > Functions Negative Image Advanced Copy Setup Inverts black and white portions of the image for printing. (Value: [Off] / [On]) NOTE This function is only available for black and white copy mode. Mirror Image Advanced Copy Setup Copies the mirrored image of the original. -
Page 356: File Name Entry
Using Various Functions > Functions Item Description Address Entry Enter E-mail address directly. Select [E-mail Address], enter the address (up to 256 characters) and select [OK]. Notify when Add a check mark if you require an e-mail notification when a job is interrupted. interrupted File Name Entry Advanced... -
Page 357: Repeat Copy
Using Various Functions > Functions Repeat Copy Advanced Copy Setup Enables additional copies in the desired quantity as necessary after a copy job is completed. For confidential documents, you can set up a password for the use of Repeat Copy. In such a case, the correct password must be entered to perform Repeat Copy. -
Page 358: Dp Read Action
Using Various Functions > Functions DP Read Action Advanced Copy Setup When the document processor is used, select the scanning operation for the document processor. This function is displayed when the document processor is installed. Item Description Speed Priority Gives priority to scanning speed. Quality Priority Gives priority to image quality at a slightly slower scan speed. -
Page 359: 2-Sided/Book Original, Book Original
Using Various Functions > Functions 2-sided/Book Original, Book Original Org./Sending Functions Functions Custom Send Drive Data Format Select the type and orientation of the binding based on the original. Item Value Description 1-sided ― "2-sided/Book Original" is not set. 2-sided Binding Binding Left/ Select the binding orientation of originals. -
Page 360: Sending Size
Using Various Functions > Functions Sending Size Org./Sending Functions Custom Send Data Format Select size of image to be sent. Select [Standard Sizes 1], [Standard Sizes 2], or [Others] to select the storing size. Item Value Description Standard Sizes 1 Metric models: Same as Original Size, A3, A4, A5, Select from Same as Original Size or A6, B4, B5, B6, Folio, 216×340 mm... -
Page 361: File Format
Using Various Functions > Functions File Format Org./Sending Functions Functions Custom Send Drive Data Format Specify the image file format. Image quality level can also be adjusted. Select the file format from [PDF], [TIFF], [JPEG], [XPS], [OpenXPS], [High Comp. PDF], [Word], [Excel], and [PowerPoint]. - Page 362 Using Various Functions > Functions OCR Text Recognition (Option) When [PDF], [High Comp. PDF], [Word], [Excel], or [PowerPoint] is selected for the file format, you can create Searchable file by running OCR on the scanned document. Select [OCR Text Recognition], and then [On], select the language of the document, and select [OK].
- Page 363 Using Various Functions > Functions PDF Encryption Functions If you have selected PDF or High Comp. PDF for file format, you can restrict the access level for displaying, printing, and editing PDF's by assigning a secure password. Select [PDF] or [High Comp. PDF] in [File Format], and select [Encryption]. Items that can be set vary depending on the setting selected in [Compatibility].
- Page 364 Using Various Functions > Functions When [Acrobat 5.0 and later, Encryption Level: High(128-bit)] is selected Item Value Description Password to Open Off, On Enter the password to open the PDF file. Document Select [On], enter a password (up to 256 characters) and then select [Next].
- Page 365 Using Various Functions > Functions Scan to Office Function This machine provides the function which converts scanned documents including text, figures and pictures into searchable and editable Microsoft Office (Word, Excel and PowerPoint) 2007 or later data format, via OCR processing. NOTE •...
-
Page 366: File Separation
Using Various Functions > Functions File Separation Org./Sending Functions Functions Custom Send Drive Data Format Creates several files by dividing scanned original data page by specified number of pages, and sends the files. NOTE A three-digit serial number such as "abc_001.pdf, abc_002.pdf..." is attached to the end of the file name. Item Value Description... -
Page 367: E-Mail Subject/Body
Using Various Functions > Functions E-mail Subject/Body Advanced Functions Custom Send Setup Adds subject and body when sending a document. Select [Subject] / [Body] to enter the E-mail subject/body. NOTE • The subject can include up to 256 characters, and the body can include up to 500 characters. •... -
Page 368: Ftp Encrypted Tx
Using Various Functions > Functions FTP Encrypted TX Advanced Functions Custom Send Setup Encrypts images when sending via FTP. Encryption secures the document transmission. (Value: [Off] / [On]) NOTE Click [Security Settings], and then [Network Security] in the Command Center RX. Be sure that "SSL" of Secure Protocol Settings is "On"... -
Page 369: Storing Size
Using Various Functions > Functions Storing Size Functions Functions Custom Drive Select size of image to be stored. Select [Standard Sizes 1], [Standard Sizes 2], or [Others] to select the storing size. Item Value Description Standard Sizes 1 Metric models: Same as Original Size, A3, A4, A5, Select from Same as Original Size or A6, B4, B5, B6, Folio, 216×340 mm Standard Size. -
Page 370: Encrypted Pdf Password
Using Various Functions > Functions Encrypted PDF Password Functions Drive Enter the preassigned password to print the PDF data. Enter the Password, and select [OK]. NOTE For details on entering the password, refer to the following: Character Entry Method (page 11-10) JPEG/TIFF Print Functions Drive... -
Page 371: Status/Job Cancel
Status/Job Cancel This chapter explains the following topics: Checking Job Status ............................7-2 Details of the Status Screens ........................7-3 Checking Detailed Information of Jobs ....................7-8 Checking Job History ............................7-9 Checking the Detailed Information of Histories ..................7-10 Sending the Log History ........................ -
Page 372: Checking Job Status
Status/Job Cancel > Checking Job Status Checking Job Status Check the status of jobs being processed or waiting to be printed. Available Status Screens The processing and waiting statuses of jobs are displayed as a list on the touch panel in four different screens - Printing Jobs, Sending Jobs, Storing Jobs, and Scheduled Jobs. -
Page 373: Details Of The Status Screens
Status/Job Cancel > Checking Job Status Details of the Status Screens NOTE • You can show the job statuses of all users, or only the statuses of your own jobs. Display Status/Log (page 8-31) • This setting can also be changed from Command Center RX. Command Center RX User Guide Print Job Status Screen Status... - Page 374 Status/Job Cancel > Checking Job Status Item Description [Pause All Print Pauses all the printing jobs. By pressing this key again, the Jobs] printing jobs will be resumed. [Cancel] Select the job you want to cancel from the list, and press this key.
- Page 375 Status/Job Cancel > Checking Job Status Send Job Status screen Status Scheduled Job Status Job Type Job No. Accept Time Type Destination User Name Status 14:47 abc@def.com InProcess Cancel Priority Detail Override Printing Jobs Sending Jobs Storing Jobs Device/ Paper/ Close Communicate Supplies...
- Page 376 Status/Job Cancel > Checking Job Status NOTE The address and user name can be changed to other information if needed. Customize Status Display (page 8-31) Store Job Status screen Status Status Job Type Job No. Accept Time Type Job Name User Name Status 14:47...
- Page 377 Status/Job Cancel > Checking Job Status NOTE The job name and user name can be changed to other information if needed. Customize Status Display (page 8-31) Scheduled Job Status Screen Status Status Scheduled Job Job No. Type Destination User Name Start Time Accept Time 0007...
-
Page 378: Checking Detailed Information Of Jobs
Status/Job Cancel > Checking Job Status Checking Detailed Information of Jobs Display the screen. Details of the Status Screens (page 7-3) Check the information. Select [Detail] for the job for which you wish to display detailed information. Status Scheduled Job Status Job Type Job No. -
Page 379: Checking Job History
Status/Job Cancel > Checking Job History Checking Job History NOTE • Job history is also available by Command Center RX or KYOCERA Net Viewer from the computer. Command Center RX User Guide KYOCERA Net Viewer User Guide • You can show the job log of all users, or only your own job log. -
Page 380: Checking The Detailed Information Of Histories
Status/Job Cancel > Checking Job History Displaying Job History Screen Display the screen. Select the [Status/Job Cancel] key. Select the job to check details. Select the [Log] tab, and select the job to check details from the list. Checking the Detailed Information of Histories Display the screen. -
Page 381: Job Operation
Status/Job Cancel > Job Operation Job Operation Pause and Resumption of Jobs Pause/resume all printing jobs in printing/waiting. Display the screen. Select the [Status/Job Cancel] key. Select [Pause All Print Jobs] on the printing jobs status screen. Printing is paused. When resuming the printing of jobs that have been paused, select [Resume All Print Jobs]. -
Page 382: Reordering Print Jobs
Status/Job Cancel > Job Operation Reordering Print Jobs This function allows you to select a queued print job and raise its output priority. Display the screen. Select the [Status/Job Cancel] key. Select [Printing Jobs]. Select the job to be assigned a higher priority and select [Move Up]. -
Page 383: Device/Communication
Status/Job Cancel > Device/Communication Device/Communication Configure the devices/lines installed or connected to this machine or check their status. Display the screen. Select the [Status/Job Cancel] key. Select [Device/Communicate]. The screen to check the status or configure the devices is displayed. Check the status. -
Page 384: Checking The Remaining Amount Of Toner And Paper (Paper/Supplies)
Status/Job Cancel > Checking the Remaining Amount of Toner and Paper (Paper/Supplies) Checking the Remaining Amount of Toner and Paper (Paper/Supplies) Check the remaining amount of toner, and paper on the touch panel. Display the screen. Select the [Status/Job Cancel] key. Select [Paper/Supplies]. - Page 385 Setup and Registration (System Menu) This chapter explains the following topics: System Menu ..............................8-2 Operation Method ............................ 8-2 System Menu Settings ..........................8-4 Counter ..............................8-7 Cassette/MP Tray Settings ........................8-7 Common Settings ..........................8-10 Home ..............................8-34 Copy ..............................8-35 Send ..............................
-
Page 386: Operation Method
Setup and Registration (System Menu) > System Menu System Menu Configure settings related to overall machine operation. Operation Method Display the screen. Select the [System Menu/Counter] key. Select a function. 1 Displays the System Menu items. System Menu Quick Setup Wizard Counter 2 Scrolls up and down when the list of Cassette/MP Tray Settings... - Page 387 Login User Name Login Password TASKalfa 5003i 5000 5000 TASKalfa 6003i 6000 6000 • If function default settings have been changed, the [Reset] key can be selected in each function screen to immediately change the settings. Refer to System Menu Settings on the following page and configure as needed.
-
Page 388: System Menu Settings
Setup and Registration (System Menu) > System Menu System Menu Settings This section explains the functions that can be configured in System Menu. To configure the settings, select the item in System Menu and select the setting item. For details on each function, see the table below. Reference Item Description... - Page 389 Setup and Registration (System Menu) > System Menu Reference Item Description Page Display Status/Log Set the display method of the Status/Log. page 8-31 Message Banner Print Set whether the confirmation screen appears before each sheet is page 8-31 printed when printing multiple banner sheets. Customize Status Display Select the item that appears for the printing jobs status.
- Page 390 Setup and Registration (System Menu) > System Menu Reference Item Description Page System/Network Configure machine system settings. page 8-51 Network Configures network settings. page 8-51 Optional Network Configure settings for the optional Network Interface Kit. page 8-65 Primary Network (Client) Select the network interface to be used for the send function that page 8-68 this machine functions as a client, the network authentication and...
-
Page 391: Counter
Setup and Registration (System Menu) > System Menu Counter [System Menu/Counter] key > [Counter] Check the number of sheets printed and scanned. Cassette/MP Tray Settings Select paper size and media type for Cassettes and multipurpose tray. Cassette 1 (to 5) [System Menu/Counter] key >... - Page 392 Setup and Registration (System Menu) > System Menu Selection Item Selectable Size/Type Paper Size Size Entry Enter the size not included in the standard size. Values Cassette 1 Metric X: 148 to 356 mm (in 1mm increments) Y: 98 to 297 mm (in 1mm increments) Inch X: 5.83 to 14.02"...
- Page 393 Setup and Registration (System Menu) > System Menu Item Description Paper Size Standard Sizes 2 Select from standard sizes except Standard Sizes 1. Values Metric models: Ledger , Letter-R , Letter , Legal , Statement-R , Executive, 12×18" , Oficio II, 8K, 16K-R, 16K Inch models: , A4-R , A4...
-
Page 394: Common Settings
Setup and Registration (System Menu) > System Menu Common Settings Configures overall machine operation. Language [System Menu/Counter] key > [Common Settings] > [Language] Item Description Language Set the language to use for the touch panel display. Default Screen [System Menu/Counter] key > [Common Settings] > [Default Screen] Item Description Default Screen... - Page 395 Setup and Registration (System Menu) > System Menu Keyboard Layout [System Menu/Counter] key > [Common Settings] > [Keyboard Layout] Item Description Keyboard Layout Change the layout of the touch panel keyboard used to enter characters. Value: QWERTY, QWERTZ, AZERTY Original / Paper Settings [System Menu/Counter] key >...
- Page 396 Setup and Registration (System Menu) > System Menu Item Description Custom Paper Size Set up frequently-used custom paper size. The custom size option is displayed on the screen to select paper size in the multipurpose tray. To register a custom paper size, press [On] and enter the desired size. Up to four custom paper sizes can be added.
- Page 397 Setup and Registration (System Menu) > System Menu Item Description Auto Detect Original Size Select whether to automatically detect originals of special or non-standard size. Select [Metric] when automatically detecting the originals in centimeter sizes. Select [Inch] when detecting the originals in inch sizes. Metric A6/Hagaki As A6 and Hagaki (Cardstock) are similar in size, select either one of them for...
- Page 398 Setup and Registration (System Menu) > System Menu Item Description Special Paper Action When printing on Prepunched, Preprint, and Letterhead, punch-holes might not be aligned or the print direction might be upside-down depending on how originals are set and the combination of copying functions. In such a case, select [Adjust Print Direction] to adjust the print direction.
- Page 399 Setup and Registration (System Menu) > System Menu Media Type Setting The following media type and paper weight combinations are available. Paper Weight Weight (g/m Paper Weight Weight (g/m Light 52 g/m² to 59 g/m² Heavy 2 136 g/m² to 163 g/m² Normal 1 60 g/m²...
- Page 400 Setup and Registration (System Menu) > System Menu Error Handling [System Menu/Counter] key > [Common Settings] > [Error Handling] Select whether to cancel or continue the job when error has occurred. Item Description Duplexing Error Set what to do when duplex printing is not possible for the selected paper sizes and media types.
- Page 401 Setup and Registration (System Menu) > System Menu Item Description Paper Jam before Staple The page from which printing is resumed when a paper jam occurs during a job with stapling can be selected. Value Resume at Top of Page: Resume printing from the first page of the document. Resume at Jammed Page: Resume printing from the page where the jam occurred.
- Page 402 Setup and Registration (System Menu) > System Menu Paper Output [System Menu/Counter] key > [Common Settings] > [Paper Output] Item Description Paper Output Select the output tray respectively for copy jobs, print jobs from Document Box, computers, and FAX RX data. Value: with optional job separator •...
- Page 403 Setup and Registration (System Menu) > System Menu Orientation Confirmation [System Menu/Counter] key > [Common Settings] > [Orientation Confirmation] Item Description Orientation Confirmation Select whether to display a screen for selecting the orientation of the originals to be placed on the platen when using the following functions. Original Orientation (page 6-24) •...
- Page 404 Setup and Registration (System Menu) > System Menu Item Description Prevent Bleed (Send/Store) Set the default Prevent Bleed (Send/Store). Value: Off, On Zoom Select the enlarged/reduced default when paper size/sending size changed after the originals set. Value: 100%, Auto Border Erase Default Set the default width to be erased as a border.
- Page 405 Setup and Registration (System Menu) > System Menu Item Description JPEG/TIFF Print Select the image size (resolution) when printing JPEG or TIFF file. Value: Fit to Paper Size, Image Resolution, Fit to Print Resolution XPS Fit to Page Set the default value for the XPS fit to page function. Value: Off, On PDF/A Select the default PDF/A setting.
- Page 406 Setup and Registration (System Menu) > System Menu Item Description OCR Output Format Select the OCR output style for text, graphics, and photos. Value: Text + Graphics, Text+Graphics w/Scan Image, Scanned Image w/ Srchable Txt Repeat Copy Select the Repeat Copy default. Value: Off, On NOTE •...
- Page 407 Setup and Registration (System Menu) > System Menu *1 This function can only be used when the optional OCR Scan Activation Kit is installed. *2 Displayed only when the optional FAX Kit is installed. Optional Keyboard Type [System Menu/Counter] key > [Common Settings] > [Optional Keyboard Type] Item Description Optional Keyboard Type...
- Page 408 Setup and Registration (System Menu) > System Menu Item Description Printing Jobs Configure settings for stamps when a document is printed. After configuring the setting, return to the Copying Functions or Custom Box (Printing a Document) screen from System Menu, and select the [Reset] key. Text Stamp Select whether to print a text stamp on all printing jobs.
- Page 409 Setup and Registration (System Menu) > System Menu Item Description Printing Jobs Bates Stamp Select whether to print a bates stamp on all printing jobs. Value: Off, On NOTE When [On] is selected, the Bates Stamp settings cannot be changed when printing. Edit Bates Stamp Set the default Bates Stamp.
- Page 410 Setup and Registration (System Menu) > System Menu Item Description Sending Jobs Configure stamp settings for sending documents. After configuring the setting, return to the Sending Functions or Custom Box (Sending Documents) screen from System Menu, and select the [Reset] key. Text Stamp Select whether to print a text stamp on all sending jobs.
- Page 411 Setup and Registration (System Menu) > System Menu Item Description Sending Jobs Bates Stamp Select whether to print a bates stamp on all sending jobs. Value: Off, On NOTE When [On] is selected, the Bates Stamp settings cannot be changed when sending. Edit Bates Stamp Set the default Bates Stamp.
- Page 412 Setup and Registration (System Menu) > System Menu Item Description Storing Jobs Configure stamp settings for storing documents in USB drive. After configuring the setting, return to the Custom Box (Storing Documents) screen from System Menu, and select the [Reset] key. Text Stamp Select whether to print a text stamp on all storing jobs.
- Page 413 Setup and Registration (System Menu) > System Menu Item Description Storing Jobs Bates Stamp Select whether to print a bates stamp on all storing jobs. Value: Off, On NOTE When [On] is selected, the Bates Stamp settings cannot be changed when storing. Edit Bates Stamp Set the default Bates Stamp.
- Page 414 Setup and Registration (System Menu) > System Menu Low Toner Alert Level [System Menu/Counter] key > [Common Settings] > [Low Toner Alert Level] Item Description Low Toner Alert Set the amount of remaining toner to notify the administrator when to order a toner when the toner is running low.
- Page 415 Setup and Registration (System Menu) > System Menu Display Status/Log [System Menu/Counter] key > [Common Settings] > [Display Status/Log] Set the display method of the Status/Log. Item Description Display Jobs Detail Status Value: Show All, My Jobs Only, Hide All Display Jobs Log Value: Show All, My Jobs Only, Hide All Display FAX Log...
- Page 416 Setup and Registration (System Menu) > System Menu Message Board Settings [System Menu/Counter] key > [Common Settings] > [Message Board Settings] Item Description Message Board Select whether to use the Message Board. Value: Off, On Message List Configure settings for the registered message board. Add a new message board.
- Page 417 Setup and Registration (System Menu) > System Menu Numeric Keypad Settings [System Menu/Counter] key > [Common Settings] > [Numeric Keypad Settings] Item Description Default Copy/Print Select whether or not to display the numeric keypad. Display from Box Value: Off, On HyPAS Application Layout (HyPAS Application) Select the HyPAS numeric keypad layout to display upon startup.
-
Page 418: Home
Setup and Registration (System Menu) > System Menu Clear Set. after Job Started [System Menu/Counter] key > [Common Settings] > [Clear Set. after Job Started] Item Description Clear Set. after Job Started Set whether to reset function settings to their defaults after the job starts. Value: Clear, Do Not Clear Direct Printing from Web [System Menu/Counter] key >... -
Page 419: Copy
Setup and Registration (System Menu) > System Menu Copy [System Menu/Counter] key > [Copy] Configures settings for copying functions. Item Description Paper Selection Set the default paper selection. Value: Auto, Default Paper Source Auto Image Rotation Action Set whether the image is rotated when the orientation of the document to be printed is different from the orientation of the paper. -
Page 420: Send
Setup and Registration (System Menu) > System Menu Send [System Menu/Counter] key > [Send] Configures settings for sending functions. Item Description Quick Setup Registration Select the functions to be registered for Quick Setup. Six keys of the Quick Setup screen are allocated to typical functions but can be changed as necessary. Six items in the following options are available. - Page 421 Setup and Registration (System Menu) > System Menu Item Description Send and Forward Select whether to forward the original to another destination when sending images. Forward Select whether to forward the original. Value: Off, On NOTE When selecting [On], select rules to forward from [E-mail], [Folder (SMB)], [Folder (FTP)], [FAX] , [i-FAX (Via server-On)] , and [i-FAX (Via server-Off)]...
- Page 422 Setup and Registration (System Menu) > System Menu Item Description OCR Text Recognition Act. Configure settings for OCR Text Recognition Action. Value: Speed Priority, Quality Priority NOTE This function can only be used when the optional OCR Scan Activation Kit is installed. Scan Extension Kit(A) "OCR Scan Activation Kit"...
- Page 423 Setup and Registration (System Menu) > System Menu File format Adjustable range of image quality Color setting JPEG 1 Low Quality (High Comp.) to Auto Color (Color/Grayscale), Full Color, Grayscale 5 High Quality (Low Comp.) 1 Low Quality (High Comp.) to Auto Color (Color/Grayscale), Auto Color (Color/ 5 High Quality (Low Comp.) Black and White), Full Color, Grayscale, Black and...
- Page 424 Setup and Registration (System Menu) > System Menu When [Acrobat 5.0 or later Encryption Level: High (128-bit)] is selected [System Menu/Counter] key > [Send] > [Send and Forward] > [File Format] > [PDF/High Comp. PDF] > [Encryption] Item Value Description Password to Open Off, On Enter the password to open the PDF file.
-
Page 425: Document Box/Usb Drive
Setup and Registration (System Menu) > System Menu Document Box/USB Drive [System Menu/Counter] key > [Document Box/USB Drive] Configures settings related to the Custom Box, Job Box, Sub Address Box and Polling Box. Item Description Custom Box Configure settings for Custom Box. Add/Edit Box Creating a New Custom Box (page 5-56) Default Setting... -
Page 426: Fax
Setup and Registration (System Menu) > System Menu Item Description Quick Setup Registration Select the functions to be registered for Quick Setup. Six keys of the Quick Setup screen are allocated to typical functions but can be changed as necessary. Store File Select the functions to be registered for Store File Quick Setup. - Page 427 Setup and Registration (System Menu) > System Menu Item Description EcoPrint EcoPrint conserves toner when printing. This is recommended for test copies where faded printing is not a problem. Value: Off, On Toner Save Level (EcoPrint) Select the default Toner Save Level (EcoPrint). Value: 1 (Low) to 5 (High) NOTE Raising the level reduces toner consumption, but image quality falls.
- Page 428 Setup and Registration (System Menu) > System Menu Item Description MP Tray Priority If paper is set in the MP Tray then it is possible for priority to be given to that MP tray in the paper feed. Value Off: The printer driver settings are followed. Auto Feed: If Auto is selected in the printer driver and there is paper in the MP tray then the paper feed will be from the MP tray.
-
Page 429: Report
Setup and Registration (System Menu) > System Menu Report Print reports to check the machine settings, status, and history. Settings for printing reports can also be configured. Print Report [System Menu/Counter] key > [Report] > [Print Report] Item Description Status Page Prints the status page, allowing you to check the information including current settings, available memory space, and optional equipment installed. - Page 430 Setup and Registration (System Menu) > System Menu Item Description Optional Network Status Prints the optional network status, allowing you to check the information including optional network interface firmware version, network address and protocol. NOTE This function is displayed when the optional Network Interface Kit or Wireless Network Interface Kit is installed.
- Page 431 Setup and Registration (System Menu) > System Menu Sending Log History [System Menu/Counter] key > [Report] > [Sending Log History] Item Description Auto Sending This function automatically sends the log history to the specified destinations whenever a set number of jobs has been logged. Value: Off, On NOTE If [On] is selected, specify the number of job histories.
- Page 432 The factory default login user name and login password are set as shown below. Model Name Login User Name Login Password TASKalfa 5003i 5000 5000 TASKalfa 6003i 6000 6000 8-48...
- Page 433 The factory default login user name and login password are set as shown below. Model Name Login User Name Login Password TASKalfa 5003i 5000 5000 TASKalfa 6003i 6000 6000 8-49...
- Page 434 The factory default login user name and login password are set as shown below. Model Name Login User Name Login Password TASKalfa 5003i 5000 5000 TASKalfa 6003i 6000 6000 8-50...
-
Page 435: System/Network
Setup and Registration (System Menu) > System Menu System/Network Configures machine system settings. Network Configures network settings. Host Name [System Menu/Counter] key > [System/Network] > [Network] > [Host Name] Item Description Host Name Check the host name of the machine. Host name can be changed from Command Center RX. - Page 436 Setup and Registration (System Menu) > System Menu Item Description Persistent Group Set whether Wi-Fi Direct connection as Persistent Group (information for the connection is kept even if the power is turned off). Value: Off, On NOTE This function is displayed when [Wi-Fi Direct] is set to [On]. Wi-Fi Settings [System Menu/Counter] key >...
- Page 437 Setup and Registration (System Menu) > System Menu Item Description Custom Setup The detailed settings for wireless LAN can be changed. Network Name (SSID) Set the SSID (Service Set Identifier) of the wireless LAN to which the machine connects. NOTE Up to 32 characters can be entered.
- Page 438 Setup and Registration (System Menu) > System Menu TCP/IP Setting Item Description TCP/IP Select whether to use TCP/IP Protocol. Value: Off, On IPv4 Set up TCP/IP (IPv4) to connect to the network. This setting is available when [TCP/ IP] is set to [On]. IP Address Set the IP address.
- Page 439 Setup and Registration (System Menu) > System Menu Item Description IPv6 Set up TCP/IP (IPv6) to connect to the network. This setting is available when [TCP/ IP] is [On]. IPv6 Select whether to use IPv6. Value: Off, On NOTE Selecting [On] displays IP address in [IP Address (Link Local)] after restarting the network.
- Page 440 Setup and Registration (System Menu) > System Menu Wired Network Settings [System Menu/Counter] key > [System/Network] > [Network] > [Wired Network Settings] Configure wired network settings. TCP/IP Setting Item Description TCP/IP Select whether to use TCP/IP Protocol. Value: Off, On IPv4 Set up TCP/IP (IPv4) to connect to the network.
- Page 441 Setup and Registration (System Menu) > System Menu Item Description IPv6 Set up TCP/IP (IPv6) to connect to the network. This setting is available when [TCP/ IP] is [On]. IPv6 Select whether to use IPv6. Value: Off, On NOTE Selecting [On] displays IP address in [IP Address (Link Local)] after restarting the network.
- Page 442 Setup and Registration (System Menu) > System Menu LAN Interface Item Description LAN Interface Specify the settings for the LAN interface to be used. Value: Auto, 10BASE-T Half, 10BASE-T Full, 100BASE-TX Half, 100BASE-TX Full, 1000BASE-T IMPORTANT After changing the setting, restart the network or turn the machine OFF and then ON. Bonjour [System Menu/Counter] key >...
- Page 443 Setup and Registration (System Menu) > System Menu Item Description SMB Client (Transmission): Select whether to send documents using SMB. To use the SMB Client, set the protocol to [On]. The default port number is 445. Value: Off, On NetBEUI Selects whether to receive documents using NetBEUI.
- Page 444 Setup and Registration (System Menu) > System Menu Item Description Selects whether to receive documents using LPD. Value: Off, On Wi-Fi Direct Set whether to enable this function for each network. Value: Disable, Enable Wi-Fi Wired Network Select whether to receive documents using Raw Port. Value: Off, On Wi-Fi Direct Set whether to enable this function for each network.
- Page 445 Setup and Registration (System Menu) > System Menu Item Description LDAP Select whether to use LDAP. Value: Off, On SNMPv1/v2c Select whether to communicate using SNMP. Value: Off, On Wi-Fi Direct Set whether to enable this function for each network. Value: Disable, Enable Wi-Fi Wired Network...
- Page 446 Setup and Registration (System Menu) > System Menu Item Description VNC (RFB) This is set when starting up a VNC Viewer (E.g. RealVNC) to use the Remote Operation. The default port number is 9062. Value: Off, On Wi-Fi Direct Set whether to enable this function for each network. Value: Disable, Enable Wi-Fi Wired Network...
- Page 447 Setup and Registration (System Menu) > System Menu Item Description *1, *2 REST over SSL Select whether to communicate using REST over SSL. Value: Off, On NOTE When selecting [On], it also requires a certificate for SSL. the default certificate is the self-certificate of the machine.
- Page 448 Setup and Registration (System Menu) > System Menu Ping [System Menu/Counter] key > [System/Network] > [Network] > [Ping] Item Description Ping Checks if communication with the destination by entering the host name or IP address of the destination is possible. NOTE If [Primary Network (Client)] is set to [Others], this item is not displayed.
- Page 449 Setup and Registration (System Menu) > System Menu Optional Network [System Menu/Counter] key > [System/Network] > [Optional Network] Basic Configure settings for the optional Network Interface Kit. NOTE This menu is displayed when the optional Network Interface Kit or Wireless Network Interface Kit is installed. Item Description Host Name...
- Page 450 Setup and Registration (System Menu) > System Menu Wireless Network Configure settings for the optional Wireless Network Interface Kit. NOTE This function is displayed when the Wireless Network Interface Kit (IB-51) is installed. Item Description Connection Status You can check the wireless LAN status. Quick Setup If the machine will connect to an access point that supports the automatic wireless network setup, connection settings can be configured by Quick Setup.
- Page 451 Setup and Registration (System Menu) > System Menu Item Description Custom Setup The detailed settings for wireless LAN can be changed. Network Name (SSID) Set the SSID (Service Set Identifier) of the wireless LAN to which the machine connects. NOTE Up to 32 characters can be entered.
- Page 452 Setup and Registration (System Menu) > System Menu Primary Network (Client) [System Menu/Counter] key > [System/Network] > [Primary Network (Client)] NOTE This function is displayed when the optional Network Interface Kit (IB-50) or Wireless Network Interface Kit (IB-51 or IB-35) is installed. The Wireless Network Interface Kit (IB-35) is an option for some models.
- Page 453 Setup and Registration (System Menu) > System Menu Interface Block Setting [System Menu/Counter] key > [System/Network] > [Interface Block Setting] This allows you to protect this machine by blocking the interface with external devices such as USB hosts or optional interfaces.
- Page 454 Setup and Registration (System Menu) > System Menu Data Security [System Menu/Counter] key > [System/Network] > [Data Security] Configure settings for data stored in the SSD, hard disk, and machine's memory. Item Description Hard Disk/SSD Initialization Change security functions. NOTE •...
- Page 455 Setup and Registration (System Menu) > System Menu Item Description Data Sanitization Return the following information registered in the machine to the factory defaults. • Address Book • Favorites • System settings • Fax transmission and reception / forwarding data •...
- Page 456 Setup and Registration (System Menu) > System Menu Information erased Category Data erased Devices/jobs • Job settings configured by users • Network settings • Image data saved in Document Box, etc. • Data registered in One Touch keys • Job histories •...
- Page 457 Setup and Registration (System Menu) > System Menu Optional Function [System Menu/Counter] key > [System/Network] > [Optional Function] Item Description Optional Function You can use the optional applications installed on this machine. Applications (page 11-8) Bluetooth Settings [System Menu/Counter] key > [System/Network] > [Bluetooth Settings] Item Description Bluetooth...
- Page 458 Setup and Registration (System Menu) > System Menu Remote Operation [System Menu/Counter] key > [System/Network] > [Remote Operation] Item Description Remote Operation Configure settings for remote operation. Value: Off, On If [On] is selected, set the Use Restrictions. [Off]: Users without administrator privileges can also execute remote operation. [Use Password]: Enter the password, then re-enter it to confirm.
-
Page 459: Edit Destination
Setup and Registration (System Menu) > System Menu Edit Destination Address Book [System Menu/Counter] key > [Edit Destination] > [Address Book] Configure settings for address book. Adding a Destination (Address Book) (page 3-35) One Touch Key [System Menu/Counter] key > [Edit Destination] > [One Touch Key] Configure settings for One Touch Key. -
Page 460: User Login/Job Accounting
Setup and Registration (System Menu) > System Menu Edit Restriction [System Menu/Counter] key > [Edit Destination] > [Edit Restriction] Item Description Address Book Restrict editing of the address book. If you selected [Administrator Only], you can only edit the Address Book by logging in with administrator privileges. Value: Off, Administrator Only One-Touch Key Restrict editing of the One Touch Key. - Page 461 Setup and Registration (System Menu) > System Menu Item Description Auto Panel Reset If no jobs are run for a certain period of time, automatically reset settings and return to the default setting. Select to use Auto Panel Reset or not. Value: Off, On NOTE For setting the time until the panel is automatically reset, refer to the following:...
- Page 462 Setup and Registration (System Menu) > System Menu Item Description Error Clear Timer If you select [On] for Auto Error Clear, set the amount of time to wait before automatically clearing errors. Value: 5 to 495 seconds (in 5 second increments) NOTE This function is displayed when [Auto Error Clear] is set to [On].
- Page 463 Setup and Registration (System Menu) > System Menu Item Description Weekly Timer Settings Configure settings for switching the machine into Sleep mode and waking it automatically at a specified time for each day of the week. Weekly Timer Select whether to use Weekly Timer. Value: Off, On Schedule Specify the time for each day of the week at which the machine enters Sleep mode...
-
Page 464: Adjustment/Maintenance
Setup and Registration (System Menu) > System Menu Adjustment/Maintenance [System Menu/Counter] key > [Adjustment/Maintenance] Adjust printing quality and conduct machine maintenance. Item Description Density Adjustment Adjust density. Copy Adjust copy density. Adjustment can be made in 7 levels. Value: -3 (Lighter), -2, -1, 0 (Normal), +1, +2, +3 (Darker) Send/Box Adjust scan density when sending or storing the data in Document Box. - Page 465 Setup and Registration (System Menu) > System Menu Item Description Correcting Black Lines Correct fine lines (streaks caused by contamination), which may appear on the image, when the document processor is used. Value Off: No correction performed. On (Low): Correction performed. The reproduction of fine lines on the original may become lighter than when using [Off].
- Page 466 Setup and Registration (System Menu) > System Menu Item Description Developer Refresh Adjust the printed image that is too light or incomplete, even though there is enough toner. Developer Refresh (page 10-57) NOTE Waiting time may be longer when the toner is refilled during developer refresh. Laser Scanner Cleaning Remove vertical white lines from the printout.
-
Page 467: Internet
Setup and Registration (System Menu) > System Menu Internet [System Menu/Counter] key > [Internet] Configure settings related to the internet. Item Description Internet Browser Select whether to use the Internet browser. Value: Off, On Browser Environment This specifies Internet browser preferences such as your home page setting and how pages are displayed. -
Page 468: User Authentication And Accounting (User Login, Job Accounting)
User Authentication and Accounting (User Login, Job Accounting) This chapter explains the following topics: Overview of User Login Administration ..9-2 Job Accounting (Local) ....... 9-36 Managing the Job Account from PC ... 9-2 Adding an Account ......9-36 Managing the Users to Use TWAIN Restricting the Use of the Machine ... -
Page 469: Overview Of User Login Administration
User Authentication and Accounting (User Login, Job Accounting) > Overview of User Login Administration Overview of User Login Administration User login administration specifies how the user access is administered on this machine. Enter a correct login user name and password for user authentication to login. Enable User Login Set the user Enter the login user name and password... -
Page 470: Enabling User Login Administration
The factory default login user name and login password are set as shown below. Model Name Login User Name Login Password TASKalfa 5003i 5000 5000 TASKalfa 6003i 6000 6000 "User Login Setting" [Next] > "User Login" [Change] Configure the settings. Select [Local Authentication] or [Network Authentication]. Select [Off] to disable user login administration. - Page 471 User Authentication and Accounting (User Login, Job Accounting) > Enabling User Login Administration Select [OK]. "Do you want to add a new function to the home screen?" appears when [OK] is selected. To add a new function, select [Yes]. The selection screen for functions displayed in the home screen will appear.
-
Page 472: Setting User Login Administration
The factory default login user name and login password are set as shown below. Model Name Login User Name Login Password TASKalfa 5003i 5000 5000 TASKalfa 6003i 6000 6000 "User Login Setting" [Next] > "Authentication Security" [Next] > "User Account Lockout Set" [Next]... - Page 473 User Authentication and Accounting (User Login, Job Accounting) > Setting User Login Administration Configure the settings. The following settings can be selected. Item Descriptions Lockout Select whether or not account lockout policy is enabled. Value: Off, On Lockout Policy Specify the conditions and the extent to which the account lockout is applied.
- Page 474 The factory default login user name and login password are set as shown below. Model Name Login User Name Login Password TASKalfa 5003i 5000 5000 TASKalfa 6003i 6000 6000 "User Login Setting" [Next] > "Authentication Security" [Next] > "Password Policy Settings" [Next] Configure the settings. The following settings can be selected.
-
Page 475: Adding A User (Local User List)
By default, one of each default user with machine administrator rights and administrator privileges is already stored. Each user's properties are: Machine Administrator User Name: DeviceAdmin Login User Name: TASKalfa 5003i: 5000, TASKalfa 6003i: 6000 Login Password: TASKalfa 5003i: 5000, TASKalfa 6003i: 6000 Access Level: Machine Administrator Administrator... - Page 476 User Authentication and Accounting (User Login, Job Accounting) > Setting User Login Administration Item Descriptions Access Level Set user access privileges. Settings Access Level Select [Administrator] or [User] for user access privileges. System Admin If the user privileges set in the [Access Level] are [User], select Permission the privileges that can be set from the following.
- Page 477 User Authentication and Accounting (User Login, Job Accounting) > Setting User Login Administration Item Descriptions Local Authorization Set usage authority for each user. Print Select whether or not use of the print function of the printer is Restriction prohibited. Applicable print functions are as follows: •...
-
Page 478: Changing User Properties
Login Password TASKalfa 5003i 5000 5000 TASKalfa 6003i 6000 6000 For a user with administrator rights who logs in User properties can be changed and users can be deleted. The items, which can be added, are all able to be changed. - Page 479 User Authentication and Accounting (User Login, Job Accounting) > Setting User Login Administration Deleting a user Select the user to delete. Delete > [Yes] The selected user will be deleted. NOTE The default user with machine administrator rights cannot be deleted. Changing the user information of logged in user (User Property) These users can partially change their own user properties including user name, login password, E-mail address, Simple Login, and My Panel.
- Page 480 User Authentication and Accounting (User Login, Job Accounting) > Setting User Login Administration Item Description Authorization Rules Displays the usage restriction that is set for the logged in user. NOTE This function appears when Local Authorization is set to [On], Group Authorization is set to [On], or Guest Authorization Setting is set to [On].
-
Page 481: User Login Administration For Printing
User Authentication and Accounting (User Login, Job Accounting) > Setting User Login Administration User Login Administration for Printing It is possible to manage the users that print on this machine from a PC. Setting Printer Driver To manage the users that print on this machine from a PC, the following settings are necessary in the printer driver. Instructions are based on interface elements as they appear in Windows 8.1. -
Page 482: Managing The Users To Scan Using Twain
Select [Search] in charms, and enter "TWAIN Driver Setting" in the search box. Click [TWAIN Driver Setting] in the search list then the TWAIN Driver Setting screen appears. NOTE In Windows 7, select [Start] button on the Windows, [All Programs], [Kyocera] and then [TWAIN Driver Setting]. Select the machine, and click [Edit]. -
Page 483: Managing The Users To Scan Using Wia
User Authentication and Accounting (User Login, Job Accounting) > Setting User Login Administration Managing the Users to Scan Using WIA It is possible to manage the users that scan using WIA. Setting WIA Driver To manage the users that scan using WIA, the following settings are necessary in the WIA driver. Instructions are based on interface elements as they appear in Windows 8.1. -
Page 484: Managing The Users That Send Faxes From A Pc
User Authentication and Accounting (User Login, Job Accounting) > Setting User Login Administration Managing the Users that Send Faxes from a PC It is possible to manage the users that send faxes from a PC. Setting FAX Driver To manage the users that send faxes from a PC, the following settings are necessary in the FAX driver. Instructions are based on interface elements as they appear in Windows 8.1. -
Page 485: Local Authorization
The factory default login user name and login password are set as shown below. Model Name Login User Name Login Password TASKalfa 5003i 5000 5000 TASKalfa 6003i 6000 6000 "User Login Setting" [Next] > "Local Authorization" [Change] [Off] or [On] > [OK] 9-18... -
Page 486: Group Authorization Settings
The factory default login user name and login password are set as shown below. Model Name Login User Name Login Password TASKalfa 5003i 5000 5000 TASKalfa 6003i 6000 6000 "User Login Setting" [Next] > "Group Authorization Set." [Next] > "Group Authorization" [Change] [On] > [OK] 9-19... - Page 487 Model Name Login User Name Login Password TASKalfa 5003i 5000 5000 TASKalfa 6003i 6000 6000 "User Login Setting" [Next] > "Group Authorization Set." [Next] > "Group List" [Change] Configure the settings. [Add] > Add information on each item > [OK]...
- Page 488 User Authentication and Accounting (User Login, Job Accounting) > Setting User Login Administration *1 For "Group ID", specify PrimaryGroupID assigned by Active Directory of Windows. If you are using Windows Server 2008, check Attribute Editor tab of user properties. If you are using Windows Server 2000/2003, check ADSIEdit.
-
Page 489: Guest Authorization Set
The factory default login user name and login password are set as shown below. Model Name Login User Name Login Password TASKalfa 5003i 5000 5000 TASKalfa 6003i 6000 6000 "User Login Setting" [Next] > "Guest Authorization Set." [Next] > "Guest Authorization" [Change] [On] > [OK] NOTE If the guest authorization setting is enabled, the [Authentication/Logout] key must be selected when logging in. - Page 490 Model Name Login User Name Login Password TASKalfa 5003i 5000 5000 TASKalfa 6003i 6000 6000 "User Login Setting" [Next] > "Guest Authorization Set." [Next] > "Guest Property" [Next] Configure the settings. Check the settings and change or add information as needed.
- Page 491 User Authentication and Accounting (User Login, Job Accounting) > Setting User Login Administration Item Descriptions Authorization Set usage authority for each user. Rules The items you can restrict the access level with are as follows. Print Restriction: Select whether or not use of the print function of the printer is prohibited.
-
Page 492: Obtain Nw User Property
The factory default login user name and login password are set as shown below. Model Name Login User Name Login Password TASKalfa 5003i 5000 5000 TASKalfa 6003i 6000 6000 [User Login Setting] > [Obtain NW User Property] > [On] Configure the settings. [On] > Add information on each item > [OK] Item... - Page 493 User Authentication and Accounting (User Login, Job Accounting) > Setting User Login Administration Item Descriptions Search Timeout Set the amount of time to wait before time-out in seconds (from 5 to 255 seconds). LDAP Security Select the type of encryption according to the type of security employed by the LDAP server.
-
Page 494: Simple Login Settings
The factory default login user name and login password are set as shown below. Model Name Login User Name Login Password TASKalfa 5003i 5000 5000 TASKalfa 6003i 6000 6000 "User Login Setting" [Next] > "Simple Login Settings" [Next] > "Simple Login" [Change] [On] or [Off] > [OK] 9-27... - Page 495 Login User Name Login Password TASKalfa 5003i 5000 5000 TASKalfa 6003i 6000 6000 "User Login Setting" [Next] > "Simple Login Settings" [Next] > "Simple Login Key" [Next] Enter the user information. Select the key to which you want to register a user.
- Page 496 User Authentication and Accounting (User Login, Job Accounting) > Setting User Login Administration Specifying the user from network users Simple Login Key: - User Enter login user name and password. domain 1 Domain: User Name Login 0099 User Name # Keys Login ********** Password...
-
Page 497: Id Card Settings
The factory default login user name and login password are set as shown below. Model Name Login User Name Login Password TASKalfa 5003i 5000 5000 TASKalfa 6003i 6000 6000 "User Login Setting" [Next] > "ID Card Settings" [Next] Configure the settings. The following settings can be selected. Item... -
Page 498: Pin Code Authorization
The factory default login user name and login password are set as shown below. Model Name Login User Name Login Password TASKalfa 5003i 5000 5000 TASKalfa 6003i 6000 6000 "User Login Setting" [Next] > "PIN Code Authorization" [Change] [Off] or [On] > [OK] 9-31... -
Page 499: Using User Login Administration
User Authentication and Accounting (User Login, Job Accounting) > Using User Login Administration Using User Login Administration This section explains procedures while setting job accounting. Login/Logout If user login administration is enabled, the login user name and login password entry screen appears each time you use this machine. -
Page 500: Overview Of Job Accounting
User Authentication and Accounting (User Login, Job Accounting) > Overview of Job Accounting Overview of Job Accounting Job accounting manages the copy/print/scan/FAX count accumulated by individual accounts by assigning an ID to each account. Enable job Setting an account. Enter the assigned account Count the number of pages accounting. -
Page 501: Enabling Job Accounting
The factory default login user name and login password are set as shown below. Model Name Login User Name Login Password TASKalfa 5003i 5000 5000 TASKalfa 6003i 6000 6000 "Job Accounting Settings" [Next] > "Job Accounting" [Change] Configure the settings. [On] > [OK] NOTE •... -
Page 502: Job Accounting Access
The factory default login user name and login password are set as shown below. Model Name Login User Name Login Password TASKalfa 5003i 5000 5000 TASKalfa 6003i 6000 6000 [Job Accounting Settings] > [Job Accounting Access] Configure the settings. [Local] or [Network] > [OK] NOTE To select [Network], network authentication must be enabled and [Ext.] must be selected... -
Page 503: Job Accounting (Local)
Model Name Login User Name Login Password TASKalfa 5003i 5000 5000 TASKalfa 6003i 6000 6000 "Job Accounting Settings" [Next] > "Job Accounting (Local)" [Next] > "Accounting List" [Add/Edit] > [Add] Enter the account information. "Account Name" [Change] > Enter the account name > [OK]... -
Page 504: Restricting The Use Of The Machine
User Authentication and Accounting (User Login, Job Accounting) > Job Accounting (Local) Restricting the Use of the Machine This section explains how to restrict the use of the machine by account or the number of sheets available. The items that can be restricted differ depending on whether "Individual" or "Total" is selected for "Copy/Print Count". Copy/Printer Count (page 9-51) Restriction Items "Individual"... -
Page 505: Editing An Account
Model Name Login User Name Login Password TASKalfa 5003i 5000 5000 TASKalfa 6003i 6000 6000 "Job Accounting Settings" [Next] > "Job Accounting (Local)" [Next] > "Accounting List" [Add/Edit] Edit an account. Select [Detail] for the account name you wish to edit. -
Page 506: Deleting An Account
The factory default login user name and login password are set as shown below. Model Name Login User Name Login Password TASKalfa 5003i 5000 5000 TASKalfa 6003i 6000 6000 "Job Accounting Settings" [Next] > "Job Accounting (Local)" [Next] > "Accounting List" [Add/Edit] Delete an account. Select the account name you wish to delete. -
Page 507: Job Accounting For Printing
User Authentication and Accounting (User Login, Job Accounting) > Job Accounting (Local) Job Accounting for Printing The number of jobs to be printed from the computer can be managed by Job Accounting. Setting Printer Driver To manage the number of jobs to be printed from the PC on the network, you need configure the following settings by using the printer driver on the PC. -
Page 508: Job Accounting For Scan Using Twain
Select [Search] in charms, and enter "TWAIN Driver Setting" in the search box. Click [TWAIN Driver Setting] in the search list then the TWAIN Driver Setting screen appears. NOTE In Windows 7, select [Start] button on the Windows, [All Programs], [Kyocera] and then [TWAIN Driver Setting]. Select the machine, click [Edit]. -
Page 509: Job Accounting For Scan Using Wia
User Authentication and Accounting (User Login, Job Accounting) > Job Accounting (Local) Job Accounting for Scan Using WIA The number of jobs scanned by using WIA can be managed by Job Accounting. Setting WIA Driver To manage the number of jobs scanned by using WIA, you need to configure the following settings by using the WIA Driver on the computer. -
Page 510: Job Accounting For The Fax Transmitted From A Computer
User Authentication and Accounting (User Login, Job Accounting) > Job Accounting (Local) Job Accounting for the FAX Transmitted from a Computer The number of FAX jobs transmitted from the computer can be managed by Job Accounting. NOTE FAX functions are available only on products with the fax function installed. Setting FAX Driver To manage the number of FAX jobs transmitted from the computer, you need to configure the following settings by using the FAX Driver on the computer. -
Page 511: Configuring Job Accounting
Model Name Login User Name Login Password TASKalfa 5003i 5000 5000 TASKalfa 6003i 6000 6000 "Job Accounting Settings" [Next] > "Job Accounting (Local)" [Next] > "Default Setting" [Next] > "Default Counter Limit" [Next] Configure the settings. Select [Change] for the item you want to modify and then select [+], [-] or use the numeric keys to enter the default restriction on the number of sheets. - Page 512 Model Name Login User Name Login Password TASKalfa 5003i 5000 5000 TASKalfa 6003i 6000 6000 "Job Accounting (Local)" [Next] > "Default Setting" [Next] > "Count by Paper Size" [Next] > "Paper Size 1 (to 5)" [Change] Configure the settings. Select [On].
-
Page 513: Counting The Number Of Pages Printed
Model Name Login User Name Login Password TASKalfa 5003i 5000 5000 TASKalfa 6003i 6000 6000 "Job Accounting (Local)" [Next] > "Total Job Accounting" [Next] or "Each Job Accounting" [Check] Configure the settings. The table below lists the item you can view. - Page 514 User Authentication and Accounting (User Login, Job Accounting) > Configuring Job Accounting Item Descriptions Count by Duplex/ Displays the number of pages used in Duplex (1-sided) mode, Combine Duplex (2-sided) mode and the total for both, as well as the pages used in Combine (None) mode, Combine (2in1) mode, Combine (4in1) mode and the total for all three.
-
Page 515: Print Accounting Report
The factory default login user name and login password are set as shown below. Model Name Login User Name Login Password TASKalfa 5003i 5000 5000 TASKalfa 6003i 6000 6000 Print the report. [Print Accounting Report] > [Yes] Accounting report is printed. 9-48... -
Page 516: Using Job Accounting
User Authentication and Accounting (User Login, Job Accounting) > Using Job Accounting Using Job Accounting This section explains procedures while setting job accounting. Login/Logout If job accounting is enabled, an account ID entry screen appears each time you use this machine. Login In the account ID entry screen, enter the account ID using the numeric keys and select [Login]. -
Page 517: Apply Limit
The factory default login user name and login password are set as shown below. Model Name Login User Name Login Password TASKalfa 5003i 5000 5000 TASKalfa 6003i 6000 6000 Select "Apply Limit" [Change]. Configure the settings. Select [Immediately], [Subsequently], or [Alert Only] > [OK] 9-50... -
Page 518: Copy/Printer Count
The factory default login user name and login password are set as shown below. Model Name Login User Name Login Password TASKalfa 5003i 5000 5000 TASKalfa 6003i 6000 6000 Select "Copy/Printer Count" [Change]. Configure the settings. Select [Total] or [Individual] > [OK] 9-51... -
Page 519: Unknown User Settings
The factory default login user name and login password are set as shown below. Model Name Login User Name Login Password TASKalfa 5003i 5000 5000 TASKalfa 6003i 6000 6000 "Unknown User Setting" [Next] > [Unknown ID Job]. Configure the settings. Select [Permit] or [Reject]. 9-52... -
Page 520: Registering Information For A User Whose Id Is Unknown
The factory default login user name and login password are set as shown below. Model Name Login User Name Login Password TASKalfa 5003i 5000 5000 TASKalfa 6003i 6000 6000 "Unknown User Setting" [Next] > [User Property]. Enter the user information. Enter the user information > [OK] Item... -
Page 521: 10 Troubleshooting
10 Troubleshooting This chapter explains the following topics: Regular Maintenance ........10-2 Remove any jammed paper in Right Cover 2 (500-sheet×2) ......10-80 Cleaning ............10-2 Remove any jammed paper in Right Cleaning Glass Platen ........ 10-2 Cover 2 (1,500-sheet×2) ......10-81 Cleaning inside of the Document Processor 10-2 Remove any jammed paper in the Bridge Cleaning Slit Glass ........ -
Page 522: Regular Maintenance
Troubleshooting > Regular Maintenance Regular Maintenance Cleaning Clean the machine regularly to ensure optimum printing quality. CAUTION For safety, always unplug the power cord before cleaning the machine. Cleaning Glass Platen Wipe the backside of the original cover, the inside of the document processor and the glass platen with a soft cloth dampened with alcohol or mild detergent. -
Page 523: Cleaning Slit Glass
Troubleshooting > Regular Maintenance Clean inside of the document processor. Cleaning Slit Glass When using the document processor, clean the slit glass surface and the reading guide with the supplied cleaning cloth. IMPORTANT Clean the slit glass surface with the supplied cleaning cloth. NOTE Dirt on the slit glass or the reading guide may cause black streaks to appear in the output. -
Page 524: Toner Container Replacement
Troubleshooting > Regular Maintenance Toner Container Replacement When toner is empty, the following message will be displayed. "Toner is empty." When toner runs low, the following message will be displayed. Make sure you have a new toner container available for replacement. - Page 525 Troubleshooting > Regular Maintenance Put used toner container into the plastic waste bag. Remove the new toner container from the box. IMPORTANT Do not touch the points shown below. Tap the toner container. 5 ~ 6 5 ~ 6 5 ~ 6 5 ~ 6 Shake the toner container.
- Page 526 Troubleshooting > Regular Maintenance Install the toner container. IMPORTANT Insert the toner container all the way. CLICK! Close the toner container cover. Close the front cover. NOTE • If the toner container cover or front cover does not close, check that the new toner container is installed correctly. •...
-
Page 527: Replace The Waste Toner Box
Troubleshooting > Regular Maintenance Replace the Waste Toner Box When the waste toner box is full, the following message will be displayed. Immediately replace the waste toner box. "Waste toner box is full." CAUTION Do not attempt to incinerate parts which contain toner. Dangerous sparks may cause burns. Open the waste toner box cover. - Page 528 Troubleshooting > Regular Maintenance Install the Waste Toner Box. CLICK! Close the waste toner box cover. NOTE Return the exhausted waste toner box to your dealer or service representative. The collected waste toner box will be recycled or disposed in accordance with the relevant regulations. 10-8...
-
Page 529: Loading Paper
Troubleshooting > Regular Maintenance Loading Paper When Cassette # runs out of paper, the following messages will be displayed. "Add paper in cassette #." "Add paper in Multipurpose tray." Loading in Cassette 1 (page 3-4) Loading in Cassette 2 (page 3-7) Loading Paper in the Multipurpose Tray (page 5-6) NOTE If [Show Paper Setup Message] is set to [On], the confirmation screen for the paper setting will be displayed when a... -
Page 530: Replacing Staples (Inner Finisher)
Troubleshooting > Regular Maintenance Replacing Staples (Inner Finisher) When the Staple Unit runs out of staples, the following messages will be displayed. The staple cartridge holder need to be replenished with staples. "Staple is empty." NOTE If the Staple Unit runs out of staples, contact your dealer or service representative. Open the inner finisher unit. - Page 531 Troubleshooting > Regular Maintenance Replace the staples. Install the Staple Cartridge Holder. Return the staple cover to the original position. Return the unit to the original position. 10-11...
-
Page 532: Replacing Staples (1,000-Sheet Finisher)
Troubleshooting > Regular Maintenance Replacing Staples (1,000-sheet Finisher) When the Staple Unit runs out of staples, the following messages will be displayed. The staple cartridge holder need to be replenished with staples. "Staple is empty." NOTE If the Staple Unit runs out of staples, contact your dealer or service representative. Open the finisher front cover. -
Page 533: Replacing Staples (4,000-Sheet Finisher)
Troubleshooting > Regular Maintenance Install the Staple Cartridge Holder. Close the cover. Replacing Staples (4,000-sheet Finisher) When the Staple Unit runs out of staples, the following messages will be displayed. The staple cartridge holder need to be replenished with staples. "Staple is empty."... - Page 534 Troubleshooting > Regular Maintenance Remove the Staple Cartridge Holder (A). Replace the staples. Install the Staple Cartridge Holder (A). Close the cover. 10-14...
-
Page 535: Replacing Staples (100-Sheet Staple Finisher)
Troubleshooting > Regular Maintenance Replacing Staples (100-sheet Staple Finisher) When the Staple Unit runs out of staples, the following messages will be displayed. The staple cartridge holder need to be replenished with staples. "Staple is empty." NOTE If the Staple Unit runs out of staples, contact your dealer or service representative. Open the finisher front cover 1. -
Page 536: Replacing Staples (Folding Unit)
Troubleshooting > Regular Maintenance Install the Staple Cartridge Holder (A). Close the cover. Replacing Staples (Folding Unit) When the Staple Unit runs out of staples, the following messages will be displayed. The staple cartridge holder need to be replenished with staples. "Staple is empty."... - Page 537 Troubleshooting > Regular Maintenance Remove the Staple Cartridge Holder (B) or (C). Replace the staples. Install the Staple Cartridge Holder (B) or (C). Close the covers. 10-17...
-
Page 538: Disposing Of The Staple Waste
Troubleshooting > Regular Maintenance Disposing of the Staple Waste When the staple waste box is full, the following messages will be displayed. Empty the staple waste box. "Check the staple waste box." Leave the power switch on the machine switched ON while performing this procedure. Open the finisher front cover 1. - Page 539 Troubleshooting > Regular Maintenance Install the Staple Waste Box. Close the cover. 10-19...
-
Page 540: Disposing Of The Punch Waste
Troubleshooting > Regular Maintenance Disposing of the Punch Waste When the waste punch box is full, the following messages will be displayed. Empty the punch waste box. "Empty the punch waste box." Leave the power switch on the machine switched ON while performing this procedure. Inner Finisher Open the inner finisher unit. - Page 541 Troubleshooting > Regular Maintenance Empty the Punch Waste Box. Install the Punch Waste Box. Return the unit to the original position. 10-21...
- Page 542 Troubleshooting > Regular Maintenance 1,000-sheet Finisher Open the finisher front cover. Remove the Punch Waste Box. NOTE Take care not to spill the waste hole punch scraps when removing the box. Empty the Punch Waste Box. 10-22...
- Page 543 Troubleshooting > Regular Maintenance Install the Punch Waste Box. Close the cover. 4,000-sheet Finisher/100-sheet Staple Finisher Open the finisher front cover 1. 10-23...
- Page 544 Troubleshooting > Regular Maintenance Remove the Punch Waste Box. NOTE Take care not to spill the waste hole punch scraps when removing the box. Empty the Punch Waste Box. Install the Punch Waste Box. 10-24...
- Page 545 Troubleshooting > Regular Maintenance Close the cover. 10-25...
-
Page 546: Troubleshooting
Troubleshooting > Troubleshooting Troubleshooting Solving Malfunctions The table below provides general guidelines for problem solving. If a problem occurs with your machine, look into the checkpoints and perform procedures indicated on the following pages. If the problem persists, contact your Service Representative. NOTE When contacting us, the serial number will be necessary. - Page 547 Troubleshooting > Troubleshooting Reference Symptom Checkpoints Corrective Actions Page Paper often jams. Is the paper loaded correctly? Load the paper correctly. page 3-4 ― Turn the orientation 180 degrees page 3-4 around in which the paper is positioned. Is the paper of the supported type? Remove the paper, turn it over, and page 3-4 Is it in good condition?
- Page 548 Troubleshooting > Troubleshooting Reference Symptom Checkpoints Corrective Actions Page Cannot print. Is the machine plugged in? Plug the power cord into an AC ― outlet. Is the machine powered on? Turn on the main power switch. page 2-2 Are the USB cable and network Connect the correct USB cable and page 2-7 cable connected?
- Page 549 Troubleshooting > Troubleshooting Reference Symptom Checkpoints Corrective Actions Page Cannot send via SMB. Is the network cable connected? Connect the correct network cable page 2-7 securely. Have the network settings for the Configure the TCP/IP settings page 8-56 equipment been configured properly.
- Page 550 Troubleshooting > Troubleshooting Reference Symptom Checkpoints Corrective Actions Page Cannot create Is the proper language selected? Check the language to extract. page 6-75 Searchable PDF file. Can the texts on the original not be Check the following: page 6-75 recognized as texts, or is the PDF •...
-
Page 551: Printed Image Trouble
Troubleshooting > Troubleshooting Printed Image Trouble When the following printed image trouble occurs, implement appropriate procedures. Reference Symptom Checkpoints Corrective Actions Page Printed images are totally Is the paper damp? Replace the paper with new paper. page 3-2 too light. Have you changed the density? Select appropriate density level. - Page 552 Troubleshooting > Troubleshooting Reference Symptom Checkpoints Corrective Actions Page Black dots appear on the Is the original holder or the glass Clean the original holder or the page 10-2 white background when platen dirty? glass platen. white original is scanned. ―...
- Page 553 Troubleshooting > Troubleshooting Reference Symptom Checkpoints Corrective Actions Page Part of the image is ― Open and then close the right cover. ― periodically faint or shows ― Run [Drum Refresh]. page 10-56 white lines. ― Run [Developer Refresh]. page 10-57 Print on the back of the ―...
-
Page 554: Remote Operation
Troubleshooting > Troubleshooting Remote Operation This function enables the system administrator to explain how to operate the panel and troubleshoot to user, by accessing operation panel of the machine at remote using browser and VNC software. Executing Remote Operation from Browser The supported Browser is as follows. - Page 555 Troubleshooting > Troubleshooting Start up the browser. Enter "https://" and host name of the machine to access the Command Center RX. Accessing Command Center RX (page 2-63) Select [Device Information/Remote Operation] > [Remote Operation]. Click [Start] button. NOTE • If the user is logged in to the device, the permission confirmation screen will be displayed on the operation panel.
-
Page 556: Responding To Messages
Troubleshooting > Troubleshooting Responding to Messages If the touch panel or the computer displays any of these messages, follow the corresponding procedure. NOTE When contacting us, the serial number will be necessary. To check the serial number, refer to the following: Display for Device Information (page 2-18) Reference Message... - Page 557 Troubleshooting > Troubleshooting Reference Message Checkpoints Corrective Actions Page Box is not found. — The specified box cannot be — found. Job is canceled. Select [End]. Box limit exceeded. Is [End] displayed on the The specified box is full, and no —...
- Page 558 Troubleshooting > Troubleshooting Reference Message Checkpoints Corrective Actions Page Cannot duplex print Did you select a paper size/type If the selected paper is not page 6-49 on this paper. that cannot be duplex printed? changed and [Continue] is selected, duplex is released. Select the available paper.
- Page 559 Troubleshooting > Troubleshooting Reference Message Checkpoints Corrective Actions Page Cannot print the — Only one copy is available. — specified number of Select [Continue] to continue copies. printing. Select [Cancel] to cancel the job. Cannot process this ― Restricted by Authorization ―...
- Page 560 Troubleshooting > Troubleshooting Reference Message Checkpoints Corrective Actions Page Check the paper in the — The paper size is different. Set page 5-6 multipurpose tray. selected size paper and select [Continue]. Check the side feeder. — The side feeder is not installed ―...
- Page 561 Troubleshooting > Troubleshooting Reference Message Checkpoints Corrective Actions Page Empty the punch Is the punch waste box full? Follow the instructions on the page 10-20 waste box. screen. and empty the punch waste box. Encrypted PDF Is the password you input Password is not entered or is —...
- Page 562 Troubleshooting > Troubleshooting Reference Message Checkpoints Corrective Actions Page Hard Disk error. — An error has occurred on the — hard disk. Job is canceled. Select [End]. The error cords are as follows. 01: The amount of data that can be saved at once has been exceeded.
- Page 563 Troubleshooting > Troubleshooting Reference Message Checkpoints Corrective Actions Page Job Accounting Is the acceptable printing count The printing count exceeded the — restriction restricted by Job Accounting acceptable count restricted by exceeded. exceeded? Job Accounting. Cannot print any more. The job is canceled. Select [End].
- Page 564 Troubleshooting > Troubleshooting Reference Message Checkpoints Corrective Actions Page Memory is full. — The process cannot be — performed due to insufficient memory. If only [End] is available, select [End]. The job will be canceled. When insufficient memory occurred frequently, contact your dealer or service representative.
- Page 565 Troubleshooting > Troubleshooting Reference Message Checkpoints Corrective Actions Page Perform Tone Curve Over long periods of use, the Run [Tone Curve Adjustment]. page 10-54 Adjustment in the effects of the ambient System Menu. temperature and humidity can cause output hues to vary slightly.
- Page 566 Troubleshooting > Troubleshooting Reference Message Checkpoints Corrective Actions Page Select another Is the cassette you selected The specified cassette is a fax — cassette. correct? special stage. Select another valid cassette. Select [Continue] to print. Send Error. — An error has occurred during page 10-50 transmission.
- Page 567 Troubleshooting > Troubleshooting Reference Message Checkpoints Corrective Actions Page Staple jam. — If a staple jam occurs, the page 10- machine will stop and the location of the jam will be indicated on the screen. Leave the machine on and follow the instructions to remove the jammed staple.
- Page 568 Troubleshooting > Troubleshooting Reference Message Checkpoints Corrective Actions Page This user account is — Contact administrator. ― locked out. The job is canceled. Select [End]. Time for maintenance — Call service. — soon. ##### Toner is empty. — Replace the toner container to page 10-4 our specified toner container.
- Page 569 Troubleshooting > Troubleshooting *1 When Auto Error Clear is set to [On], processing resumes automatically after a set amount of time elapses. For details on Auto Error Clear, refer to the following: Auto Error Clear (page 8-77) Reference Message Checkpoints Corrective Actions Page Warning for high...
- Page 570 Troubleshooting > Troubleshooting Responding to Send Error Error Reference Message Corrective Actions Code Page 1101 Failed to send the e-mail. Check the host name of the SMTP server on the page 2-66 Command Center RX. Failed to send i-FAX. Failed to send via FTP. Check the host name of FTP.
- Page 571 Troubleshooting > Troubleshooting Error Reference Message Corrective Actions Code Page 1104 Failed to send the e-mail. Check the e-mail address. page 5-23 NOTE If the address is rejected by the domain, you cannot send the email. Failed to send i-FAX. Check the i-FAX address.
- Page 572 Troubleshooting > Troubleshooting Error Reference Message Corrective Actions Code Page 2101 Failed to send via SMB. Check the network and SMB settings. — • The network cable is connected. • The hub is not operating properly. • The server is not operating properly. •...
- Page 573 Troubleshooting > Troubleshooting Error Reference Message Corrective Actions Code Page 3201 Failed to send the e-mail. Check the SMTP user authentication method of — the recipient. Failed to send i-FAX. 0007 — Turn the power switch off and back on. If this page 2-9 error occurs several times, make a note of the 4201...
-
Page 574: Adjustment/Maintenance
Troubleshooting > Adjustment/Maintenance Adjustment/Maintenance Overview of Adjustment/Maintenance If there is an image problem and the message to run adjustment or maintenance menu appears, run Adjustment/ Maintenance in the system menu. The table below lists the item you can carry out. Item Description Reference Page... - Page 575 Troubleshooting > Adjustment/Maintenance IMPORTANT • Load the paper with the print side facing up. • After removing new paper from its packaging, fan the paper before loading it in the cassette. Loading in Cassette 1 (page 3-4) • Before loading the paper, be sure that it is not curled or folded. Paper that is curled or folded may cause paper jams.
-
Page 576: Drum Refresh
Troubleshooting > Adjustment/Maintenance Drum Refresh Remove image blur and white dots from the printout. NOTE Drum Refresh cannot be performed while printing. Execute Drum Refresh after the printing is done. Display the screen. [System Menu/Counter] key > [Adjustment/Maintenance] > "Drum Refresh" [Next] Perform the drum refresh. -
Page 577: Developer Refresh
Troubleshooting > Adjustment/Maintenance Developer Refresh Adjust the printed image that is too light or incomplete, even though there is enough toner. Display the screen. [System Menu/Counter] key > [Adjustment/Maintenance] > "Developer Refresh" [Next] Perform the Developer Refresh. Select [Start]. "Developer Refresh" begins. NOTE Waiting time may be longer when the toner is refilled during developer refresh. -
Page 578: Clearing Paper Jams
Troubleshooting > Clearing Paper Jams Clearing Paper Jams If a paper jam occurs, printing stops and the location at which the paper jam has occurred and the following message appear on the touch panel. "Paper Jam." Refer to these procedures to remove the jammed paper. Jam Location Indicators 1 Shows the location of a paper jam. - Page 579 Troubleshooting > Clearing Paper Jams Paper Jam Location Indicator Paper Jam Location Reference Page Cassette 1 page 10-60 Cassette 2 page 10-63 Cassette 3 (500-sheet×2) page 10-66 Cassette 3 (1,500-sheet×1) page 10-68 Cassette 4 (500-sheet×2) page 10-66 Cassette 4 (1,500-sheet×2) page 10-70 Cassette 5 (Side Feeder) page 10-73...
-
Page 580: Remove Any Jammed Paper In Cassette 1
Troubleshooting > Clearing Paper Jams Remove any jammed paper in Cassette 1 CAUTION • Do not reuse jammed papers. • If the paper tears during removal, be sure to remove any loose scraps of paper from inside the machine. Scraps of paper left in the machine could cause subsequent jamming. If the optional side feeder is installed, detach the side feeder. - Page 581 Troubleshooting > Clearing Paper Jams Remove any jammed paper. Return the cover to the original position. Pull Cassette 1 out toward you until it stops. Remove any jammed paper. 10-61...
- Page 582 Troubleshooting > Clearing Paper Jams NOTE To remove paper which is difficult to get access to, the cassette can be removed. Push Cassette 1 back in. If the optional side feeder is installed, return the side feeder to the original position. 10-62...
-
Page 583: Remove Any Jammed Paper In Cassette 2
Troubleshooting > Clearing Paper Jams Remove any jammed paper in Cassette 2 CAUTION • Do not reuse jammed papers. • If the paper tears during removal, be sure to remove any loose scraps of paper from inside the machine. Scraps of paper left in the machine could cause subsequent jamming. If the optional side feeder is installed, detach the side feeder. - Page 584 Troubleshooting > Clearing Paper Jams Remove any jammed paper. Return the cover to the original position. Pull Cassette 2 out toward you until it stops. Remove any jammed paper. 10-64...
- Page 585 Troubleshooting > Clearing Paper Jams NOTE To remove paper which is difficult to get access to, the cassette can be removed. Push Cassette 2 back in. If the optional side feeder is installed, return the side feeder to the original position. 10-65...
- Page 586 Troubleshooting > Clearing Paper Jams Remove any jammed paper in Cassette 3 and 4 (500-sheet×2) See the explanation for Cassette 3 below. CAUTION • Do not reuse jammed papers. • If the paper tears during removal, be sure to remove any loose scraps of paper from inside the machine. Scraps of paper left in the machine could cause subsequent jamming.
- Page 587 Troubleshooting > Clearing Paper Jams Pull Cassette 3 out toward you until it stops. Remove any jammed paper. NOTE To remove paper which is difficult to get access to, the cassette can be removed. Push Right Cover 2 and Cassette 3 back in. 10-67...
-
Page 588: Remove Any Jammed Paper In Cassette 1
Troubleshooting > Clearing Paper Jams If the optional side feeder is installed, return the side feeder to the original position. Remove any jammed paper in Cassette 3 (1,500-sheet×2) CAUTION • Do not reuse jammed papers. • If the paper tears during removal, be sure to remove any loose scraps of paper from inside the machine. Scraps of paper left in the machine could cause subsequent jamming. -
Page 589: Remove Any Jammed Paper In Cassette
Troubleshooting > Clearing Paper Jams Remove any jammed paper. Pull Cassette 3 out toward you until it stops. Remove any jammed paper. Push Right Cover 2 and Cassette 3 back in. 10-69... -
Page 590: Remove Any Jammed Paper In Cassette 2
Troubleshooting > Clearing Paper Jams If the optional side feeder is installed, return the side feeder to the original position. Remove any jammed paper in Cassette 4 (1,500-sheet×2) CAUTION • Do not reuse jammed papers. • If the paper tears during removal, be sure to remove any loose scraps of paper from inside the machine. Scraps of paper left in the machine could cause subsequent jamming. - Page 591 Troubleshooting > Clearing Paper Jams Remove any jammed paper. Pull Cassette 3 out toward you until it stops. Pull Cassette 4 out toward you until it stops. Pull out paper feed unit (B1). 10-71...
- Page 592 Troubleshooting > Clearing Paper Jams Open cover (B2). Remove any jammed paper. Push paper feed unit, Cassette 3 and Cassette 4 back in. Return the cover to the original position. 10-72...
-
Page 593: Remove Any Jammed Paper In Cassette 5 (Side Feeder)
Troubleshooting > Clearing Paper Jams If the optional side feeder is installed, return the side feeder to the original position. Remove any jammed paper in Cassette 5 (Side Feeder) CAUTION • Do not reuse jammed papers. • If the paper tears during removal, be sure to remove any loose scraps of paper from inside the machine. Scraps of paper left in the machine could cause subsequent jamming. - Page 594 Troubleshooting > Clearing Paper Jams Pull Cassette 5 out toward you until it stops. Remove any jammed paper. Return the Cassette 5 and side feeder to the original position. 10-74...
-
Page 595: Remove Any Jammed Paper In The Multipurpose Tray
Troubleshooting > Clearing Paper Jams Remove any jammed paper in the Multipurpose Tray CAUTION • Do not reuse jammed papers. • If the paper tears during removal, be sure to remove any loose scraps of paper from inside the machine. Scraps of paper left in the machine could cause subsequent jamming. - Page 596 Troubleshooting > Clearing Paper Jams Remove any jammed paper in Right Cover 1 CAUTION The fixing unit is extremely hot. Take sufficient care when working in this area, as there is a danger of getting burned. If the optional side feeder is installed, detach the side feeder. Open Right Cover 1.
- Page 597 Troubleshooting > Clearing Paper Jams Open the paper feed unit cover (A1). Remove any jammed paper. Open the fuser cover (A2). Remove any jammed paper. 10-77...
- Page 598 Troubleshooting > Clearing Paper Jams Open the cover (A3). Remove any jammed paper. Lift the cover (A4). Remove any jammed paper. 10-78...
- Page 599 Troubleshooting > Clearing Paper Jams Lift the duplex unit (A5). Remove any jammed paper. Remove the paper from the paper ejector. Return the cover to the original position. 10-79...
- Page 600 Troubleshooting > Clearing Paper Jams If the optional side feeder is installed, return the side feeder to the original position. Remove any jammed paper in Right Cover 2 (500-sheet×2) CAUTION • Do not reuse jammed papers. • If the paper tears during removal, be sure to remove any loose scraps of paper from inside the machine. Scraps of paper left in the machine could cause subsequent jamming.
-
Page 601: Remove Any Jammed Paper In Right Cover 1
Troubleshooting > Clearing Paper Jams Remove any jammed paper. Return the cover to the original position. If the optional side feeder is installed, return the side feeder to the original position. Remove any jammed paper in Right Cover 2 (1,500-sheet×2) CAUTION •... -
Page 602: Remove Any Jammed Paper In Right
Troubleshooting > Clearing Paper Jams Open Right Cover 2. Remove any jammed paper. Return the cover to the original position. If the optional side feeder is installed, return the side feeder to the original position. 10-82... -
Page 603: Remove Any Jammed Paper In The Bridge Unit
Troubleshooting > Clearing Paper Jams Remove any jammed paper in the Bridge Unit CAUTION • Do not reuse jammed papers. • If the paper tears during removal, be sure to remove any loose scraps of paper from inside the machine. Scraps of paper left in the machine could cause subsequent jamming. -
Page 604: Remove Any Jammed Paper In The Mailbox
Troubleshooting > Clearing Paper Jams Remove any jammed paper in the Mailbox CAUTION • Do not reuse jammed papers. • If the paper tears during removal, be sure to remove any loose scraps of paper from inside the machine. Scraps of paper left in the machine could cause subsequent jamming. Open the mailbox cover. -
Page 605: Remove Any Jammed Paper In The Inner Finisher
Troubleshooting > Clearing Paper Jams Remove any jammed paper in the Inner Finisher CAUTION • Do not reuse jammed papers. • If the paper tears during removal, be sure to remove any loose scraps of paper from inside the machine. Scraps of paper left in the machine could cause subsequent jamming. -
Page 606: Remove Any Jammed Paper In The Document Processor (Reverse Automatic)
Troubleshooting > Clearing Paper Jams Return the unit to the original position. Remove any jammed paper in the Document Processor (Reverse Automatic) CAUTION If the paper tears during removal, be sure to remove any loose scraps of paper from inside the machine. Scraps of paper left in the machine could cause subsequent jamming. - Page 607 Troubleshooting > Clearing Paper Jams Turn dial (C1) to remove any jammed paper. Open reverse unit (C2) and remove any jammed paper. Turn dial (C1) to remove any jammed paper. Return the cover to the original position. 10-87...
-
Page 608: Remove Any Jammed Paper In The Document Processor (Dual Scan)
Troubleshooting > Clearing Paper Jams Remove any jammed paper in the Document Processor (Dual Scan) CAUTION If the paper tears during removal, be sure to remove any loose scraps of paper from inside the machine. Scraps of paper left in the machine could cause subsequent jamming. Remove the originals from the Original Table. -
Page 609: Remove Any Jammed Paper In The 1,000-Sheet Finisher
Troubleshooting > Clearing Paper Jams Return the cover to the original position. Remove any jammed paper in the 1,000-sheet Finisher CAUTION • Do not reuse jammed papers. • If the paper tears during removal, be sure to remove any loose scraps of paper from inside the machine. Scraps of paper left in the machine could cause subsequent jamming. - Page 610 Troubleshooting > Clearing Paper Jams Open the conveyor guide (D2). Remove any jammed paper. Return the conveyor guide (D2) to the original position. Open the finisher front cover. 10-90...
- Page 611 Troubleshooting > Clearing Paper Jams Open the conveyor guide (D1). Remove any jammed paper. Return the conveyor guide (D1) to the original position. Return the covers to the original position. 10-91...
-
Page 612: Remove Any Jammed Paper In The 4,000-Sheet Finisher/100-Sheet Staple Finisher (Inner)
Troubleshooting > Clearing Paper Jams Remove any jammed paper in the 4,000-sheet Finisher/100-sheet Staple Finisher (Inner) CAUTION • Do not reuse jammed papers. • If the paper tears during removal, be sure to remove any loose scraps of paper from inside the machine. Scraps of paper left in the machine could cause subsequent jamming. -
Page 613: Remove Any Jammed Paper In The 4,000-Sheet Finisher/100-Sheet Staple Finisher (Tray A)
Troubleshooting > Clearing Paper Jams Return the conveyor guide (D1) to the original position. Return the cover to the original position. Remove any jammed paper in the 4,000-sheet Finisher/100-sheet Staple Finisher (Tray A) CAUTION • Do not reuse jammed papers. •... - Page 614 Troubleshooting > Clearing Paper Jams Open the finisher front cover 1. Open the conveyor guide (D6). Remove any jammed paper. Return the conveyor guide (D6) to the original position. 10-94...
- Page 615 Troubleshooting > Clearing Paper Jams Open the conveyor guide (D4). Turn knob (D5). Remove any jammed paper. Return the conveyor guide (D4) to the original position. 10-95...
- Page 616 Troubleshooting > Clearing Paper Jams Open the conveyor guide (D1). Remove any jammed paper. Return the conveyor guide (D1) to the original position. Return the cover to the original position. 10-96...
-
Page 617: Remove Any Jammed Paper In The 4,000-Sheet Finisher/100-Sheet Staple Finisher (Tray B)
Troubleshooting > Clearing Paper Jams Remove any jammed paper in the 4,000-sheet Finisher/100-sheet Staple Finisher (Tray B) CAUTION • Do not reuse jammed papers. • If the paper tears during removal, be sure to remove any loose scraps of paper from inside the machine. Scraps of paper left in the machine could cause subsequent jamming. - Page 618 Troubleshooting > Clearing Paper Jams Turn knob (D3). Remove any jammed paper. Return the conveyor guide (D2) to the original position. Open the conveyor guide (D1). 10-98...
- Page 619 Troubleshooting > Clearing Paper Jams Remove any jammed paper. Return the conveyor guide (D1) to the original position. Return the cover to the original position. 10-99...
-
Page 620: Remove Any Jammed Paper In The Folding Unit (4,000-Sheet Finisher)
Troubleshooting > Clearing Paper Jams Remove any jammed paper in the Folding Unit (4,000-sheet Finisher) CAUTION • Do not reuse jammed papers. • If the paper tears during removal, be sure to remove any loose scraps of paper from inside the machine. Scraps of paper left in the machine could cause subsequent jamming. - Page 621 Troubleshooting > Clearing Paper Jams Return the conveyor guide (D7) to the original position. Open the conveyor guide (D8). Remove any jammed paper. Return the conveyor guide (D8) to the original position. 10-101...
- Page 622 Troubleshooting > Clearing Paper Jams Remove paper from inside the finisher. Return the covers to the original position. Lift the folding tray. Remove any jammed paper. 10-102...
- Page 623 Troubleshooting > Clearing Paper Jams Press the release lever to pull the folding unit out. Open the folding unit left cover. Turn dial (D9). Remove any jammed paper. 10-103...
- Page 624 Troubleshooting > Clearing Paper Jams Return the folding unit left cover to the original position. Open the folding unit top cover. Turn dial (D9). Remove any jammed paper. 10-104...
-
Page 625: Remove Any Jammed Paper In The Folding Tray (4,000-Sheet Finisher)
Troubleshooting > Clearing Paper Jams Return the folding unit top cover to the original position. Return the folding unit to the original position. Remove any jammed paper in the Folding Tray (4,000-sheet Finisher) CAUTION • Do not reuse jammed papers. •... - Page 626 Troubleshooting > Clearing Paper Jams Press the release lever to pull the folding unit out. Open the folding unit left cover. Turn dial (D9). Remove any jammed paper. 10-106...
- Page 627 Troubleshooting > Clearing Paper Jams Return the folding unit left cover to the original position. Open the folding unit top cover. Turn dial (D9). Remove any jammed paper. 10-107...
- Page 628 Troubleshooting > Clearing Paper Jams Return the folding unit top cover to the original position. Return the folding unit to the original position. Open the finisher front cover 1 and 2. Remove paper from inside the finisher. 10-108...
-
Page 629: Remove Any Jammed Paper In The Folding Unit (100-Sheet Staple Finisher)
Troubleshooting > Clearing Paper Jams Return the covers to the original position. Remove any jammed paper in the Folding Unit (100-sheet Staple Finisher) CAUTION • Do not reuse jammed papers. • If the paper tears during removal, be sure to remove any loose scraps of paper from inside the machine. Scraps of paper left in the machine could cause subsequent jamming. - Page 630 Troubleshooting > Clearing Paper Jams Open the conveyor guide (D7). Remove any jammed paper. Return the conveyor guide (D7) to the original position. Open the conveyor guide (D8). 10-110...
- Page 631 Troubleshooting > Clearing Paper Jams Remove any jammed paper. Return the conveyor guide (D8) to the original position. Remove paper from inside the finisher. Return the covers to the original position. 10-111...
- Page 632 Troubleshooting > Clearing Paper Jams Lift the release lever to pull the folding unit out. Open the folding unit top cover. Turn dial (D9). Remove any jammed paper. 10-112...
- Page 633 Troubleshooting > Clearing Paper Jams Open the folding unit conveyor guide. Turn dial (D9). Remove any jammed paper. Lift the folding tray. 10-113...
- Page 634 Troubleshooting > Clearing Paper Jams Remove any jammed paper. Return the covers to the original position. Return the folding unit to the original position. 10-114...
-
Page 635: Remove Any Jammed Paper In The Folding Tray (100-Sheet Staple Finisher)
Troubleshooting > Clearing Paper Jams Remove any jammed paper in the Folding Tray (100-sheet Staple Finisher) CAUTION • Do not reuse jammed papers. • If the paper tears during removal, be sure to remove any loose scraps of paper from inside the machine. Scraps of paper left in the machine could cause subsequent jamming. - Page 636 Troubleshooting > Clearing Paper Jams Remove any jammed paper. Open the folding unit conveyor guide. Turn dial (D9). Remove any jammed paper. 10-116...
- Page 637 Troubleshooting > Clearing Paper Jams Lift the folding tray. Remove any jammed paper. Return the covers to the original position. Return the folding unit to the original position. 10-117...
- Page 638 Troubleshooting > Clearing Paper Jams Open the finisher front cover 1 and 2. Remove paper from inside the finisher. Return the covers to the original position. 10-118...
-
Page 639: Clearing A Staple Jam
Troubleshooting > Clearing a Staple Jam Clearing a Staple Jam Clearing a Staple Jam of the Inner Finisher Open the inner finisher unit. Remove any jammed paper. Open the staple cover. 10-119... - Page 640 Troubleshooting > Clearing a Staple Jam Remove the Staple Cartridge Holder. Remove the jammed staple. Install the Staple Cartridge Holder. Return the staple cover to the original position. 10-120...
-
Page 641: Clearing A Staple Jam Of The 1,000-Sheet Finisher
Troubleshooting > Clearing a Staple Jam Return the unit to the original position. Clearing a Staple Jam of the 1,000-sheet Finisher Open the finisher top cover. Open the conveyor guide (D2). Remove any jammed paper. 10-121... - Page 642 Troubleshooting > Clearing a Staple Jam Return the conveyor guide (D2) to the original position. Open the finisher front cover. Open the conveyor guide (D1). Remove any jammed paper. 10-122...
- Page 643 Troubleshooting > Clearing a Staple Jam Return the conveyor guide (D1) to the original position. Remove the Staple Cartridge Holder. Remove the jammed staple. Install the Staple Cartridge Holder. 10-123...
-
Page 644: Clearing A Staple Jam Of The 4,000-Sheet Finisher
Troubleshooting > Clearing a Staple Jam Return the covers to the original position. Clearing a Staple Jam of the 4,000-sheet Finisher Open the finisher front cover 1. Open the conveyor guide (D4). Turn knob (D5). 10-124... - Page 645 Troubleshooting > Clearing a Staple Jam Remove any jammed paper. Return the conveyor guide (D4) to the original position. Remove the Staple Cartridge Holder (A). Remove the jammed staple. 10-125...
-
Page 646: Clearing A Staple Jam Of The 100-Sheet Staple Finisher
Troubleshooting > Clearing a Staple Jam Install the Staple Cartridge Holder (A). Return the cover to the original position. Clearing a Staple Jam of the 100-sheet Staple Finisher Open the finisher front cover 1. Open the conveyor guide (D4). 10-126... - Page 647 Troubleshooting > Clearing a Staple Jam Turn knob (D5). Remove any jammed paper. Return the conveyor guide (D4) to the original position. Remove the Staple Cartridge Holder (A). 10-127...
- Page 648 Troubleshooting > Clearing a Staple Jam Remove the jammed staple. Install the Staple Cartridge Holder (A). Return the cover to the original position. 10-128...
-
Page 649: Clearing A Staple Jam Of The Folding Unit (4,000-Sheet Finisher)
Troubleshooting > Clearing a Staple Jam Clearing a Staple Jam of the Folding Unit (4,000-sheet Finisher) Open the finisher front cover 1 and 2. Remove paper from inside the finisher. Remove the Staple Cartridge Holder (B) or (C). 10-129... - Page 650 Troubleshooting > Clearing a Staple Jam Remove the jammed staple. Install the Staple Cartridge Holder (B) or (C). Return the covers to the original position. Lift the folding tray. 10-130...
- Page 651 Troubleshooting > Clearing a Staple Jam Remove any jammed paper. Press the release lever to pull the folding unit out. Open the folding unit left cover. Turn dial (D9). 10-131...
- Page 652 Troubleshooting > Clearing a Staple Jam Remove any jammed paper. Return the folding unit left cover to the original position. Open the folding unit top cover. Turn dial (D9). 10-132...
-
Page 653: Clearing A Staple Jam Of The Folding Unit (100-Sheet Staple Finisher)
Troubleshooting > Clearing a Staple Jam Remove any jammed paper. Return the folding unit top cover to the original position. Return the folding unit to the original position. Clearing a Staple Jam of the Folding Unit (100-sheet Staple Finisher) Open the finisher front cover 1 and 2. 10-133... - Page 654 Troubleshooting > Clearing a Staple Jam Remove paper from inside the finisher. Remove the Staple Cartridge Holder (B) or (C). Remove the jammed staple. Install the Staple Cartridge Holder (B) or (C). 10-134...
- Page 655 Troubleshooting > Clearing a Staple Jam Return the covers to the original position. Lift the release lever to pull the folding unit out. Open the folding unit top cover. Turn dial (D9). 10-135...
- Page 656 Troubleshooting > Clearing a Staple Jam Remove any jammed paper. Open the folding unit conveyor guide. Turn dial (D9). Remove any jammed paper. 10-136...
- Page 657 Troubleshooting > Clearing a Staple Jam Lift the folding tray. Remove any jammed paper. Return the covers to the original position. Return the folding unit to the original position. 10-137...
-
Page 658: 11 Appendix
11 Appendix This chapter explains the following topics: Optional Equipment ............................11-2 Overview of Optional Equipment ......................11-2 Applications ..............................11-8 Starting Application Use ........................11-8 Checking Details of Application ......................11-9 Character Entry Method ..........................11-10 Entry Screens ............................11-10 Entering Characters .......................... -
Page 659: Optional Equipment
Appendix > Optional Equipment Optional Equipment Overview of Optional Equipment The following optional equipment is available for the machine. (1) PLATEN COVER (1) DP-7130 (1) DP-7110 (1) DP-7100 TYPE E (2) MT-730(B) (13) PH-7100, (14) PH-7A, PH-7120, PH-7130 PH-7C, PH-7D (12) DF-7100 (11) Banner Guide 10 (3) DF-7110... - Page 660 Appendix > Optional Equipment (18) Keyboard Holder 10 (16) NK-7120, NK-7130 (17) DT-730(B) (19) FAX System 12 (23) Card Authentication Kit(B) (20) IB-50 (22) IB-35 (21) IB-51 Software option (24) Internet FAX Kit(A) (25) UG-33 (26) UG-34 (27) Scan Extension Kit(A) (28) USB Keyboard 11-3...
- Page 661 Appendix > Optional Equipment (1) DP-7130 "Document Processor (Dual Scan with Skewed and Multifeed Detection)" DP-7110 "Document Processor (Dual Scan)" DP-7100 "Document Processor (Reverse Automatic)" PLATEN COVER TYPE E "Original Cover" Automatically scans originals. Also you can perform duplex copying and split copying. For document processor operation, refer to the following: Loading Originals in the Document Processor (page 5-4) When the document processor is not used, please use the PLATEN COVER TYPE E.
- Page 662 Appendix > Optional Equipment (9) PF-7110 "Large Capacity Feeder (1,500-sheet×2)" In addition to the machine’s cassettes, you can also install an optional large capacity feeder (1,500-sheet×2) capable of holding up to 3,000 sheets of A4, B5 or Letter paper. Loading in the Large Capacity Feeder (page 3-14) (10) PF-7120 "Side Feeder (3,000-sheet)"...
- Page 663 Appendix > Optional Equipment (19) FAX System 12 "FAX Kit" By installing the FAX kit, fax send/receive is enabled. Also, it is possible to use it as a network fax, by using it with a computer. When two FAX kits are installed, the units can be connected to two different telephone lines which will enable quicker message transmission to a number of recipients.
- Page 664 Appendix > Optional Equipment (28) USB Keyboard "USB Keyboard" A USB keyboard can be used to enter information into the text fields on the operation panel. A special mount is also available to install the keyboard on the machine. Please contact your dealer or service representative for information on keyboards that are compatible with your machine before you purchase one.
-
Page 665: Applications
Model Name Login User Name Login Password TASKalfa 5003i 5000 5000 TASKalfa 6003i 6000 6000 Select the desired application > [Activate] You can view detailed information on the selected application by selecting [Detail]. Select [Official] in the license key entry screen. -
Page 666: Checking Details Of Application
Model Name Login User Name Login Password TASKalfa 5003i 5000 5000 TASKalfa 6003i 6000 6000 Select the desired application and select [Detail]. You can view detailed information on the selected application. The table below lists the item you can view. -
Page 667: Character Entry Method
Appendix > Character Entry Method Character Entry Method To enter characters for a name, use the on-display keyboard in the touch panel following the steps as explained below. NOTE Keyboard Layout "QWERTY", "QWERTZ" and "AZERTY" are available as keyboard layouts the same as a PC keyboard. Select the [System Menu/Counter] key, [Common Settings] and then [Keyboard Layout] to choose the desired layout. - Page 668 Appendix > Character Entry Method Upper-case Letter Entry Screen Use the keyboard to enter. Limit: characters Input: characters Backspace & ˜ " < > Lower-case Upper-case Lower-case No./Symbol Space Cancel Status k0101_01_al Number/Symbol Entry Screen Use the keyboard to enter. Limit: characters Input:...
-
Page 669: Entering Characters
Appendix > Character Entry Method Entering Characters Follow the steps below to enter 'List A-1' for an example. Select [Upper-case]. Select [L]. The letter "L" is shown on the display. Use the keyboard to enter. Limit: characters Input: characters Backspace &... -
Page 670: Paper
Appendix > Paper Paper This section explains the paper sizes and types that can be used in the paper source. For details on the sizes, types, and number of sheets of paper that can be loaded in each paper tray, refer to the following: Specifications (page 11-20) Basic Paper Specifications... -
Page 671: Choosing The Appropriate Paper
Appendix > Paper Choosing the Appropriate Paper This section describes guidelines for choosing paper. Condition Avoid using paper with bent corners or that is curled, dirty, or torn. Do not use paper that has a rough surface or paper fiber lint, or that is especially delicate. Use of paper in any of these conditions will not only deliver poor copies but may also cause jams and shorten the useful life of the machine. - Page 672 Appendix > Paper Other Paper Specifications Porosity: The density of the paper fibers. Stiffness: Paper must be stiff enough or it may buckle in the machine, causing jams. Curl: Most paper naturally tends to curl after the package is opened. When paper passes through the fixing unit, it curls upward slightly.
-
Page 673: Special Paper
Appendix > Paper Special Paper This section describes printing onto special paper and print media. Special Paper that can be Used with This Machine • Transparencies • Preprinted paper • Bond paper • Recycled paper • Thin paper • Letterhead •... - Page 674 Appendix > Paper Label Be sure to feed labels from the multipurpose tray. For selecting labels, use extreme care so that the adhesive may not come in direct contact with any part of the machine and that the labels are not easily peeled from the carrier sheet. Adhesives that stick to the drum or rollers and peeled labels remaining in the machine may cause a failure.
- Page 675 Appendix > Paper Hagaki (Cardstock) Burrs Burrs Before loading Hagaki (Cardstock), fan them and align the edges. Hagaki (Cardstock) should be fed from the MP tray with the print-side down or the cassette and the optional paper feeder with the print-side up. If the Hagaki (Cardstock) paper is curled, straighten it before loading.
- Page 676 Appendix > Paper Colored Paper Colored paper must conform to the specifications. Basic Paper Specifications (page 11-13) In addition, the pigments in the paper must be able to withstand the heat of printing (up to 200°C or 392°F). Preprinted Paper Preprinted paper must conform to the specifications.
-
Page 677: Specifications
Appendix > Specifications Specifications IMPORTANT Specifications are subject to change without notice. NOTE For more information on using the FAX, refer to the following: FAX Operation Guide Machine Item Description Type Desktop Printing Method Electrophotography by semiconductor laser Paper Weight Cassette 52 to 300 g/m Multipurpose... - Page 678 Appendix > Specifications Item Description Warm-up Time Power on 17 seconds or less (23°C/73.4°F, Low Power 14.4 seconds or less 60%) Sleep 14.4 seconds or less Paper Capacity Cassette 500 sheets (80 g/m Multipurpose 150 sheets (A4/Letter or smaller) (80 g/m Tray 50 sheets (larger than A4/Letter) (80 g/m 1 sheet (Banner sheet (210 ×...
-
Page 679: Copy Functions
48 sheets/min A6-R 30 sheets/min First Copy Black and White TASKalfa 5003i 3.7 seconds or less Time (A4, TASKalfa 6003i 3.4 seconds or less place on the platen, feed from Cassette) Zoom Level Manual mode: 25 to 400%, 1% increments... -
Page 680: Printer Functions
Other than the above size, specifications are the same as those of Copy Speed. First Print Black and White TASKalfa 5003i 4.3 seconds or less Time (A4, TASKalfa 6003i 3.8 seconds or less feed from Cassette) Resolution 4800 dpi equivalent × 1200 dpi Operating System Windows 7, Windows 8.1, Windows 10, Windows Server 2008/R2, Windows... -
Page 681: Scanner Functions
(A4 landscape, 300 dpi, Image quality: Text/Photo original) TASKalfa 5003i 1-sided B/W 120 Images/min Color 120 Images/min 2-sided B/W 220 Images/min Color 220 Images/min TASKalfa 6003i 1-sided B/W 120 Images/min Color 120 Images/min 2-sided B/W 220 Images/min Color 220 Images/min Interface... -
Page 682: Paper Feeder (500-Sheet×2)
Appendix > Specifications Paper Feeder (500-sheet×2) Item Description Paper Supply Method Friction roller feeder (No. Sheets: 550, 64 g/m , 2 cassettes/ No. Sheets: 500, 80 g/m , 2 cassettes) Paper Size A3, A4, A5, A6, B4, B5, B6, 216×340 mm, SRA3, Ledger, Letter, Legal, Statement, Executive, 12×18", Oficio II, Folio, 8K, 16K, ISO B5, Envelope #10, Envelope #9, Envelope #6, Envelope Monarch, Envelope DL, Envelope C5, Envelope C4, Hagaki (Cardstock), Oufuku Hagaki (Return postcard),... -
Page 683: Inner Finisher
Appendix > Specifications Inner Finisher Item Description Number of Trays 1 tray Paper Size (80 g/m A3, B4, 216×340 mm, SRA3, Ledger, Legal, 12×18", Oficio II, Folio, 8K, Envelope C4: 250 sheets Finisher tray (no stapling) A4-R, A4, A5-R, A5, A6, B5-R, B5, B6, Letter-R, Letter, Statement, Executive, 16K-R, 16K, ISO B5, Envelope #10, Envelope #9, Envelope #6 3/4, Envelope Monarch, Envelope DL, Envelope C5, Hagaki (Cardstock), Oufuku hagaki (Return postcard), Youkei 4, Youkei 2: 500 sheets... -
Page 684: 1,000-Sheet Finisher
Appendix > Specifications 1,000-sheet Finisher Item Description Number of Trays 1 tray Paper Size Finisher tray A3, A5-R, B4, B5-R, B6-R, 216×340 mm, SRA3, Ledger, Legal, Statement-R, (80 g/m (Non-stapling) Executive, 12×18", Oficio II, Folio, 8K, 16K-R: 500 sheets A4-R, A4, B5, Letter-R, Letter, 16K: 1,000 sheets Supported Paper Weight Stapling: 90 g/m or less... -
Page 685: 4,000-Sheet Finisher
Appendix > Specifications 4,000-sheet Finisher Item Description Number of Trays 2 trays Paper Tray A (Non-Stapling) A3, B4, B5-R, 216×340 mm, SRA3, Ledger, Legal, Executive, 12×18", Size Oficio II, Folio, 8K: 1,500 sheets (80 g/m A4-R, A4, B5, Letter-R, Letter, 16K-R, 16K: 4,000 sheets A5-R, B6-R, Statement-R: 500 sheets Tray B A3, A4-R, A4, A5-R, A6-R, B4, B5-R, B5, B6-R, 216×340 mm, SRA3,... -
Page 686: 100-Sheet Staple Finisher
Appendix > Specifications 100-sheet Staple Finisher Item Description Number of Trays 2 trays Paper Tray A (Non-Stapling) A3, B4, B5-R, 216×340 mm, SRA3, Ledger, Legal, Executive, 12×18", Size Oficio II, Folio, 8K: Height 227 mm (Equivalent to 1,500 sheets) (80 g/m A4-R, A4, B5, Letter-R, Letter, 16K-R, 16K: Height 512 mm (Equivalent to 4,000 sheets) A5-R, B6-R, Statement-R: Height 91 mm (Equivalent to 500 sheets) -
Page 687: Mailbox (For 4,000-Sheet Finisher)
Appendix > Specifications Mailbox (For 4,000-sheet Finisher) Item Description Number of Trays 7 trays Paper Size A3, B4, Ledger, Legal, 8K: 50 sheets (80 g/m A4-R, A4, A5-R, B5-R, B5, 216×340 mm, Letter-R, Letter, Statement-R, Executive, Oficio II, Folio, 16K-R, 16K: 100 sheets Dimensions (W ×... -
Page 688: Folding Unit (For 100-Sheet Staple Finisher)
Appendix > Specifications Folding Unit (For 100-sheet Staple Finisher) Item Description Sizes Bi-Fold A3, B4, A4-R, SRA3, Ledger, Legal, Letter-R, Oficio II, 8K, 12×18" Saddle Stitch A3, B4, A4-R, SRA3, Ledger, Letter-R, Legal, Oficio II, 8K, 12×18" Tri-Fold A4-R, Letter-R Number of Sheets Bi-Fold 5 sheets (52 to 90 g/m... -
Page 689: Job Separator Tray
Appendix > Specifications Job Separator Tray Item Description Number of Trays 1 tray Maximum Sheets 100 Sheets (80 g/m Paper Size A3, A4-R, A4, A5-R, A5, A6-R, B4, B5-R, B5, B6-R, 216×340 mm, SRA3, Ledger, Letter-R, Letter, Legal, Statement-R, Executive, 12×18", Oficio II, Folio, 8K, 16K-R, 16K, ISO B5, Envelope #10, Envelope #9, Envelope #6, Envelope Monarch, Envelope DL, Envelope C5, Envelope C4, Hagaki (Cardstock), Oufuku hagaki (Return postcard), Youkei 4, Youkei 2, Custom (98 ×... -
Page 690: Glossary
Appendix > Glossary Glossary Accessibility The machine is designed featuring good accessibility even for the elderly and those who are physically challenged or visually impaired. The angle of the touch panel is adjustable. Apple Talk AppleTalk offers file sharing and printer sharing and it also enables you to utilize application software that is on another computer on the same AppleTalk network. - Page 691 The function to interpret and execute other printers' page description languages. The machine emulates operation of PCL6, KPDL3 (PostScript 3 compatible). Enhanced WSD Kyocera's proprietary web services. FTP (File Transfer Protocol) A protocol to transfer files on the TCP/IP network, whether the Internet or an intranet. Along with HTTP and SMTP/POP, FTP is now frequently used on the Internet.
- Page 692 KPDL (Kyocera Page Description Language) Kyocera's PostScript page description language compatible with Adobe PostScript Level 3. Multipurpose (MP) Tray The paper supply tray on the front side of the machine. Use this tray instead of the cassettes when printing onto envelopes, Hagaki (Cardstock), transparencies, or labels.
- Page 693 Appendix > Glossary Printer Driver The software to enable you to print data created on any application software. The printer driver for the machine is contained in the DVD enclosed in the package. Install the printer driver on the computer connected to the machine. RA (Stateless) The IPv6 router communicates (transmits) information such as the global address prefix using ICMPv6.
- Page 694 Appendix > Glossary TWAIN (Technology Without An Interesting Name) A technical specification for connecting scanners, digital cameras, and other image equipment to computers. The TWAIN compatible devices enable you to process image data on any relevant application software. TWAIN is adopted on a large amount of graphic software (e.g.
-
Page 695: Index
Index Bates Stamp 6-64 Bluetooth Settings 8-73 Bonjour 11-33 Settings 8-58 Numerics Booklet 6-46 1,000-sheet Finisher 11-4 Border Erase, Border Erase/Full Scan 6-44 100-sheet Staple Finisher 11-4 2-sided/Book Original 6-72 4,000-sheet Finisher 11-4 Cables Calibration 8-81, 10-56 Canceling Jobs 5-21, 5-42 Accessibility 11-33... - Page 696 Numeric Keypad Settings 8-33 Offset Documents by Job 8-29 Data Sanitization 8-71 Offset One Page Documents 8-30 Data Security 8-70 Orientation Confirmation 8-19 Date Format 8-76 Original/Paper Settings 8-11 Date/Time 8-76 Paper Output 8-18 Date/Timer/Energy Saver 8-76 Prevent Light Reflection 8-33 Auto Error Clear 8-77...
- Page 697 Primary OCR Language 8-21 FAX Box 8-41 Repeat Copy 8-22 FAX Memory RX Box 8-41 Scan Resolution 8-19 Job Box 8-41 Separator Paper Source 8-22 Polling Box 8-41 Skip Blank Page (Copy) 8-22 Quick Setup Registration 8-42 Skip Blank Page (Send/Store) 8-22 Document Processor Toner Save Level (EcoPrint)
- Page 698 Error Clear Timer 8-78 Group Authorization 9-19 Error Handling 8-16 Group List 9-20 Continue or Cancel Err. Job 8-17 Guest Authorization Set. 9-22 Duplexing Error 8-16 Guest Authorization 9-22 Finished Pages Exceeded 8-16 Guest Property 9-23 Finishing Error 8-16 Guides Provided with the Machine No Staple Error 8-16 Paper Jam before Staple...
- Page 699 Detailed Information Laser Scanner Cleaning 8-82, 10-56 Detailed Information of Histories 7-10 LDAP Details of the Status Screens Protocol Settings 8-61 Displaying History Screen 7-10 Legal Information 1-10 Displaying Status Screens Legal Restriction on Copying Pause and Resumption 7-11 Legal Restriction on Scanning Priority Override 7-11 Limited Use of This Product...
- Page 700 Settings 8-65 Settings 8-11 Network Interface Size xxvi, 6-18 Network Interface Connector Original Eject Table Network Interface Kit 11-6 Original Image 6-33 Default 8-19 Printing 4-17 Original Orientation 6-24 Settings 2-38, 8-73 Default 8-19 Notice Original Preview 2-20 Numeric Keypad Settings 8-33 Original Size 6-18...
- Page 701 Cassette 3 (1,500-sheet×2) 10-68 EcoPrint 8-43 Cassette 3 and 4 (500-sheet×2) 10-66 Emulation 8-42 Cassette 4 (1,500-sheet×2) 10-70 Form Feed TimeOut 8-43 Cassette 5 (Side Feeder) 10-73 Job Name 8-43 Document Processor (Dual Scan) 10-88 8-44 Document Processor (Reverse Automatic) 10-86 LF Action 8-43...
- Page 702 Replacing Staples Sending 5-22 1,000-sheet Finisher 10-12 Preparation for Sending a Document to a PC 3-22 100-sheet Staple Finisher 10-15 Sending Document to Desired Shared Folder on a 4,000-sheet Finisher 10-13 Computer 5-24 Folding Unit 10-16 Sending Size 6-73 Inner Finisher 10-10 Setting Date and Time 2-29...
- Page 703 Side Feeder (3,000-sheet) 11-25 Security Level 8-68 Security Settings 8-63 Stack Level Adjuster 3-19 TCP/IP 11-36 Staple Jam Settings 8-54, 8-56 1,000-sheet Finisher 10-121 TCP/IP (IPv4) 100-sheet Staple Finisher 10-126 Settings 2-30, 8-54, 8-56 4,000-sheet Finisher 10-124 TCP/IP (IPv6) 11-34 Folding Unit (100-sheet Staple Finisher) 10-133 Settings 8-55,...
- Page 704 Overview of User Login Administration Password Policy Settings PIN Code Authentication 9-31 Printing 9-14 Simple Login Settings 9-27 TWAIN 9-15 User Account Lockout Setting 9-16 User Login/Job Accounting 8-76 Job Accounting 9-33 Unknown User Settings 9-52 User Login User Property 8-76 VNC (RFB) Protocol Settings...
- Page 708 2019.4 2VKKDEN003...
Need help?
Do you have a question about the TASKalfa 6003i and is the answer not in the manual?
Questions and answers