
Subscribe to Our Youtube Channel
Related Manuals for Krautzberger A-14


Summary of Contents for Krautzberger A-14
- Page 1 Operating instructions Automatic spray gun A-14 T-Dok-144-GB-Rev.1 ■ 200-0151 Translation of the original operating instructions...
- Page 2 Thank you for selecting a Krautzberger product. This product has been manufactured following state-of-the-art manufacturing procedures and extensive quality assurance measures. We promise you a product of the highest quality. If you have questions, requests or suggestions, please contact us. We are always glad to assist you.
-
Page 3: Table Of Contents
ENGLISH Automatic spray gun A-14 Table of contents Function and identification....................5 Function........................5 Identification......................... 5 Safety and responsibility....................6 Labelling of the safety information................6 Safety information in operating instructions..............7 Personnel requirements....................7 Personal safety equipment and clothing..............8 Responsibility of the system owner................ - Page 4 Operating instructions T-Dok-144-GB-Rev.1 Spare parts........................33 Spare parts........................ 34 Accessories........................39 Disposal..........................40 Technical data........................41 12.1 Dimensions and weight.................... 41 12.2 General specifications..................... 41 12.3 Tightening torques....................41 Declaration of incorporation................... 42 Index..........................43 GB–4 mail@krautzberger.com, www.krautzberger.com...
-
Page 5: Function And Identification
Type Weight aluminium / stainless steel Length/width/h\ (mm) Product number A-14 (HVLP)* 0.75 kg / 0.96 kg max. 178 / max. 142 / 74 200-0151 * HVLP = High Volume, Low Pressure Ä Chapter 12 ‘Technical data’ on page 41) Further information can be found in ( ■... -
Page 6: Safety And Responsibility
This symbol highlights useful tips and recommendations as well as information for efficient and fault-free operation. ENVIRONMENT! This combination of symbol and signal word points out potential hazards for the environment. GB–6 mail@krautzberger.com, www.krautzberger.com... -
Page 7: Safety Information In Operating Instructions
ENGLISH Automatic spray gun A-14 Safety information in operating instructions Safety information can refer to specific individual operating instructions. Such safety information is embedded in the operating instructions so that they don't disrupt the reading flow during the execu- tion of the action. The signal words described above are used. -
Page 8: Personal Safety Equipment And Clothing
The light respiratory protection is used as a protection against hazardous dusts. Protective gloves Protective gloves are used to protect the hands against friction, abrasions, punctures, and deeper injuries as well as against contact with hot surfaces. GB–8 mail@krautzberger.com, www.krautzberger.com... -
Page 9: Responsibility Of The System Owner
ENGLISH Automatic spray gun A-14 Safety goggles Safety goggles are used to protect the eyes against flying parts and splashes. Responsibility of the system owner System owner The system owner is the person, who directly operates the device for commercial or economical purposes or who allows a third party to use/apply it and who is responsible for the legal product responsibility for the protection of the user, the personnel or third parties. -
Page 10: Intended Use
– Do not use sharply abrasive, chemically aggressive, very hot or very cold spray media without first consulting with and receiving approval from Krautzberger GmbH. – Adhere to the spray media manufacturer's safety data sheets. –... -
Page 11: General Safety Information
The use of incorrect or defective spare parts can cause risks for the personnel as well as damage, malfunctions or complete failure. – Only use original spare parts from Krautzberger or spare parts that have been approved by Krautzberger. –... - Page 12 After the useful life of the device has been exhausted, dispose of it via the commercial waste. – Properly dispose of potential spray fluid residue separately from the device. – If in doubt, obtain information about environmentally-appropriate disposal with the local municipalities or specialized disposal companies. GB–12 mail@krautzberger.com, www.krautzberger.com...
-
Page 13: Transport And Storage
ENGLISH Automatic spray gun A-14 3 Transport and storage Transport The automatic spray gun is protected by cardboard packaging. The cardboard packaging can be reused for storage. Storage Store packages subject to these conditions: Do not store outside. Dry and dust-free storage. -
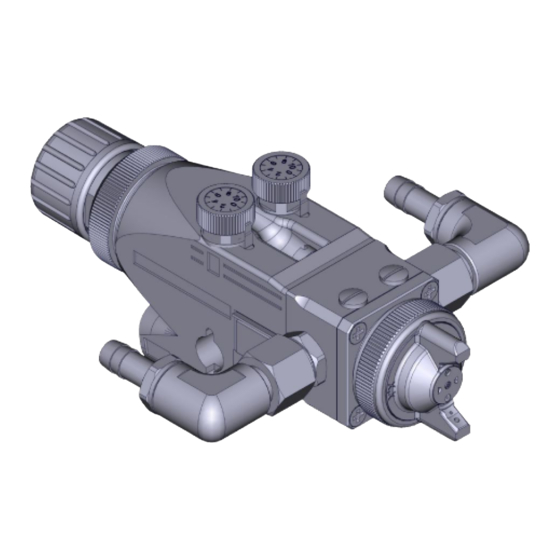
Page 14: Overview
Main element Fastening hole Closing piece Connection control (St)/atomisation air Adjustment nut for needle stroke Connection angle (simple fluid connection) Fluid nozzle (flat, round, rotary jet or full- Round jet regulator (R) (option) cone rotary jet) Fastening screws GB–14 mail@krautzberger.com, www.krautzberger.com... -
Page 15: Installation
ENGLISH Automatic spray gun A-14 5 Installation Personnel: Qualified personnel Protective equipment: Protective gloves General installation information Adhere to the following general information for the installation: Only carry out the installation and commissioning according to the steps described in this operating manual. -
Page 16: Mounting The Automatic Spray Guns
Ensure proper earth connection of the automatic spray gun. Connection scheme Air and fluid supply Fig. 4: Air and fluid supply Control air Material Atomisation air Filter Pressure regulator valve Pressure generator Opener/closer with bleed –––– Fluid supply - - - - Air supply GB–16 mail@krautzberger.com, www.krautzberger.com... - Page 17 ENGLISH Automatic spray gun A-14 Fluid supply for circulation connection Fig. 5: Fluid supply for circulation DE Pressure generator RR Back pressure regulators RW Stirrer mechanism Material Filter ––– Fluid supply ■ 200-0151 GB–17...
-
Page 18: Connecting The Automatic Spray Gun
Connect the control air to input "St" (Fig. 6/2). Connect the atomisation air to input "Z" (Fig. 6/4). Connect the fluid line to (Fig. 6/1 or 3). For models with circulation connection, connect the second fluid line to the fluid connection (Fig. 6/5). GB–18 mail@krautzberger.com, www.krautzberger.com... -
Page 19: Checking Connections
ENGLISH Automatic spray gun A-14 Checking connections Disconnect spray medium supply. Fig. 7: Checking closures Completely open the round jet regulator (Fig. 7/2, if present) and the flat jet regulator (Fig. 7/1) . To do this, turn the regulator counter-clockwise up to the stop. -
Page 20: Commissioning
Adhere to the following general information for the commissioning: Only carry out the commissioning of the automatic spray gun pursuant to the steps described in this operating manual. Check the material and compressed air hose lines before each use for damage and tight fit. GB–20 mail@krautzberger.com, www.krautzberger.com... -
Page 21: Operation
Do not use sharply abrasive, chemically aggressive, very hot or very cold spray media without first consulting with and receiving approval from Krautzberger GmbH. Adhere to the spray media manufacturer's safety data sheets. Only operate the automatic spray gun while adhering to the values specified in the Ä... -
Page 22: Adjusting The Spray Pattern
(Fig. 8/3). In order to obtain reproducible settings, the zero point should be checked and if neces- sary set after each maintenance ( Ä Chapter 6.4 ‘Setting the zero point of the needle stroke setting’ on page 23). GB–22 mail@krautzberger.com, www.krautzberger.com... -
Page 23: Setting The Zero Point Of The Needle Stroke Setting
ENGLISH Automatic spray gun A-14 Setting the zero point of the needle stroke setting Fig. 9 Close the air feed. Turn the adjustment nut (Fig. 9/1) by turning clockwise. Open fluid feed. Open the control air feed. Slowly open the adjustment nut (Fig. 9/1) turning counter-clockwise until fluid escapes. -
Page 24: Maintenance
The use of incorrect or defective spare parts can cause risks for the personnel as well as damage, malfunctions or complete failure. – Only use original spare parts from Krautzberger or spare parts that have been approved by Krautzberger. –... -
Page 25: Cleaning Spray Guns
ENGLISH Automatic spray gun A-14 Cleaning spray guns WARNING! Danger of injury due to improper cleaning! – Observe the safety data sheets of the cleaning product manufacturer. – Do not immerse the automatic spray gun entirely in cleaning product. Ä Chapter 6.5 ‘Operation breaks’ on page 23). -
Page 26: Changing The Air And Fluid Nozzles
Ä Chapter 7.4 ‘Changing the fluid needle’ on page 27). Attaching the nozzles Tighten the fluid nozzle (Fig. 10/3). Attach the air nozzle (Fig. 10/2) and tighten it with the clamping nut (Fig. 10/1). Screw on the closing piece (Fig. 10/5). GB–26 mail@krautzberger.com, www.krautzberger.com... -
Page 27: Changing The Fluid Needle
ENGLISH Automatic spray gun A-14 Changing the fluid needle Removing the fluid needle Ä Chapter 7.2 ‘Cleaning spray guns’ on page 25) Clean automatic spray gun ( Fig. 11: Removing the fluid needle WARNING! The closing piece (Fig. 11/1) is under spring force! Carefully unscrew the entire closing piece (Fig. - Page 28 Screw the nut (Fig. 14/1) onto the valve shaft pipe (Fig. 14/4). Fig. 15: Attaching the fluid needle Push the entire valve shaft (Fig. 15/3) into the main element (Fig. 15/4). Attach the spring (Fig. 15/2) and tighten it with the entire closing piece (Fig. 15/1). GB–28 mail@krautzberger.com, www.krautzberger.com...
-
Page 29: Changing Needle Packing
ENGLISH Automatic spray gun A-14 Changing needle packing Removing needle packing Ä Chapter 7.2 ‘Cleaning spray guns’ on page 25 Clean automatic spray gun ( Ä Chapter 7.4 ‘Changing the fluid needle’ on page 27) Remove the fluid needle ( Fig. - Page 30 Insert the transition part (Fig. 19/3) into the main element (Fig. 19/2). Screw the transition part (Fig. 19/3) and main element (Fig. 19/2) together with the screw (Fig. 19/1). Attach the fluid needle ( Ä Chapter 7.4 ‘Changing the fluid needle’ on page 27) GB–30 mail@krautzberger.com, www.krautzberger.com...
-
Page 31: Faults
ENGLISH Automatic spray gun A-14 8 Faults Personnel: Qualified personnel Fault table Spray pattern Fault Cause Remedy Normal flat jet spray pattern Spray pattern too Dirty air nozzle Clean nozzles Ä Chapter 7.2 heavy towards the top Dirty fluid nozzle and towards the ‘Cleaning spray... - Page 32 ‘Changing needle packing’ on page 29) Dirty or damaged Clean Ä Chapter 7.2 fluid nozzle ‘Cleaning spray guns’ on page 25) or replace fluid nozzle Ä Chapter 7.3 ‘Changing the air and fluid nozzles’ on page 26) GB–32 mail@krautzberger.com, www.krautzberger.com...
-
Page 33: Spare Parts
The use of incorrect or defective spare parts can cause risks for the personnel as well as damage, malfunctions or complete failure. – Only use original spare parts from Krautzberger or spare parts that have been approved by Krautzberger. –... -
Page 34: Spare Parts
Operating instructions T-Dok-144-GB-Rev.1 Spare parts Spare parts overview Fig. 20: Spare parts GB–34 mail@krautzberger.com, www.krautzberger.com... - Page 35 ENGLISH Automatic spray gun A-14 Spare parts list Item Designation Article no. Additional infor- mation Union nut 040-0051 Air nozzle 060-..Wear parts Fluid nozzle 050-..Wear parts Flat seal 010-0354 Screw 030- Lightly grease parts Head section, alum. (incl. pos. 7, 8) 040-0263 Head section, VA (incl.
- Page 36 Lightly grease parts Sealing screw, brass, nickel plated 040-1504 Lightly grease parts Sealing screw, aluminium, hardened 040-1505 Lightly grease parts Sealing screw, stainless steel (VA) 040-1506 Lightly grease parts Screw plug 040-1510 Circlip 030-0706 Catch spring 020-0024 GB–36 mail@krautzberger.com, www.krautzberger.com...
- Page 37 ENGLISH Automatic spray gun A-14 Item Designation Article no. Additional infor- mation Jet regulator 080-0485 Scale disk 040-0212 Screw 030-0179 Lightly grease parts Slotted ring 010-0179 O-ring 010-0546 Valve housing 040-1515 O-ring 010-0213 Slotted ring 010-0178 Disk 040-1512 Main element...
- Page 38 Operating instructions T-Dok-144-GB-Rev.1 Item Designation Article no. Additional infor- mation Valve shaft guide 040-1516 Slotted ring 010-0190 Lightly grease parts GB–38 mail@krautzberger.com, www.krautzberger.com...
-
Page 39: Accessories
Automatic spray gun A-14 Accessories A wide range of accessories are available for the automatic spray gun. For further information, visit us on the Internet (www.krautzberger.com) or contact your Krautzberger specialist dealer, consul- tant or our office staff. Here are a few examples: Nozzle extensions etc. -
Page 40: Disposal
Scrap metals. Recycle plastic elements. Sort remaining components based on the respective material and dispose of accordingly. In order to prevent damage to the environment, properly dispose of spray fluid residue separate from the device. GB–40 mail@krautzberger.com, www.krautzberger.com... -
Page 41: Technical Data
ENGLISH Automatic spray gun A-14 Technical data 12.1 Dimensions and weight Specification Value Unit Width max. 142 Height Length max. 178 Connection of spray fluid G 3/8 " Connection of atomisation air (internal thread) G 1/4 " Connection of control air (internal thread) G 1/4 "... -
Page 42: Declaration Of Incorporation
Operating instructions T-Dok-144-GB-Rev.1 Declaration of incorporation Fig. 21: Declaration of incorporation GB–42 mail@krautzberger.com, www.krautzberger.com... -
Page 43: Index
ENGLISH Automatic spray gun A-14 14 Index Cleaning............................25 Connection values......................... 41 Delivery............................13 Dimensions............................ 41 Fault table............................31 Hazards............................6 Health............................11 Measurements..........................15 Overview............................14 Personal safety equipment and clothing..................8 Personnel............................7 Safety equipment and clothing......................8 Safety information........................... - Page 44 Krautzberger GmbH Stockbornstrasse 13 65343 Eltville am Rhein, Germany Hotline: +49 (0) 6123 698-222 Reception: +49 (0) 6123 698-0 Fax: +49 (0) 6123 698-200 email: mail@krautzberger.com Internet: www.krautzberger.com © Krautzberger GmbH 2013...
Need help?
Do you have a question about the A-14 and is the answer not in the manual?
Questions and answers