Table of Contents
Advertisement
Advertisement
Table of Contents

Related Manuals for HP x2301


Summary of Contents for HP x2301
- Page 1 HP x2301 LCD Monitor User Guide...
- Page 2 Nothing herein should be construed as constituting an additional warranty. HP shall not be liable for technical or editorial errors or omissions contained herein. This document contains proprietary information that is protected by copyright.
-
Page 3: About This Guide
About This Guide This guide provides information on setting up the monitor, installing drivers, using the on-screen display menu, troubleshooting and technical specifications. WARNING! Text set off in this manner indicates that failure to follow directions could result in bodily harm or loss of life. - Page 4 About This Guide ENWW...
-
Page 5: Table Of Contents
Identifying Monitor Conditions ... 17 Power-Saver Feature ... 18 Appendix A Troubleshooting ... 19 Resolving Common Issues ... 19 Getting Support from the HP website ... 20 Preparing to Call Technical Support ... 20 Locating the Rating Label ... 20 ENWW... - Page 6 Appendix B Technical Specifications ... 21 HP x2301 Model ... 21 Preset Video Modes ... 22 Entering User Modes ... 22 LCD Monitor Quality and Pixel Policy ... 23 Appendix C Agency Regulatory Notices ... 24 Federal Communications Commission Notice ... 24 Modifications ...
-
Page 7: Product Features
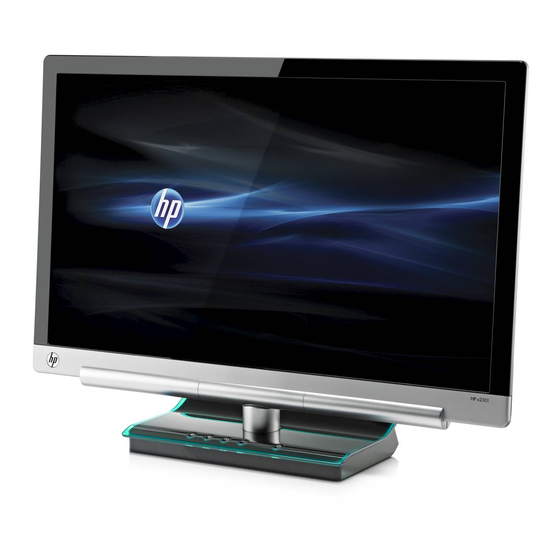
Product Features HP x2301 LCD Monitor Figure 1-1 HP x2301 LCD Monitor The HP x2301 LCD Monitor has an active matrix, thin-film transistor (TFT) screen with an LED backlight and the following features: Large diagonal display ● Maximum graphics resolution of 1920 x 1080 at 60Hz, plus full-screen support for lower ●... - Page 8 Power Saver to reduce energy consumption ● Quick View settings display ● HDCP (High Bandwidth Digital Content Protection) on DVI and HDMI inputs ● Software and utilities CD containing drivers and documents ● Chapter 1 Product Features ENWW...
-
Page 9: Safety And Maintenance Guidelines
Do not pull on a cord or cable. When unplugging from the electrical outlet, grasp the cord by the plug. To reduce the risk of serious injury, see the HP Safety and Comfort Guide on the HP website at http://www.hp.com/ergo posture, and health and work habits for computer users, and provides important electrical and mechanical safety information. -
Page 10: Maintenance Guidelines
● HP dealer, reseller, or service provider. Turn the monitor off when not in use. You can substantially increase the life expectancy of the ● monitor by using a screen saver program and turning off the monitor when not in use. - Page 11 To prepare the monitor for shipping: Disconnect the power and video cables from the monitor. Place the monitor in the original packing box. ENWW Maintenance Guidelines...
-
Page 12: Setting Up The Monitor
Connecting the DVI-D Cable Connect one end of the DVI-D video cable to the back of the monitor and the other end to the DVI-D video connector on the computer. You can use this cable only if your computer has a DVI-compliant graphics card that is either integrated or installed. -
Page 13: Connecting The Vga Cable
Connecting the VGA Cable Connect one end of the VGA cable to the back of the monitor and the other end of the cable to the input device. A VGA cable is provided. Figure 3-2 Connecting the VGA cable Connecting the HDMI Cable (select models) Connect one end of the HDMI cable to the back of the monitor and the other end of the cable to the input device. -
Page 14: Connecting The Power Cord
Do not pull on a cord or cable. For additional information, see Connect the round end of the power cord to the monitor, and then connect one end of the power cord to the power supply and the other end to a grounded electrical outlet. -
Page 15: High-Bandwidth Digital Content Protection (Hdcp)
The monitor automatically scans the signal inputs for an active input and uses that input for the display. If two inputs are active, the monitor will display the default input source. If the default source is not an active input, then the monitor displays the other input if it is active. You can change the default source in the OSD by pressing the Menu button and selecting Source Control >... - Page 16 Adjust the tilt by moving the top edge of the monitor either toward or away from you, without touching the screen. Figure 3-5 Tilt Adjustment Chapter 3 Setting Up the Monitor ENWW...
-
Page 17: Operating The Monitor
Installing Drivers If you determine that you have to update the drivers, you can install the monitor driver INF and ICM files from the CD or download them from the HP website. Installing the monitor driver software from the CD Insert the CD in your computer CD drive. -
Page 18: Control Buttons
Pressing the Menu button for 10 seconds will disable operation of the remaining OSD buttons. Pressing it again for 10 seconds will re-enable functionality. Turns the monitor on or puts it in standby or sleep mode. The Power button is located on the bottom-right of the monitor. NOTE: Pressing the Power button for 10 seconds will disable operation of the Power button. -
Page 19: Using The On-Screen Display (Osd)
Use the On-Screen Display (OSD) to adjust the screen image based on your viewing preferences. To access the OSD: Make sure the monitor is on. To access the OSD menu, press the Menu button. The OSD Main Menu appears. To navigate through the Main or sub-menu, press the + (Plus) button to scroll up, or the – (Minus) button to scroll in reverse. - Page 20 Vertical Position Adjusts the position of the screen image up and down. Custom Scaling Selects the method on how displayed information on the monitor will be formatted. Select: Fill to Screen—image fills the entire ● screen and might look distorted or...
- Page 21 Enables the power saving feature (see Power-Saver Feature on page Select: The factory default is On. Power-On Recall Restores power to the monitor following an unexpected removal of power. Select: The factory default is On. Mode Display Displays the resolution, refresh rate, and frequency information on the screen each time the OSD Main Menu is accessed.
- Page 22 Set Sleep Time — Sets the time you want to place the monitor in sleep mode. Set On Time — Sets the time you want the monitor to wake up from sleep mode. Timer — Sets the Sleep Timer feature on or off; the default setting is Off.
-
Page 23: Identifying Monitor Conditions
Identifying Monitor Conditions Special messages appear on the monitor screen for the following monitor conditions: Monitor Status—When the monitor is powered on or when the input source signal is changed, a ● Monitor Status message appears for 5 seconds. The message shows which input is the current active signal, the status of the auto-switch source setting (On or Off), the default source signal, the current preset display resolution, and the recommended preset display resolution. -
Page 24: Power-Saver Feature
Power-Saver Feature When the monitor is in normal operating mode, the Power light is blue and the monitor uses the normal watts of power. For power usage, see the The monitor also supports a power-saver mode that is controlled by the computer. When the monitor is in the reduced-power state, the monitor screen is blank, the backlight is off, the Power light is amber, and the monitor uses minimum power. -
Page 25: Appendix A Troubleshooting
Restart your computer so that the new settings take effect. Adjust the contrast and brightness controls. Make sure that you are not using an extension cable or switch box. HP recommends plugging the monitor directly into the graphic card output connector on the back of your computer. -
Page 26: Getting Support From The Hp Website
(amber LED). Getting Support from the HP website Before you contact customer service, see the HP Technical Support website at support. Select your country/region, and then follow the links to the support page for your monitor. Preparing to Call Technical Support If you cannot solve an issue by using the troubleshooting tips in this section, you might have to call technical support. -
Page 27: Appendix B Technical Specifications
Technical Specifications All specifications represent the typical specifications provided by HP's component manufacturers; actual performance might vary either higher or lower. HP x2301 Model Table B-1 x2301 Specifications Display Type: Viewable Image Size: Video Input Terminals: Tilt: Maximum Weight (unpacked):... -
Page 28: Preset Video Modes
You are not using a preset mode. ● It this occurs, you have to readjust the parameters of the monitor screen by using the on-screen display. Your changes can be made to any or all of these modes and saved in memory. The monitor... -
Page 29: Lcd Monitor Quality And Pixel Policy
50 cm (16 inches). For more information about your LCD Monitor and pixel policy, see the HP website at http://www.hp.com/support. To find pixel policy information on the HP website, type in "HP Pixel Policy"... -
Page 30: Appendix C Agency Regulatory Notices
Agency Regulatory Notices Federal Communications Commission Notice This equipment has been tested and found to comply with the limits for a Class B digital device, pursuant to Part 15 of the FCC Rules. These limits are designed to provide reasonable protection against harmful interference in a residential installation. -
Page 31: Canadian Notice
Cet appareil numérique de la classe B respecte toutes les exigences du Règlement sur le materiel brouilleur du Canada. Japanese Notice Korean Notice Power Cord Set Requirements The monitor power supply is provided with Automatic Line Switching (ALS). This feature allows the monitor to operate on input voltages between 100–120V or 200–240V. ENWW Canadian Notice... -
Page 32: Japanese Power Cord Requirements
0.75 mm² or 18 AWG, and the length of the cord must be between 6 ft (1.8 m) and 12 ft (3.6 m). If you have questions about the type of power cord to use, contact an authorized HP service provider. -
Page 33: Disposal Of Waste Equipment By Users In Private Household In The European Union
Chemical Substances HP is committed to providing our customers with information about the chemical substances in our products as needed to comply with legal requirements such as REACH (Regulation EC No 1907/2006 of the European Parliament and Council). A chemical information report for this product can be found at the EU REACH Declarations page in the HP website at http://www.hp.com/go/reach. -
Page 34: Turkey Eee Regulation
July 1, 2006. To view the JIS C 0950 material declaration for this product, visit the HP website at http://www.hp.com/go/jisc0950. Turkey EEE Regulation In Conformity with the EEE Regulation EEE Yönetmeliğine Uygundur Appendix C Agency Regulatory Notices...
Need help?
Do you have a question about the x2301 and is the answer not in the manual?
Questions and answers