Omron Sysmac CPM1 Operation Manual
Hide thumbs
Also See for Sysmac CPM1:
- Programming manual (615 pages) ,
- Programming manual (541 pages) ,
- Operation manual (157 pages)
Table of Contents
Advertisement
Quick Links
Advertisement
Chapters
Table of Contents

Related Manuals for Omron Sysmac CPM1


Summary of Contents for Omron Sysmac CPM1
- Page 1 Cat.No. W262–E1–4 SYSMAC CPM1 Programmable Controllers OPERATION MANUAL...
- Page 2 CPM1 Programmable Controllers Operation Manual Revised February 1998...
- Page 3 OMRON. No patent liability is assumed with respect to the use of the information contained herein. Moreover, because OMRON is constantly striving to improve its high-quality products, the information contained in this manual is subject to change without notice.
-
Page 4: Table Of Contents
TABLE OF CONTENTS PRECAUTIONS ....... . . 1 Intended Audience . - Page 5 About this Manual: The CPM1 is a compact, high-speed Programmable Controller (PC) designed for control operations in systems requiring from 10 to 50 I/O points per PC. There are two manuals describing the setup and opera- tion of the CPM1: the CPM1 Operation Manual (this manual) and the CQM1/CPM1/CPM1A/SRM1 Pro- gramming Manual.
-
Page 6: Precautions
PRECAUTIONS This section provides general precautions for using the Programmable Controller (PC) and related devices. The information contained in this section is important for the safe and reliable application of the Programmable Con- troller. You must read this section and understand the information contained before attempting to set up or operate a PC system. -
Page 7: Intended Audience
It is extremely important that a PC and all PC Units be used for the specified purpose and under the specified conditions, especially in applications that can directly or indirectly affect human life. You must consult with your OMRON representative before applying a PC System to the above-mentioned applications. -
Page 8: Operating Environment Precautions
Application Precautions Operating Environment Precautions Caution Do not operate the control system in the following places: • Locations subject to direct sunlight. • Locations subject to temperatures or humidity outside the range specified in the specifications. • Locations subject to condensation as the result of severe changes in tempera- ture. - Page 9 Application Precautions • Interlock circuits, limit circuits, and similar safety measures in external circuits (i.e., not in the Programmable Controller) must be provided by the customer. • Always use the power supply voltage specified in the operation manuals. An incorrect voltage may result in malfunction or burning. •...
- Page 10 Application Precautions • Do not touch the Expansion I/O Unit Connecting Cable while the power is being supplied in order to prevent any malfunction due to static electricity. Caution Always clear memory before beginning to program the CPM1. Although memory is cleared before the CPU Unit is shipped (except for bits with specific functions), AR 1314, which turns ON when the internal capacitor cannot back up memory, may have turned ON during shipment.
- Page 11 Application Precautions If the power remains off for a period exceeding the data backup period, AR 1314 will turn ON to indicate that the capacitor can no longer back up data and the data backed up by the capacitor will be cleared. AR 1314 will remain ON unless it is turned OFF using I/O monitor operations, using memory clear operations, or from the user program.
-
Page 12: Introduction
SECTION 1 Introduction This section describes the CPM1’s special features and functions and shows the possible system configurations. Refer to the Programming Manual (W228) for details on programming actual operation. CPM1 Features and Functions ..........1-1-1 CPM1 Features . -
Page 13: Cpm1 Features And Functions
The CPM1 PCs conform to EC directives (EMC and low-voltage directives), so they can be incorporated in equipment destined for the EC. Contact your OMRON representative for more details. Input Interrupts The CPM1-10CDR-j PCs can handle 2 interrupt inputs; the CPM1-20CDR-j and CPM1-30CDR-j (CPM1-30CDR-j-V1 (Available soon)) PCs can handle 4 interrupt inputs. - Page 14 Standard Peripheral Devices The CPM1 uses the same Programming Consoles, SYSMAC Support Software (SSS), and Ladder Support Software (LSS) as the Mini H-type and CQM1 PCs. Programming is Possible Programming operation is possible through the PT screen by using an OMRON Using the PT PT that has a built-in Programming Console function.
- Page 15 Section 1-1 CPM1 Features and Functions 1-1-3 CPM1 Functions Analog Setting Function CPM1 PCs have 2 analog volume controls that can be used to make analog timer and counter settings manually. When one of the volume controls is turned, the content of the corresponding IR word is set automatically between 0 and 200 (BCD).
- Page 16 Section 1-1 CPM1 Features and Functions Input Interrupts The CPM1-10CDR-j PCs have 2 interrupt input terminals and the CPM1-20CDR-j and CPM1-30CDR-j PCs have 4 interrupt input terminals. There are two modes for input interrupts: input interrupt mode and counter mode. 1, 2, 3...
- Page 17 Section 1-1 CPM1 Features and Functions Quick-response Inputs The CPM1-10CDR-j PCs have 2 quick-response input terminals and the CPM1-20CDR-j/30CDR-j PCs have 4 quick-response input terminals. (The same terminals are used for quick-response inputs and interrupt inputs.) Quick-response inputs have an internal buffer, so input signals shorter than one cycle can be detected.
- Page 18 Section 1-1 CPM1 Features and Functions High-speed Counter CPM1 PCs have a high-speed counter that can be used in incremental mode or up/down mode. The high-speed counter can be combined with input interrupts to perform target value control or zone comparison control that isn’t affected by the PC’s cycle time.
-
Page 19: System Configuration
System Configuration Section 1-2 System Configuration 1-2-1 CPU Unit and Expansion I/O Unit Configuration CPM1 CPU Unit Expansion I/O Unit Connecting Cable CPM1 CPU Units The following table describes the six CPM1 CPU Units. All outputs are relay out- puts. Number of Inputs Outputs... - Page 20 System Configuration Section 1-2 1-2-2 Host Link Communications Host Link communications which allows up to 32 OMRON PCs to be controlled from a host computer. The computer-PC connections can be made connectors such as RS-232C and RS-422 Adapters. 1-to-1 Communications The following diagram shows the possible methods for a 1-to-1 connection between a CPM1 and an IBM PC/AT or compatible computer.
- Page 21 System Configuration Section 1-2 1-to-n Communications The following diagram shows how to connect up to 32 CPM1 PCs to an IBM PC/AT or compatible computer. IBM PC/AT or compatible RS-422 Adapters CPM1 CPU Units RS-232C Cable RS-422 Cable 3G2A9-AL004-E Link Adapter CPM1 PCs (32 PCs max.) The maximum cable length of RS-422 should be 500 m.
- Page 22 System Configuration Section 1-2 1-2-3 1-to-1 Communications Links A data link can be created with a data area in another CPM1, CQM1, or C200HS PC. An RS-232C Adapter must be used to make the 1-to-1 connection. RS-232C Adapters CPM1 CPU Units RS-232C Cable CQM1-series PC C200HS-series PC...
- Page 23 System Configuration Section 1-2 1-2-4 NT Link Communications Using the NT Link, the CPM1 PC can connected to the Programmable Terminal (NT Link Interface) through an RS-232C Adapter. RS-232C Adapter CPM1 CPU Unit Programmable Terminal RS-232C Cable Name Usage Model Number RS-232C Adapter Converts to the Peripheral Port format.
- Page 24 System Configuration Section 1-2 SYSMAC Support Software An IBM PC/AT or compatible personal computer running SSS or the SYSMAC- and SYSMAC-CPT Support CPT Support Software can be connected to the CPM1A as shown in the follow- Software ing diagram. Refer to 3-4-7 Host Link Connections for a diagram showing the standard wiring for the RS-232C cable.
-
Page 25: Revised Specifications
Revised Specifications Section 1-3 Revised Specifications The following table shows the changes that have been made in product specifi- cations beginning with lots produced in January 1998 (December 1997 for some models). Item Previous specifications New specifications Relevant pages Input indicator operation The input indicators will The input indicators will Item 8., Input Indicators, on... -
Page 26: Unit Specifications And Components
SECTION 2 Unit Specifications and Components This section provides the technical specifications of the Units that go together to create a CPM1 PC and describes the main components of the Units. Specifications ............2-1-1 General Specifications . -
Page 27: Specifications
Section 2-1 Specifications Specifications 2-1-1 General Specifications Item CPM1-10CDR-j CPM1-20CDR-j CPM1-30CDR-j CPM1-30CDR-j-V1 (see note 2) Supply voltage AC type 100 to 240 VAC, 50/60 Hz DC type 24 VDC Operating voltage range AC type 85 to 264 VAC DC type 20.4 to 26.4 VDC Power consumption AC type... -
Page 28: Characteristics
Section 2-1 Specifications 2-1-2 Characteristics Item CPM1-10CDR-j CPM1-20CDR-j CPM1-30CDR-j CPM1-30CDR-j-V1 (see note 2) Control method Stored program method I/O control method Cyclic scan with direct output; immediate refresh processing Programming language Ladder diagram Instruction length 1 step per instruction, 1 to 5 words per instruction Types of instructions Basic instructions: Special instructions:... - Page 29 Section 2-1 Specifications Memory Backup The user program and memory area data in the CPM1 are backed up either by an internal capacitor or in flash memory as shown in the following table. Backup method Data Internal capacitor Read/write DM area (DM 0000 to DM 0999, DM 1022, and DM 1023) Error log area (DM 1000 to DM 1021) HR area (HR 00 to HR 19)
-
Page 30: I/O Specifications
Section 2-1 Specifications Either switch the CPM1 to RUN or MONITOR mode, or turn off and on power to the CPM1 after changing from a Programming Device any data that is backed up in flash memory. This data includes the user program, read-only DM area (DM 6144 to DM 6599), and the PC Setup (DM 6600 to DM 6655). - Page 31 Section 2-1 Specifications Differential Phase Mode (2.5 KHz Max.) IN00000 (A phase), IN00001 (B phase) 400 µs min. Phase A Phase B : 90 µs min. IN00002 (Z phase) 100 µs min. Phase Z 500 µs min. When IN00003 through IN00006 are used as interrupt inputs, the delay is 0.3 ms max.
-
Page 32: Communications Adapter Specifications
Section 2-1 Specifications CPU Unit and Expansion I/O Unit Output Specifications Item Specification Output type All outputs are relay outputs. Max. switching capacity 2 A, 250 VAC (cosφ = 1) 2 A, 24 VDC (4 A/common) Min. switching capacity 10 mA, 5 VDC Service life of relay Electrical: 300,000 operations (resistive load) 100,000 operations (inductive load) Mechanical: 10,000,000 operations... -
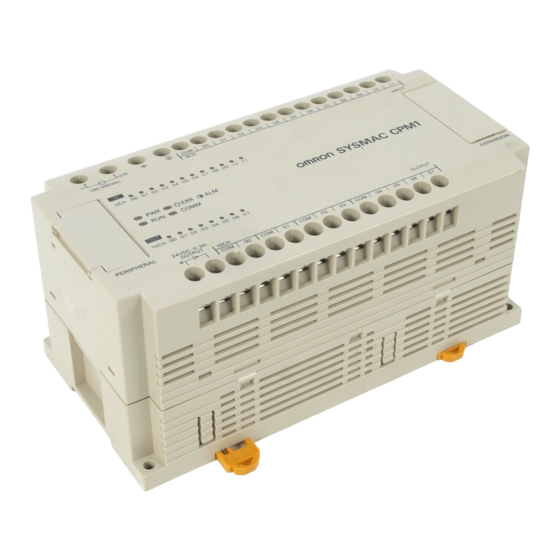
Page 33: Unit Components
Unit Components Section 2-2 RS-422 Adapter Specifications Item Specification Function Converts between the CMOS format (PC CPU Unit side) and the RS-422 format (peripheral device side). Insulation The RS-422 (peripheral device side) is isolated by a DC/DC convertor and photocoupler. Power supply Power is supplied from the PC CPU Unit. - Page 34 Unit Components Section 2-2 CPM1-20CDR-j CPM1-30CDR-j CPM1-30CDR-j-V1 (see note) Note CPM1-30CDR-j-V1 will be available soon CPU Unit Component Descriptions 1, 2, 3... 1. Power Supply Input Terminals Connect the power supply (100 to 240 VAC or 24 VDC) to these terminals. 2.
- Page 35 Unit Components Section 2-2 7. PC Status Indicators These indicators show the operating status of the PC, as shown in the fol- lowing table. Indicator Status Meaning POWER (green) Power is being supplied to the PC. Power isn’t being supplied to the PC. RUN (green) The PC is operating in RUN or MONITOR mode.
-
Page 36: Expansion I/O Unit Components
Unit Components Section 2-2 2-2-2 Expansion I/O Unit Components 1. Input terminals 3. Input indicators 5. Expansion I/O Unit 4. Output indicators Connecting Cable 2. Output terminals 1, 2, 3... 1. Input Terminals Connect to the input circuits. 2. Output Terminals Connect to the output circuits. -
Page 37: Communications Adapter Components
Unit Components Section 2-2 2-2-3 Communications Adapter Components RS-232C Adapter 1. Mode Setting Switch 3. RS-232C port RS-232C Port Pin allocation 2. Connector 1, 2, 3... 1. Mode Setting Switch Set this switch to “HOST” when using a Host Link system to connect to a personal computer. -
Page 38: Installation And Wiring
SECTION 3 Installation and Wiring This section provides information on installing and wiring a CPM1 PC. Be sure to follow the directions and precautions in this section when installing the CPM1 in a panel or cabinet, wiring the power supply, or wiring I/O. Design Precautions . -
Page 39: Design Precautions
Section 3-1 Design Precautions Design Precautions Observe the following precautions when designing a system incorporating a CPM1 PC. 3-1-1 Power Supply Wiring Separate the power supply wiring from the control system, CPM1 system, and DC I/O system wiring. 3-1-2 Interlock and Limit Circuits Construct an external interlock circuit if CPM1 outputs are used to perform recip- rocal operations such as controlling the forward and reverse operation of a motor or if incorrect PC operation could cause accidents or mechanical damage. -
Page 40: Selecting An Installation Site
Selecting an Installation Site Section 3-2 Automatic Restart When the supply voltage recovers to a value higher than 85% of the rated value, operations resumes automatically. Under Over 10 ms (2 ms) Duration of power interrupt (Below 85% of rated voltage) Normal operation Operation may stop. -
Page 41: Installing The Cpm1
Installing the CPM1 Section 3-3 3-2-2 Panel/Cabinet Installation Consider PC operation, maintenance, and surrounding conditions when instal- ling the CPM1 in a panel or cabinet. Overheating The operating temperature range for the CPM1 is 0_C to 55_C. Be sure that there is adequate ventilation for cooling. -
Page 42: Cpm1 Installation
Installing the CPM1 Section 3-3 Do not install the CPM1 in either of the following positions. Incorrect Incorrect 3-3-2 CPM1 Installation The CPM1 can be installed on a horizontal surface or on a DIN track. Surface Installation Use the following pattern when installing a CPM1 on a horizontal surface. Four, M4 holes 81 mm 8 mm... - Page 43 Installing the CPM1 Section 3-3 DIN Track Installation The CPM1 can be installed on a 35-mm DIN Track. DIN Track PFP-100N (1 m) End Plates PFP-50N (50 cm) (PFP-M) PFP-100N2 (1 m) Installation Lower the CPM1 so that the notch on the back of the PC catches the top of the DIN Track.
-
Page 44: Connecting An Expansion I/O Unit
Installing the CPM1 Section 3-3 3-3-3 Connecting an Expansion I/O Unit A single Expansion I/O Unit can be connected to the CPM1’s CPU Unit. Use the following procedure when connecting an Expansion I/O Unit. 1, 2, 3... 1. Remove the cover from the CPU Unit’s Expansion I/O Unit Connector. Expansion I/O Unit connector cover 2. -
Page 45: Wiring And Connections
Wiring and Connections Section 3-4 Wiring and Connections This section provides basic information on wiring the Power Supply Unit and Expansion I/O Units, and on connecting Peripheral Devices. 3-4-1 General Precautions for Wiring I/O Line Noise Do not run CPM1 I/O lines in the same duct or conduit as power lines. Caution Attach the dustproof label provided before wiring. -
Page 46: Power Supply Wiring
Wiring and Connections Section 3-4 Grounding Be sure to ground the functional earth and protective earth terminals together to less than 100 Ω in order to protect against electric shock and incorrect operation from electrical noise. Be sure to use a wire of at least 1.25 mm for grounding. -
Page 47: Input Wiring
Wiring and Connections Section 3-4 24-VDC Power Supply Use a DC power supply with sufficient capacity and low ripple. 24 VDC Caution Do not perform a dielectric test on a DC-type CPU Unit. Use the Power Supply provided with double insulation or reinforced insulation for conforming to the EC Directives (Low-voltage Directives). - Page 48 Wiring and Connections Section 3-4 CPM1-30CDR-j CPU Units This diagram shows the input configuration for CPM1-30CDR-j CPU Units. Input devices 24 VDC Input Devices The following table shows how to connect various input devices. Device Circuit Diagram Relay output Relay 5 mA/12 mA CPM1 COM (+)
-
Page 49: Output Wiring
Wiring and Connections Section 3-4 Leakage Current (24 VDC) A leakage current can cause false inputs when using 2-wire sensors (proximity switches or photoelectric switches) or limit switches with LEDs. False inputs won’t occur if the leakage current is less than 1.0 mA (2.5 mA for IN00000 to IN00002), but if the leakage current exceeds these values, insert a bleeder resistor in the circuit to reduce the input impedance, as shown in the fol- lowing diagram. - Page 50 Wiring and Connections Section 3-4 CPM1-10CDR-j CPU Units An AC-type CPU Unit is shown. DC-type CPU Units don’t have power supply outputs. CPM1-20CDR-j CPU Units This diagram shows the output configuration for CPM1-20CDR-j CPU Units and CPM1-20EDR and CPM1-20EDR Expansion I/O Unit. Expansion I/O Unit CPM1-30CDR-j This diagram shows the output configuration for CPM1-30CDR-j or...
-
Page 51: Conformance To Emc Directives
Wiring and Connections Section 3-4 The diode should satisfy the following requirements: Peak reverse-breakdown voltage must be at least 3 times the load voltage. Average rectified current must be 1 A. CPM1 relay output Diode 3-4-5 Conformance to EMC Directives Each CPM1 PC conforms to the Common Emission Standards (EN50081-2, established in June 1993) of the EMC Directives. - Page 52 Wiring and Connections Section 3-4 Countermeasure Examples When switching an inductive load, connect an surge protector, diodes, etc., in parallel with the load or contact as shown below. Circuit Current Characteristic Required element CR method If the load is a relay or solenoid, there The capacitance of the capacitor must be 1 to 0.5 µF per contact current of 1 is a time lag between the moment the...
-
Page 53: Peripheral Device Connection
Wiring and Connections Section 3-4 3-4-6 Peripheral Device Connection The CPM1 CPU Unit can be connected to a C200H-PRO27-E Programming Console with a standard C200H-CN222 (2 m) or C200H-CN422 (4 m) Connect- ing Cable. The CPM1 CPU Unit can be also connected to a CQM1-PRO01-E. The CQM1-PRO01-E is provided with a 2-m Connecting Cable. - Page 54 Wiring and Connections Section 3-4 The following diagram shows the wiring in the RS-232C cable used to connect a CPM1 to a host computer or Programmable Terminal. IBM PC/AT compatible computer or Programmable Terminal (9-pin) RS-232C Adapter Signal Pin No. Pin No.
- Page 55 Wiring and Connections Section 3-4 The following diagram shows the wiring in the RS-422 cables used to connect CPM1 PCs to a B500-AL004 Link Adapter. In both the Link Adapter/RS-422 Adapter connections and the RS-422 Adapter/RS-422 Adapter connections, connect the SG, RDA, RDB, SDA, and SDB terminals to the same terminals in the other Adapter.
-
Page 56: One-To-One Pc Connections
Wiring and Connections Section 3-4 3-4-8 One-to-one PC Connections A CPM1 can be linked to a CPM1, CQM1, or C200HS PC through an RS-232C Adapter. One PC acts as the Master and the other as the Slave to link up to 256 bits in the LR area (LR 0000 to LR 1515). -
Page 57: Nt Link Connections
Wiring and Connections Section 3-4 3-4-9 NT Link Connections High-speed communications can be achieved by providing a direct access through the use of the NT Link between the CPM1 and Programmable Terminal. Programmable Terminal RS-232C Adapter RS-232C Cable CPM1 CPU Unit Note The NT Link can only be used when the RS-232C Adapter (CPM1-CIF01) is con- nected. -
Page 58: Using Peripheral Devices
SECTION 4 Using Peripheral Devices This section outlines the operations possible with the SYSMAC Support Software (SSS) and the Programming Consoles. Actual SSS operating procedures are provided in the SSS Operation Manual: C-series PCs. Programming Console connec- tion and operating procedures are provided in this section. Support Software Capabilities . -
Page 59: Support Software Capabilities
Section 4-1 Support Software Capabilities Support Software Capabilities The SSS is a complete programming and control package designed for C-series and CVM1 PCs. It provides not only programming capabilities, but also advanced debugging, monitoring, and program/data management. The follow- ing tables provide only a brief introduction to the capabilities of the SSS. For fur- ther information and actual operating procedures, please refer to the SYSMAC Support Software Operation Manual: C-series. -
Page 60: Offline Operations
Section 4-1 Support Software Capabilities The default settings for the CQM1 are as shown in the following table. Function code Mnemonic Function code Mnemonic ASFT SPED PULS MCMP BCNT BCMP CMPL STIM 7SEG CTBL Online Editing If unsupported addresses are set in the program for operands or set values, error messages will be displayed and the values will not be accepted. - Page 61 Section 4-1 Support Software Capabilities Group Name Description Go To Page Displays the contents of the data memory in the system work area in pages (data memory) (units of 160 words). The data can be altered with this function. (C-series PCs only) Copy Copies the contents of the DM area of the system work area (data memory...
- Page 62 Section 4-1 Support Software Capabilities Group Name Description Utility Data Area Lists Displays lists (such as used areas and cross-references) in accordance with the contents of the user program in the system work area. Change Globally changes bit and word addresses in the user program in the system Addresses work area.
-
Page 63: Online Operations
Section 4-1 Support Software Capabilities 4-1-4 Online Operations Refer to 1-2-5 Peripheral Device Connections for details on connecting a per- sonal computer to the CPM1. Group Name Description Monitoring Monitor Data Uses the lower one third of the screen as a monitor area where bits, words, DM contents, and TIM/CNT SV/PV are monitored, forced-set/reset, and changed. - Page 64 Section 4-1 Support Software Capabilities Group Name Description I/O Table Transfer I/O Table Transfers and compares the I/O table data between the computer and PC. Create I/O Table Registers into the PC the I/O Units mounted on the PC and then assigns the words to the Units.
-
Page 65: Offline And Online Operations
Section 4-1 Support Software Capabilities 4-1-5 Offline and Online Operations Group Name Description System Setup PC model Specifies the model of PC that is being programmed or that is connected to the (see note) computer. PC Interface C-series PCs: Specifies whether communications with the PC are performed through a SYSMAC NET Link Unit, peripheral interface, or a Host Link (RS-232C) interface and the computer port (COM1 or COM2) to use. -
Page 66: Using A Programming Console
Using a Programming Console Section 4-2 Using a Programming Console This section provides information on connecting and using a Programming Con- sole. Refer to 5-4 Programming Console Operation Errors for details on errors that might occur during Programming Console operations. 4-2-1 Compatible Programming Consoles There are two Programming Consoles that can be used with the CPM1: the CQM1-PRO01-E and the C200H-PRO27-E. -
Page 67: Connecting The Programming Console
Using a Programming Console Section 4-2 4-2-2 Connecting the Programming Console Connect the Programming Console’s connecting cable to the CPM1’s periph- eral port, as shown below. Panel Installation The C200H-PRO27-E Programming Console can be installed in a control panel as shown in the following diagram. (The C200H-ATT01 Mounting Bracket is sold separately.) Mounting hole dimensions (DIN43700 standards) -
Page 68: Preparation For Operation
Using a Programming Console Section 4-2 4-2-3 Preparation for Operation This section describes the procedures required to begin Programming Console operation. Caution Always confirm that the Programming Console is in PROGRAM mode when turning on the PC with a Programming Console connected unless another mode is desired for a specific purpose. -
Page 69: Changing The Cpm1'S Mode
Using a Programming Console Section 4-2 4-2-5 Changing the CPM1’s Mode Once the Programming Console has been connected, its mode switch can be used to change the CPM1’s PC mode. The mode display (<PROGRAM>, <MONITOR>, or <RUN>) will appear on the Programming Console screen. •... -
Page 70: Programming Console Operations
Programming Console Operations Section 4-3 Programming Console Operations 4-3-1 Overview The following table lists the programming and monitoring operations that can be performed from a Programming Console. Refer to the rest of this section for details on operational procedures. Name Function Clearing memory Clears all or part of the Program Memory and any data areas that are not read-only, as well... -
Page 71: Clearing Memory
Programming Console Operations Section 4-3 4-3-2 Clearing Memory This operation is used to clear all or part of the Program Memory and any data areas that are not read-only, as well as the contents of the Programming Con- sole’s memory. This operation is possible in PROGRAM mode only. MONITOR PROGRAM Before beginning to program for the first time or when installing a new program,... -
Page 72: Reading/Clearing Error Messages
Programming Console Operations Section 4-3 4-3-3 Reading/Clearing Error Messages This operation is used to display and clear error messages. It is possible to dis- play and clear non-fatal errors and MESSAGE instruction messages in any mode, but fatal errors can be cleared in PROGRAM mode only. MONITOR PROGRAM Before inputting a new program, any error messages recorded in memory... -
Page 73: Setting And Reading A Program Memory Address
Programming Console Operations Section 4-3 Key Sequence Follow the procedure below to turn the key-input buzzer on and off. 1, 2, 3... 1. Press the CLR, SHIFT, and then the CLR Key to bring up the mode display. In this case the PC is in PROGRAM mode and the buzzer is on. <MONITOR>... -
Page 74: Bit Operand Search
Programming Console Operations Section 4-3 2. Input the address from which the search will begin and press the Down Arrow Key. It is not necessary to input leading zeroes. 00100 ↓ 3. Input the instruction to be found and press the SRCH Key. In this case, the search is for LD instructions. - Page 75 Programming Console Operations Section 4-3 To demonstrate this operation, an IR 00105 NO condition will be inserted at program address 00206 and an IR 00103 NO condition deleted from address 00205, as shown in the following diagram. Original Program Address Instruction Operands 00104 00100...
-
Page 76: Entering Or Editing Programs
Programming Console Operations Section 4-3 After completing the insertion and deletion procedures, use the Up and Down Arrow Keys to scroll through the program and verify that it has been changed correctly, as shown in the following diagram. Corrected Program Address Instruction Operands 00104... - Page 77 Programming Console Operations Section 4-3 If a mistake was made inputting the instruction, press the Up Arrow Key to return to the previous program address and input the instruction again. The mistaken instruction will be overwritten 6. Input the second instruction and operand. (In this case it isn’t necessary to enter the timer number, because it’s 000.) Press the WRITE Key to write the instruction to Program Memory.
- Page 78 Programming Console Operations Section 4-3 Note When an instruction operand is input, the bit or word designation can be omitted. 12. Input the next instruction. 00203 ADB(050) Press the WRITE Key to write the instruction to Program Memory. 00203 ADB DATA A WRITE #0000 •...
-
Page 79: Checking The Program
Programming Console Operations Section 4-3 4-3-10 Checking the Program This operation checks for programming errors and displays the program address and error when errors are found. It is possible in PROGRAM mode only. MONITOR PROGRAM 1, 2, 3... 1. Press the CLR Key to bring up the initial display. 2. - Page 80 Programming Console Operations Section 4-3 If the status of a word is being monitored, that word’s value can be changed using the Hexadecimal/BCD Data Modification operation. Refer to page 74 for details. 4. Press the CLR Key to end monitoring. 00200 Bit Monitor Follow the procedure below to monitor the status of a particular bit.
-
Page 81: Differentiation Monitor
Programming Console Operations Section 4-3 If more than six bits and words are input, monitoring of the bit or word input first will be canceled. 4. Press the CLR Key to stop monitoring the leftmost bit or word and clear it from the display. -
Page 82: 3-Word Monitor
Programming Console Operations Section 4-3 1, 2, 3... 1. Monitor the status of the desired word according to the procedure described in 4-3-11 Bit, Digit, Word Monitor. The desired word should be leftmost on the display if 2 or more words are being monitored. C000 0000 (Word monitor) -
Page 83: Signed Decimal Monitor
Programming Console Operations Section 4-3 4-3-15 Signed Decimal Monitor This operation converts the contents of the specified word from signed hexa- decimal (two’s complement format) to signed decimal for display. The opera- tion can be executed while using I/O monitoring, multiple address monitoring or 3-word monitoring. -
Page 84: Changing Timer, Counter Sv
Programming Console Operations Section 4-3 4-3-17 3-Word Data Modification This operation is used to change the contents of one or more of the 3 con- secutive words displayed in the 3-Word Monitor operation. It is possible in MONITOR or PROGRAM mode only. MONITOR PROGRAM 1, 2, 3... -
Page 85: Hexadecimal, Bcd Data Modification
Programming Console Operations Section 4-3 3. Press the Down Arrow Key and then the CHG Key. 00201DATA? ↓ T001 #0123 #???? 4. At this point a new SV constant can be input or the SV constant can be changed to a word address designation a) To input a new SV constant, input the constant and press the WRITE Key. -
Page 86: Binary Data Modification
Programming Console Operations Section 4-3 2. Press the CHG Key to begin hexadecimal, BCD data modification. PRES VAL? D0000 0119 ???? 3. Input the new PV and press the WRITE Key to change the PV. The operation will end and the normal monitoring display will return when the WRITE Key is pressed. -
Page 87: Unsigned Decimal Data Modification
Programming Console Operations Section 4-3 tents of the specified word are converted automatically to signed hexadeci- mal (two’s complement format). Words SR 253 to SR 255 cannot be changed. MONITOR PROGRAM Caution Check that there is no effect on equipment before changing the current values. 1, 2, 3... -
Page 88: Force Set, Reset
Programming Console Operations Section 4-3 Press the CLR Key or the SHIFT and TR Keys to return to the normal moni- toring display. If an erroneous input has been made, press the CLR Key to restore the sta- tus prior to the input. Then enter the correct input. 4-3-23 Force Set, Reset This operation is used to force bits ON (force set) or OFF (force reset) and is useful when debugging the program or checking output wiring. -
Page 89: Programming Example
Programming Example Section 4-4 Note If you mistakenly press the wrong key, press CLR and start again from the beginning. 3. Press the NOT Key to clear the force-set/reset status of bits in all data areas. 00000FORCE RELE 4-3-25 Hex-ASCII Display Change This operation is used to convert word data displays back and forth between 4-digit hexadecimal data and ASCII. - Page 90 Programming Example Section 4-4 1, 2, 3... 1. Set the Programming Console’s mode switch to PROGRAM mode and turn on the CPM1’s power supply. The password input display will appear on the Programming Console. MONITOR PROGRAM <PROGRAM> PASSWORD! 2. Enter the password by pressing the CLR and then the MONTR Key. <PROGRAM>...
-
Page 91: Example Program
Programming Example Section 4-4 4-4-2 Example Program The following ladder program will be used to demonstrate how to write a pro- gram with the Programming Console. This program makes output IR 01000 flicker ON/OFF (one second ON, one second OFF) ten times after input IR 00000 is turned ON. -
Page 92: Programming Procedures
Programming Example Section 4-4 4-4-3 Programming Procedures The example program will be written to the CPM1 according to the mnemonic list in 4-4-2 Example Program. The procedure is performed beginning with the initial display. (Clear the memory before entering a new program.) (1) Inputting the Self-holding Bit 1, 2, 3... - Page 93 Programming Example Section 4-4 4. Input the SV for T001 (#0010 = 1.0 s). 00006 TIM DATA #0010 00007READ WRITE NOP(000) (3) Inputting the The following key operations are used to input the 2-second timer. Two-second Timer 1, 2, 3... 1.
-
Page 94: Checking The Program
Programming Example Section 4-4 4. Input the counter 000. 00013 00013 CNT DATA WRITE #0000 5. Input the SV for 000 (#0010 = 10 counts). 00013 CNT DATA #0010 00014READ WRITE NOP(000) (5) Inputting the Flicker Output 1, 2, 3... 1. -
Page 95: Test Run In Monitor Mode
Programming Example Section 4-4 3. Input the desired check level (0, 1, or 2). The program check will begin when the check level is input, and the first error found will be displayed. 00178CIRCUIT ERR 00200 Note Refer to 5-5 Programming Errors for details on check levels. 4. -
Page 96: Test Runs And Error Processing
SECTION 5 Test Runs and Error Processing This section describes procedures for test runs of CPM1 operation, self-diagnosis functions, and error processing to identify and correct the hardware and software errors that can occur during PC operation. Initial System Checks and Test Run Procedure . -
Page 97: Initial System Checks And Test Run Procedure
Section 5-1 Initial System Checks and Test Run Procedure Initial System Checks and Test Run Procedure 5-1-1 Initial System Checks Note Check the following items after setting up and wiring the CPM1. Be sure to check the wiring and connections before performing a test run. Item Points to check Power supply and... -
Page 98: Flash Memory Precautions
Section 5-1 Initial System Checks and Test Run Procedure 5-1-3 Flash Memory Precautions Observe the following precautions to protect the flash memory and ensure proper operation. 1, 2, 3... 1. If the power is turned off without changing the mode after having made chan- ges in the read-only DM area (DM 6144 through DM 6599), or PC Setup (DM 6600 through DM 6655), the contents of changes will not be written to flash memory. -
Page 99: The Cpm1 Cycle
The CPM1 Cycle Section 5-2 The CPM1 Cycle The overall flow of CPM1 operation is as shown in the following flowchart. The CPM1 is initialized internally when the power is turned on. If no errors are detected, the overseeing processes, program execution, I/O refreshing, and Peripheral Device servicing are executed consecutively (cyclically). -
Page 100: Self-Diagnosis Functions
Self-diagnosis Functions Section 5-3 Self-diagnosis Functions The CPM1 is equipped with a variety of self-diagnosis functions to help identify and correct errors that might occur and reduce down time. PC errors are divided into 2 categories based on the severity of the errors. Fatal errors are more serious errors which stop CPM1 operation. -
Page 101: Identifying Errors
Self-diagnosis Functions Section 5-3 Message FALS Meaning and appropriate response Power interruption None Power has been interrupted for at least 10 ms for the AC-type CPU Unit and at least (no message) 2 ms for the DC-type CPU Unit. Check power supply voltage and power lines. Try to power-up again. -
Page 102: Programming Console Operation Errors
Programming Errors Section 5-5 SEVERE FAILURE ALARM – FALS(07) is an instruction that causes a fatal error. The following will occur when FALS(07) an FALS(07) instruction is executed: 1, 2, 3... 1. Program execution will be stopped and outputs will be turned OFF. 2. - Page 103 Programming Errors Section 5-5 level 0 checks for type A, B, and C errors; check level 1, for type A and B errors; and check level 2, for type A errors only. Type Message Meaning and appropriate response ????? The program has been damaged, creating a non-existent function code.
-
Page 104: Troubleshooting Flowcharts
Troubleshooting Flowcharts Section 5-6 Troubleshooting Flowcharts Use the following flowcharts to troubleshoot errors that occur during operation. Main Check Error Power indicator lit? Check power supply. (See page 94.) Operation stopped. Check for fatal errors. RUN indicator lit? (See page 95.) ERR/ALM indicator Check for non-fatal errors. - Page 105 Troubleshooting Flowcharts Section 5-6 Power Supply Check Power indicator not lit. Connect power Is power being supplied? supply. Is Power indicator lit? Set supply voltage Is voltage adequate? within acceptable limits. Is Power indicator lit? Tighten screws or Are there any loose terminal screws or bro- replace wires.
- Page 106 Troubleshooting Flowcharts Section 5-6 Fatal Error Check RUN indicator not lit. Is the ERR/ALM indicator lit? Determine the cause Is PC mode displayed of the error with a on Peripheral Device? Peripheral Device. Is PC mode displayed Turn the power on Peripheral Device? supply OFF, and then ON again.
- Page 107 Troubleshooting Flowcharts Section 5-6 Non-fatal Error Check ERR/ALM indicator flashing. Determine the cause of the error with a Peripheral Device. Identify the error, eliminate its Is a non-fatal error indicated? cause, and clear the error. Flashing Is the ERR/ALM indi- cator flashing? Not lit Replace the CPU...
- Page 108 Troubleshooting Flowcharts Section 5-6 I/O Check The I/O check flowchart is based on the following ladder diagram section. (LS1) (LS2) 00002 00003 01003 SOL1 01003 SOL1 malfunction. Malfunction of SOL1 Is the IR 01003 out- put indicator operat- ing normally? Check the voltage at the Wire correctly.
- Page 109 Troubleshooting Flowcharts Section 5-6 Are the IR 00002 and IR 00003 input indi- cators operating normally? From previous page Check the voltage at Check the voltage at the IR 00002 and IR the IR 00002 and IR Are the terminal 00003 terminals.
- Page 110 Troubleshooting Flowcharts Section 5-6 Environmental Conditions Check Environmental conditions check Is the ambient Consider using a temperature fan or cooler. below 55°C? Is the ambient Consider using a temperature above heater. 0°C? Is the ambient humidity Consider using an between 10% and air conditioner.
- Page 111 Troubleshooting Flowcharts Section 5-6 Memory Error Check Memory error occurred. Replace the CPU AR 1309 ON? Unit. Check/correct data backed up by AR 1314 ON? capacitor and clear error. Check the program, correct any AR 1308 ON? errors, and clear the error. Check the error indicated by AR 1310 to Turned ON during...
-
Page 112: Maintenance Inspections
Maintenance Inspections Section 5-7 Maintenance Inspections In order that your SYSMAC system operates in optimum condition, be sure to carry out daily or periodical inspections. Inspection Items The main system components of a SYSMAC system are semiconductors, and it contains few components with limited lifetimes. Environmental conditions, how- ever, can lead to electrical element deterioration, making regular maintenance necessary. -
Page 113: Handling Precautions
• When returning a faulty Unit for repair, make a detailed note of the Unit’s mal- function and take it together with the Unit to your nearest OMRON office or sales representative. • If a contact is not good, put some industrial alcohol on a clean cotton cloth and wipe the surface. -
Page 114: A Standard Models
Appendix A Standard Models CPU Units Description Input points Output points Power Supply Model Number CPU Units with 10 I/O points 6 points 4 points 100 to 240 VAC, 50/60 Hz CPM1-10CDR-A 24 VDC CPM1-10CDR-D CPU Units with 20 I/O points 12 points 8 points 100 to 240 VAC, 50/60 Hz... - Page 115 Appendix A Standard Models Peripheral Devices Name Model Number Specifications Programming Console CQM1-PRO01-E 2-m Connecting Cable attached C200H-PRO27-E Hand-held, w/backlight; requires the C200H-CN222 or C200H-CN422 Connecting Cable, see below SYSMAC Support Software C500-ZL3AT1-E 3.5”, 2HD for IBM PC/AT compatible SYSMAC-CPT WS01-CPTB1-E For IBM PC/AT or compatible computers (3.5”...
-
Page 116: B Dimensions
Appendix B Dimensions All dimensions are in millimeters. CPM1-10CDR-j 81 90... - Page 117 Appendix B Dimensions CPM1-20CDR-j 81 90 CPM1-30CDR-j CPM1-30CDR-j-V1 (Available soon)
- Page 118 Appendix B Dimensions CPM1-20EDR 81 90...
- Page 119 Appendix B Dimensions CPM1-CIF01 90 81 CPM1-CIF11 90 81...
- Page 120 Appendix B Dimensions Dimensions with Peripheral Devices Attached CPM1-jjCDR-j When the Communications Adapter or Programming Console is attached. Approx. 125 CPM1-CIF01 When the RS-232C connector is attached. Approx. 120...
- Page 121 Glossary Indirectly addressed DM area. See indirect address and DM area. 1:1 link A link created between two PCs to create common data in their LR areas. See add count input. add count input An input signal used to increment a counter when the signal changes from OFF to ON.
-
Page 122: Glossary
Glossary bit designator An operand that is used to designate the bit or bits of a word to be used by an instruction. bit number A number that indicates the location of a bit within a word. Bit 00 is the rightmost (least-significant) bit;... - Page 123 Glossary Completion Flag A flag used with a timer or counter that turns ON when the timer has timed out or the counter has reached its set value. condition A symbol placed on an instruction line to indicate an instruction that controls the execution condition for the terminal instruction.
- Page 124 Glossary data link An automatic data transmission operation that allows PCs or Units within PC to pass data back and forth via common data areas. data link area A common data area established through a data link. data movement instruction An instruction used to move data from one location in memory to another.
- Page 125 Glossary and ‘distributed’ over the system. Distributed control is a concept basic to PC Systems. DM area A data area used to hold only word data. Words in the DM area cannot be accessed bit by bit. DM word A word in the DM area. downloading The process of transferring a program or data from a higher-level or host com- puter to a lower-level or slave computer.
- Page 126 Glossary Factory automation. factory computer A general-purpose computer, usually quite similar to a business computer, that is used in automated factory control. FAL error An error generated from the user program by execution of an FAL(06) instruc- tion. FALS error An error generated from the user program by execution of an FALS(07) instruc- tion or an error generated by the system.
- Page 127 Glossary I/O capacity The number of inputs and outputs that a PC is able to handle. This number ranges from around one hundred for smaller PCs to two thousand for the largest ones. I/O delay The delay in time from when a signal is sent to an output to when the status of the output is actually in effect or the delay in time from when the status of an input changes until the signal indicating the change in the status is received.
- Page 128 Glossary instruction A direction given in the program that tells the PC of the action to be carried out, and the data to be used in carrying out the action. Instructions can be used to simply turn a bit ON or OFF, or they can perform much more complex actions, such as converting and/or transferring large blocks of data.
- Page 129 Glossary link A hardware or software connection formed between two Units. “Link” can refer either to a part of the physical connection between two Units or a software con- nection created to data existing at another location (i.e., data links). load The processes of copying data either from an external device or from a storage area to an active portion of the system such as a display buffer.
- Page 130 Glossary non-fatal error A hardware or software error that produces a warning but does not stop the PC from operating. normal condition See normally open condition. normally closed condition A condition that produces an ON execution condition when the bit assigned to it is OFF, and an OFF execution condition when the bit assigned to it is ON.
- Page 131 Glossary output bit A bit in the IR area that is allocated to hold the status to be sent to an output device. output device An external device that receives signals from the PC System. output point The point at which an output leaves the PC System. Output points correspond physically to terminals or connector pins.
- Page 132 Glossary Programmable Controller A computerized device that can accept inputs from external devices and gener- ate outputs to external devices according to a program held in memory. Pro- grammable Controllers are used to automate control of external devices. Although single-unit Programmable Controllers are available, building-block Programmable Controllers are constructed from separate components.
- Page 133 Glossary response format A format specifying the data required in a response to a data transmission. response monitoring time The time a device will wait for a response to a data transmission before assum- ing that an error has occurred. Restart Bit A bit used to restart part of a PC.
- Page 134 Glossary self-maintaining bit A bit that is programmed to maintain either an OFF or ON status until set or reset by specified conditions. series A wiring method in which Units are wired consecutively in a string. servicing The process whereby the PC checks a connector or Unit to see if special proces- sing is required.
- Page 135 The memory area used to hold the active program, i.e., the program that is being currently executed. Unit In OMRON PC terminology, the word Unit is capitalized to indicate any product sold for a PC System. Most of the names of these products end with the word Unit.
- Page 136 Glossary unmasked bit A bit whose status is effective. See masked bit. unsigned binary A binary value that is stored in memory without any indication of whether it is positive or negative. unsigned decimal One-word hexadecimal values can be displayed at the Programming Console as decimal values from 0 to 65,535.
- Page 137 Index Numbers configuration, 8 Counter Mode, 5 1-to-1 communications, 9, 42 countermeasures, EMC Directives, 40 counters 1-to-n communications, 10, 43 changing SV, Programming Console, 73 example of inputting, 82 CPM1 installation, 31 CPU Units, standard models, 103 Adapters, list of communications adapters, 10 cycle, CPM1 operating cycle, 88 analog setting function, 3, 4 cycle time...
-
Page 138: Index
Index FAL(06), 90 instructions inserting and deleting, Programming Console, 63 FALS numbers, 89 searching, Programming Console, 62 FALS(07), 91 interlock circuit, example, 28 false inputs, 38 interrupt inputs, 2, 5 fatal errors, troubleshooting, 95 Interrupt Mode, 5 features, CPM1 features, 2 interval timer, 2, 6 filter function, 2 IR bit allocation, 3... - Page 139 Index NT Link programming checking the program, 83–84 communications, 12 checks for syntax, Programming Console, 68 connections, 46 errors, 91 inserting and deleting instructions, Programming Console, 63–65 preparation for, 78 searching, Programming Console, 62–63 setting and reading a memory address, Programming Con- one-shot mode, 6 sole, 62 operating conditions, troubleshooting, 99...
- Page 140 Index SSS, 48 test run example, 84 offline and online operations, 54 procedure, 86 offline operations, 49 online operations, 52 timers precautions, 48 changing SV, Programming Console, 73 restrictions, 48 example of inputting, 82 System Setup, 48 troubleshooting, 93 status, monitoring, Programming Console, 68 fatal errors, 95 I/O errors, 97 SV, modifying, Programming Console, 73...
- Page 141 Page 4: Top sentence corrected. Pages 4 to 6: References to the Programming Manual added. Page 8: Link Adapter model number corrected. “OMRON PCs” in 1-to-n Communications corrected to “CPM1 PCs.” Page 11: Ladder Support Software information removed. Remaining information in table updated.
-
Page 142: Revision History
Revision History Revision code Date Revised content February 1998 Pages xiii to xvi: Cautions rewritten and corrected. Page 2: I/O capacity information added to Extra I/O Capacity. Page 3: New CPU Unit information added to the table. Page 4: Information added to Input Filter Function. Pages 5, 14, 15, 21, 29, 37, 104: “(-V1)”...
Need help?
Do you have a question about the Sysmac CPM1 and is the answer not in the manual?
Questions and answers