Table of Contents
Advertisement
Quick Links
Quick-Start Guide
HDMI Over CAT5 or CAT6 Extender - 4K 60Hz
ST121HDBT20L
For full manual content please refer to the online manual @ www.
startech.com/ST121HDBT20L.
FR: Guide de l'utilisateur - fr.startech.com
DE: Bedienungsanleitung - de.startech.com
ES: Guía del usuario - es.startech.com
NL: Gebruiksaanwijzing - nl.startech.com
PT: Guia do usuário - pt.startech.com
IT: Guida per l'uso - it.startech.com
JP: 取扱説明書 - jp.startech.com
Package Contents
• 1 x HDMI Transmitter
• 1 x HDMI Receiver
• 1 x Universal Power Adapter (NA/JP, EU, UK, ANZ)
• 2 x Mounting Brackets
• 8 x Rubber Feet
• 1 x Quick-Start Guide
• 1 x IR (Infrared) Receiver
• 1 x IR (Infrared) Blaster
Requirements
• HDMI® Enabled Video Source Device (e.g. computer)
• HDMI Enabled Display Device (e.g. projector)
• Available AC Electrical Outlet for Transmitter or Receiver
• HDMI Cables for Transmitter and Receiver
• CAT5e/CAT6 Network Cable (shielded CAT6 Cable recommended)
• (Optional) Grounding Wire
• (Optional) Phillips Head Screwdriver
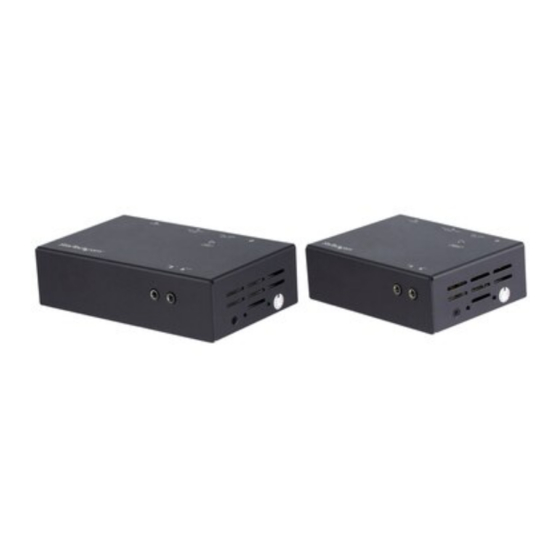
Product Diagram
Actual product may vary from photos.
Transmitter Front View
2
1. LED
2. IR Out Port
For the latest information, technical specifications, and support for
this product, please visit www.startech.com/ST121HDBT20L.
1
3
3. IR In Port
Receiver Front View
2
1. LED
2. IR In Port
Transmitter Rear View
1
2
3
1. Grounding Screw
3. DC 18V Power Port
Receiver Rear View
1
2
3
1. Grounding Screw
3. DC 18V Power Port
Installation
Installing the HDMI Transmitter or Receiver
Note: Make sure that either the HDMI Transmitter or Receiver is
located near an AC Electrical Outlet and that all devices connected
to them are turned off.
1. Set up the HDMI Enabled Video Source Device (e.g. computer)
and the HDMI Enabled Display Device (place/mount the display
appropriately).
1
3
3. IR Out Port
4
2. LINK (RJ45 Connector)
4. HDMI In Port
4
2. LINK (RJ45 Connector)
4. HDMI Out Port
Manual Revision: 05/02/2018
Advertisement
Table of Contents

Related Manuals for StarTech.com ST121HDBT20L


Summary of Contents for StarTech.com ST121HDBT20L
- Page 1 ST121HDBT20L Receiver Front View For full manual content please refer to the online manual @ www. startech.com/ST121HDBT20L. FR: Guide de l’utilisateur - fr.startech.com DE: Bedienungsanleitung - de.startech.com ES: Guía del usuario - es.startech.com NL: Gebruiksaanwijzing - nl.startech.com PT: Guia do usuário - pt.startech.com IT: Guida per l’uso - it.startech.com...
- Page 2 This manual may make reference to trademarks, registered trademarks, and other protected names and/or symbols of third-party companies not related in any way to StarTech.com. Where they occur these references are for illustrative purposes only and do not represent an endorsement of a product or service by StarTech.com, or an endorsement of the product(s) to which this manual applies by the third-party company in question.
Need help?
Do you have a question about the ST121HDBT20L and is the answer not in the manual?
Questions and answers