Table of Contents
Advertisement
Quick Links
Advertisement
Chapters
Table of Contents
Troubleshooting

Related Manuals for Xerox VersaLink B405DN


Summary of Contents for Xerox VersaLink B405DN
- Page 1 Xerox VersaLink B405 ® ® Multifunction Printer User Guide...
- Page 2 © 2017 Xerox Corporation. All rights reserved. Unpublished rights reserved under the copyright laws of the United States. Contents of this publication may not be reproduced in any form without permission of Xerox Corporation. Copyright protection claimed includes all forms of matters of copyrightable materials and information now allowed by statutory or judicial law or hereinafter granted, including without limitation, material generated from the software programs which are displayed on the screen such as styles, templates, icons, screen displays, looks, and so on.
-
Page 3: Table Of Contents
Configuration Report ..............................33 Printing the Configuration Report ........................33 The Embedded Web Server ............................34 Accessing the Embedded Web Server ......................34 Finding the IP Address of Your Printer ......................34 Xerox VersaLink B405 Multifunction Printer ® ® User Guide... - Page 4 ® App Gallery Account ....................... 60 Logging in to your Xerox ® App Gallery Account ..................61 Installing or Updating an App from the Xerox ® App Gallery ............... 62 Device ....................................63 Device Overview ..............................63 About ..................................64 Supply Status ................................
- Page 5 Lightness ................................131 Contrast .................................. 131 Image Shift ................................131 Printing Booklets ..............................131 Using Special Pages ............................132 Printing Watermarks for Windows ....................... 134 Orientation ................................135 Printing Banner Pages ............................135 Xerox VersaLink B405 Multifunction Printer ® ® User Guide...
- Page 6 Toner Cartridges ..............................176 Recycling Supplies ............................... 177 Managing the Printer ..............................178 Viewing the Meter Reading ..........................178 Printing the Billing Summary Report ......................178 Moving the Printer ..............................179 Xerox VersaLink B405 Multifunction Printer ® ® User Guide...
- Page 7 Viewing Warning Messages on the Control Panel.................. 213 Viewing Current Errors on the Control Panel .................... 213 Using the Integrated Troubleshooting Tools ................... 213 Online Support Assistant ..........................214 Information Pages.............................. 214 More Information ............................... 214 Xerox VersaLink B405 Multifunction Printer ® ® User Guide...
- Page 8 Power Supply Voltage and Frequency ......................222 Power Consumption ............................222 ENERGY STAR Qualified Product ........................222 Germany - Blue Angel ............................223 Recycling Supplies ............................... 223 Performance Specifications ............................ 224 Print Speed ................................224 Xerox VersaLink B405 Multifunction Printer ® ® User Guide...
- Page 9 Eurasian Economic Community Certification ..................230 Regulatory Information for 2.4-GHz and 5-GHz Wireless Network Adapter ........ 230 Ozone Release ..............................231 Copy Regulations ................................ 232 United States ................................ 232 Canada ..................................233 Other Countries ..............................234 Xerox VersaLink B405 Multifunction Printer ® ® User Guide...
- Page 10 Domestic/Household Environment ......................244 Professional/Business Environment ......................244 Collection and Disposal of Equipment and Batteries ................245 Battery Symbol Note ............................245 Battery Removal ..............................245 Other Countries................................246 Apps Features Xerox VersaLink B405 Multifunction Printer ® ® User Guide...
-
Page 11: Safety
Environmental, Health, and Safety Contact Information ................20 Your printer and the recommended supplies have been designed and tested to meet strict safety requirements. Attention to the following information ensures the continued safe operation of your Xerox printer. Xerox VersaLink B405 Multifunction Printer ®... -
Page 12: Notices And Safety
These include safety agency evaluation and certification, and compliance with electromagnetic regulations and established environmental standards. The safety and environment testing and performance of this product have been verified using Xerox ® materials only. -
Page 13: Electrical Safety
The printer causes a circuit breaker, fuse, or other safety device to activate. If any of these conditions occur, do the following: Power off the printer immediately. Disconnect the power cord from the electrical outlet. Call an authorized service representative. Xerox VersaLink B405 Multifunction Printer ® ®... -
Page 14: Power Cord
Emergency Turn Off If any of the following conditions occur, power off the printer immediately and disconnect the power cord from the electrical outlet. Contact an authorized Xerox service representative to correct the problem if: •... -
Page 15: Operational Safety
Ozone is heavier than air and is not produced in amounts large enough to harm anyone. Install the printer in a well-ventilated room. For more information in the United States and Canada, go to www.xerox.com/environment. In other markets, please contact your local Xerox representative or go to www.xerox.com/environment_europe. -
Page 16: Printer Supplies
Agreement, and Total Satisfaction Guarantee do not cover damage, malfunction, or degradation of performance caused by use of non-Xerox supplies, or the use of Xerox supplies not specified for this printer. The Total Satisfaction Guarantee is available in the United States and Canada. -
Page 17: Maintenance Safety
Do not attempt any maintenance procedure that is not specifically described in the documentation supplied with your printer. • Clean the device with a dry lint-free cloth only. • Do not burn any consumables or routine maintenance items. For information on Xerox ® supplies recycling programs, go to www.xerox.com/gwa WARNING: Do not use aerosol cleaners. -
Page 18: Printer Symbols
Do not touch the part or area of the printer. Do not expose the drum cartridges to direct sunlight. Do not burn the toner cartridges. Do not burn the waste cartridge. Do not burn the drum cartridges. Xerox VersaLink B405 Multifunction Printer ® ®... - Page 19 Do not reload paper previously printed on or used. Do not copy money, revenue stamps, or postage stamps. For details about all the printer symbols that appear on your printer, refer to the Printer Symbols guide at www.xerox.com/office/VLB405docs Xerox VersaLink B405 Multifunction Printer ®...
-
Page 20: Environmental, Health, And Safety Contact Information
Safety Environmental, Health, and Safety Contact Information For more information on Environment, Health, and Safety in relation to this Xerox product and supplies, contact the following customer help lines: United States and Canada: 1-800-ASK-XEROX (1-800-275-9376) Europe: +44 1707 353 434 For product safety information in the United States and Canada, go to www.xerox.com/environment. -
Page 21: Getting Started
Introduction to Apps............................... 31 • Information Pages ................................32 • Configuration Report ..............................33 • The Embedded Web Server ............................34 • Installation and Setup ..............................35 • More Information ................................52 Xerox VersaLink B405 Multifunction Printer ® ® User Guide... -
Page 22: Parts Of The Printer
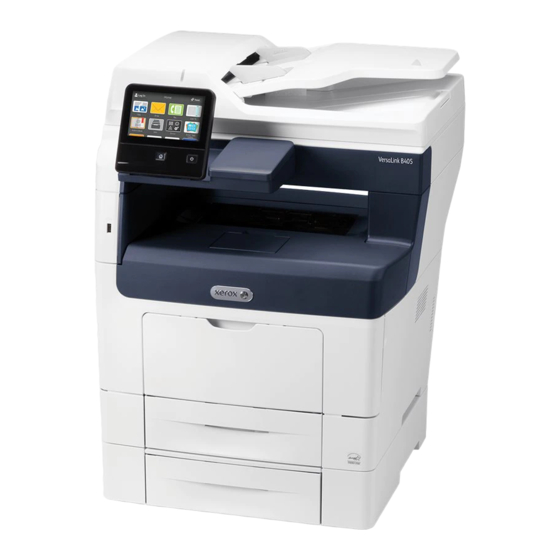
7. Duplex Automatic Document Feeder 3. Front Door 8. Output Tray 4. USB Memory Port 9. Output Tray Paper Stop 5. Control Panel 10. Optional 550 Sheet Feeder, maximum of 3 (Trays 2–4) Xerox VersaLink B405 Multifunction Printer ® ® User Guide... -
Page 23: Duplex Automatic Document Feeder
Paper with paper clips or staples attached • Paper with wrinkles, curls, folds, tears, or notches • Coated or carbonless paper or items other than paper, such as cloth or metal • Envelopes • Books Xerox VersaLink B405 Multifunction Printer ® ® User Guide... -
Page 24: Control Panel
The screen displays information and provides access to printer functions. Display Home Button This button provides access to the Home menu for access to printer features, such as copy, scan, and fax. Xerox VersaLink B405 Multifunction Printer ® ® User Guide... - Page 25 When a job is being scanned or processed, a Pause icon appears in the notification banner area. To pause the current job, touch the Pause icon. The job pauses with the option to resume or delete the job. Xerox VersaLink B405 Multifunction Printer ®...
-
Page 26: Internal Parts
Getting Started Internal Parts 1. Output Tray Paper Stop 5. Duplex Automatic Document Feeder 2. Front Door 6. Document Cover 3. Drum Cartridge 7. Document Glass 4. Toner Cartridge Xerox VersaLink B405 Multifunction Printer ® ® User Guide... -
Page 27: Rear View
8. Transfer Roll 3. Wireless Network Adapter Port Cover 9. Fuser 4. USB Port 10. Control Board 5. Foreign Device Interface Connector 11. Left Side Cover 6. Back Cover 12. Power Connector Xerox VersaLink B405 Multifunction Printer ® ® User Guide... -
Page 28: Power Options
When in Low-Power mode, or Sleep mode, the touch screen is powered off and unresponsive. To wake the printer manually, press the Power/Wake button. CAUTION: Do not plug or unplug the power cord while the printer is powered on. Xerox VersaLink B405 Multifunction Printer ®... -
Page 29: Restarting, Placing In Sleep Mode, Or Powering Off The Printer
5 seconds. A wait message appears as the printer powers down. After 10 seconds, the touch screen goes dark and the Power/Wake button flashes until the printer completes the power-down process. CAUTION: Do not unplug the power cord while the printer powers down. Xerox VersaLink B405 Multifunction Printer ® ®... -
Page 30: Accessing The Printer
Type the User Name using the keypad, then touch Enter. If prompted, enter the password, then press Enter. Touch OK. Note: To access each service that is password-protected, repeat steps 3 and 4. Xerox VersaLink B405 Multifunction Printer ® ®... -
Page 31: Introduction To Apps
Introduction to Apps Xerox Apps are a gateway to the features and functions of your device. There are standard Apps that are already installed on the device and that appear on the Home screen. There are also Apps that are installed as standard but are hidden when your device is used for the first time. -
Page 32: Information Pages
At the printer control panel, press the Home button. Touch Device > About > Information Pages. To print an information page, touch the desired page. To return to the Home screen, press the Home button. Xerox VersaLink B405 Multifunction Printer ®... -
Page 33: Configuration Report
Printing the Configuration Report At the printer control panel, press the Home button. Touch Device > About > Information Pages. Touch Configuration Report. To return to the Home screen, press the Home button. Xerox VersaLink B405 Multifunction Printer ® ®... -
Page 34: The Embedded Web Server
Touch Device > About > Information Pages. Touch Configuration Report. The IP address appears in the Connectivity section of the Configuration Report for IPv4 or IPv6. To return to the Home screen, press the Home button. Xerox VersaLink B405 Multifunction Printer ®... -
Page 35: Installation And Setup
Routers, network hubs and switches, modems, Ethernet cables, and USB cables are not included with your printer and are purchased separately. Xerox recommends an Ethernet connection because it is typically faster than a USB connection, and it provides access to the Embedded Web Server. -
Page 36: Connecting The Printer
USB and allows direct access to the settings of the printer using the Embedded Web Server. Telephone: To send and receive faxes, the multifunction printer must be connected to a dedicated • telephone line. Xerox VersaLink B405 Multifunction Printer ® ®... -
Page 37: Connecting To A Computer Using Usb
Attach the power cord, then plug in the printer and turn it on. Set the network IP printer address, or set up the printer for automatic printer IP detection. For more information, refer to the System Administrator Guide at www.xerox.com/office/VLB405docs. Connecting to a Wireless Network A wireless local area network (WLAN) provides the means to connect two or more devices in a LAN without a physical connection. - Page 38 To remove the Wireless Network Adapter Port Cover, press the latch to the left, then pull the cover away from the printer. Remove the packaging from the Wireless Network Adapter. To install the Wireless Network Adapter, follow the installation instructions provided with the Wireless Network Adapter. Xerox VersaLink B405 Multifunction Printer ® ®...
- Page 39 Removing the Wireless Network Adapter. Power on the printer. Configure the Wi-Fi Settings. For details about configuring the Wi-Fi settings, refer to the System Administrator Guide at www.xerox.com/office/VLB405docs Removing the Wireless Network Adapter Power off the printer. Xerox...
- Page 40 Reach into the printer and pull the release lever. Grasp the Wireless Network Adapter with your other hand and carefully pull it away from the printer. Xerox VersaLink B405 Multifunction Printer ®...
- Page 41 Place the left-side cover into position and slide it toward the front of the printer. Tighten the bolt to secure the cover. Xerox VersaLink B405 Multifunction Printer ®...
- Page 42 To prevent the printer from attempting to connect to the previous network, reset the wireless settings. For more information, refer to the System Administrator Guide at www.xerox.com/office/VLB405docs. Connecting to Wi-Fi Direct You can connect to your printer from a Wi-Fi mobile device, such as a tablet, computer, or smart phone, using Wi-Fi Direct.
-
Page 43: Connecting To A Telephone Line
• Security Settings For more information on configuring the printer settings, refer to the System Administrator Guide at www.xerox.com/office/VLB405docs. Configuring AirPrint AirPrint is a software feature that allows you to print from wired or wireless Apple iOS-based mobile devices and Mac OS-based devices without the need to install a print driver. AirPrint-enabled printers allow you to print or fax directly from a Mac, an iPhone, iPad, or iPod touch. -
Page 44: Configuring Google Cloud Print
Google Cloud Print allows you to print documents that are stored in the cloud without using a print driver. Before you begin: • Set up a Google email account. • Configure the printer to use IPv4. • Configure Proxy Server settings as needed. Xerox VersaLink B405 Multifunction Printer ® ® User Guide... - Page 45 After the printer is registered, a confirmation status window appears. 11. To access the Google Cloud Print feature, in your Google account, click Manage Your Printer. Note: The default printer name appears in this format: Model name (MAC address). Xerox VersaLink B405 Multifunction Printer ®...
-
Page 46: Installing The Software
Finding the IP Address of Your Printer on page 34. If the Software and Documentation disc is not available, download the latest drivers from www.xerox.com/office/VLB405drivers. Operating System Requirements • Windows 7, Windows 8.1, Windows Server 2008, Windows 10, Windows Server 2008 R2, and Windows Server 2012. -
Page 47: Installing The Print Drivers For A Windows Network Printer
To install the printer support software, select Software, then click Next. In the Software and Documentation window, clear the check box for any undesired options. Click Next. To complete the installation, click Finish. Xerox VersaLink B405 Multifunction Printer ® ®... -
Page 48: Installing The Drivers And Utilities For Macintosh Os X
Insert the Software and Documentation disc into the appropriate drive on your computer. Open Xerox ® Print Drivers 3.xx.x.dmg/.pkg as needed for your printer. To run Xerox ® Print Drivers 3.xx.x.dmg/.pkg, double-click the appropriate file name. When prompted, click Continue. - Page 49 From the printer software list, select the print driver for your printer model. 10. Click Add. For reference: Online Support Assistant at: www.xerox.com/office/VLB405support Installing Scan Drivers for Macintosh Insert the Software and Documentation disc into your computer. Double-click the disc icon on your desktop to view the .dmg file for your printer.
- Page 50 If the printer is not detected, ensure that the printer is on and that the cable is connected properly. In the Print Using drop-down list, choose Select Printer Software. LAN fax driver model, then click OK. In the printer software list, select the appropriate Xerox ® Click Add. To add the printer by specifying the IP address: From the computer Applications folder or from the dock, open System Preferences.
-
Page 51: Installing Drivers And Utilities For Unix And Linux
In the Address field, enter the IP address of the printer. In the Name field, enter the name of the printer. In the Print Using drop-down list, choose Select Printer Software. In the printer software list, select the appropriate Xerox ® LAN fax driver model, then click OK. -
Page 52: More Information
You can obtain more information about your printer from these sources: Resource Location Installation Guide Packaged with the printer. Other documentation for your printer www.xerox.com/office/VLB405docs Technical support information for your printer; www.xerox.com/office/VLB405support including online technical support, Online Support Assistant, and print driver downloads. Information Pages Print from the control panel. -
Page 53: Customize And Personalize
Customize and Personalize This chapter includes: • Customize and Personalize Overview ........................54 • Customizing or Personalizing the Home Screen ....................55 • Customizing or Personalizing the Apps ........................56 Xerox VersaLink B405 Multifunction Printer ® ® User Guide... -
Page 54: Customize And Personalize Overview
Default settings for each app can be specified, and settings for regular jobs can be saved for your use. Personalization options ensure that the features and functions displayed meet individual user needs, improving efficiency. Xerox VersaLink B405 Multifunction Printer ®... -
Page 55: Customizing Or Personalizing The Home Screen
Touch and hold the required App. Drag the App to the new location. Release the App. Touch Done. Verify that the Apps appear in the correct location on the Home screen. Xerox VersaLink B405 Multifunction Printer ® ® User Guide... -
Page 56: Customizing Or Personalizing The Apps
Touch the needed options. Note: For logged-in administrators, a window appears that asks you to confirm if the changes are for a Guest or for you. To save the current configuration, touch X. Xerox VersaLink B405 Multifunction Printer ® ®... -
Page 57: Saving Presets
To remove the current App customization settings: At the printer control panel, press the Home button. Touch the App required. Scroll to the bottom, then touch Customize. Touch Remove App Customization. At the prompt, touch OK. Xerox VersaLink B405 Multifunction Printer ® ® User Guide... -
Page 58: Customizing App Default Settings
To customize the App default settings: At the control panel, press the Home button. Touch the App required. Configure the required default settings. Touch Save. Touch Save Defaults. The new settings override the previous default settings. Xerox VersaLink B405 Multifunction Printer ® ® User Guide... -
Page 59: Xerox Apps
For details about Customizing the Home screen and the Apps features, refer to Customize and Personalize on page 53. A range of Apps are available for download and installation from the Xerox ® App Gallery. These include Xerox ®... -
Page 60: Xerox ® App Gallery
An App Gallery account can be setup using the control panel or the Embedded Web Server. For information about accessing the Embedded Web Server, refer to Getting Started on page 34. Note: If you have an existing Xerox App Gallery Account, refer to Logging in to your App Gallery Account on page 61. Xerox VersaLink B405 Multifunction Printer ®... -
Page 61: Logging In To Your Xerox ® App Gallery Account
Access your email account for the email address that you provided to Xerox App Gallery. Open the Xerox App Gallery Account Request email, then click the URL link for creating an account. Review and accept the Terms of Use. To continue creating an account, click the Agree button. -
Page 62: Installing Or Updating An App From The Xerox ® App Gallery
App Gallery ® Xerox ® Apps add, extend, or customize the functionality of your device. You can use the Xerox ® Gallery App to browse and install Apps at your device control panel. To install an App from the App Gallery: At the printer control panel, press the Home button. -
Page 63: Device
Xerox Apps ® Device This section includes: • Device Overview ................................63 • About ....................................64 • Supply Status ..................................65 • Billing and Usage Counters ............................66 • Reset to Factory Defaults ............................. 66 • Remote Services................................67 Device Overview The Device App gives you access to information about your printer, including the serial number and model. -
Page 64: About
Xerox Apps ® Paper Trays Use the Paper Trays option to see the paper size, type, and color set for each paper tray and the tray-capacity status. Use the Supplies section to monitor the status of the components you can Supplies replace. -
Page 65: Supply Status
Xerox Apps ® PostScript Font List The PostScript Font List provides a printout of all PostScript fonts that are available on the printer. The PCL Font List provides a printout of all PCL fonts that are PCL Font List available on the printer. -
Page 66: Billing And Usage Counters
To return to the Device screen, touch the back arrow. To check the supplies status and set up alerts using the Embedded Web Server, refer to the System Administrator Guide at www.xerox.com/office/VLB405docs. Billing and Usage Counters The Billing/Usage menu displays the total number of impressions that the printer generated or printed during its lifetime. -
Page 67: Remote Services
You can use the Remote Services option in the Embedded Web Server to send error and usage information to the Xerox support team to help them resolve problems quickly. For information about enabling Remote Services and uploading information to Xerox, refer to the System Administrator Guide at www.xerox.com/office/VLB405docs. -
Page 68: Address Book
Xerox Apps ® Address Book This section includes: • Address Book Overview ..............................68 • Editing the Address Book .............................. 68 • Managing Favorites ................................ 71 Address Book Overview Use the Device Address Book to create individual contacts or group contacts for use with the Email, Fax, and Scan To Apps. - Page 69 Xerox Apps ® Enter the contact details: To add an email address to the contact, touch Add Email. Enter an email address, − then touch Enter. To add a fax number to the contact, touch Add Fax. Enter a fax number, then touch Enter.
- Page 70 Xerox Apps ® To edit or delete groups: At the printer control panel, press the Home button. Touch Address Book. From the Address Book, select a group, then touch Edit. To add group members, touch Add Member. To add a contact, from the Favorites or Contacts menu, select a contact.
-
Page 71: Managing Favorites
Xerox Apps ® Adding or Editing Groups in the Address Book in the Embedded Web Server To add groups: At your computer, open a Web browser. In the address field, type the IP address of the printer, then press Enter or Return. - Page 72 Xerox Apps ® Managing Favorites at the Control Panel At the printer control panel, press the Home button, then touch Address Book. Select a contact, then touch Edit. To make the contact a Global Favorite, for the contact name, touch the Star icon.
-
Page 73: Jobs
Xerox Apps ® Jobs This section includes: • Jobs Overview ..................................73 • Managing Jobs .................................. 73 • Managing Special Job Types ............................74 • Managing Jobs using the Embedded Web Server ....................79 Jobs Overview Use Jobs to view current jobs, print saved, personal, and secure jobs, and view details of completed jobs. -
Page 74: Managing Special Job Types
Xerox Apps ® To view, print, or delete saved and secure jobs: At the printer control panel, press the Home button. To view a list of active and completed jobs, touch Jobs. To view a list of specific job types, touch an option. - Page 75 For Windows, click Printer Properties. Depending on your application, the title of the button − can vary. For Macintosh, in the Print window, click Preview, then select Xerox Features. − For Job Type, select Saved Job. Type a job name or select a name from the list, then click OK.
- Page 76 For Windows, click Printer Properties. Depending on your application, the title of the button − varies. For Macintosh, in the Print window, click Preview, then select Xerox Features. − For Job Type, select Secure Print. Type the passcode, confirm the passcode, then click OK.
- Page 77 Xerox Apps ® Personal Print Personal Print allows you to store a document in the printer, then print it from the control panel. Note: This feature is only available on a Windows computer printing to a network printer. Personal Print is a type of saved job with these features: •...
- Page 78 For Windows, click Printer Properties. Depending on your application, the title of the button varies. − For Macintosh, in the Print window, click Preview, then select Xerox Features. For Job Type, select Sample Set. Select any other required printing options.
-
Page 79: Managing Jobs Using The Embedded Web Server
Xerox Apps ® Managing Jobs using the Embedded Web Server You can view a list of active jobs and delete print jobs from the Active Jobs list in the Embedded Web Server. You can use the Embedded Web Server to submit jobs for printing at the device. You can print .pdf, .ps, .pcl, .prn, .xps, .jpg, .tif and .txt files directly from the Embedded Web Server without opening... -
Page 80: Copy
Xerox Apps ® Copy This section includes: • Copy Overview ................................... 80 • Making a Copy .................................. 80 • Copy Workflows ................................83 Copy Overview To make a copy, the device scans your original documents and temporarily stores the images. It then prints the images based on the options selected. -
Page 81: Making A Copy
Xerox Apps ® Making a Copy To make a copy: At the printer control panel, press the Home button. To clear previous App settings, touch Reset. Load your original documents. − Use the document glass for single pages or paper that cannot be fed using the duplex automatic document feeder. - Page 82 Xerox Apps ® If you are scanning from the document glass, when prompted, do one of the following: To complete the job and return to the Copy app, touch Done. − To scan another page, load a new original document on the document glass, then touch Add −...
-
Page 83: Copy Workflows
Xerox Apps ® Copy Workflows This section includes: • Changing the Page Layout ............................83 • Book Copying ..................................83 • Shifting the Image ................................84 • Creating a Booklet ................................85 • Adding a Front Cover ..............................86 •... - Page 84 Xerox Apps ® Book Copying You can use the Book Copying feature to copy books, magazines, or other bound documents. You can use this feature to copy images for different results. • Copy either the left or right page onto a single sheet of paper •...
- Page 85 Xerox Apps ® Select one of the following options. Off: This option is the default setting. − Auto Center: This option centers the image on the page. − Snap to Edge: This option shifts the image to the edge of the document. Select one of the −...
- Page 86 Xerox Apps ® Touch Original Document, then select the option that matches your original documents: 1-Sided Original: This option scans only one side of the original image and produces 1-sided − output files. 2-Sided Original: This option scans both sides of the original image.
- Page 87 Xerox Apps ® Erasing the Edges of Copies You can erase content from the edges of your copies using the Edge Erase feature. You can specify the amount to erase on the right, left, top, and bottom edges. To erase the edges of copies: At the printer control panel, press the Home button.
- Page 88 Xerox Apps ® Adding Annotations You can use the Annotations feature to add a page number, comment, date, or Bates Stamp to your copies. Notes: • This function is available on printers with an optional Productivity Kit installed only. •...
- Page 89 Xerox Apps ® To insert the current date: Select the required page location, then touch Date Stamp. Touch Format, then select the required date format. To adjust which pages contain the selected annotation, touch Apply To, then select the required option.
-
Page 90: Id Card Copy
To scan the second side of the original document and print the copies, touch Scan. To return to the home screen, press the Home button. Xerox® VersaLink® B405 Multifunction Printer User Guide... -
Page 91: Email
Xerox Apps ® Email This section includes: • Email Overview .................................. 91 • Sending a Scanned Image in an Email ........................91 Email Overview You can use the Email app to scan images and attach them to emails. You can specify the file name and format of the attachment, and include a subject heading and message for the email. - Page 92 Xerox Apps ® − For multiple, single, or 2-sided pages, use the duplex automatic document feeder. Remove any staples or paper clips from the pages. Insert the original documents face up in the automatic document feeder, with the top of the page entering the feeder first. Adjust the paper guides so that they fit against the document originals.
-
Page 93: Scan To
Xerox Apps ® Scan To This section includes: • Scan To Overview ................................93 • Scanning to an Email Address ............................. 93 • Scanning to a USB Flash Drive ............................ 94 • Scanning to a User Home Folder ..........................95 •... -
Page 94: Scanning To An Email Address
Scanning to an Email Address Before you scan to an email address, ensure that you configure the printer with the email server information. For details, refer to the System Administrator Guide at www.xerox.com/office/VLB405docs. To scan an image and send it to an email address: Load the original document on the document glass or into the duplex automatic document feeder. -
Page 95: Scanning To A User Home Folder
Xerox Apps ® To scan to a USB Flash drive: Load the original document on the document glass or in the duplex automatic document feeder. At the printer control panel, press the Home button. Insert your USB Flash drive into the USB memory port on the front of the printer. -
Page 96: Scan To Desktop
Xerox Apps ® Scanning to a Home Folder Note: If LDAP Network Authentication is configured, the Home button appears as an option that you can select on the Scan To screen. Load the original document on the document glass or into the duplex automatic document feeder. -
Page 97: Scanning To A Shared Folder On A Network Computer
Xerox Apps ® To Scan to Desktop: Load the original document on the document glass or into the duplex automatic document feeder. At the printer control panel, press the Home button. Touch Scan to Desktop. To select a destination, touch the computer address. - Page 98 Xerox Apps ® Sharing a Folder in Macintosh OS X Version 10.7 and Later From the Apple menu, select System Preferences. From the Internet & Wireless menu, select Sharing. From the Service menu, select File Sharing. Under Shared Folders, click the plus icon (+).
-
Page 99: Scanning Images Into An Application On A Connected Computer
Xerox Apps ® Adding a Folder as an Address Book Entry Using the Control Panel At the printer control panel, touch the Home button. Touch Address Book. Touch the plus icon (+), then select Add Contact. Enter the name to appear in the address book. - Page 100 Xerox Apps ® Scanning an Image into an Application Note: Some Windows applications, including Microsoft Office 2007 and newer, do not support this feature. Load the original document on the document glass or in the duplex automatic document feeder. At your computer, open the application into which you want to scan the image.
-
Page 101: Fax
Not all options listed are supported on all printers. Some options apply only to a specific printer model, configuration, operating system, or print driver type. For details, refer to the System Administrator Guide at www.xerox.com/office/VLB405docs. You can adjust various settings for individual Fax jobs and save settings as Presets for future jobs. The list of features can be customized, and some features could be hidden from view when the App is installed. -
Page 102: Sending A Fax
Xerox Apps ® Sending a Fax To send a fax: At the printer control panel, press the Home button. To clear previous App settings, touch Reset. Load your original documents. − Use the document glass for single pages or paper that cannot be fed using the single-pass duplex automatic document feeder. - Page 103 Xerox Apps ® If you are scanning from the document glass, when prompted, do one of the following: To complete the job and return to the Fax app, touch Done. − − To scan another page, load a new original document on the document glass, then touch Add Page.
-
Page 104: Fax Workflows
Note: Before you use this feature, ensure that the printer is set to the current time. For details, refer to the System Administrator Guide at www.xerox.com/office/VLB405docs. To specify the time to send your fax: At the printer control panel, press the Home button. - Page 105 Xerox Apps ® Sending a Cover Sheet with a Fax You can send a cover sheet with your fax. The cover sheet lists recipient information from the fax address book, and sender information from the Company Name Fax Line setting.
- Page 106 Xerox Apps ® To forward a fax to an email address: At the printer control panel, press the Home button. Touch Device > Apps > Fax. Touch Fax Forwarding > Fax Forwarding. Select Receive Only, Send Only, or Send & Receive.
- Page 107 Xerox Apps ® Sending a Fax Manually You can use the Manual Send feature to enable the fax modem speaker temporarily. This feature is helpful to dial international numbers, or to use phone systems that require you to wait for a specific audio tone.
- Page 108 Xerox Apps ® Sending a Fax From Your Computer This section includes: • Sending a Fax From Windows Applications ......................108 • Sending a Fax From Macintosh Applications ...................... 108 You can send a fax to the printer from an application on your computer.
- Page 109 File > Print or press CMD+P. Select the required printer. To access the fax driver settings, click Preview, select Xerox Features, then from Job Type list, select Fax. To add a recipient, in the Fax window, click the Recipients tab, then click the Add Recipient icon.
-
Page 110: Usb
Xerox Apps ® This section includes: • USB Overview .................................. 110 • Scanning to a USB Flash Drive ..........................110 • Printing From a USB Flash Drive ..........................111 USB Overview Use the USB feature to save jobs to a USB Flash drive, or to print jobs already stored on a USB Flash drive. -
Page 111: Printing From A Usb Flash Drive
At the USB Drive has been detected screen, touch Print from USB. Note: If this feature does not appear, enable the feature or contact the system administrator. For details, refer to the System Administrator Guide at www.xerox.com/office/VLB405docs. Xerox VersaLink B405 Multifunction Printer ®... - Page 112 Touch Print from USB. Note: If this feature does not appear, enable the feature or contact the system administrator. For details, refer to the System Administrator Guide at www.xerox.com/office/VLB405docs. Add files to the Document Source Table. − To print a group of print-ready files, for the USB drive or folder, touch the Select All icon. Verify that your files are selected.
-
Page 113: Printing
• Printing Overview ................................114 • Selecting Printing Options ............................115 • Printing From a USB Flash Drive ..........................123 • Printing Features ................................124 • Using Custom Paper Sizes............................137 Xerox VersaLink B405 Multifunction Printer ® ® User Guide... -
Page 114: Printing Overview
Access the print settings in your software application. For most software applications, press CTRL+P for Windows, or CMD+P for Macintosh. Select your printer. Access the print driver settings by selecting Properties or Preferences for Windows, or Xerox ® Features for Macintosh. The title of the button can vary depending on your application. -
Page 115: Selecting Printing Options
• Mobile Printing Options ............................... 121 Printing options, also called print driver software options, are specified as Printing Preferences in Windows, and Xerox ® Features in Macintosh. Printing options include settings for 2-sided printing, page layout, and print quality. Printing options that are set from Printing Preferences become the default setting. -
Page 116: Windows Printing Options
In the Printing Preferences window, click a tab, then select the options. To save the settings, click OK. Note: For more information about Windows print driver options, click the Help button (?) in the Printing Preferences window. Xerox VersaLink B405 Multifunction Printer ® ®... - Page 117 In the Printing Properties window, click Saved Settings, then click Save As. To save the set of options in the Saved Settings list, type a name for the set of printing options, then click OK. Xerox VersaLink B405 Multifunction Printer ®...
-
Page 118: Macintosh Printing Options
To use specific printing options, change the settings before sending the job to the printer. With the document open in your application, click File > Print. Select your printer. In the Print window, click Preview, then select Xerox Features. To see all printing options, click Show Details. Note: Select any other required printing options from the lists. - Page 119 Provide a common look and feel across the many different suppliers of UNIX and Linux operating systems. Installing the Xerox Printer Manager ® Before you begin: Ensure that you have root or superuser privileges to install Xerox ® Printer Manager. To install the Xerox Printer Manager: ®...
- Page 120 For UNIX, log in as root. From a terminal window, type xosdprtmgr, then press Enter or Return. • For Linux, type sudo xeroxprtmgr, then press Enter or Return. • Printing with xeroxprint Xerox has its own print command. You can use the following command: xeroxprint -d<Some_Queue> -o[Options] <Somefile> Xerox VersaLink B405 Multifunction Printer ®...
-
Page 121: Mobile Printing Options
® Support website. Copy the PPD into the CUPS ppd/Xerox folder on your workstation. If you are unsure of the location of the folder, use the Find command to locate the PPD files. Follow the instructions that are included with the PPD. - Page 122 Wireless devices must join the same wireless network as the printer. • The name and location of your printer appears in a list of Mopria-enabled printers on connected devices. To print using Mopria, follow the directions provided with your mobile device. Xerox VersaLink B405 Multifunction Printer ® ®...
-
Page 123: Printing From A Usb Flash Drive
At the USB Drive has been detected screen, touch Print from USB. Note: If this feature does not appear, enable the feature or contact the system administrator. For details, refer to the System Administrator Guide at www.xerox.com/office/VLB405docs. Add files to the Document Source Table. −... -
Page 124: Printing Features
To delete the print job, touch Delete. At the prompt, touch Delete. Note: If you do not make a selection within 60 seconds, the job automatically resumes. To return to the Home screen, press the Home button. Xerox VersaLink B405 Multifunction Printer ®... -
Page 125: Printing Special Job Types
For Windows, click Printer Properties. Depending on your application, the title of the button − can vary. For Macintosh, in the Print window, click Preview, then select Xerox Features. − For Job Type, select Saved Job. Type a job name or select a name from the list, then click OK. - Page 126 For Windows, click Printer Properties. Depending on your application, the title of the button varies. − For Macintosh, in the Print window, click Preview, then select Xerox Features. For Job Type, select Secure Print. Type the passcode, confirm the passcode, then click OK.
- Page 127 Sample Set is a type of saved job with these features: • A Sample Set job appears in a folder named after the user ID associated with the print job. • A Sample Set job does not use a passcode. Xerox VersaLink B405 Multifunction Printer ® ®...
-
Page 128: Selecting Paper Options For Printing
158. • For Windows, paper options are in the Paper field on the Printing Options tab. • For Macintosh, in the Print window, in Xerox Features, paper options are in the Paper field for Paper/Output. Xerox VersaLink B405 Multifunction Printer ®... -
Page 129: Scaling
2-Sided Print: This option prints the job on both sides of the paper to allow binding on the long edge of the paper. The following illustrations show the result for documents with portrait and landscape orientations, respectively: Xerox VersaLink B405 Multifunction Printer ®... -
Page 130: Printing Mirror Images
For Macintosh, in the Print window, Layout is on the Preview list. Print Quality Print-quality modes: • Standard print-quality mode: 600 x 600 dpi • Enhanced print-quality mode: 1200 x 1200 dpi Xerox VersaLink B405 Multifunction Printer ® ® User Guide... -
Page 131: Image Options
For Windows, Lightness and Contrast features are on the Image Options tab. • For Macintosh, in the Print window, in Xerox Features, Image Options is on the Paper/Output list. Lightness The Lightness feature allows you to adjust the overall lightness or darkness of the text and images in your printed job. -
Page 132: Using Special Pages
• For Windows, the Special Pages tab is on the Document Options tab. • For Macintosh, in the Print window, in Xerox Features, Special Pages is on the Paper/Output drop-down list. Printing Cover Pages A cover page is the first or last page of a document. You can select paper sources for the cover pages that are different from the source used for the body of a document. - Page 133 Job Setting: Displays the attributes of the paper for the remainder of the job. • Note: Some combinations of 2-sided printing with certain paper types and sizes can produce unexpected results. Xerox VersaLink B405 Multifunction Printer ® ® User Guide...
-
Page 134: Printing Watermarks For Windows
− Print on Page 1 Only prints the watermark only on the first page of the document. If you select a picture as a watermark, specify the lightness settings for the image. Click OK. Xerox VersaLink B405 Multifunction Printer ®... -
Page 135: Orientation
For Macintosh, to print portrait text and images in landscape orientation, clear the Auto Rotate check box. Printing Banner Pages To enable or disable Banner Pages, contact your system administrator, or refer to the System Administrator Guide at www.xerox.com/office/VLB405docs. Xerox VersaLink B405 Multifunction Printer ®... -
Page 136: Selecting Job Completion Notification For Windows
To select job completion notification from the Advanced tab: Click Notifications. Click Notify for Completed Jobs, then select an option. − Enabled: This option turns on notifications. − Disabled: This option turns off the Notification feature. Click OK. Xerox VersaLink B405 Multifunction Printer ® ® User Guide... -
Page 137: Using Custom Paper Sizes
When setting the paper size, ensure that you specify the same size as the paper in the tray. Setting the wrong size can cause a printer error. Print driver settings override control panel settings when you print using the print driver software on your computer. Xerox VersaLink B405 Multifunction Printer ®... - Page 138 Touch the current size setting, then from the list, touch Custom. In the Custom Paper Size screen, enter the height and width of the new size. To save the setting, touch OK. To return to the Home screen, press the Home button. Xerox VersaLink B405 Multifunction Printer ®...
-
Page 139: Paper And Media
Paper and Media This chapter includes: • Supported Paper ................................140 • Loading Paper ................................. 145 • Printing on Special Paper ............................155 Xerox VersaLink B405 Multifunction Printer ® ® User Guide... -
Page 140: Supported Paper
For best results, use Xerox paper and media recommended for your printer. Ordering Paper To order paper or other media, contact your local reseller or visit www.xerox.com/office/VLB405supplies. General Paper Loading Guidelines •... -
Page 141: Paper That Can Damage Your Printer
CAUTION: The Xerox Warranty, Service Agreement, or Xerox Total Satisfaction Guarantee does not cover damage caused by using unsupported paper or specialty media. The Xerox Total Satisfaction Guarantee is available in the United States and Canada. Coverage could vary outside these areas. Please contact your local representative for details. -
Page 142: Supported Standard Paper Sizes
Supported Paper Types and Weights Trays Paper Types Weights All Trays Plain 60–90 g/m² Hole-Punched Recycled Custom Bond 90–105 g/m² Letterhead Pre-Printed Lightweight Cardstock 106–163 g/m² Cardstock 164–220 g/m² Bypass Tray Envelopes 60–216 g/m² Labels Xerox VersaLink B405 Multifunction Printer ® ® User Guide... -
Page 143: Supported Standard Paper Sizes For Automatic 2-Sided Printing
Statement (140 x 216 mm, 5.5 x 8.5 in.) Supported Paper Types and Weights for Automatic 2-Sided Printing Paper Type Weight Plain 60–90 g/m² Hole-Punched Recycled Custom Bond 90–105 g/m² Letterhead Pre-Printed Lightweight Cardstock 106-163 g/m² Xerox VersaLink B405 Multifunction Printer ® ® User Guide... -
Page 144: Supported Custom Paper Sizes
Supported Paper Types and Weights on page 142. • For types and weights of supported Cardstock for 2-Sided printing, refer to Supported Paper Types and Weights for Automatic 2-Sided Printing on page 143. Xerox VersaLink B405 Multifunction Printer ® ® User Guide... -
Page 145: Loading Paper
Loading Paper in Trays 1-4 You can adjust the length of the paper tray to accommodate A4, Letter (8.5 x 11 in.), and Legal (8.5 x 14 in.) paper sizes. Note: Trays 2–4 are optional. Xerox VersaLink B405 Multifunction Printer ® ®... - Page 146 For 1-sided printing, load letterhead paper face up with the top of the paper toward the back of the tray. − For 2-sided printing, load letterhead and pre-printed paper face down with the top edge going into the printer. Xerox VersaLink B405 Multifunction Printer ® ®...
- Page 147 To confirm the same paper size, type, or color, touch OK. • • To select a new paper size, type or color, touch the current setting, then select a new setting. When you are finished, touch OK. Xerox VersaLink B405 Multifunction Printer ® ®...
-
Page 148: Loading Paper In The Bypass Tray
Open the bypass tray. If the bypass tray is loaded with paper already, remove any paper that is a different size or type. Pull out the extension tray for larger sizes. Move the width guides to the edges of the tray. Xerox VersaLink B405 Multifunction Printer ®... - Page 149 For 1-sided printing, load letterhead or pre-printed paper face up with the top edge going into the printer. − For 2-sided printing, load letterhead and pre-printed paper face down with the top edge facing you. Xerox VersaLink B405 Multifunction Printer ® ®...
-
Page 150: Loading Small Paper Sizes In The Bypass Tray
To load small paper sizes in the bypass tray: Open the bypass tray. If the bypass tray is loaded with paper already, remove any paper that is a different size or type. Xerox VersaLink B405 Multifunction Printer ®... - Page 151 Flex the sheets back and forth and fan them, then align the edges of the stack on a level surface. This procedure separates any sheets that are stuck together and reduces the possibility of jams. Xerox VersaLink B405 Multifunction Printer ®...
- Page 152 Do not load paper above the maximum fill line. Overfilling the tray can cause the printer to jam. Adjust the width guides and the paper stop until they touch the edges of the paper. Slide the tray back into the printer. Xerox VersaLink B405 Multifunction Printer ®...
-
Page 153: Configuring Trays 1-4 For The Paper Length
To compress the tray for shorter paper, hold the back of the tray with one hand. With the other hand, press the release latch at the front of the tray, then push the ends inward until they latch. Xerox VersaLink B405 Multifunction Printer ®... - Page 154 If the tray is extended for Legal-size paper, the tray protrudes when it is inserted into the printer. Load paper into the tray before inserting it back into the printer. For details, refer to Loading Paper into Trays 1–4 on page 145. Xerox VersaLink B405 Multifunction Printer ® ® User Guide...
-
Page 155: Printing On Special Paper
Printing on Special Paper This section includes: • Envelopes ..................................155 • Labels ....................................160 To order paper or other media, contact your local reseller or visit www.xerox.com/office/VLB405supplies. For reference: www.xerox.com/rmlna Recommended Media List (United States) www.xerox.com/rmleu Recommended Media List (Europe) Envelopes You can print envelopes from the bypass tray only. - Page 156 Move the width guides to the edges of the tray. Note: If you do not load envelopes immediately after you remove them from the packaging, they can bulge. Flatten them to avoid jams. Xerox VersaLink B405 Multifunction Printer ® ®...
- Page 157 − For C5 envelopes, do one of the following steps. • Insert envelopes with the print side up, flaps open and down, and the bottom of the envelope going into the printer. Xerox VersaLink B405 Multifunction Printer ® ® User Guide...
- Page 158 To select a paper type, touch the current paper type, then select envelope. • To select an envelope color, touch the current paper color, then select a color. To save the settings, touch OK. To return to the Home screen, press the Home button. Xerox VersaLink B405 Multifunction Printer ® ®...
- Page 159 On the back of the printer, lift the door release latch, then pull open the door. To open the Fuser, lift both green fuser levers to their full-upright position. Locate the two gray Fuser switches, then slide each one to the setting for envelopes. Xerox VersaLink B405 Multifunction Printer ®...
- Page 160 Lower the green levers to their original position. Close the rear door. Print your document. When printing completes, to print all other paper types, repeat these steps to return the gray switches back to the paper setting. Xerox VersaLink B405 Multifunction Printer ® ®...
-
Page 161: Labels
Do not use any sheet where labels are missing, curled, or pulled away from the backing sheet. It could damage the printer. Loading Labels in Trays 1-4 To remove the tray, lift the front of it slightly, then pull it out of the printer. Xerox VersaLink B405 Multifunction Printer ®... - Page 162 Note: Do not load paper above the maximum fill line. Overfilling the tray can cause paper jams. Adjust the length and width guides to fit the paper. Slide the tray back into the printer. Xerox VersaLink B405 Multifunction Printer ®...
- Page 163 To select a paper type, touch the current paper type, then select Labels. • To select a paper color, touch the current paper color, then select a paper color. To save the settings, touch OK. To return to the Home screen, press the Home button. Xerox VersaLink B405 Multifunction Printer ® ®...
- Page 164 To select a paper type, touch the current paper type, then select labels. • To select a paper color, touch the current paper color, then select a paper color. To save the settings, touch OK. To return to the Home screen, press the Home button. Xerox VersaLink B405 Multifunction Printer ® ®...
-
Page 165: Maintenance
General Precautions ..............................166 • Cleaning the Printer ..............................167 • Adjustments and Maintenance Procedures ......................170 • Supplies ....................................173 • Managing the Printer ..............................178 • Moving the Printer ................................. 179 Xerox VersaLink B405 Multifunction Printer ® ® User Guide... -
Page 166: General Precautions
Do not touch the electrical contacts or gears. Doing so could damage the printer and cause the print quality to deteriorate. • Ensure any parts removed during cleaning are replaced before you plug in the printer. Xerox VersaLink B405 Multifunction Printer ®... -
Page 167: Cleaning The Printer
To ensure optimum print quality, clean the document glass regularly. Cleaning helps avoid output with streaks, smears, and other marks that transfer from the glass while scanning documents. Slightly dampen a soft, lint-free cloth with water. Remove any paper or other media from the output tray. Xerox VersaLink B405 Multifunction Printer ®... - Page 168 Open the document cover. Wipe the surfaces of the document glass until they are clean and dry. Note: For best results, use Xerox ® Glass Cleaner to remove marks and streaks. Wipe the white underside of the document cover until it is clean and dry.
-
Page 169: Cleaning The Interior
If a sheet of paper is wrapped around the heat roller, do not try to remove it immediately. Power off the printer immediately and wait 40 minutes for the fuser to cool. Try to remove the paper jam after the printer has cooled. Xerox VersaLink B405 Multifunction Printer ®... -
Page 170: Adjustments And Maintenance Procedures
At the printer control panel, press the Home button. Log in as administrator. For details, refer to For details, refer to the System Administrator Guide at www.xerox.com/office/VLB405docs Touch Device > Support > Image Position. Select the source paper tray for the registration print. - Page 171 Performing a Paper Registration Adjustment At the printer control panel, press the Home button. Log in as administrator. For details, refer to the System Administrator Guide at www.xerox.com/office/VLB405docs. Touch Device > Support > Image Position. To adjust registration, select the source paper tray.
- Page 172 As needed, repeat steps 4 through 6 to enter additional values. Print another sample page, then repeat the process until you complete the registration corrections. 10. To return to the Home screen, press the Home button. Xerox VersaLink B405 Multifunction Printer ®...
-
Page 173: Supplies
Xerox ® Toner is the only toner designed and manufactured under strict quality controls by Xerox for specific use with this printer. Routine Maintenance Items Routine maintenance items are printer parts that have a limited life and require periodic replacement. -
Page 174: Ordering Supplies
Agreement, and Total Satisfaction Guarantee do not cover damage, malfunction, or degradation of performance caused by use of non-Xerox supplies, or the use of Xerox supplies not specified for this printer. The Total Satisfaction Guarantee is available in the United States and Canada. - Page 175 To return to the Device screen, touch the back arrow. To check the supplies status and set up alerts using the Embedded Web Server, refer to the System Administrator Guide at www.xerox.com/office/VLB405docs. Supplies Usage Report The Supplies Usage Report provides coverage information and part numbers for reordering supplies. The date a supply item was installed also appears on the report.
-
Page 176: Toner Cartridges
Use a damp cloth to wipe off spilled toner. Never use a vacuum cleaner to remove spills. Electric sparks inside the vacuum cleaner can cause a fire or explosion. If you spill a large volume of toner, contact your local Xerox representative. •... -
Page 177: Recycling Supplies
The toner cartridge is low. Order a new toner cartridge. Out of Toner The toner cartridge is empty. Replace the toner cartridge with a new one. Recycling Supplies For more information on the Xerox supplies recycling program, go to: www.xerox.com/gwa. ® Xerox VersaLink B405 Multifunction Printer ®... -
Page 178: Managing The Printer
If you provide regular billing information for your device, you can use the Remote Services Upload feature to simplify the process. You can enable Remote Services to send billing meter readings to Xerox automatically so that you do not have to collect the readings manually. Refer to the System Administrator Guide for further information. -
Page 179: Moving The Printer
Pulling the cord can damage it, which can lead to fire or electric shock. Remove any paper or other media from the output tray. If the output tray extension is open, close it. Xerox VersaLink B405 Multifunction Printer ®... - Page 180 When moving the printer over a long distance, remove the drum cartridge and toner cartridge to prevent toner from spilling. CAUTION: Failure to repackage the printer properly for shipment can result in damage not covered by the Xerox ® Warranty, Service Agreement, or Total Satisfaction Guarantee. The Xerox Warranty, Service Agreement, or Total Satisfaction Guarantee do not cover damage to ®...
-
Page 181: Troubleshooting
• General Troubleshooting............................. 182 • Paper Jams ..................................187 • Print-Quality Problems ..............................204 • Copy and Scan Problems ............................. 210 • Fax Problems ..................................211 • Getting Help ..................................213 Xerox VersaLink B405 Multifunction Printer ® ® User Guide... -
Page 182: General Troubleshooting
Use a power source with the specifications listed in the Electrical voltage or frequency that does not match the Specifications on page 222. printer specifications. CAUTION: Plug the three-wire cord with grounding prong directly into a grounded AC outlet. Xerox VersaLink B405 Multifunction Printer ® ® User Guide... -
Page 183: Printer Resets Or Powers Off Frequently
Power off the printer, then power on again. Print the Error History Report. For details, refer to Printing the Error History Report page 214. If the error persists, contact your Xerox representative. The printer is connected to an uninterruptible Power off the printer, then connect the power cord to a suitable power supply. -
Page 184: Printing Takes Too Long
For more help, contact the system administrator. The job is complex. Wait. No action needed. The print-quality mode in the driver is set to Change the print-quality mode in the print driver to Standard. Enhanced. Xerox VersaLink B405 Multifunction Printer ® ® User Guide... -
Page 185: Document Prints From Wrong Tray
Solutions There is an obstruction or debris inside the Power off the printer and remove the obstruction or debris. If you printer. cannot remove it, contact your Xerox representative. Paper Tray Will Not Close Probable Causes Solutions The paper tray does not fully close. -
Page 186: Condensation Has Formed Inside The Printer
The relative humidity of the room is too high. • Reduce the humidity in the room. • Move the printer to a location where the temperature and relative humidity are within the operating specifications. Xerox VersaLink B405 Multifunction Printer ®... -
Page 187: Paper Jams
If a sheet of paper is wrapped around the heat roller, do not try to remove it immediately. Power off the printer immediately and wait 40 minutes for the fuser to cool. Try to remove the jam after the printer has cooled. If the error persists, contact your Xerox representative. -
Page 188: Minimizing Paper Jams
Tray 1 Minimizing Paper Jams The printer is designed to function with minimal paper jams using Xerox supported paper. Other paper types can cause jams. If supported paper is jamming frequently in one area, clean that area of the paper path. - Page 189 Loading more than one type, size, or weight of paper in a tray at the same time. • Overfilling the tray. • Allowing the output tray to overfill. For a detailed list of supported paper, refer to Supported Paper on page 140. Xerox VersaLink B405 Multifunction Printer ® ® User Guide...
-
Page 190: Clearing Paper Jams
To resolve the error that appears on the control panel, clear all paper from the document feeder areas. Open the Top Cover, then remove any paper. If paper is jammed in the Duplex Automatic Document Feeder, open the Document Cover, then remove any jammed paper. Xerox VersaLink B405 Multifunction Printer ®... -
Page 191: Clearing Paper Jams From The Bypass Tray
23. Clearing Paper Jams from the Bypass Tray To resolve the error that appears on the control panel, clear all paper from the paper path. Remove any paper from the Bypass Tray. Xerox VersaLink B405 Multifunction Printer ® ®... - Page 192 Grasp both sides of the Bypass Tray, then pull it straight out of the printer. Pull out Tray 1 until it stops. To remove the tray, lift the front of it slightly, then pull it out of the printer. Xerox VersaLink B405 Multifunction Printer ®...
- Page 193 − To select a new paper size, type or color, touch the current setting, then select a new setting. When finished, touch OK. To return to the Home screen, press the Home button. Xerox VersaLink B405 Multifunction Printer ® ®...
-
Page 194: Clearing Paper Jams From The Tray 1 Area
To resolve the error that appears on the control panel, clear all paper from the paper path. Remove any paper from the Bypass Tray. Grasp both sides of the Bypass Tray, then pull it straight out of the printer. Pull out Tray 1 until it stops. Xerox VersaLink B405 Multifunction Printer ®... - Page 195 To remove the tray, lift the front of it slightly, then pull it out of the printer. Remove any crumpled paper from the tray and any remaining paper jammed in the printer. Insert Tray 1 into the printer, then push it in all the way. Xerox VersaLink B405 Multifunction Printer ®...
-
Page 196: Clearing Paper Jams From Tray 2, 3 And 4 Areas
Clearing Paper Jams from Tray 2, 3 and 4 Areas To resolve the error that appears on the control panel, clear all paper from the paper path. Pull out Tray 2, 3, or 4 until it stops. Xerox VersaLink B405 Multifunction Printer ®... - Page 197 Remove any crumpled paper from the tray and any remaining paper jammed at the front of the printer. At the back of the printer, open the Tray 2 Door, then remove any paper jammed at the back of the printer. Xerox VersaLink B405 Multifunction Printer ®...
-
Page 198: Clearing Paper Jams From The Fuser Area
Clearing Paper Jams from the Fuser Area To resolve the error that appears on the control panel, clear all paper from the paper path. Lift the door release latch, then pull open the door. Xerox VersaLink B405 Multifunction Printer ®... - Page 199 If paper is jammed in the Fuser, raise both green levers to open the Fuser. To open the paper guide, raise the green handle. Remove any jammed paper from the Fuser area. Close the paper guide on the Fuser. Xerox VersaLink B405 Multifunction Printer ®...
- Page 200 Troubleshooting Lower the green levers to their original position. Remove any jammed paper from the back of the printer. Close the rear door. Xerox VersaLink B405 Multifunction Printer ® ® User Guide...
-
Page 201: Troubleshooting Paper Jams
Remove the paper from the tray, and replace it with new dry paper. Too much static electricity is present. Try a new ream of paper. Using unsupported paper. Use only Xerox -approved paper. For details, refer to Supported ® Paper on page 140. - Page 202 The paper is moist from humidity. Remove the moist paper and replace it with new, dry paper. Using paper of the wrong size, thickness, Use only Xerox approved paper. For details, refer to Supported or type. Paper on page 140.
- Page 203 Ensure that paper is loaded into the correct tray. For details, refer Supported Paper on page 140. Tray is loaded with mixed paper. Load the tray with only one type and size of paper. Xerox VersaLink B405 Multifunction Printer ® ®...
-
Page 204: Print-Quality Problems
CAUTION: The Xerox Warranty, Service Agreement, or Xerox Total Satisfaction Guarantee does not cover damage caused by using unsupported paper or specialty media. The Xerox Total Satisfaction Guarantee is available in the United States and Canada. Coverage could vary outside these areas. Please contact your local representative for details. -
Page 205: Solving Print-Quality Problems
For details, refer to Information Pages on page 32. If the print quality does not improve after performing the appropriate action, contact your Xerox representative. Note: To maintain print quality, the toner cartridge is designed to provide a warning message when the toner level is low. - Page 206 • Verify that the toner cartridge is approved for use in this printer, and replace it as needed. For best results, use a genuine Xerox toner cartridge. • Replace the paper with a recommended size and type, and confirm that your printer and print driver settings are correct.
- Page 207 Embedded Web Server. If the toner cartridge is near empty, replace it. • Verify that the toner cartridge is approved for use in this printer, and replace it as needed. For best results, use a genuine Xerox toner cartridge. Xerox...
- Page 208 1. Print a solid image over the entire surface of one sheet of paper. bumpy. 2. Load the printed sheet into the tray with the printed side face down. 3. Print five blank pages to remove debris from the fuser rollers. Xerox VersaLink B405 Multifunction Printer ®...
- Page 209 • 95 mm (3.7 in.) - Fuser 3. If the repeating defects matches the Drum Cartridge distances, replace the Drum Cartridge. 4. If the distance matches the Fuser or Transfer Roller, call for service or replace the Maintenance Kit. Xerox VersaLink B405 Multifunction Printer ® ®...
-
Page 210: Copy And Scan Problems
Turn on Background Suppression. the copy or scan. Image is too light or too dark. To lighten, darken, or adjust contrast, use the Image Quality settings. If the problem persists, for online support information, go to www.xerox.com/office/VLB405support. Xerox VersaLink B405 Multifunction Printer ®... -
Page 211: Fax Problems
Contact the recipient. machine of the recipient. The fax is not installed or is not Verify that the fax is installed and enabled. enabled. If the problem persists, for online support information, go to www.xerox.com/office/VLB405support. Xerox VersaLink B405 Multifunction Printer ® ®... -
Page 212: Problems Receiving Faxes
If the copy prints correctly, have the recipient verify their fax machine is operating correctly. If the problem persists, for online support information, go to www.xerox.com/office/VLB405support. Xerox VersaLink B405 Multifunction Printer ®... -
Page 213: Getting Help
At the printer control panel, press the Home button. Touch Device > About > Information Pages. To print an information page, touch the desired page. To return to the Home screen, press the Home button. Xerox VersaLink B405 Multifunction Printer ®... -
Page 214: Online Support Assistant
You can find solutions for print-quality problems, paper jams, software installation issues, and more. To access the Online Support Assistant, go to www.xerox.com/office/VLB405support. Information Pages Your printer has a set of information pages that you can print. These pages include configuration and font information, demonstration pages, and more. -
Page 215: Specifications
Specifications This appendix includes: • Printer Configurations and Options ........................216 • Physical Specifications ..............................218 • Environmental Specifications ............................ 221 • Electrical Specifications ............................... 222 • Performance Specifications ............................224 Xerox VersaLink B405 Multifunction Printer ® ® User Guide... -
Page 216: Printer Configurations And Options
• Up to 600 dpi Max Scan Size • Document Glass • 215.9 x 355.6 mm (8.5 x 14 in.) • Single-Pass Duplex Automatic • 215.9 x 355.6 mm (8.5 x 14 in.) Document Feeder Xerox VersaLink B405 Multifunction Printer ® ® User Guide... -
Page 217: Options And Upgrades
• 16-GB Solid State Drive • 550-Sheet Feeder • Stand • External Card Reader/RFID Kit • Foreign Device Interface Kit Note: This product supports up to three additional 550-Sheet Feeder trays. Xerox VersaLink B405 Multifunction Printer ® ® User Guide... -
Page 218: Physical Specifications
495 mm (19.5 in.) Depth 495 mm (19.5 in.) 495 mm (19.5 in.) Height 551 mm (21.69 in.) 971 mm (38.2 in.) Weight 22 kg (48.5 lbs.) 32.5 kg (71.7 lbs.) Standard Configuration Xerox VersaLink B405 Multifunction Printer ® ® User Guide... -
Page 219: Configuration With Three Optional 550-Sheet Feeders
Configuration with Three Optional 550-Sheet Feeders Width 995 mm (39.2 in.) 995 mm (39.2 in.) Depth 1495 mm (58.9 in.) 1495 mm (58.9 in.) Height 871 mm (34.3 in.) 1291 mm (50.8 in.) Xerox VersaLink B405 Multifunction Printer ® ® User Guide... -
Page 220: Clearance Requirements
Specifications Clearance Requirements Clearance Requirements with Three Optional 550-Sheet Feeders Xerox VersaLink B405 Multifunction Printer ® ® User Guide... -
Page 221: Environmental Specifications
Under extreme environmental conditions, such as 10°C and 85% relative humidity, printing defects can occur due to condensation inside the printer. Elevation For optimum performance, use the printer at elevations below 3100 m (10,170 ft.). Xerox VersaLink B405 Multifunction Printer ®... -
Page 222: Electrical Specifications
ENERGY STAR settings are preset on Xerox equipment at the factory to switch to Power Saver modes ®... -
Page 223: Germany - Blue Angel
Recycling Supplies If you want to return used supplies for recycling, follow the instructions included with the new supplies. If the instructions or shipping label are not available, for more information, go to www.xerox.com/gwa more information. Xerox VersaLink B405 Multifunction Printer ®... -
Page 224: Performance Specifications
1-sided printing: 47ppm on Letter-sized paper and 45 ppm on A4 paper • 2-sided printing: 28 images per minute on Letter-sized paper and on A4 paper • Heavyweight Paper: 23 ppm Xerox VersaLink B405 Multifunction Printer ® ® User Guide... -
Page 225: Regulatory Information
Regulatory Information This appendix includes: • Basic Regulations ................................226 • Copy Regulations ................................232 • Fax Regulations ................................235 • Safety Certification ............................... 239 • Material Safety Data Sheets ............................. 240 Xerox VersaLink B405 Multifunction Printer ® ® User Guide... -
Page 226: Basic Regulations
• Consult the dealer or an experienced radio/TV technician for help. Changes or modifications to this equipment not approved by Xerox can void the authority of the user to operate this equipment. Note: To ensure compliance with Part 15 of the FCC rules, use shielded interface cables. -
Page 227: European Union Lot 4 Imaging Equipment Agreement Environmental Information
Regulatory Information This printer, if used properly in accordance with the instructions, is not dangerous for the consumer or for the environment. A signed copy of the Declaration of Conformity for this printer can be obtained from Xerox. WARNINGS: •... - Page 228 . For further assistance, contact your System Administrator or refer to the System Administrator Guide. To enable Auto Power Off mode, contact your System Administrator. For details, refer to the System Administrator Guide at www.xerox.com/office/VLB405docs. Xerox VersaLink B405 Multifunction Printer ®...
-
Page 229: Germany
Regulatory Information To learn more about Xerox participation in sustainability initiatives, go to: www.xerox.com/about-xerox/environment/enus.html. Note: Changing the default Power Saver activation times can result in an overall higher energy consumption of the device. Before you turn off Power Saver modes or set a long activation time, consider the increase in device power consumption. -
Page 230: Turkey Rohs Regulation
(2) this device must accept any interference received, including interference that may cause undesired operation. Changes or modifications to this device not specifically approved by the Xerox Corporation may void the user's authority to operate this equipment. Xerox... -
Page 231: Ozone Release
Ozone is heavier than air and is not produced in amounts large enough to harm anyone. Install the printer in a well-ventilated room. For more information in the United States and Canada, go to www.xerox.com/environment . In other markets, please contact your local Xerox representative or go to www.xerox.com/environment_europe. Xerox VersaLink B405 Multifunction Printer ®... -
Page 232: Copy Regulations
− Stamps and other representatives of value, of whatever denomination, which have been or may be issued under any Act of Congress. − Adjusted Compensation Certificates for Veterans of the World Wars. Xerox VersaLink B405 Multifunction Printer ® ® User Guide... -
Page 233: Canada
• Proclamations, orders, regulations, or appointments, or notices thereof (with intent to falsely cause same to purport to have been printed by the Queens Printer for Canada, or the equivalent printer for a province) Xerox VersaLink B405 Multifunction Printer ®... -
Page 234: Other Countries
Copyright material or trademarks without the consent of the owner • Postage stamps and other negotiable instruments This list is not inclusive and no liability is assumed for either its completeness or accuracy. In case of doubt, contact your legal counsel. Xerox VersaLink B405 Multifunction Printer ® ®... -
Page 235: Fax Regulations
To order the correct service from the local Telephone Company, you could also have to quote the codes in the following list: • Facility Interface Code (FIC) = 02LS2 • Service Order Code (SOC) = 9.0Y Xerox VersaLink B405 Multifunction Printer ® ® User Guide... -
Page 236: Canada
Telephone Company may request you to disconnect the equipment until the problem is resolved. Only a Xerox Service Representative or an authorized Xerox Service provider are authorized to make repairs to the printer. This applies at any time during or after the service warranty period. If unauthorized repair is performed, the remainder of the warranty period is null and void. -
Page 237: European Union
Malta United Kingdom If you have problems with your product, contact your local Xerox representative. This product can be configured to be compatible with other country networks. Before reconnecting the device to a network in another country, contact your Xerox representative for assistance. -
Page 238: New Zealand
For correct operation, total of the RNs of all devices connected to a single line at any time should not exceed five. South Africa This modem must be used in conjunction with an approved surge protection device. Xerox VersaLink B405 Multifunction Printer ®... -
Page 239: Safety Certification
UL 60950-1, 2nd Edition, 2014-10-14 CAN/CSA C22.2 No. 60950-1-07, 2nd Edition, 2014-10 Underwriters Laboratories Inc. (Europe) IEC 60950-1:2005 + A1:2009 + A2:2013 EN 60950-1:2006 + A11:2009 + A1:2010 + A12:2011 + A2:2013 Xerox VersaLink B405 Multifunction Printer ® ® User Guide... -
Page 240: Material Safety Data Sheets
Regulatory Information Material Safety Data Sheets For Material Safety Data information regarding your printer, go to: • North America: www.xerox.com/msds • European Union: www.xerox.com/environment_europe For the Customer Support Center phone numbers, go to www.xerox.com/office/worldcontacts Xerox VersaLink B405 Multifunction Printer ®... -
Page 241: Recycling And Disposal
Recycling and Disposal This appendix includes: • All Countries ..................................242 • North America ................................. 243 • European Union ................................244 • Other Countries ................................246 Xerox VersaLink B405 Multifunction Printer ® ® User Guide... -
Page 242: All Countries
Recycling and Disposal All Countries If you are managing the disposal of your Xerox product, please note that the printer may contain lead, mercury, perchlorate, and other materials whose disposal may be regulated due to environmental considerations. The presence of these materials is fully consistent with global regulations applicable at the time that the product was placed on the market. -
Page 243: North America
Recycling and Disposal North America Xerox operates an equipment take-back and reuse/recycle program. Contact your Xerox representative (1-800-ASK-XEROX) to determine if this Xerox product is part of the program. For more information about Xerox environmental programs, visit www.xerox.com/environment , or for recycling and disposal information, contact your local authorities. -
Page 244: European Union
In accordance with European legislation, end of life electrical and electronic equipment subject to disposal must be managed within agreed procedures. Prior to disposal, please contact your local reseller or Xerox representative for end of life take-back information. Xerox... -
Page 245: Collection And Disposal Of Equipment And Batteries
This wheeled bin symbol may be used in combination with a chemical symbol. This establishes compliance with the requirements set out by the Directive. Battery Removal Batteries should only be replaced by a manufacturer-approved service facility. Xerox VersaLink B405 Multifunction Printer ®... -
Page 246: Other Countries
Recycling and Disposal Other Countries Please contact your local waste management authority to request disposal guidance. Xerox VersaLink B405 Multifunction Printer ® ® User Guide... -
Page 247: Apps Features
1, 2, 3, 4, 5, 6; 1, 2, 3, 4, 5, 6; 1, 2, 3, 4, 5, 6. Reduce/Enlarge You can reduce the image to as ■ little as 25% of its original size or enlarge it as much as 400%. Xerox VersaLink B405 Multifunction Printer ® ® User Guide... - Page 248 ■ ■ scanning the correct area of the documents, specify the original size. Book Copying You can use the Book Copying ■ feature to copy books, magazines, or other bound documents. Xerox VersaLink B405 Multifunction Printer ® ® User Guide...
- Page 249 Use this option to view a ■ ■ ■ sample image. Resolution Resolution determines how fine ■ ■ ■ or grainy graphic images appear. Image resolution is measured in dots per inch (dpi). Xerox VersaLink B405 Multifunction Printer ® ® User Guide...
- Page 250 Starting Rate Select the highest starting rate ■ for transmitting the fax, unless the destination for the fax you are sending has special requirements. Xerox VersaLink B405 Multifunction Printer ® ® User Guide...
- Page 251 This feature is helpful to dial international numbers, or to use phone systems that require you to wait for a specific audio tone. Polling Polling allows you to retrieve ■ faxes stored on other fax machines. Xerox VersaLink B405 Multifunction Printer ® ® User Guide...
Need help?
Do you have a question about the VersaLink B405DN and is the answer not in the manual?
Questions and answers