Table of Contents
Advertisement
Quick Links
CONTENTS
INTRODUCTION ........................................................ 7
Symbols used in these instructions ..........................................7
Letters in brackets ....................................................................7
Troubleshooting and repairs ....................................................7
SAFETY .................................................................... 7
Fundamental safety warnings .................................................7
Designated use.........................................................................8
Instructions ..............................................................................8
DESCRIPTION ........................................................... 8
Description of the appliance ....................................................8
Description of milk container and accessories .........................8
Description of control panel .....................................................8
PRELIMINARY CHECKS .............................................. 8
Controls after transport ...........................................................8
Installing the appliance............................................................8
Connecting the appliance ........................................................9
AUTOMATIC CUP TRAY LIGHT ..................................... 9
BUILT-IN INSTALLATION .......................................... 10
USING THE APPLIANCE FOR THE FIRST TIME ............. 12
TURNING ON AND HEATING UP ................................ 12
MAKING COFFEE USING COFFEE BEANS .................... 12
AJUSTING THE COFFEE MILL .................................... 14
(INSTEAD OF BEANS) ............................................. 14
DELIVERING HOT WATER ......................................... 14
CHANGING THE QUANTITY OF HOT WATER ................ 14
MAKING FROTHED MILK (WITHOUT COFFEE) ............. 15
CAPPUCCINO .......................................................... 15
CLEANING AND MAINTENANCE ................................ 16
Cleaning the coffee maker......................................................16
Cleaning the coffee grounds container ...................................16
Cleaning the drip tray.............................................................16
Cleaning the water tank .........................................................16
Cleaning the spouts ...............................................................16
Cleaning the pre-ground coffee funnel ..................................16
Cleaning the inside of the coffee maker .................................16
Cleaning the infuser ...............................................................16
Cleaning the milk container ...................................................17
CHANGING AND SETTING MENU PARAMETERS .......... 17
Setting the clock ...................................................................18
Setting auto-start time .........................................................18
Descaling ...............................................................................18
Changing coffee temperature ................................................19
Setting water hardness .........................................................19
Resetting default values (reset) .............................................19
Washing procedure ................................................................19
CHANGING THE LANGUAGE ...................................... 19
TURNING THE APPLIANCE OFF ................................. 19
TECHNICAL SPECIFICATION ..................................... 20
DISPOSING OF THE APPLIANCE ................................ 20
DISPLAYED MESSAGES ............................................ 21
TROUBLESHOOTING ................................................ 22
RECIPES ................................................................ 23
6
Advertisement
Table of Contents
Troubleshooting

Related Manuals for Smeg CMS6451X


Summary of Contents for Smeg CMS6451X
-
Page 1: Table Of Contents
CONTENTS Descaling ................18 Changing coffee temperature ..........19 INTRODUCTION ............7 Changing the length of time the appliance remains on ..19 Symbols used in these instructions ..........7 Setting water hardness ............19 Letters in brackets ..............7 Resetting default values (reset) ..........19 Troubleshooting and repairs ............7 Washing procedure ..............19 SAFETY .............. -
Page 2: Introduction
INTRODUCTION SAFETY Thank you for choosing the automatic coffee and cappuccino Fundamental safety warnings maker. We hope you enjoy using your new appliance. Important! The appliance is designed and produced Take a few minutes to read these instructions. for domestic use only. This will avoid all risks and damage to the machine. -
Page 3: Designated Use
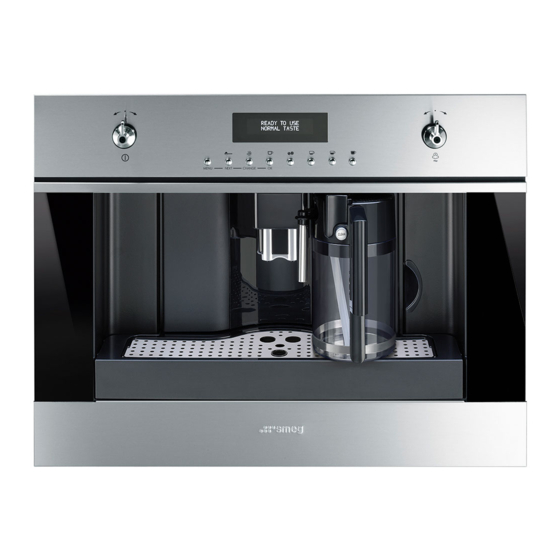
B2. Milk container handle Designated use B3. CLEAN button This appliance is designed and made to prepare coffee and heat B4. Milk intake tube drinks. B5. Frothed milk spout All other use is considered improper. B6. Milk frother This appliance is not suitable for commercial use. B7. -
Page 4: Connecting The Appliance
• Do not install the appliance in rooms where the tempera- ture may drop to 0°C or lower (the water in the appliance could freeze and cause damage). • You should customise the water hardness as soon as pos- sible following the instructions in the “SETTING WATER HARDNESS” section. Connecting the appliance Danger! Check that the mains power supply voltage corresponds to the value indicated on the appliance rating pla- Connect the appliance to an efficiently earthed and correctly installed socket with a minimum current rating of 10A only. -
Page 5: Built-In Installation
BUILT-IN INSTALLATION Verify the minimum measurements required for correct instal- lation of the appliance. The coffee maker must be installed in a column and the column must be firmly fixed to the wall with commercially available brackets. Important: • Important: all installation or maintenance operations must be performed with the appliance disconnected from the mains electricity supply. - Page 6 x 16 Position the rails on the sides of the cabinet as shown in the figure. Fix with the screws, then extract them completely. Position the appliance on the rails, making sure the pins are If the coffee maker is installed over a warmer drawer (500 W correctly inserted in the housings, then fix it with the screws max.), use the top surface of this as a reference to position the supplied.
-
Page 7: Using The Appliance For The First Time
USING THE APPLIANCE FOR THE FIRST TIME right or left. • Coffee has been used to factory test the appliance and it is TURNING ON AND HEATING UP therefore completely normal for there to be traces of coffee in the mill. Each time the appliance is turned on, it performs an automatic The machine is, however, guaranteed to be new. -
Page 8: Changing The Quantity Of Coffee In The Cup
collected in the drip tray beneath. Take care to avoid scalds). NOTE 1: If the coffee is delivered a drop at a time or not at all, turn the grinding adjustment knob (fig. 12) one click clockwise (see “Adjusting the coffee mill”). Proceed one click at a time until coffee delivery is satisfactory. NOTE 2: If the coffee is delivered too fast and the cream is not sa- tisfactory, turn the grinding adjustment knob (fig. 12) one click anticlockwise (see “Adjusting the coffee mill”). -
Page 9: Ajusting The Coffee Mill
ADJUSTING THE COFFEE MILL enable the coffee mill. NOTE 1: Never introduce pre-ground coffee when the machine is The coffee mill is preset in the factory to make coffee correctly off or it could spread through the inside of the appliance. and should not require adjusting initially. NOTE 2: Never add more than 1 level measure, otherwise either However, if after making the first few coffees you find that deli- the appliance will not make the coffee and the pre-ground very is either too fast or too slow (a drop at a time), this can be coffee will be dispersed inside the appliance, dirtying it, or the... -
Page 10: Making Frothed Milk (Without Coffee)
ast 3 seconds (fig. 25). The appliance displays “ CLEANING”. cappuccino by pressing the button (C7). • Remove the lid of the milk container. After cleaning, remove the milk container and place in the • Fill the container with about 100 grams of milk for each refrigerator. cappuccino to be prepared (fig. 19). Never exceed the MAX The milk should not be left out of the refrigerator for more than 15 minutes. level (corresponding to about 750 ml) marked on the jug. -
Page 11: Cleaning And Maintenance
1. Open the service door (A2) (fig. 14). CLEANING AND MAINTENANCE 2. Remove the drip tray (A11) and the grounds container (A4) Before performing any cleaning operations, leave the machine (fig. 15). to cool down completely and unplug from the mains power sup- ply. Never immerse the coffee maker in water. It is an electrical 3. Empty the drip tray and grounds container and wash them. -
Page 12: Cleaning The Milk Container
Cleaning the milk container 3. Remove the drip tray (A11) and grounds container (fig. 15). 4. Press the two red release buttons inwards and at the same Important! Always clean the tubes inside the milk time pull the infuser outwards (fig. 28). container (B) when you prepare milk. -
Page 13: Setting The Clock
• DESCALE NO relating to the procedure to follow in the event of contact with • TEMPERATURE MEDIUM the skin and eyes. • OFF AFTER 1 HOUR • WATER HARDNESS 4 N:B:: Use the descaler recommended by the manufac- turer only. Use of other descalers invalidates the guarantee. • DEFAULT VALUES NO Failure to descale the appliance as described also invalidates the guarantee. -
Page 14: Changing Coffee Temperature
message “ RINSING COMPLETE... PRESS OK”; Proceed as follows: • Press the OK button (C5) and refill the water tank with cle- • remove the “ Total Hardness Test” strip (attached to page 2) an water. from its packaging then dip it fully in the water for a few • The descale programme is now terminated and the ap- seconds, pliance is ready to make coffee again. Then remove and wait about 30 seconds (until it changes NOTE: If descaling is interrupted before completion, the machi- colour and forms red squares). -
Page 15: Technical Specification
base of the plug. To turn the appliance off, turn the knob (C6). B) If your appliance is not fitted with a plug, please follow the The appliance performs the rinse cycle then goes off. instructins provided below: WARNING - THIS APPLIANCE MUST BE EARTHED N.B.: If the appliance is not used for an extended period, IMPORTANT place the main switch (A19) on the back of the appliance in the The wires in the mains lead are coloured in accordance with the... -
Page 16: Displayed Messages
DISPLAYED MESSAGES DISPLAYED MESSAGE POSSIBLE CAUSE REMEDY FILL TANK The water tank is empty or positioned Fill the tank with water and/or insert it incorrectly. correctly, pushing it as far as it will go. GROUND TOO FINE ADJUST MILL The grinding is too fine and the coffee is Turn the grinding adjustment knob one Insert water spout and press OK (C5) delivered too slowly. -
Page 17: Troubleshooting
TROUBLESHOOTING If the problem cannot be resolved as described, contact Custo- mer Services. Below is a list of some of the possible malfunctions. PROBLEM POSSIBLE CAUSE REMEDY The coffee is not hot. The cups were not preheated. Heat the cups by rinsing them in hot wa- ter or leaving them to rest for at least 20 minutes on the cup warmer tray. -
Page 18: Recipes
PROBLEM POSSIBLE CAUSE REMEDY The milk contains bubbles or squirts out The milk is not cold enough or is not You should ideally use skimmed or semi- of the milk spout. semi-skimmed. skimmed milk at refrigerator temperatu- re (about 5°C). If the result is still disap- pointing, try another brand of milk. - Page 20 C9 C10...
Need help?
Do you have a question about the CMS6451X and is the answer not in the manual?
Questions and answers