Table of Contents
Advertisement
Quick Links
UHF Wireless Microphone and Instrument System
TABLE OF CONTENTS:
FCC Warning Statement
A. INTRODUCTION
B. SYSTEM FEATURES
UB-16
6. Selecting the Tone Squelch™ Mode
D. FREQUENCY GUIDE
E. CHANNEL DISPLAY AND UP/DOWN BUTTONS OPERATION
F. SPECIFICATIONS
UB-16 Transmitters
G. SERVICE FOR YOUR NADY WIRELESS SYSTEM
U.S.
International
FCC RF Exposure Statement
This device complies with FCC radiation exposure limits as set forth for an uncontrolled
environment. This device should be installed and operated so that its antenna(s) are not
co-located or operating in conjunction with any other antenna or transmitter.
UB-16
16 Channel PLL Frequency Synthesized
OWNER'S MANUAL
a. Instrument Use
b. Microphone Use
a. Changing the Channel Assignment
b. Selecting Tone Squelch™ Mode
c. Selecting Keyboard Lock
Preliminary 01/02
Advertisement
Table of Contents

Related Manuals for Nady Systems UB-16


Summary of Contents for Nady Systems UB-16
- Page 1 FCC Warning Statement A. INTRODUCTION Using this Manual B. SYSTEM FEATURES UB-16 C. OPERATING INSTRUCTIONS UB-16 Bodypack Transmitter 1. Powering the Transmitter 2. Selecting Input for Operation 3. Connecting the Audio Source 4. Turning on the Transmitter 5. Selecting the Operating Frequency 6.
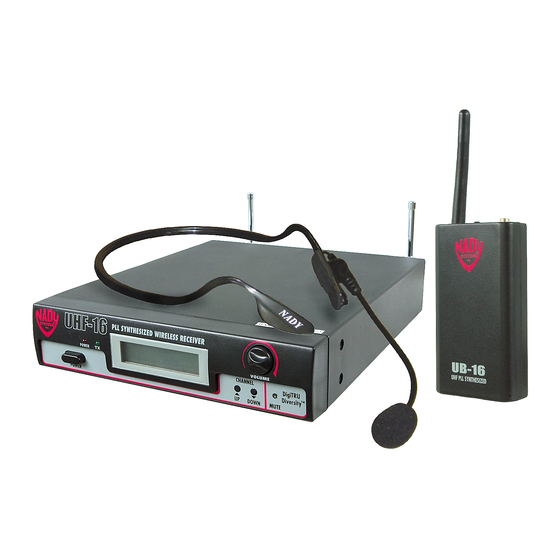
- Page 2 UB-16 Transmitters Choice of transmitters: UH-16 handheld or UB-16 bodypack, both 16-channel selectable • UB-16 operates on 2 AA batteries for the longest reliable and economical battery life. • UB-16 bodypack is a versatile unit with unique 3-way input switch allowing it operation selectively as an instrument, lavalier mic, or headworn mic transmitter (with convenient DC phantom powering in the mic settings for condensers).
- Page 3 (for headworn mic)/ LT (for lavalier mic). 3. Connecting the Audio Source The UB-16 is provided with a 3.5 mm LOCKING JACK (22) for connecting the audio input selected. Connect either the INSTRUMENT CORD (23) or the HEADWORN MIC (24) or LAVALIER MIC CORD (25) as desired, according to the input selected.
- Page 4 ON position. Adjust the volume of the receiver as per the Audio Output Instrument Connections section of the above UHF-16 receiver instructions. (Note: The INPUT LEVEL CONTROL (30) is deactivated and not used when the UB-16 is in GT, instrument mode. Levels should be adjusted with the volume control of your instrument.)
- Page 5 level peaks. (Note: Turning down the gain too much can compromise the signal-to-noise and is not recommended.) Cautions 1. Feedback Observe care in selecting P.A. volume, transmitter location and speaker placement so that acoustic feedback, howling and screeching, will be avoided. Please also note the pickup pattern characteristics of the microphone selected.
- Page 6 744.10 MHz 817.60 MHz 862.05 MHz 745.90 MHz 819.05 MHz 863.60 MHz E. CHANNEL DISPLAY AND UP/DOWN BUTTON OPERATION 1. UB-16 Transmitters Operation of Channel Display and Up and Down buttons, Keyboard Lock, and Tone Squelch™ a. Changing the Channel Assignment Press Up or Down button to change channels.
Need help?
Do you have a question about the UB-16 and is the answer not in the manual?
Questions and answers