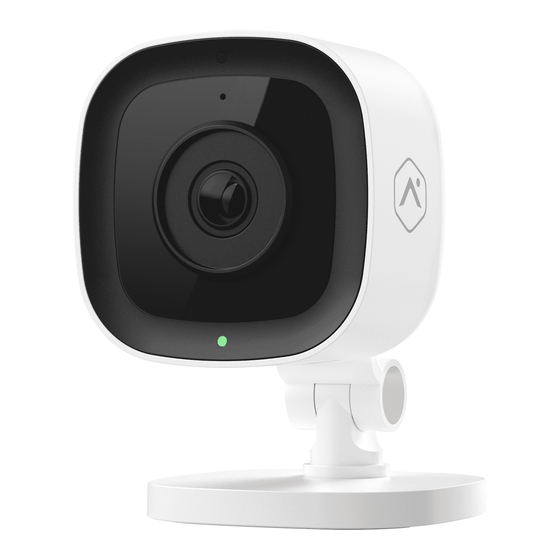
Alarm.Com ADC-V523 Installation Manual
Wi-fi indoor camera
Hide thumbs
Also See for ADC-V523:
- Quick start manual (2 pages) ,
- Quick start manual (6 pages) ,
- Quick start manual (14 pages)
Advertisement
Quick Links
Advertisement

Related Manuals for Alarm.Com ADC-V523


Summary of Contents for Alarm.Com ADC-V523
- Page 1 WI-FI INDOOR CAMERA INSTALLATION GUIDE ADC-V523...
-
Page 2: Pre-Installation Checklist
• A computer, tablet or smartphone with Wi-Fi is required if the router does not have the Wi-Fi Protected Setup (WPS) feature • Login and Password for the Alarm.com account to which you will add the camera Note: There are three options for connecting... -
Page 3: Ethernet Mode
Ethernet Mode Add the Camera to an Alarm.com Account Using an Ethernet cable, connect the camera to the network. Connect the camera’s AC power adapter and plug it into a non-switched outlet. Add the device to the account by either selecting the... - Page 4 On an Internet enabled device, connect to the wireless network “ALARM (XX:XX:XX)” where XX:XX:XX is the last six digits of the ADC-V523’s MAC address, which is located on the back of the ADC-V523. On the same device, open a web browser and enter “http://522irinstall”...
- Page 5 Follow the on-screen instructions to finish adding the camera. You may configure camera settings from the Customer Website. You can now power down the camera and install it in its final location using the included hardware. ADC-V523 Installation Guide...
- Page 6 WPS Mode Add the Camera to an Alarm.com Account To ensure sufficient Wi-Fi signal, complete these steps with the camera near its final location but prior to mounting. Connect the camera’s AC power adapter and plug it into a non-switched outlet.
- Page 7 Follow the on-screen instructions to finish adding the camera. You may configure camera settings from the Customer Website. You can now power down the camera and install it in its final location using the included hardware. ADC-V523 Installation Guide...
- Page 8 Local network and internet connection | Local network connection Flashing Green Local network connection only, no internet | No network connection Solid Red No local network or internet connection | System booting Flashing Red Camera is booting (Continued) ADC-V523 Installation Guide...
- Page 9 WARNING: This will restore factory-default settings to the camera. If already installed, the camera may need to be removed from the Alarm.com account and re- added after a factory reset. To perform a factory reset, push the WPS button and release when flashing Green and Red (about 15 seconds).
-
Page 10: Troubleshooting
LED is flashing Green and Red (about 15 seconds), then release the button. The camera will reboot with factory defaults. If the camera was previously installed to an Alarm.com account, it will need to be deleted before it can be installed again. Questions? Visit: www.alarm.com/supportcenter... -
Page 11: Important Note
This device is restricted for indoor use Federal Communication Commission Interference Statement This equipment has been tested and found to comply with the limits for a Class B digital device, pursuant to Part 15 of the FCC Rules. These limits are designed to provide reasonable protection against harmful interference in a residential installation. This equipment generates, uses and can radiate radio frequency energy and, if not installed and used in accordance with the instructions, may cause harmful interference to radio communications. However, there is no guarantee ... - Page 12 FCC Radiation Exposure Statement: This equipment complies with FCC radiation exposure limits set forth for an uncontrolled environment. This equipment should be installed and operated with minimum distance 20cm between the radiator & your body. ISED This device contains licence‐exempt transmitter(s)/receiver(s) that comply with Innovation, Science and Economic Development Canada’s licence‐exempt RSS(s). Operation is subject to the following two conditions: This device may not cause interference. This device must accept any interference, including interference that may cause undesired operation of the device. L’émetteur/récepteur exempt de licence contenu dans le présent appareil est conforme aux CNR d’Innovation, Sciences et Développement économique Canada applicables aux appareils radio exempts de licence. L’exploitation est autorisée aux deux conditions suivantes : L’appareil ne doit pas produire de brouillage; L’appareil doit accepter tout brouillage radioélectrique subi, même si le brouillage est susceptible d’en compromettre le fonctionnement. This radio transmitter [IC: 4491A‐V523] has been approved by Innovation, Science and Economic Development Canada to operate with the antenna types listed below, with the maximum permissible gain indicated. Antenna types not included in this list that have a gain greater than the maximum gain indicated for any type listed are strictly prohibited for use with this device. No. Antenna Model Antenna ...
- Page 13 pour l'exploitation de l'émetteur. No. Antenna Model Number Antenna Remark Type Gain(dBi) 4.9 2.4GHz 1 Dipole ALX18F‐222AA4‐00 5.4 5GHz 5.2 2.4GHz 2 Dipole ALX18F‐222AA5‐00 4.7 5GHz The device for operation in the band 5150‐5250 MHz is only for indoor use to reduce the potential for harmful interference to co‐channel mobile satellite systems. Les dispositifs fonctionnant dans la bande 5150‐5250 MHz sont réservés uniquement pour une utilisation à l’intérieur afin de réduire les risques de brouillage préjudiciable aux systèmes de satellites mobiles utilisant les mêmes canaux. IMPORTANT NOTE: IC Radiation Exposure Statement: This equipment complies with IC RSS‐102 radiation exposure limits set forth for an uncontrolled environment. This equipment should be installed and operated with minimum distance 20cm between the radiator & your body. Cet équipement est conforme aux limites d’exposition aux rayonnements IC établies pour un environnement non contrôlé. Cet équipement doit être installé et utilisé avec un minimum de 20cm de distance entre la source de rayonnement et votre corps. ...
- Page 14 For product available in the USA/Canada market, only channel 1~11 can be operated. Selection of other channels is not possible. Pour les produits disponibles aux États‐Unis / Canada du marché, seul le canal 1 à 11 peuvent être exploités. Sélection d'autres canaux n'est pas possible. IC For indoor use only. Pour une utilisation en intérieur uniquement. ...
- Page 15 © 2017 Alarm.com. All rights reserved. 8281 Greensboro Drive, Suite 100 Tysons, VA 22102 170512...
Need help?
Do you have a question about the ADC-V523 and is the answer not in the manual?
Questions and answers