Table of Contents
Advertisement
Quick Links
Advertisement
Table of Contents

Related Manuals for Tascam BD-R2000

Summary of Contents for Tascam BD-R2000
- Page 1 LST1148-001B BD-R2000 HDD/BLU-RAY /DVD RECORDER OWNER'S MANUAL...
-
Page 2: Safety Precaution
Safety Precaution Dear Customer, Thank you for purchasing the TASCAM BLU-RAY recorder. Before use, please read the safety information and precautions to ensure safe use of your new unit. CAUTION NOT OPEN The lightning flash with arrowhead symbol, within an equilateral triangle, is intended to alert the user to the presence of uninsulated “dangerous... -
Page 3: Important Safety Instructions
8. AVOID violent shocks to the unit during transport. Safety Precaution CAUTION: Changes or modifications not approved by TASCAM could void user’s authority to operate the equipment. This equipment has been tested and found to comply with the limits for a Class B digital device, pursuant to Part 15 of the FCC Rules. - Page 4 0 Do not put the batteries in a place where young children can reach. DISCLAIMER OF LIABILITY TASCAM shall not be liable for any loss relating to the unit’s failure to properly record, store or playback any content (video, audio or otherwise) for any reason whatsoever. Any applicable warranties shall only cover replacement or repair of the effected unit, and shall not apply to recovery or replacement of lost content.
-
Page 5: Table Of Contents
Contents Safety Precaution Contents Getting Started Key Features ... 6 How to Read this Manual ... 6 Other Precautionary Notes... 7 Hard Disk Drive (HDD) ... 8 SD Cards... 8 On-screen Displays ... 9 Discs ... 9 Precautions on the Use of Discs ... 11 Precautions for placement and use... -
Page 6: Getting Started
Getting Started Key Features Professional Blu-ray Disc recorder of the high-definition era Copy videos to a Blu-ray Disc in high-definition from a high- definition camcorder, or down convert the videos and record them onto DVDs, all without the need for a PC. The internal hard disk drive enables for easy editing and dubbing multiple discs. -
Page 7: Other Precautionary Notes
• Read and understand fully the terms and conditions of all copyright works before using this unit in the correct manner. Under no circumstances shall TASCAM take any responsibility for any infringements of copyright caused by the customer when using this unit. The customer shall be responsible for resolving all legal issues regarding to any copyright infringements. -
Page 8: Hard Disk Drive (Hdd)
Getting Started Hard Disk Drive (HDD) Hard disk drive (HDD) The HDD rotates at a high speed whenever the power is turned "On". Pay particular attention to the following precautions when using this unit. Warning • Do not subject it to vibration or strong impact Subjecting this unit to excessive impact may result in loss of recorded data and even damage of the HDD. -
Page 9: On-Screen Displays
On-screen Displays Status display Displays the current settings and operating status (such as playback, pause) of this unit. Pressing the [ON SCREEN] button on the remote control displays the status. To cancel the display, press the [ON SCREEN] button again. You can select whether to display the statuses by changing the settings in the settings menu. - Page 10 Getting Started Discs (Continued) Discs that enable both dubbing and playback Disc Type Recording Format BD-RE BDAV mode BDMV mode BD-R BDAV mode BDMV mode DVD-RW Video mode VR mode DVD-R Video mode VR mode Discs that enable playback only Disc Type DVD-RAM (4.7 GB) Supports specific forms of playback, but no recording can be done.
-
Page 11: Precautions On The Use Of Discs
Precautions on the Use of Discs Maintenance of discs • Dirt attached to the disc, such as fingerprints and dust, may cause distortion in the video image or sound. Keep the disc clean at all times such as by using a soft cloth. -
Page 12: Precautions For Placement And Use
Getting Started Precautions for placement and use Precautions When Mounting Rack • The guaranteed operating temperature range of this prod- uct is 5º - 35º C (41º- 95º F). • Do not install in the following types of places. Doing so could degrade the image quality and/or cause malfunctions. -
Page 13: Name And Function Of Parts
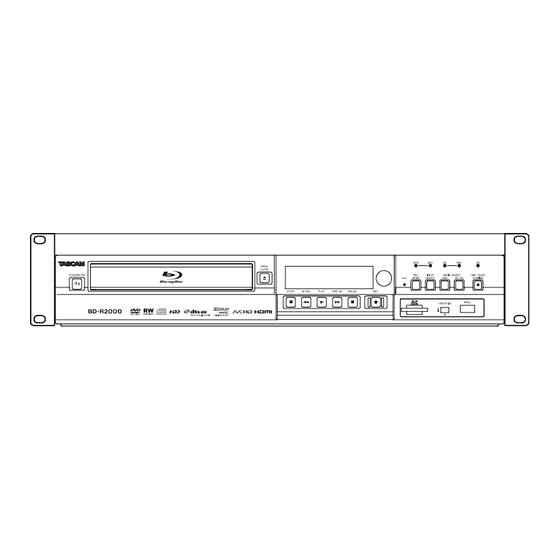
Name and Function of Parts Front panel A [ A ] button Switches operation between on and standby. B Disc tray C [ M ] button Opens/closes the disc tray. D Display window E Remote control sensor F [RESET] switch Reset the unit. -
Page 14: Display Window
Getting Started Name and Function of Parts (Continued) Display window A HDD/DISC remaining level display B Dubbing display C Disc status display D HDMI output display Memo: • The brightness of the display window can be adjusted. For more details, refer to “PANEL DISPLAY BRIGHTNESS” (A page 75). -
Page 15: Remote Control
Remote control A [DELETE] Deletes a title or characters. B [ M ] Opens/closes the disc tray. C [HDD] For operating the HDD. D [1]-[9] For entering characters. E [Z] For entering characters. F [RED] Enabled when the color button (red) is displayed. G [GREEN] Enabled when the color button (green) is displayed. -
Page 16: Remote Control Codes
Getting Started Name and Function of Parts (Continued) g [ N ] Fast forwards the video and starts slow playback. h [ I ] Plays the video. i [ W ] Pauses the video that is currently playing. j [ o ] Stops playback/recording. -
Page 17: Preparation
Connecting a Monitor To display video images from this unit, connect it to a monitor. • This unit supports connections using "HDMI cable", "component video cable", "S-video cable", or "video cable". Memo: • Switch to the appropriate monitor input according to the type of connection cable used. -
Page 18: Connecting A Video Deck Or Other Equipment
Preparation Connecting a Video Deck or Other Equipment Connecting a video camera Connecting via the i.LINK terminal Connecting via the USB terminal Memo: • Some video camera models may require an AC adapter instead of batteries to run. For details, refer to the video camera’s instruction manual. -
Page 19: Connecting External Devices
Connecting External Devices Connecting a wired remote control Using a wired connection enables stable control of this unit from an external device. Operation is possible using any code (1 to 4) regardless of the remote control code settings of this unit. Memo: •... -
Page 20: Setting And Displaying Date/Time
Preparation Setting and Displaying Date/Time Set the date/time of the built-in clock as follows. The recording date/time is stored on the disc. Setting the date/time Set the date/time of the built-in clock as follows. 1 Press the [SET UP] button on the remote control unit •... - Page 21 6 After setting is complete, select “ENTER”, and press the [OK] button • Doing so exits date/time setting, and returns to the initial screen. Memo: • The value for seconds cannot be set. After setting the minute, press the [SET UP] button according to the time signal.
- Page 22 Preparation Setting and Displaying Date/Time (Continued) Memo: • The date display style will be applied in the following information displays. • Recording date of the title that is shown in the playback navigation screen (The recording date will be shown in place of the title if the title has not been input).
-
Page 23: Dubbing/Importing
Dubbing/Importing Bi-directional dubbing between the HDD and a BD/DVD is possible using this unit alone. Also, data can be imported to the HDD from a video camera by connecting it via i.LINK or USB. Dubbing from the HDD to a BD/DVD High-speed dubbing Select this option if you want to significantly shorten the time required for dubbing. -
Page 24: Dubbing Chart
Dubbing/Importing Dubbing chart Dubbing the video data from the HDD Dubbing Quality Content BDMV(HD Quality) Quality DR (Other) AF/AN/AL/AE High-speed dubbing High-speed dubbing XP/SP/LP/EP* Memo: : High-speed dubbing to DVD-VIDEO format discs in EP mode title To perform high-speed dubbing of a EP mode title to a DVD-VIDEO format disc, set " HIGH-SPEED DUBBING " (A page 77) in the settings menu to “4:3”... -
Page 25: Formatting
Formatting Unused discs or SD cards may require formatting in some cases. When the need arises, format the disc or SD card accordingly. Memo: • Formatting a disc or SD card erases all existing data from the media. Double-check carefully before formatting so as not to erase important titles. - Page 26 Dubbing/Importing Formatting (Continued) 5 Select “YES”, and press the [OK] button in the format confirmation screen • Formatting starts. • After formatting is complete, a “THE DISC HAS BEEN FORMATTED” message appears on the monitor, and the normal screen is displayed. Memo: •...
- Page 27 Formatting an SD Card 1 Insert the SD card to be formatted into the [SD SLOT] • With the terminal side facing down, insert the SD card until a “click” sound is heard. Note: • Formatting cannot be performed if the SD card is write- protected.
-
Page 28: Recording Modes
Dubbing/Importing Recording Modes Maximum recording time for each recording mode You can specify a recording mode according to the intended use. Setting the video to a high picture quality shortens the maximum recording time, while setting to a lower picture quality lengthens the recording time. Refer to the following table for the maximum recording time in the respective modes. -
Page 29: Importing Data To The Hdd Using The One Touch Dubbing Button
Importing Data to the HDD Using the ONE TOUCH DUBBING Button Titles can be imported to the HDD from an SD card or device connected to the USB or i.LINK terminal simply by pressing the [ONE TOUCH DUBBING] button. • File formats that can be imported A USB connection device, SD card AVCHD, SD-VIDEO, and JPEG B i.LINK-connected device... -
Page 30: Importing Data From A Bd/Dvd To The Hdd
Dubbing/Importing Importing Data from a BD/ DVD to the HDD Data can be imported from a BD/DVD to the HDD as follows. • File formats that can be imported BD-MV, BD-AV, AVCHD, DVD-VR, DVD-VIDEO, and JPEG Memo: • Titles that are imported using “FULL IMPORT” combined into one title. - Page 31 5 Select “START”, and press the [OK] button • Importing of the titles starts. • After titles are successfully imported, a “DUBBING IS COMPLETED” message appears on the monitor. Specify a title 1 Select “SEL. TITLE(VIDEO)” in the import selection screen, and press the [OK] button •...
- Page 32 Dubbing/Importing Importing Data from a BD/ DVD to the HDD (Continued) 7 Select “START”, and press the [OK] button • Importing of titles starts according to the sequence in the created title list. • After titles are successfully imported, a “DUBBING IS COMPLETED”...
-
Page 33: Importing Data From A Usb-Compatible Device To The Hdd
Importing Data from a USB- compatible Device to the Data on devices connected to the USB terminal can be imported to the HDD as follows. • File formats that can be imported AVCHD, SD-VIDEO, and JPEG Memo: • Titles that are imported using “FULL IMPORT” combined into one title. - Page 34 Dubbing/Importing Importing Data from a USB- compatible Device to the HDD (Continued) • Importing of the titles starts. • After titles are successfully imported, a “DUBBING IS COMPLETED” message appears on the monitor. Specify a title 1 Select “SEL. TITLE(VIDEO)” in the import selection screen, and press the [OK] button •...
-
Page 35: Importing Data From An Sd Card To The Hdd
Importing Data from an SD Card to the HDD Data can be imported from a SD (SDHC) card to the HDD as follows. • File formats that can be imported AVCHD, SD-VIDEO, and JPEG Memo: • Titles that are imported using “FULL IMPORT” combined into one title. - Page 36 Dubbing/Importing Importing Data from an SD Card to the HDD (Continued) Memo: • Choose “BACK” from the menu and press the [OK] button to return to the previous screen. Specify a title 1 Select “SEL. TITLE(VIDEO)” in the import selection screen, and press the [OK] button •...
-
Page 37: Importing Data From An I.link-Compatible Device To The Hdd
Importing Data from an i.LINK-compatible Device to the HDD Data on devices connected to the i.LINK terminal can be imported to the HDD as follows. • Video formats that can be imported: DV and HDV content Memo: • Only titles that are not copyright-protected can be imported. •... - Page 38 Dubbing/Importing Importing Data from an i.LINK-compatible Device to the HDD (Continued) • Select "XP", "SP", "LP", or "EP" from the “RECORDING MODE” option. Memo: • HDV contents will be imported in DR mode. For more details, refer to "Recording Modes" (A page 28) . 4 Select “START”, and press the [OK] button •...
-
Page 39: Dubbing A Title From The Hdd To A Bd/Dvd
Dubbing a Title from the HDD to a BD/DVD Titles stored in the internal HDD can be dubbed to a BD/DVD as follows. Memo: • Disc types that can be used for dubbing with this unit are: BD-RE, BD-R, DVD-RW, and DVD-R. For more details, refer to "Discs that enable both dubbing and playback"... - Page 40 Dubbing/Importing Dubbing a Title from the HDD to a BD/DVD (Continued) Memo: • High-speed dubbing Select this option if you want to significantly shorten the time required for dubbing. Make use of a disc that supports high-speed recording. • AF/AN/AL/AE Can be selected for BD-R and BD-RE.
- Page 41 Memo: • The background image of the disc menu can be selected (only for DVD-Video and BD-MV). 7 Set the operations for finalize • Finalize will be performed after dubbing if “ON” has been set for “FINALIZE”. If a BD-MV disc is being dubbed, “OFF” cannot be set for “FINALIZE”.
-
Page 42: Dubbing Still Images From The Hdd
Dubbing/Importing Dubbing Still Images from the HDD Still images stored in the internal HDD can be dubbed to a BD-RE or an SD card as follows. Memo: • Only “JPEG” still image format is supported. For more details, refer to "Dubbing the picture data from the HDD"... - Page 43 6 Select “START”, and press the [OK] button • Dubbing starts. A progress bar is displayed during the dubbing process. • After dubbing is complete, a “DUBBING IS COMPLETED” message appears on the monitor. Memo: • A directory of the following configuration is created in the media, and still images are written with file names ranging from "PIC_0001.jpg"...
-
Page 44: Enabling Playback On Other Devices (Finalizing)
Dubbing/Importing Enabling Playback on Other Devices (Finalizing) DVD-R and DVD-RW discs may need to be finalized before they can be played on other DVD players. Memo: • Discs in the Video mode becomes a DVD-Video format with a title menu after finalizing. •... -
Page 45: Unfinalizing A Disc
C Select “CHANGE DISC MENU BACKGROUND” to select a background image for the top menu • You can register and use a background image of your preference. Memo: • The items in “FIRST PLAY”, “REPEAT” and “CHANGE DISC MENU BACKGROUND” can also be set in "Dubbing a Title from the HDD to a BD/DVD"... -
Page 46: Copying The Entire Disc
Dubbing/Importing Copying the Entire Disc Copying the entire disc allows all content on a BD (BDMV) or DVD (AVCHD, DVD-Video) to be copied onto another disc. Note: • Content cannot be copied to a formatted BD-R or DVD-R disc. Make use of an unformatted disc. •... -
Page 47: Recording Using External Inputs
9 Complete the entire disc copying • After copy is complete the tray will open automatically, and copy of the entire disc ends. Memo: • The screen prompting you to insert a new disc appears repeatedly until this unit has finished copying the number of discs specified in Step 3. -
Page 48: Playing Back
Playing Back About Playing Back Videos or edited videos stored on the internal HDD, as well as videos stored on a disc or SD card can be played back on this unit. The types of media that are playable on this unit are as follows. - Page 49 Switching between thumbnail and list displays You can switch between the thumbnail display and list display of a video. • When the video thumbnail list screen is displayed Press the [RED] button to display the title list screen. • When the title list screen is displayed Press the [RED] button to display the video thumbnail list screen.
-
Page 50: Option Menu List
Playing Back Using Playback Navigation (Continued) 2 Select an operation option, and press the [OK] button • Options that cannot be operated are displayed in gray and cannot be selected. For details on the Option menu items, refer to "Option menu list"... -
Page 51: Video Playback Operation
Video Playback Operation Frequently used button operations [ I ] button • If the stop position (resume point) is memorized in the selected video, pressing the button plays back the video from this position. The video may not resume playback depending on the media and settings used. -
Page 52: Video Playback Operation
Playing Back Video Playback Operation (Continued) [ v ] button • During normal playback, 1.3x playback, slow motion playback, fast forward, or fast reverse, pressing the button moves the playback position forward by about 30 seconds. Pressing the button multiple times moves playback to the position equivalent to the number of times pressed multiplied by 30 seconds. -
Page 53: Playing Videos On A Bd/Dvd
Playing Videos on a BD/ Playback starts automatically after a BD/DVD is set. If the Auto Play feature is disabled, play the title using Playback Navigation. Memo: • For details on the button operations during playback, refer to "Video Playback Operation" (A page 51) . Playing a disc when Auto Play is enabled 1 Set a BD or DVD on the disc tray •... -
Page 54: Playing Videos On The Hdd
Playing Back Playing Videos on the HDD Titles stored on the HDD can be played back using Playback Navigation. You can select a video to play from "Title", "Group", or "Playlist". Memo: • For details on the button operations during playback, refer to "Video Playback Operation"... -
Page 55: Playing Still Images (Jpeg)
Playing Still Images (JPEG) Still images stored on the HDD/BD/DVD/SD card can be played back using Playback Navigation. Playing still images 1 Select the playback location : If the current playback location is “BD/DVD” or “SD CARD”, press the [HDD] button on the remote control unit to switch it to “HDD”. -
Page 56: Changing Playback Settings
Playing Back Changing Playback Settings Displaying the playback settings menu 1 Press the [PB MODE] button on the remote control unit during the playback of a title • The Settings Menu screen appears. • The playback settings menu can only be displayed during the playback of a title. -
Page 57: Video Settings
Video settings PICTURE QUALITY The following items can be set. Setting Values Description NORMAL Standard picture quality. CINEMA Effective when playing movies. FINE Produces sharp images with enhanced outlines. SOFT Reduces noise that is prominent in the video image. USER Enables the Details setting. -
Page 58: Editing
Editing Editing Before editing This unit mainly edits video images stored on the HDD. To edit video images stored in a disc or SD card, do so after importing them to the HDD. Data on a finalized disc cannot be edited. To edit a finalized disc, you have to either unfinalize the disc, or do so after importing the data to the HDD. -
Page 59: Entering Characters
Entering Characters Names can be changed or given to stored videos or groups. You can enter characters while referring to the input on the monitor. Character input screen A Function name field B Screen description C Input window Characters entered appear on the input window. D Operation guide 1 The [0]-[9], [Z], [#], [PAGE PRV ], [ w ] and [ v ] buttons are displayed. -
Page 60: Grouping
Editing Grouping Multiple titles stored on the HDD can be combined into a group. Memo: • Only video data stored on the HDD can be grouped. Grouping 1 Press the [NAVIGATION] button on the remote control unit • The Playback Navigation screen appears. 2 Select the titles or groups to be grouped, and press the [MARK] button •... - Page 61 4 Select “YES”, and press the [OK] button • All titles within the selected group are ungrouped. Memo: • To cancel ungrouping, select “NO” and press the [OK] button. • Alternatively, you can press the [RETURN] button to cancel ungrouping and return to the initial screen. Excluding from a group You can select titles and exclude them from a group.
-
Page 62: Changing The Title/Group Name
Editing Changing the Title/Group Name The saved title/group name can be changed as follows. Memo: • A title/group name can be added to video data stored on the HDD, BD-RE, BD-R, DVD-RW, or DVD-R, and the name can be changed. •... -
Page 63: Turning On Title/Group Protection
Turning On Title/Group Protection Titles/groups can be protected. Editing and deletion cannot be performed on protected titles/ groups. • Title/group protection can be turned on for video data stored on the HDD, BD-RE (BDAV), BD-R (BDAV), and DVD-RW (VR). 1 Press the [NAVIGATION] button on the remote control unit •... -
Page 64: Turning Off Title/Group Protection
Editing Turning Off Title/Group Protection Protection of a title/group can be turned off. Titles/groups can be edited and deleted after their protection is turned off. • Title/group protection can be turned off for video data stored on the HDD, BD-RE (BDAV), BD-R (BDAV), and DVD-RW (VR). -
Page 65: Creating A Playlist
Creating a Playlist A playlist can be created from the video titles on the HDD. • Playlists can only be created for titles that are stored on the HDD. Playlist : Enables you to create a program by selecting chapters from a specific title and editing their playback sequence. -
Page 66: Editing A Thumbnail
Editing Editing a Thumbnail Thumbnails (index images) can be changed to a still image according to your preference. Memo: • Thumbnails of titles stored on the HDD, BD-RE, BD-R, DVD-RW, and DVD-R can be edited. • However, thumbnails of titles that are stored on an SD card or finalized disc cannot be edited. -
Page 67: Editing A Chapter
Editing a Chapter Creating a chapter mark for a saved title enables you to find a specific scene within the title. Memo: • All chapter editing functions can be performed on titles stored on the HDD. Titles stored on a BD-RE (BDAV), BD-R (BDAV), DVD-R (VR), or DVD-RW (VR) only allow chapters to be divided or combined. - Page 68 Editing Editing a Chapter (Continued) Chapter mark insertion (divide chapter) 1 Play the video, and press the [ W ] button to stop at the scene you want to add a chapter mark 2 Press the [MARK] button on the remote control unit •...
-
Page 69: Dividing
Dividing You can select a saved title and divide it into two titles. Memo: • Dividing can only be applied to titles stored on the HDD. • Titles that are protected cannot be divided. To divide a title, turn off the protection. For details on turning off the title protection, refer to "Turning Off Title/Group Protection"... -
Page 70: Delete Scenes
Editing Memo: • To cancel the dividing operation, select “CANCEL” and press the [OK] button. • Alternatively, you can press the [RETURN] button to cancel the divide operation and return to the initial screen. • The dividing edit screen can also be called up from the Playback Navigation screen. - Page 71 A Play the video, and press the [ W ] button at the point where you want to start the delete operation B Select “START”, and press the [OK] button - : -- : -- - : -- : -- C Play the video, and press the [ W ] button at the point where you want to end the delete operation D Select “END”, and press the [OK] button...
-
Page 72: Changing The Disc Name
Editing Changing the Disc Name The name of a BD or DVD disc can be changed as follows. 1 Set the BD or DVD for which the disc name is to be changed on the disc tray 2 Press the [MEDIA MANAGE] button on the remote control unit •... -
Page 73: Mode Conversion
5 Select “ENTER”, and press the [OK] button • The modified shooting date/time is saved. Memo: • Alternatively, you can press the [RETURN] button to cancel the shooting date/time modification and return to the initial screen. • The shooting date/time modification will not be reflected on a title that was dubbed. -
Page 74: Settings Menu
Settings Menu Changing Settings of this Unit Settings changed in the Settings Menu screen are stored on this unit even when its power is turned off. Displaying the Settings Menu 1 Press the [SET UP] button on the remote control unit •... -
Page 75: Setup
Setup AUTO POWER (OFF) You can specify a time for the power of the unit to turn off automatically when it is not being operated. Setting Values Description Power does not turn off automatically. 2 HOURS Turns off power after two hours. 6 HOURS Turns off power after six hours. -
Page 76: Playback Setting
Settings Menu • DIMMER (POWER OFF) For turning on/off the light of the display window when the power is turned "Off". Setting Values Description Turns off the light. Turns on the light. QUICK STARTUP The quick startup setting can be specified as follows. Setting Description Values... -
Page 77: Record
RESUME The stop position can be stored when playback of a BD- Video, DVD-Video, BDMV, AVCHD, finalized discs, or SD card is stopped halfway. Setting Values Description Resume information is not stored. Stores resume information. Memo: • Resume information is stored at all times for other discs as well as the HDD regardless of this setting. -
Page 78: Audio
Settings Menu • DISC RECORDING AUDIO For changing the settings of audio to be recorded to the disc when in the AF, AN, AE or AL mode. Setting Description Values AUTO Records "Stereo", "Surround" or "Dual broadcast" audio sounds as they are. FIXED Records "Stereo"... -
Page 79: Display
• DTS-HD For setting audio output to “BITSTREAM” or “PCM”. Setting Values Description BITSTREAM Use this setting when connecting a device that is able to decode “DTS-HD”. Audio input will be changed and output as “PCM”. Use this setting when connecting a device that is unable to decode “DTS-HD”. -
Page 80: Connection
Settings Menu Connection MONITOR TYPE For setting the aspect ratio according to the connected monitor. Setting Values Description 16:9 Set to this value when connected to monitors with 16:9 aspect ratio. 16:9FULL Choose this setting when a 16:9 monitor is connected to display images without the black borders. - Page 81 • x.v.Color Setting Description Values AUTO Outputs x.v.Color information with HDMI when video images that include x.v.Color information are played back. This is applicable when an x.v.Color compatible monitor is connected. Memo: • This is applicable when an x.v.Color compatible monitor is connected.
-
Page 82: Others
Others Locking the Disc Tray By turning on the lock for the disc tray, the tray cannot be opened or closed using the [ M ] button. Memo: • When the [ M ] button is pressed while the disc tray lock is turned on, a "LOCKED"... -
Page 83: Rs-232C Interface
RS-232C Interface Command Table Lower Order Higher Order Complete Error Sense Title Chapter Sense Chapter Title Search Search Cancel- Disc Finalize Disc Erase Finalization Standby Standby Command Target Specifications • Pin layout PIN No. Signal Operation Receive data Transmit data Signal grounding Memo: •... -
Page 84: Command
Others Command Operation Commands Commands for operating functions such as PLAY and REC on the BLU-RAY DISC & HDD RECORDER Command Description Plays the selected deck. Stops the selected deck. Resume will be cleared when this is pressed while in the Stop mode. - Page 85 80-8F 80 : Chapter Search 1st Byte Chapter Search Hundreds Tens ASCII codes (30 - 39) E.g. (012) E.g. : When searching the 12th chapter. 81 : Title Search under "ORIGINAL" 1st Byte Title Search (ORIGINAL) ASCII codes (30 - 39) E.g.
- Page 86 Others 9F : Remote Data The remote control codes for controlling the wired remote controller via RS-232C is as shown in the following table. The codes apply to all three HDD, BD and SD deck unless otherwise stated. Code Items INPUT SELECT STOP F.F/SPEED+...
- Page 87 COLOR KEY BLUE COLOR KEY RED JOG-1/6 JOG +1/6 JOG +1 INSTANT REPLAY EDIT COLOR KEY GREEN COLOR KEY YELLOW B8 : Input/Output Selection External input selection L-1 VIDEO External input selection L-1 S-VIDEO External input selection DV B8 : Recording Mode Selection 1st Byte 2nd Byte NAVIGATION...
-
Page 88: Subtitle Selection
Others Subtitle Selection B8 : Subtitle Selection Byte Byte JAPANESE ENGLISH GERMAN FRENCH ITALIAN SPANISH DUTCH SWEDISH NORWEGIAN FINNISH DANISH "Language Code List" (A page 94) Byte Byte Byte Byte Byte Byte... - Page 89 Audio Language Selection B8 : Audio Language Selection Byte Byte JAPANESE ENGLISH GERMAN FRENCH ITALIAN SPANISH DUTCH SWEDISH NORWEGIAN FINNISH DANISH "Language Code List" (A page 94) Byte Byte Byte Byte Byte Others Byte...
- Page 90 Others Response Commands Commands relating to RS-232C control system. Command Complete: Issued by the external recorder upon completing all specified operations by commands. Error: Issued by the external recorder when receiving invalid commands in the context. In such cases, commands that are sent will not be accepted. However, a return command will be issued but only to the Status Sense.
- Page 91 • Title/Track Sense under "ORIGINAL" Title/Track Sense (ORIGINAL) E.g. (345) E.g. : When the current title under "ORIGINAL" is the 345th title. • Title/Track Sense in "PLAY LIST" Title/Track Sense (PLAY LIST) E.g. (028) E.g. : When the current title under "PLAY LIST" is the 28th title. •...
- Page 92 Others • Status Data Sense For acquiring the remaining time in the current recording mode in hours, minutes and seconds for HDD/DVD. 1byte 1byte STATUS SENSE bit7 1 (Fixed) 1 (Fixed) bit6 0 (Fixed) 1 (Fixed) bit5 0 (Fixed) 0 (Fixed) bit4 Record Record...
- Page 93 • SEARCH SPEED bit3 STILL SEARCH1 SEARCH2 SEARCH3 SEARCH4 SEARCH5 • CTL Data Sense For acquiring lapse counter of selected deck in hours, minutes and seconds. 1st Byte 2nd Byte CTL Data Sense Hr (Tens) Hr (Ones) Min (Tens) Min (Ones) Sec (Tens) Sec (Ones) Frame (Tens) Frame (Ones) E.g.
-
Page 94: Language Code List
Others Language Code List Code Language Afar Abkhazian Afrikaans Akan Albanian Amharic Arabic Aragonese Armenian Assamese Avar Avestan Aymara Azerbaijani Bashkir Bambara Basque Belarusian Bengali Bihari Bislama Bosnian Breton Bulgarian Burmese Catalan, Valencian Chamorro Chechen Chinese Church Slavic Chuvash Cornish Corsican Cree Czech... - Page 95 Divehi Dutch Dzongkha English Esperanto Estonian Faroese Fijian Finnish French Western Frisian Fulah Georgian German Scottish Gaelic Irish Galician Manx Greek Guaraní Gujarati Haitian Hausa Hebrew Herero Luba-Katanga Ganda Macedonian Marshallese Malayalam Māori Marathi Malay Malagasy Maltese Moldavian Mongolian Nauruan Navajo South Ndebele North Ndebele...
-
Page 96: Country Code List
Others Country Code List Code Country Name Andorra United Arab Emirates Afghanistan Antigua and Barbuda Anguilla Albania Armenia Netherlands Antilles Angola Antarctica Argentina American Samoa Austria Australia Aruba Azerbaijan Bosnia and Herzegovina Barbados Bangladesh Belgium Burkina Faso Bulgaria Bahrain Burundi Benin Bermuda Brunei... - Page 97 Cook Islands Chile Cameroon China Colombia Costa Rica Cuba Cape Verde Christmas Island Cyprus Czech Republic Germany Djibouti Denmark Dominica, Commonwealth of Dominican Republic Algeria Ecuador Estonia Egypt Western Sahara Eritrea Spain Ethiopia Finland Fiji Falkland Islands (Malvinas) Micronesia (Federated States of) Faroe Islands France France, Metropolitan...
-
Page 98: Using The Hdmi Consumer Electronics Control (Hdmi Cec)
Others Using the HDMI Consumer Electronics Control (HDMI CEC) HDMI Consumer Electronics Control • By using a HDMI cable to connect this unit with a TV that supports the HDMI CEC standard, this unit and the TV can be linked and operated together. •... -
Page 99: Troubleshooting
The cooling fan motor is spoiled. Remove the power plug from the power point, and consult the dealer from which this product is purchased, or any nearby TASCAM Servicing Center. Change the “AUTO POWER (OFF)” setting of “SETUP” to “OFF”. - Page 100 Others Problem Data cannot be The title to be dubbed is copyright imported protected. The number of titles stored in the HDD has reached the maximum amount. The remaining space on the HDD is running out. The title/group name Protection of the title/group name is cannot be changed turned on.
-
Page 101: Specifications
Specifications General Power requirement AC 120 V H, 60 Hz Power consumption Power on : 34 W Power off : 3.0 W Laser specification For CD Wavelength : 779 nm to 789 nm Output : No hazardous radiation is emitted with the safety protection. -
Page 102: Index
Others Index AUDIO CABLE ... 14, 18, 17 AUDIO LANGUAGE ... 56, 76, 89 AUDIO/SUBTITLE SETTINGS ... 56 BD (BD-R/BD-RE) ... 9, 10, 25, 39, 58, 93 BD MIX SOUND ... 79 BD VIDEO DATA ... 8 BDAV ... 9, 10, 24 BDMV ... -
Page 103: Important Notice Concerning The Software
Important Notice Concerning the Software Software License Attached to the Product The Software embedded in the Product is composed of several independent software components, and in each of such individual components, a copyright of a third party subsists. The Product uses the software component designated in the End-User License Agreement that was executed a third party (hereinafter "EULA"). - Page 104 Others GNU GENERAL PUBLIC LICENSE TERMS AND CONDITIONS FOR COPYING, DISTRIBUTION AND MODIFICATION 0. This License applies to any program or other work which contains a notice placed by the copyright holder saying it may be distributed under the terms of this General Public License. The "Program", below, refers to any such program or work, and a "work based on the Program"...
- Page 105 4. You may not copy, modify, sublicense, or distribute the Program except as expressly provided under this License. Any attempt otherwise to copy, modify, sublicense or distribute the Program is void, and will automatically terminate your rights under this License. However, parties who have received copies, or rights, from you under this License will not have their licenses terminated so long as such parties remain in full compliance.
- Page 106 Others END OF TERMS AND CONDITIONS How to Apply These Terms to Your New Programs If you develop a new program, and you want it to be of the greatest possible use to the public, the best way to achieve this is to make it free software which everyone can redistribute and change under these terms.
- Page 107 Finally, software patents pose a constant threat to the existence of any free program. We wish to make sure that a company cannot effectively restrict the users of a free program by obtaining a restrictive license from a patent holder. Therefore, we insist that any patent license obtained for a version of the library must be consistent with the full freedom of use specified in this license.
- Page 108 Others d) If a facility in the modified Library refers to a function or a table of data to be supplied by an application program that uses the facility, other than as an argument passed when the facility is invoked, then you must make a good faith effort to ensure that, in the event an application does not supply such function or table, the facility still operates, and performs whatever part of its purpose remains meaningful.
- Page 109 b) Use a suitable shared library mechanism for linking with the Library. A suitable mechanism is one that (1) uses at run time a copy of the library already present on the user's computer system, rather than copying library functions into the executable, and (2) will operate properly with a modified version of the library, if the user installs one, as long as the modified version is interface-compatible with the version...
- Page 110 Others Each version is given a distinguishing version number. If the Library specifies a version number of this License which applies to it and "any later version", you have the option of following the terms and conditions either of that version or of any later version published by the Free Software Foundation.
- Page 111 Others...
- Page 112 BD-R2000 TEAC CORPORATION Phone: +81-42-356-9143 1-47 Ochiai, Tama-shi, Tokyo 206-8530, Japan TEAC AMERICA, INC. Phone: +1-323-726-0303 7733 Telegraph Road, Montebello, California 90640 USA TEAC CANADA LTD. Phone: +1905-890-8008 Facsimile: +1905-890-9888 5939 Wallace Street, Mississauga, Ontario L4Z 1Z8, Canada TEAC MEXICO, S.A. de C.V.
Need help?
Do you have a question about the BD-R2000 and is the answer not in the manual?
Questions and answers