Table of Contents
Advertisement
Quick Links
Advertisement
Table of Contents

Related Manuals for INTERSPIRO OX10 MOLLE BC


Summary of Contents for INTERSPIRO OX10 MOLLE BC
- Page 1 ENGLISH OX10 MOLLE BC User manual 34299A01 2022-06...
- Page 2 Copyright © 2022 Interspiro This publication contains or refers to proprietary information which is protected by copyright. All rights are reserved. Interspiro®, Oxydive® and Divator® are registered trademarks belonging to Interspiro. This publication may not be copied, photocopied, reproduced, translated, or converted to any electronic or machinereadable form in whole or in part, without prior written approval from Interspiro.
-
Page 3: Table Of Contents
OX10 MOLLE BC Table of Contents Introduction ..................5 Safety notice ................5 Safety terminology and symbols ..........7 Technical description ..............8 Before use ..................11 Assembling ................11 Filling the buoyancy / emergency air cylinder ......19 Mounting the air cylinder in the cylinder pouch ......20 Inflation regulator and hose ............ -
Page 5: Introduction
EN1809, and is to be used according to local regulations. Manufacturer: Interspiro AB, Box 2853 18728 Täby Sweden It is approved for use together with the Interspiro OX10 diving apparatus. This is not a lifejacket: it does not guarantee a head up position of the wearer at the surface. - Page 6 High pressure gas systems must be handled with care. Damage to high pressure gas system components may result in injury or death. Interspiro is not liable for damages incurred as a consequence of failure to follow the instructions in this manual.
-
Page 7: Safety Terminology And Symbols
OX10 MOLLE BC Warning The breathing gas shall meet the requirements for breathing gas according to EN 12021. Safety terminology and symbols In this document, the terms WARNING and NOTICE are used to indicate potential hazards. Read the accompanying information carefully and follow the safety instructions. -
Page 8: Technical Description
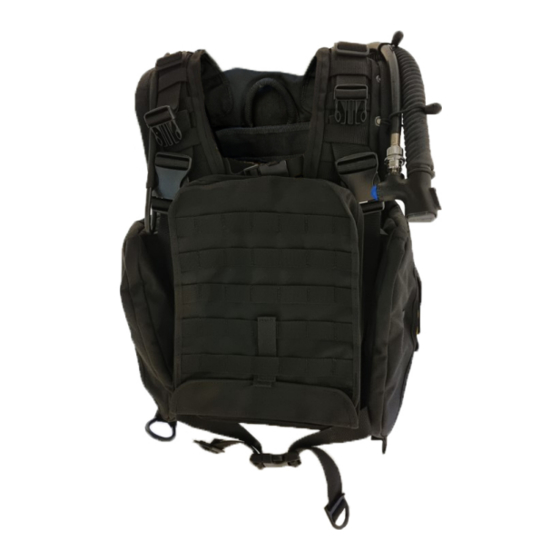
OX10 MOLLE BC Technical description Adjustable shoulder strap, left and right Shoulder dump pipe Rapid droppable weight pocket with yellow drop handle, left and right Waist dump pipe Cummerband, left and right OX10 attachment buckles Front ballistic plate pocket BCD inflator Medium pressure quick release connector 10. - Page 9 OX10 MOLLE BC Convoluted inflation hose with elbow dump Inflation regulator Inflation cylinder Shoulder dump / over pressure valve Weight pocket, left and right (optional) Droppable weight pocket, left and right Waist dump / over pressure valve Cylinder pouch Bungee hose retainer 10.
- Page 10 OX10 MOLLE BC Technical information • Weight = approximately 5,5 kg with filled cylinder and inflation regulator (without weights). • Cylinder = 0,35 litre x 300 bar, din 5/8" female connection, 1375 grams filled with air. • Dimensions = 60 x 60 cm with connected cummerbund and straps. About 25 cm thick.
-
Page 11: Before Use
During the following fitting and sizing procedures, stop between procedures and try on the OX10 Molle BC to assure that a correct and good fit has been achieved before continuing with the next step. - Page 12 OX10 MOLLE BC Thread back the plastic reinforced webbing over one band and then under as many bands as are needed. Do the same for the other side. Thread the webbing on the velcro protector though the ninth molle band counting from the lower band on the BCD.
- Page 13 OX10 MOLLE BC Pull on the webbing so that the velcro protector lies flat against the back part of the BCD. Tuck back the plastic reinforced part over some molle bands, in under the velcro protector. Do the same for the other side.
- Page 14 OX10 MOLLE BC Front worn ballistic plate pocket (optional) Start by undoing the side release buckles and pull back the 40 mm webbing. Undo the side release buckles and pull back the 50 mm webbing. Thread the ballistic plate pocket webbing under all but the last three molle bands starting from the lower end.
- Page 15 OX10 MOLLE BC Thread the plastic reinforced webbing back over one band and under two molle bands. Then thread the 50 mm webbing under the three top molle bands and over two bands and then under and over molle bands until the webbing sticks out when two molle bands remain.
- Page 16 OX10 MOLLE BC Put on the 40 mm side release buckle and thread the webbing back under one molle band, through the tri-glide and tuck the remaining webbing material under as many Molle bands as are needed. Repeat this process with the other shoulder.
- Page 17 OX10 MOLLE BC Weight pockets (optional) Thread the molle bands on the weight pocket under the molle bands, where you want to place the weight pocket on the back of the BCD. Thread the bands under molles on the BCD and the weight pocket until all...
- Page 18 OX10 MOLLE BC Thread back the plastic reinforced molle band under bands on the weight pocket. Elastic Y shaped crotch strap (optional) Interlace the two loops from the elastic Y shaped crotch strap on both cummerbunds when inserting these in place.
-
Page 19: Filling The Buoyancy / Emergency Air Cylinder
OX10 MOLLE BC Cummerbund Thread back the molle bands on the cummerbund over one band and under the second band. Or as many or few as you want, to adjust the size of the cummerbund. Stick in the cummerbund through the first (outer) molle band on the inside of the BCD, over the second and under the third, over the fourth and then under the last, fifth, molle band. -
Page 20: Mounting The Air Cylinder In The Cylinder Pouch
OX10 MOLLE BC Warning Never decant from a gas cylinder with an unknown content. Warning As a precaution always stand to one side when opening high pressure cylinder valves. DIN 5/8”: Fill the buoyancy air cylinder from an air compressor or decant from an air cylinder bank. -
Page 21: Inflation Regulator And Hose
OX10 MOLLE BC Inflation regulator and hose Put the inflation regulator through one bungee retainer. Assemble the regulator in the cylinders female 5/8” screw thread and tighten moderately... - Page 22 OX10 MOLLE BC Guide the medium pressure hose through two bungee retainers on the back of the BCD and then through the bungee hose holder on the inflation hose.
-
Page 23: Fitting Weights And Ballistic Plates
OX10 MOLLE BC Guide the medium pressure hose through the two remaining bungee retainers on the left shoulder strap. Connect the quick connect coupling to the power inflator, making sure it fastens. If needed, adjust the routing of the medium pressure hose. -
Page 24: Regular Inspection
OX10 MOLLE BC Weight • Insert interspiro’s system weights in the pockets you want to use. Each system weight is 0,5kg. The droppable pockets can fit six system weights and the weight pockets can fit four system weights. Make sure that the weights are distributed evenly on the BCD to achieve a good balance in the water. - Page 25 Notice Interspiro has deliberately put one male and one female 40 mm side release buckle, at the waist, on the BCD, so that they can be connected when the OX10 apparatus is not worn.
-
Page 26: During Use
OX10 MOLLE BC During use Pre-dive checks Check that the BC has no obvious leaks, by inflating the bladder until the over pressure valve vents. Listen for air leaks. If any are found, then service is necessary by an certified service technician. -
Page 27: Rapid Droppable Weight Pockets
OX10 MOLLE BC Close the mouthpiece on the OX10 apparatus. Press the exhaust button at the end of the power inflator and blow into the oral inflation mouthpiece at the same time. Rapid droppable weight pockets Take a firm grip on the yellow weight pocket release handle and pull backwards and out. -
Page 28: After Use
OX10 MOLLE BC After use Post-dive maintenance Rinse the BCD with clean water after every diving session. Remove the elbow joint connecting the convoluted inflation hose and pour in clean water to rinse inside the bladder. Do not use household detergents, bleach, or other strong chemicals to clean the BCD.
Need help?
Do you have a question about the OX10 MOLLE BC and is the answer not in the manual?
Questions and answers