Advertisement
Quick Links
Advertisement

Related Manuals for NI Climbing Frames Trail011


Summary of Contents for NI Climbing Frames Trail011
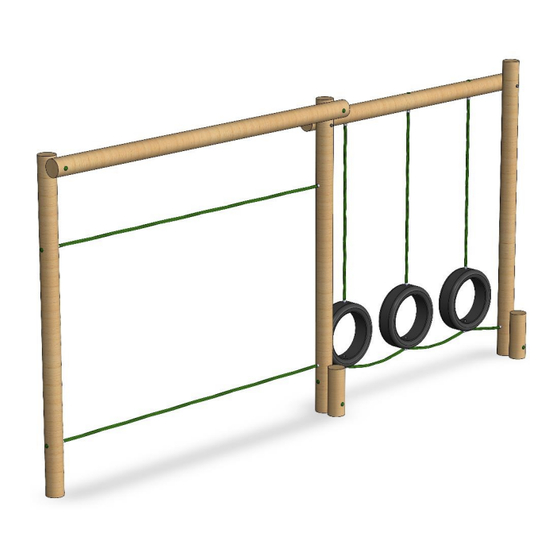
- Page 1 Trail011 - Wooden Play Balance Adventure Crossing E Instruction Manual...
- Page 2 Parts List Item Description Image Quantity Number 3m x 140mm round post (uprights) 800mm x 140mm round posts (steps) 2400mm x 140mm round post (horizontal support) 3m x 140mm round post (horizontal support)
- Page 3 3m x 3” x 1.5” (for bracing if needed) 2.4m x 3” x 1.5” (for bracing if needed) 1280mm x 3” x 1.5” (for bracing if needed) 2120mm armoured rope with joining ropes & chains 2720mm armoured rope...
- Page 4 1500mm drop ropes Tyres M12 x 280mm bolts Screw covers Decking screws...
- Page 5 Tools needed: • Cordless drill • Handsaw • Spirit Level • Pencil • Measuring tape • PZ 2 Drill Bit • 32mm drill bit • 12mm drill bit...
- Page 6 Assembly Instructions All components needed during the assembly are numbered with reference to the parts list, please refer back to the parts list to ensure you are assembling the correct components for each step. Step 1: • Dig holes approx. 400mm deep and 300mm in diameter for the upright posts to go, use the sketch below to position the holes.
- Page 7 Step 2: • Secure the 3m top support to two 3m uprights, there should be holes predrilled on the top support for the M12 x 280mm bolts to go through. You can also use the extra 3m x 3” x 1.5” and decking screws to brace the posts and keep them straight.
- Page 8 Step 3: • Secure the 2 x 2.72m armoured ropes through the predrilled holes on the 3m upright posts. • If these holes aren’t predrilled then you should drill 32mm holes 20mm deep and then 12mm holes through the whole posts on each side, one at approx. 800mm from the bottom of the post and one at approx.
- Page 9 Step 4: • Lift the assembly into the holes that have been dug, it should now be able to stand on its own, especially if it has been braced. Step 5: • Secure the 1.5m drop ropes through the hole predrilled in the 2.4m post. If this hasn’t been done, then you will need to drill 3 x 32mm holes approx.
- Page 10 Step 6: • Lift the remaining 3m post and place it in the hole that has been dug for it. Secure the 2.4m post to the two 3m uprights just below the 3m horizontal post Use the 2.4m x 3” x 1.5” as bracing if needed.
- Page 11 Step 7: • Drill 12mm holes on the top and bottom of each tyre if this hasn’t been done and secure the tyres to the 1500mm drop ropes.
- Page 12 Step 8: • Secure the 2.12m armoured rope to the two 3m uprights under the tyres and secure the tyres to it using the joining ropes. Again, you may need to predrill the holes if this hasn’t already been done.
- Page 13 Step 9: • Place the 800mm posts into the holes that have been dug and secure them using M12 bolts to the 3m uprights through the predrilled holes. Again, you may need to predrill the holes if this hasn’t already been done.
- Page 14 Step 10: • Press 32mm screw covers into all the 32mm holes and using postcrete and following the manufacturer’s instructions, concrete all the posts into the ground • The frame should be left overnight before it is used to ensure the postcrete has dried.
- Page 15 Maintaining Your Climbing Frame My climbing frame has been installed, what do I do next? A: If your climbing frame was installed in a grassed area the installers have concreted the frame into the ground. They have left a small exposed hole, where the posts have been sunk into the ground. The reason this has been done is to allow the concrete to set overnight.
Need help?
Do you have a question about the Trail011 and is the answer not in the manual?
Questions and answers