Table of Contents
Advertisement
Quick Links
IMPORTANT! KEEP THIS MANUAL FOR FUTURE REFERENCE!
INSTRUCTION MANUAL FOR USE
OF CHILD RESTRAINT SYSTEM
„LEGO"
This child restraint system
is designed and manufactured
in compliance with the requirements of Regulation 44 of the United Nations
Economic Commission for Europe concerning the safe transportation of
children, the provisions of the Product safety Directive 2001/95/EU of the
European Parliament and The Council as well as the Consumer Protection
Law of Bulgarian Legislation.
Advertisement
Table of Contents

Subscribe to Our Youtube Channel
Related Manuals for Chipolino LEGO


Summary of Contents for Chipolino LEGO
- Page 1 IMPORTANT! KEEP THIS MANUAL FOR FUTURE REFERENCE! INSTRUCTION MANUAL FOR USE OF CHILD RESTRAINT SYSTEM „LEGO” This child restraint system is designed and manufactured in compliance with the requirements of Regulation 44 of the United Nations Economic Commission for Europe concerning the safe transportation of...
- Page 2 N O T I C E 1. This is an ISOFIX CHILD RESTRAINT. It is approved to Regulation No 44, 04 series of amendments, for general use in vehicles fitted with ISOFIX anchorages systems. 2. It will fit vehicles with positions approved as ISOFIX positions (as detailed in the vehicle handbook), depending on the category of the child seat and of the fixture.
- Page 3 CAUTION! place restraint system on a vehicle seat equipped with air bag! This may result in death or serious injury! Review the instructions of the vehicle for information about airbags and conditions of transportation of children. SEAT POSITION OF THE CAR SEAT IN THE VEHICLE CORRECT NOT CORECT To be installed on this seat only if it is equipped with ISOFIX attachments. CORRECT FITTING/PROPER INSTALLATION CAUTION! This child restraint is suitable for vehicles which are equipped with ISOFIX con- nectors.
-
Page 4: Product Features
The hard parts and the parts of the child restraint made of plastic should be located and installed so that when the vehicle is in normal use, they can not be trapped by a sliding seat or in a door of the vehicle. Do not allow the safety belts of the car seat and the vehicle to be twisted, frayed or torn, latches and locks (buckles) must be always in good order and firmly fixed. If you find uncertainty or defect in the structure, latches, straps or locking mechanisms of the car seat or ISOFIX connectors , discontinue usage until removal of the damaged parts and replacement with new ones. -
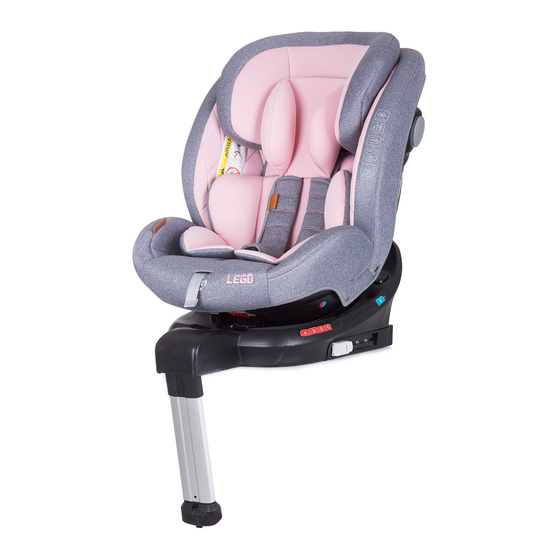
Page 5: Main Parts Diagram
MAIN PARTS DIAGRAM Headrest Shoulder straps Diagonal belt guide (for groups II and III) ISOFIX Soft shoulder pads Soft pad guide Central buckle Crotch belt Lap belt guide Shoulder belts release button Backrest recline Safety harness length adjustment handle adjusting strap Support leg length adjuster 360 degrees... - Page 6 SHOULDER BELTS HEIGHT Too low Too high Correct ATTENTION! The shoulder straps must be at the level of child’s shoulders. CENTRAL BUCKLE Step 1 Step 2 Step 3 buckle “click” release button Follow the steps from 1 to 3, in order to buckle the harness. Make sure that the belt is well fixed by trying to pull it out (Step 3). To unfasten the belt, press the button in the central buckle. ADJUSTING THE 5-POINT HARNESS Loosening 1-pull...
- Page 7 BACKREST RECLINE ADJUSTING click After adjustment in Before adjustment After rearward facing mode adjustment The backrest can be reclined in 5 positions. For car seat „REARWARD FACING“, groups 0+ and I only position 5 is used. For car seat „FORWARD FACING“, group I you can use positions 1,2,3 and 4. For car seat „FORWARD FACING“, groups II and III you can use only position 1.
-
Page 8: Support Leg
Car seat facing Car seat facing Car seat facing “SIDEWAYS” “REARWARD” “FORWARD” Only for groups 0+ and I Only for groups I, II and III Press the rotating button and twist the seat in desired position (1). Release the button and wait until you hear a click to make sure the position is fixed (2). IMPORTANT! Make sure the seat is fixed in the chosen position by trying to shake it clockwise (3). ATTENTION! DURING TRAVELING THE SEAT MUST BE FACING EITHER FORWARD OR REARWARDS! ATTENTION! USE THE CAR SEAT FACING “SIDEWAYS“ (ROTATED AT 90°) ONLY WHE CAR IS STOPPED AND YOU PUT THE CHILD IN OR OUT OF THE SEAT! SUPPORT LEG... -
Page 9: Isofix Installation
Support leg adjusting button GREEN 1. Pull out and unfold the support leg from the seat. 2. Place the car seat in a position facing “FORWARD”. 3. Press the adjusting button and pull the support leg until it hits the floor. „green“ The indicator must be color. IMPORTANT! DO NOT place any objects underneath the support leg! ATTENTION! Make sure the support leg is not in the air and is not supported by other objects. ATTENTION! Make sure that the support leg is not lifting the base of the car seat form the vehicle seat. ISOFIX INSTALLATION... - Page 10 “click” GREEN GREEN GREEN 1. Make sure that your vehicle is equipped with ISOFIX hooks. 2. Put the ISOFIX guides. 3. Place the car seat on the vehicle seat in position facing „FORWARD“. 4. Press the release buttons of the ISOFIX connectors and move them forward. ISOFIX indicators will be “red“ color. 5. Press the ISOFIX connectors to the ISOFIX guides, until you hear a „click“. 6. ISOFIX indicators of the release button of the ISOFIX connectors must be in green color.
- Page 11 SOFT SEAT PAD Use the additional soft pad until the child’s eight is up to 13 kg. Place the seat pad on the car seat and the shoulder straps on top of it. Thread the crotch strap through the opening on the pad. REMOVING THE 5-POINT SAFETY HARNESS (Shoulder straps and the shoulder pads, crotch belt and central buckle and pad) STEP 1...
- Page 12 STEP 3 STEP 4 STEP 5 Step 1: Loosen the safety harness (1). Separate the shoulder straps from the metal connector on the back of the car seat (2). Separate the top part of shoulder straps form the metal connector (3 and 4). Step 2: Pull out the shoulder straps and their soft pads from the front of the car seat. Step 3: Remove the shoulder straps as shown in the figure. Step 4: Remove the crotch belt as shown in the figure. Step 5: Adjust the recline position in position 1. Pull the belts length adjusting stipe. When the 5-point harness is removed, you can use the car seat for children weighing from 15 up to 36 kg (weight groups II and III).
-
Page 13: Head Rest Height Adjustment
SHOULDER STRAPS HEIGHT ADJUSTMENT 1. Pull up the head rest adjustment handle according to child’s height. 2. Release the handle and move it until you hear a click sound. ATTENTION! Shoulder straps must be at child’s shoulders level. HEAD REST HEIGHT ADJUSTMENT The headrest may be adjusted in 9 positions. For groups 0+ and I (fig.1 and 2) – see “SHOULDER STRAPS HEIGHT ADJUSTMENT“. For groups II and III (fig.3) – Remove the 5-point safety harness. Press and pull up or down the headrest adjustment handle according to child’s height. - Page 14 INSTALLATION OF CAR SEAT in position FACING „REARWARD“ GROUPS 0+ and I (0-18KG, 0-4 hours) ISOFIX ATTACHMENT + SUPPORT LEG + 5-POINT SAFETY HARNESS IMPORTANT! Before installation of the car seat, check if the vehicle is equipped with ISOFIX hooks between the seat and backrest of vehicle seat. “click” “click” GREEN “click”...
- Page 15 Step 1: Unfold the support leg until it is in place (1). Place the car seat in a position facing “FORWARD”. Press the ISOFIX connectors release buttons (2) and move the connectors forward (3). ISOFIX indicators will show red color. Step 2: Install the ISOFIX connectors to the ISOFIX guides until you hear a click (5). ISOFIX indicators must show green color. At the same time, you must press the car seat in a way that it is closest to the vehicle seat backrest. Step 3: Shake the car seat to check if it is well fixed (6). If car seat moves during shaking and the ISOFIX connectors come out, repeat the actions from step 2, in order to install the car seat again (7).
- Page 16 Step 1: Unfold the support leg until it is in place (1). Place the car seat in a position facing “FORWARD”. Press the ISOFIX connectors release buttons (2) and move the connectors forward (3). ISOFIX indicators will show red color. Step 2: Install the ISOFIX connectors to the ISOFIX guides until you hear a click (5 and 6). ISOFIX indicators must show green color. At the same time, you must press the car seat in a way that it is closest to the vehicle seat backrest. Step 3: Shake the car seat to check if it is well fixed (7). If car seat moves during shaking and the ISOFIX connectors come out, repeat the actions from step 2, in order to install the car seat again.
- Page 17 Diagonal belt Diagonal belt lap belt click lap belt Step 1: Remove the 5-point safety harness (shoulder straps and pads, crotch belt with central buckle and pad) - fig. 1 and 2. Step 2: Unfold the support leg until it is in place (3). ATTENTION! DO NOT PULL THE LOWER PART OF THE SUPPORT LEG! ALWAYS MAINTAIN THE SUPPORT LEG AS SHORT AS POSSIBLE! Place the car seat in a position facing “FORWARD”. Press the ISOFIX connectors release buttons (4) and move the connectors forward (5). ISOFIX indicators will show red color. Step 3: Install the ISOFIX connectors to the ISOFIX guides until you hear a click (6 and 7). ISOFIX indicators must show green color. At the same time, you must press the car seat in a way that it is closest to the vehicle seat backrest.
-
Page 18: Care And Maintenance
CARE AND MAINTENANCE Clean the plastic parts and metal parts with damp cotton cloth or sponge and mild soap. Upholstery may be hand washed at 30 С using mild detergent! Do not bleach! Do not tumble dry! Do not machine wash! Do not iron! Do not use abrasive, bleach or other aggressive detergents. Always after cleaning leave the car seat fully dry and after that use it or store it. Safety harness must be cleaned with damp cloth and mild soap! Do not wet or remove the stickers. They contain important information! Always store your car seat indoors – on dry and clean place. Do not expose to direct environment influence - sun, rain, moisture and high temperature intervals. Please, contact your authorized dealer for problems connected with the use or repair. Fabrics content: Outer fabric: 100 % polyester Filling: 100 % polyester Materials used: plastic, metal, textile. STKLE022xxx... - Page 19 List of the vehicles where the semi-universal restraint system LEGO may be installed Commercial name of Vehicle model the vehicle...
- Page 21 There may be other models vehicles, which are suitable for this car seat. If you are in doubt or have questions, contact the car seat manufacturer or the retailer where you purchased your product.
- Page 22 Bulgaria, Plovdiv, Str. Golyamokonarsko shosse № 1 www.chipolino.com...
Need help?
Do you have a question about the LEGO and is the answer not in the manual?
Questions and answers