
Related Manuals for Rtelligent R60X2


Summary of Contents for Rtelligent R60X2
- Page 1 Digital Stepper Driver R60X2 User Manual Shenzhen Rtelligent Mechanical Electrical Technology Co.,ltd...
-
Page 2: Table Of Contents
R60X2 user manual Contents 1. Product description..........................1 2. Application environment and installation..................2 2.1 Environmental requirement....................2 2.2 Driver installation dimensions....................2 2.3 Driver installation requirements..................... 3 3. Driver Port and Connection......................3 3.1 Port function description......................3 3.2 Power supply input........................4 3.3 Motor connection........................5... -
Page 3: Product Description
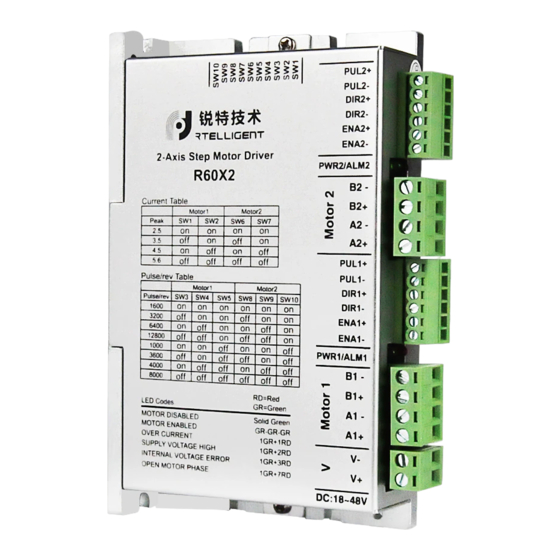
1. Product description Thank you for choosing Rtelligent R series digital stepper driver. R60X2 is a two-axis stepper motor driver. The driver has two independent control signal interfaces to control two stepper motors respectively The R60X2 driver can select the operating current and subdivision through the DIP switch. -
Page 4: Application Environment And Installation
R60X2 user manual 2. Application environment and installation 2.1 Environmental requirement Item Rtelligent R60X2 Installation environment Avoid dust, oil and corrosive environment 0.5G(4.9m/s 2 ) Max Vibration Operating temperature/humidity 0℃ ~ 45℃ / 90% RH or less (no condensation) Storage and transportation -10℃... -
Page 5: Driver Installation Requirements
R60X2 user manual 2.3 Driver installation requirements When installing, please stand the drive vertically or horizontally, with the front face up and the top face up to facilitate heat dissipation. During assembly, avoid drillings and other foreign matters falling inside the driver. -
Page 6: Power Supply Input
R60X2 user manual 3.2 Power supply input The power supply of the driver is DC power, the input voltage range is between 18V ~ 48V. Do not reverse the polarity of the input power ! ! ! The working mode of the driver is constant current control. When working, the driver outputs the input power supply to the motor in the form of PWM chopper. -
Page 7: Motor Connection
R60X2 user manual 3.3 Motor connection The matching motor of the R60X2 driver is the low resistance and low inductance hybrid stepper motor. The common 2-phase stepper motor’s lead number are 4, 8 and 6. There is only one connection mode for 4 leads motor. - Page 8 R60X2 user manual The acceptable pulse level of R60X2 driver is: default 5V Pulse & Direction (PUL + DIR) Double pulse (CW + CCW) 3.4.2 ENA port: enable/disable By default, When the internal optocoupler is off, the driver outputs current to the motor;...
- Page 9 R60X2 user manual B. Common Cathode: Pul+ Pul- Driver Controller Dir+ Dir- Ena+ Ena- C. Difference: Pul+ Pul+ Pul- Pul- Dir+ Dir+ Driver Controller Dir- Dir- Ena+ Ena+ Ena- Ena- szruitech.com...
-
Page 10: Dialing Code And Parameter Setting
R60X3 user manual 4. Dialing code and parameter setting Axis 1 current setting Axis 1 pulse setting Axis 2 current setting Axis 2 pulse setting per revolution per revolution SW10 4.1 Setting of current AXIS-1 AXIS-2 Peak current Remark 2.5A Other current 3.5A values can be... -
Page 11: Automatic Half Current
R60X3 user manual 4.3 Automatic half current The motor standby quiescent current value automatically enters a half current after the pulse stops 0.4S, which reduces the heating of the motor and the driver and improves the reliability. 5. Driver working status LED indication LED status Driver status Green indicator is on for long time Driver not enabled... - Page 12 R60X3 user manual The motor connection Check the connection is wrong Alarm The voltage is too high indicator is Check the power supply or too low Damaged motor or Replace the motor or driver driver The signal is disturbed Eliminate interference for reliable grounding The command input is Check the upper computer instructions to incorrect...
-
Page 13: Guarantee Clause
R60X3 user manual 7. Guarantee Clause 7.1 Warranty period: 18 months We provide quality assurance for one year from the date of delivery and free maintenance service for our products during the warranty period. 7.2 Exclude the following Improper connection, such as the polarity of the power supply is reversed and insert/pull the motor connection when the power supply is connected.
Need help?
Do you have a question about the R60X2 and is the answer not in the manual?
Questions and answers