
Subscribe to Our Youtube Channel
Related Manuals for Ecolab Ecodos-L


Summary of Contents for Ecolab Ecodos-L
- Page 1 Short Instruction Manual Ecodos-L (1.237.21, 1.237.22) Ecorinse-L (1.237.23, 1.237.24) Ecoset-L (1.235.40) (with PCB 2.237.82) Ecodos-L, Ecorinse-L, Ecoset-L Rev 3.12-07...
-
Page 2: Table Of Contents
Installation of conductivity sensor ..................7 Electrical connection ......................7 Maintenance and repair instructions..............8 Replacement of peristaltic tube....................8 Replacement of roller assy....................9 Replacement of PCB......................10 Replacement of buzzer ......................10 Trouble shooting....................11 Spare parts list ....................12 Technical data .....................13 Ecodos-L, Ecorinse-L, Ecoset-L - 2 - Rev 3.12-07... -
Page 3: General
General This manual contains all important information on the function, the operation, the setting, the installation and maintenance and repair of the ECODOS-L / ECORINSE-L /ECOSET-L dosing units. The systems are speed/timed and conductivity controlled dosing units for liquid/solid deter- gents and liquid rinse products. -
Page 4: Safety
Safety Safety information • Connection and repair work on the ECODOS-L / ECORINSE-L / ECOSET-L may only be performed by authorised experts. • Suitable protective clothing is to be worn during maintenance and repair work. • Safety provisions covering the handling of chemicals are always to be observed. -
Page 5: Assembly
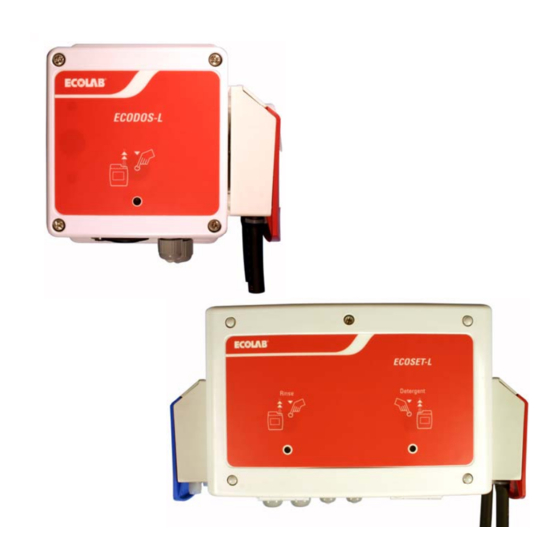
Ecorinse-L Ecodos-L Fig. 4.1 Fig. 4.2 Ecoset-L Fig. 4.3 No. Description Housing w. cover Pump head Prime button / Quit button LED operation / LED fault ind. Alarm buzzer Inductive probe connector Ecodos-L, Ecorinse-L, Ecoset-L - 5 - Rev 3.12-07... -
Page 6: Functional Description, Operation And Settings
Detailed description see: “Operation manual Ecodos-PCB 2.237.82” Adjustment of buzzer volume The unit comprises a buzzer for the acoustical alarm indication. It’s volume can be changed by manually turning the inner disk (see illustration below). Fig. 5.1 Ecodos-L, Ecorinse-L, Ecoset-L - 6 - Rev 3.12-07... -
Page 7: Mounting And Installation
- Connect sensor w. plug to unit W. 2-wire probe: - Install the connection cable to the sensor. - Connect the cable to screw terminal “7 8” of PCB Electrical connection See: “Operation manual Ecodos-PCB 2.237.82” Ecodos-L, Ecorinse-L, Ecoset-L - 7 - Rev 3.12-07... -
Page 8: Maintenance And Repair Instructions
Open lever while pressing strap (1) on back wall and lift lever. Remove old peristaltic tube. Clean tube housing and remove old silicone residues. Fig. 6.3 Insert new peristaltic tube and lubricate tube. Ecodos-L, Ecorinse-L, Ecoset-L - 8 - Rev 3.12-07... -
Page 9: Replacement Of Roller Assy
Press fixation strap (1) with screw driver and lift of holder of roller assy (2). Fig. 6.9 Carefully remove roller assy from pump head housing. Insert new roller assy, mount roller holder. Reinstall pump head (see Chapter 6.1). Ecodos-L, Ecorinse-L, Ecoset-L - 9 - Rev 3.12-07... -
Page 10: Replacement Of Pcb
2. Remove the two buzzer connectors from the screw terminal “ALARM AC24V” of the PCB. 3. Unscrew and remove coupling nut from buzzer and remove buzzer. 4. Install new buzzer simultaneously in reverse order. Ecodos-L, Ecorinse-L, Ecoset-L - 10 - Rev 3.12-07... -
Page 11: Trouble Shooting
− Connect a wire link between “3” DW filled with DEMI-water and “4” (cond < 100µS/cm) ATTENTION: Metering starts the moment Ecodos-L stands live and conductivity<setpoint − Product shortage − Replace product container Pump does not draw / me- ter product −... -
Page 12: Spare Parts List
Seal Ecodos-L / Ecorinse-L 413071140 Front Label Ecodos-L 223782 Front Label Ecorinse-L 417501924 Front Label Ecoset-L 418931008 Screw Ecodos-L / Ecorinse-L (4x) 418811360 Screw Ecoset-L (4x) 223752 Pc-Board 287409 Gear Motor Dc 24 V E99000128 Transformer Ac 240/24v, 15 W... -
Page 13: Technical Data
Technical data Supply voltage: AC 24 V,15 W, 50-60 Hz Safety type: Ecodos-L / Ecorinse-L / Ecoset-L: IP 54 Protective class: Detergent metering pump Delivery rate: Tube size = 3 CC: app. 0.6 ... 6 l/h Head of suction: (dependent on back pressure) Max.
Need help?
Do you have a question about the Ecodos-L and is the answer not in the manual?
Questions and answers