Table of Contents
Advertisement
Quick Links
Advertisement
Table of Contents

Summary of Contents for Daytona P200T
- Page 1 User Guide P200T Optos Panoramic Ophthalmoscope optos.com...
- Page 2 G102748/11_ENG Before using this system: The system should be used by trained professionals. Before using the system, please read the operating instructions and safety recommendations in this user guide. WARNING Failure to follow the instructions for use and safety recommendations provided in this user guide can cause injury to the patient, to the operator, or to other persons.
- Page 3 Copyright, Designs and Patents Act 1988 (as amended), by various intellectual property laws and by international conventions. Trademarks Optos, optomap, Daytona, Optos Daytona, California, Optos California, ResMax, 3D Wrap and registered trademarks. All rights reserved. WINDOWS is a Trademark of Microsoft Corporation.
- Page 4 Part Number: G102748/11_ENG Page 4 of 60 Copyright 2021, Optos plc. All rights reserved. English...
-
Page 5: Table Of Contents
Table of Contents Warnings and cautions 1.1 General safety 1.2 Laser safety 1.3 Electrical safety 1.4 Environmental safety 1.5 EMC safety 1.6 Cleaning guidelines 1.7 Device failure 1.8 Maintaining information security 1.9 Data security 1.10 Software on Optos-supplied PCs 1.11 Symbol and label information Introduction 2.1 Device description 2.2 Intended use... - Page 6 3.1.2.3 Log off the image server each day 3.1.2.4 Restart the image server each week 3.1.3 Use the system 3.1.3.1 Using the touch screen 3.1.3.2 Using the touch screen keyboard 3.2 Capture images 3.2.1 Working with patient details 3.2.1.1 Working with Modality Work List (MWL) 3.2.1.1.1 How to search using MWL 3.2.2 How to prepare for image capture...
- Page 7 3.4.7.3 Software update 3.4.8 Maintenance 3.4.8.1 Servicing 3.4.8.2 Warranty 3.4.8.3 Cleaning 3.4.8.3.1 General cleaning 3.4.8.3.2 Cleaning before each patient 3.4.8.3.3 How to change the eye piece 3.4.8.3.4 Cleaning the main mirror 3.4.8.3.5 Disinfection 3.4.8.4 Battery replacement 3.4.8.5 Cable management 3.4.9 Troubleshooting 3.4.9.1 Why can't I login? 3.4.9.2 What information do I need when contacting Optos?
- Page 8 4.3.2 Guidance and manufacturer declaration – electromagnetic immunity 4.3.3 Recommended separation distances Contact us 5.1 Global Headquarters 5.2 Regional Offices 5.2.1 United States and Canada 5.2.2 Australia 5.2.3 Denmark 5.2.4 France 5.2.5 Germany and Austria 5.2.6 Norway 5.2.7 Spain 5.2.8 Sweden 5.2.9 Switzerland...
- Page 9 FIGURE 1: P200T device connected to network (Daytona shown) FIGURE 2: Network data flow FIGURE 3: Example capture and review workflow FIGURE 4: Sample of the connection label Part Number: G102748/11_ENG Page 9 of 60 Copyright 2021, Optos plc. All rights reserved.
- Page 10 Part Number: G102748/11_ENG Page 10 of 60 Copyright 2021, Optos plc. All rights reserved. English...
-
Page 11: Warnings And Cautions
Chapter 1 - Warnings and cautions 1 Warnings and cautions Your system is a medical device and must be operated within the safety parameters and instructions defined in this User Guide. If the device appears faulty or has non-functioning components, please contact your Optos representative, see Contact us on page 55. -
Page 12: Laser Safety
Chapter 1 - Warnings and cautions Day to day use - patients Patients operate this device. MUST NOT The patient should not touch the touch screen. The patient should only be in contact with the face pad and eye piece. CAUTION capture images when the eye piece is in place. - Page 13 CAUTION herein may result in hazardous radiation exposure. All P200T product variants are Class 1 laser devices at the eye, and comply with IEC/EN 60825-1:2007 and 21 CFR1040.10 and 1040.11 except for deviation pursuant to Laser Notice 50, dated June 24, 2007.
-
Page 14: Electrical Safety
Chapter 1 - Warnings and cautions 1.3 Electrical safety Equipment classification Electrical Shock Protection - Class 1 Equipment Type B - relates to the allowable maximum leakage current which can flow from the applied part. The limits for this are defined in IEC/EN 60601. The applied parts are the face pad and eye piece. -
Page 15: Environmental Safety
Chapter 1 - Warnings and cautions 1.4 Environmental safety operate the device: In the presence of explosive or flammable gases, flammable anaesthetic mixtures or in oxygen rich environments. Inside the influence of the magnetic field of a magnetic resonance imaging device. WARNING In environments that block the scan head air intake vents. -
Page 16: Cleaning Guidelines
Chapter 1 - Warnings and cautions Unauthorized changes or modifications will invalidate the warranty of this device. The manufacturer is responsible for any interference caused by using: Interconnect cables supplied by Optos Unauthorized changes or modifications to this equipment use devices which intentionally transmit RF signals (cellular phones, transceivers or radio controlled devices) in the vicinity of this equipment, as it may cause performance outside the published specifications, see Recommended separation distances on page 53. -
Page 17: Device Failure
Chapter 1 - Warnings and cautions Cleaning materials Wear powder-free gloves at all times when cleaning the device including the scan head and main mirror. If the gloves become contaminated they must be replaced immediately. use lint cloths, tissues, or other materials that may create dust, on or near the scan head. -
Page 18: Data Security
Chapter 1 - Warnings and cautions IT networks used by medical devices Connection of the P200T device to an IT that includes other NETWORK DATA COUPLING equipment could result in previously unidentified or third RISKS PATIENTS OPERATORS parties. should identify, analyze, evaluate and control these... -
Page 19: Software On Optos-Supplied Pcs
Chapter 1 - Warnings and cautions 1.10 Software on Optos-supplied PCs Only install software when supplied and instructed by Optos. Installing new software Contact Optos Customer Support if you need to install other software, see Contact us on page 55. Updating existing software CAUTION Your System Administrator should carry out software upgrades using the software and instructions provided by Optos. - Page 20 Chapter 1 - Warnings and cautions Symbol and label information Type B - relates to the allowable maximum current leakage which can flow from the applied part. The limits for this are defined in IEC 60601. Serial Number. In accordance with Directive 93/42/EEC. 0197 Consult accompanying documents.
-
Page 21: Introduction
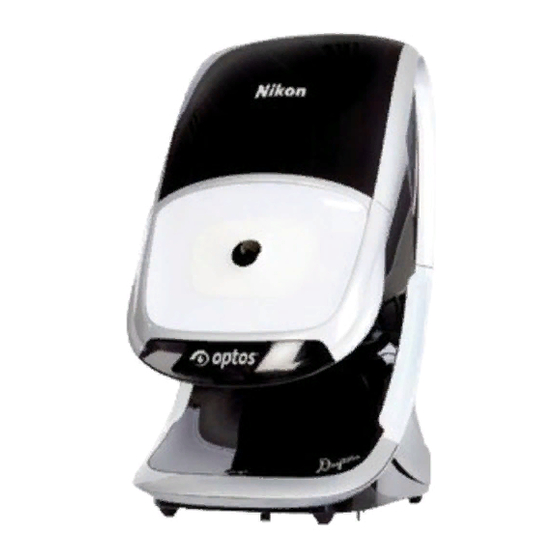
Welcome to your User Guide. This guide covers the P200T family of products. Note In this guide the term P200T is used when referring to all product variants, unless otherwise stated. 2.1 Device description This confocal scanning laser ophthalmoscope is a ultra-widefield digital imaging device capable of capturing the area from the central pole to the far periphery of the retina. -
Page 22: Target Environment
Administrators can also manage images located on local or network resources. Any browser-based review clients connected to your network can be used to review and analyze patient images. 2.6.1 System parts FIGURE 1: P200T device connected to network (Daytona shown) No. Name of Part... -
Page 23: Network Specification And Characteristics
Chapter 2 - Introduction No. Name of Part Description Runs the software which transfers patient images from the scan head to the Image server review client. Switches, Firewalls, Internet access, Review clients, Virtual image server (if Customer network required). The image server, switch, browser-based review clients and any Viewing PCs or Patient monitors must be positioned outside the patient environment;... -
Page 24: Image Modalities
Chapter 2 - Introduction FIGURE 2: Network data flow 2.6.3 Image modalities Optos multi-modal ultra-widefield retinal imaging enables the capture of posterior images, with a field of view of up to 200 degrees in a single capture, and in an imaging time of less than 0.4 seconds. Depending on the configuration of your device the following image modalities may be available: optomap optomap is an ultra-widefield... -
Page 25: Accessories And Detachable Parts
Chapter 2 - Introduction With OptosAdvance practitioners can easily view, annotate and share patient records and digital ocular scans. Detailed instructions can be found in the OptosAdvance help files. Physicians can use OptosAdvance to view and manage their diagnostic data, videos and images. OptosAdvance software is used to: Manage and display patient data... - Page 26 Part Number: G102748/11_ENG Page 26 of 60 Copyright 2021, Optos plc. All rights reserved. English...
-
Page 27: How To
Chapter 3 - How to... 3 How to... Before using the system and capturing images, you should be familiar with all the features and capabilities of the system. 3.1 Get started Read the warnings and cautions before using your device. CAUTION You must start and shut down the device each working day. -
Page 28: Switch On Browser-Based Review Clients
Chapter 3 - How to... starts up. The status lights on the front of the scan head cover will flicker and then settle on the green light. The touch screen powers up. 4. The scan head takes less than five minutes to start up, please wait for the scan head to start up. The following happens during start up: The system will run a series of self-tests during this time. -
Page 29: Shut Down The Scan Head
Chapter 3 - How to... 3.1.2.1 Shut down the scan head 1. End the current session and select on the touch screen to close the device. 2. Wait for the status indicator to turn yellow and then switch off the scan head power. The touch screen will switch off when the device is switched off. -
Page 30: Using The Touch Screen Keyboard
Chapter 3 - How to... TABLE 3: List of touch screen icons Icon Description Change laterality Changes the laterality of the captured image. Discard Deletes the current image or scan. Finished Completes the current action. Shut down device 3.1.3.2 Using the touch screen keyboard The touch screen keyboard uses the same layout as a standard keyboard in your language. - Page 31 Chapter 3 - How to... FIGURE 3: Example capture and review workflow Part Number: G102748/11_ENG Page 31 of 60 Copyright 2021, Optos plc. All rights reserved. English...
-
Page 32: Working With Patient Details
Chapter 3 - How to... 3.2.1 Working with patient details Before you capture images use the touch screen to add a new patient or select an existing patient. Search for a patient's details by entering the patient's last name or their patient ID. The matching patient records are displayed as you type. -
Page 33: How To Prepare For Image Capture
Chapter 3 - How to... 3. Select [Enter] on the touch screen to search MWL and display the corresponding MWL Work Item. Note Please contact your Optos representative if introducing MWL to your site. 3.2.2 How to prepare for image capture Before you capture an image the patient needs to be aligned and the image options selected. -
Page 34: How To Capture Slo Images
Chapter 3 - How to... c. Turn their head slightly so that their nose is on the outside of the face pad. You should check that the patient's head is vertical and has not been tilted. 5. After they are comfortable, ask the patient to move to the correct alignment position. The alignment colors seen by the patient are also shown on the touch screen. -
Page 35: What To Do After The Image Is Captured
Chapter 3 - How to... 3.2.4.1 What to do after the image is captured After you have captured the image, the image quality needs to be checked. You can then continue or complete the session. 1. Check the image quality and laterality. Accept, change laterality or delete the image. 2. -
Page 36: Starting The Review Software
Chapter 3 - How to... 3.3.1 Starting the review software Access OptosAdvance using any standard web browser, see Review client properties on page 49. 3.3.1.1 How to start the application 1. Use your web browser to go to the address provided by your System Administrator. 2. -
Page 37: How To Create User Accounts On The Image Server
Chapter 3 - How to... Note User accounts can be made inactive. 3.4.1.2 How to create user accounts on the image server User management software System Administrators can use their Windows login details to access the user management application on the image server. -
Page 38: Managing Connections
Chapter 3 - How to... You should back-up your image server data at least once a week. 3.4.5 Managing connections The ability to edit network settings is restricted to System Administrators. If there are any connection problems ask your System Administrator to review your settings and where necessary contact your Optos representative for instructions on how to proceed, see Contact us on page 55. -
Page 39: Maintenance
Chapter 3 - How to... 3.4.8 Maintenance User maintenance is restricted to cleaning and visual checks for external damage. Your device will be installed by Optos trained personnel. Do operate the device until they have completed the installation and training. Your Optos representative will configure the settings when the device is installed. -
Page 40: Cleaning
Chapter 3 - How to... 3.4.8.3 Cleaning Wear powder-free gloves at all times when cleaning the device including the scan head and main mirror. If the gloves become contaminated they must be replaced immediately. In order to prevent any contamination always clean and disinfect parts of the equipment which will be in contact with the patient, see Cleaning before each patient on the facing page. -
Page 41: Cleaning Before Each Patient
Chapter 3 - How to... 3.4.8.3.2 Cleaning before each patient The patient should not touch the touch screen. The patient should only be in contact with the face pad and eye piece. Always follow the cleaning and disinfecting agents’ manufacturer’s instructions and precautions;... -
Page 42: Cleaning The Main Mirror
Chapter 3 - How to... 3.4.8.3.4 Cleaning the main mirror The mirror can be damaged during cleaning. Preventing mirror contamination reduces the risk of damaging the mirror. It is recommended to routinely clean the main mirror. Only clean the mirror if dust particles, smudges or spots have accumulated on its surface. When cleaning the main mirror, do rub the spots too hard, as this may cause damage. -
Page 43: Disinfection
Chapter 3 - How to... 3.4.8.3.5 Disinfection Wear powder-free gloves at all times when cleaning the device including the scan head and main mirror. If the gloves become contaminated they must be replaced immediately. Always follow the cleaning and disinfecting agents’ manufacturer’s instructions and precautions;... -
Page 44: Troubleshooting
Note In this guide the term P200T is used when referring to all product variants, unless otherwise stated. If you require further assistance, please contact your Optos representative, see Contact us on page 55. When contacting Optos you will need to supply your site number, see What information do I need when contacting Optos? on the facing page. -
Page 45: Why Can't I Login
Chapter 3 - How to... Problem Possible cause Solution I see a bright reflex above the optic Patient is too close. Image with the patient further out. nerve head. Allow 15 minutes for the device to complete start up. Scan head Uncontrolled shut down starting up. -
Page 46: How Do I Restart The Scan Head
Chapter 3 - How to... To align the patient ensure the pupil is centered on the cross hairs on the touch screen. 3.4.9.4 How do I restart the scan head? Scan head problems are often temporary and can usually be resolved by restarting the scan head following these steps: 1. -
Page 47: Technical Specification
Chapter 4 - Technical Specification 4 Technical Specification Your device is a medical device and, as such, should be operated within the technical parameters and instructions defined in this User Guide. Read the warnings and cautions before using your device, see Warnings and cautions on page 11. -
Page 48: Connections
Chapter 4 - Technical Specification Feature description Compliance 300VA Power Consumption 3A at 100-120Vac The touch screen be powered through the MUST 1.5A at 200-240Vac scan head and is included in these figures. SMPS continuous Touch screen voltage +12V 4.1.2 Connections These connections are intended to be detached by the user. -
Page 49: Scan Head Dimensions
Chapter 4 - Technical Specification 4.1.3 Scan head dimensions The scan head and touch screen should be placed on a table which meets the table specification, see Table requirements on the next page. There should be adequate clearance around the table to operate the device. The image server, switch, browser-based review clients and any Viewing PCs or monitors must be positioned outside the patient environment;... -
Page 50: Battery
Device is DEHP free. 4.2 Laser safety designation (IEC 60825-1) All P200T product variants are Class 1 laser devices at the eye, and comply with IEC/EN 60825-1:2007 and 21 CFR1040.10 and 1040.11 except for deviation pursuant to Laser Notice 50, dated June 24, 2007. -
Page 51: External Laser Warning Information
Class IIIb as defined by 21 CFR1040.10 and 1040.11. 4.3 Electromagnetic compatibility (EMC) The P200T is intended for use in the electromagnetic environment as specified in the following tables. The customer or the user of the device should assure that it is used in such an environment. -
Page 52: Guidance And Manufacturer Declaration - Electromagnetic Immunity
Chapter 4 - Technical Specification 4.3.2 Guidance and manufacturer declaration – electromagnetic immunity TABLE 13: List of electromagnetic immunity compliance IEC60601 compliance Immunity test Electromagnetic environment-guidance test level Electrostatic Floors should be wood, concrete or ceramic tile. If floors ±6 kV contact discharge are covered with synthetic material, the relative ±8 kV air... -
Page 53: Recommended Separation Distances
This section lists the recommended separation distances between portable and mobile communication equipment and the device. The P200T is intended for use in an electromagnetic environment in which radiated RF disturbances are controlled. The customer or the user of the P200T can help prevent electromagnetic interference by maintaining a minimum distance between portable and mobile RF communication equipment (transmitters) and the P200T as recommended below, according to the maximum output power of the communications equipment. - Page 54 Chapter 4 - Technical Specification For transmitter rated at a maximum output power listed above, the recommended separation distance d in meters (m) can be estimated using the equation applicable to the frequency of the transmitter, where P is the maximum output power of the transmitter in watts (W) according to the transmitter manufacturer. Note At 80MHz and 800MHz the higher frequency range applies.
-
Page 55: Contact Us
Chapter 5 - Contact us 5 Contact us We welcome your questions and comments. 5.1 Global Headquarters Optos plc Queensferry House Carnegie Campus Enterprise Way Dunfermline, Fife KY11 8GR Telephone: +44 (0) 1383 843 300 Fax: +44 (0) 1383 843 333 All inquiries: ics@optos.com Website: optos.com... -
Page 56: Australia
Chapter 5 - Contact us 5.2.2 Australia Optos Australia 10 Myer Court Beverley South Australia 5009 Telephone: +61 8 8444 6500 All inquiries: auinfo@optos.com Customer Support: +61 8 84434533 5.2.3 Denmark Telephone: +47 800 16711 All inquiries: ics@optos.com Customer Support: +47 800 16711 5.2.4 France Optos PLC 191, Rue du Marché... -
Page 57: Spain
Chapter 5 - Contact us 5.2.7 Spain Optos Sucursal en España Calle Boix y Morer 11, local A 28003 Madrid España Telephone: +44 (0) 1383 843 300 All inquiries: ics@optos.com Customer Support: 800 600267 5.2.8 Sweden Telephone: +47 (0) 201 005 08 All inquiries: ics@optos.com Customer Support: +47 (0) 201 005 08 5.2.9 Switzerland... - Page 58 Part Number: G102748/11_ENG Page 58 of 60 Copyright 2021, Optos plc. All rights reserved. English...
-
Page 59: Patient Alignment Guide
Patient Alignment Guide Too far out Correct positioning Helpful tip: Stay still and keep looking at the target. Keep both eyes wide open. Too close Note: In some instances the operator may choose to capture an image when you are aligned to the blue or red target. - Page 60 G102748/11_ENG English...
Need help?
Do you have a question about the P200T and is the answer not in the manual?
Questions and answers