
Related Manuals for Thermo Scientific Sorvall WX100 Plus


Summary of Contents for Thermo Scientific Sorvall WX100 Plus
- Page 1 Thermo Scientific Sorvall WX+ Ultracentrifuge Instruction Manual 50145792-c • 06 / 2022...
-
Page 2: Table Of Contents
Table of Contents General description � � � � � � � � � � � � � � � � � � � � � � � � � � � � � � � � � � � � � � � � � � � � � � � � � � � � � � � � � � � � � � � 4 Safety notices �... - Page 3 6� Installation � � � � � � � � � � � � � � � � � � � � � � � � � � � � � � � � � � � � � � � � � � � � � � � � � � � � � � � � � � � � � � � � � � � 131 7� Warranty for the Thermo Scientific Sorvall WX Plus Ultra Series Centrifuge � � � � � 135 8�...
-
Page 4: General Description
Thermo Scientific Sorvall WX+ Ultracentrifuge General description The Thermo Scientific™ Sorvall™ WX+ Ultracentrifuge is designed to separate suspended solids of varying densities and particle sizes� This is a series of products which are targeted to provide user-friendliness and reliability based on our many years of experience in developing centrifuges�... -
Page 5: Safety Notices
Safety notices Safety reminders Carefully read and fully understand the following safety instructions� Operate your instrument in accordance with the instruction manual� ƒ ƒ Make sure to observe all safety precautions in the instruction manual and safety instructions on your unit� Failure to do so can result in personal injury and/or damage to the unit�... -
Page 6: Mechanical Safety
Mechanical safety WARNIN G ƒ Do not open the door while the rotor is spinning� Do not attempt to slow or stop the spinning rotor by hand� ƒ Do not incline or move the instrument while the rotor is spinning� Do not place any object ƒ... -
Page 7: Safety During Installation And Maintenance
C A UTI ON ƒ Install the rotor carefully and securely on the drive shaft (crown) in the rotor chamber� Always place the rotor pin in the drive hole (crown hole) next to the crown pin� Take care not to get your hands or fingers caught in the door of the centrifuge� ƒ... -
Page 8: Electrical Safety
CA UT ION If the centrifuge is exposed to ultraviolet rays for an extended period of time, the color of the covers may change or the coating may peel off. After use, cover the centrifuge with a cloth to protect it from direct exposure. Electrical safety WA RNI NG Your centrifuge must be grounded properly to avoid electrical shock hazards�... -
Page 9: Precaution Indications In This Manual
Thermo Fisher Scientific may question you as to how the centrifuge, rotor or part has been handled if the decontamination level is checked and judged to be insufficient by Thermo Scientific� It is your responsibility to bear the cost of sterilization or decontamination (chapter 4�... - Page 10 Indication of CAUTION 1� When replacing the overspeed decal with a new one, be very careful not to damage the overspeed decal and rotor body (section Rotor overspeed decal)� 2� Do not place containers holding liquid inside the rotor chamber, or on or near the centrifuge� Liquids, if spilled, can get into the instrument and damage electrical and mechanical components (section Preparation)�...
- Page 11 Safety notices WARNING • Never use any material capable of producing ammable or explosive vapors. • Be sure to take the necessary precautions before separating radioactive, toxic or pathogenic materials. AVERTISSEMENT • Ne jamais utiliser de matériau capable de produire des vapeurs inflammables ou explosives.
-
Page 12: 1� Specifications
1. Specifications Model Sorvall WX100 Plus Sorvall WX90 Plus Sorvall WX80 Plus Maximum speed 100,000 rpm 90,000 rpm 80,000 rpm Maximum RCF* 802,000 x g (T-8100) 692,100 x g (T-890) 602,600 x g (T-880) Speed control accuracy ±10 rpm (1,000 rpm to maximum speed) - Page 13 Environmental conditions ƒ Ambient temperature for operation: 2 °C to 40 °C; Ambient temperature for performance guarantee: 10 °C to 30 °C; ƒ Indoor use; ƒ Altitude up to 2000 m; ƒ Maximum relative humidity 80 % for temperatures up to 31 °C decreasing linearly to 50 % ƒ...
-
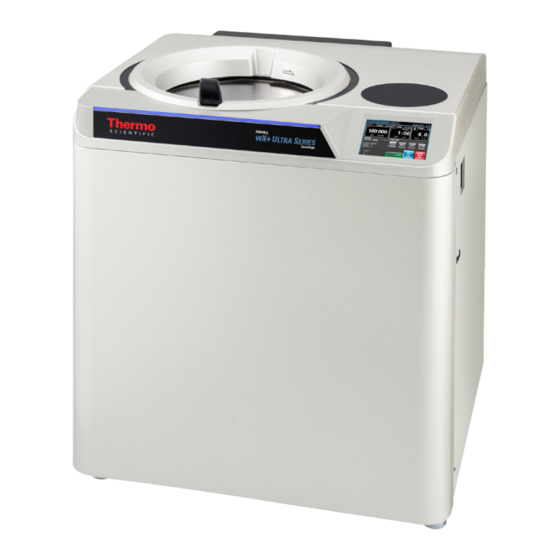
Page 14: 2� Description
2. Description External View of Ultracentrifuge The Sorvall WX+ Ultra series centrifuges are floor models� These three types of ultracentrifuges have the same external appearance, except for the model name printed on front cover, and the same dimensions� Below is the external view of the Sorvall WX100+ Ultracentrifuge�... -
Page 15: Structure
Structure Touchscreen and External Connection The touchscreen with color liquid crystal display is integrated in the Sorvall WX+ Ultra series centrifuges� You can set the run parameters, perform an operation, and display a run history, programmed operation, and user customizations screens by pressing the screen Figure 2 shows the touchscreen�... - Page 16 Functions of the Run screen No� Name and symbol Functions and actions Display areas These areas display various types of information� The SPEED (RCF), TIME, and TEMP areas display the current status in the upper part and the specified setting in the lower part� (For settings, see section Setting Run Parameters�) SPEED area...
- Page 17 ƒ The following four stages are displayed, depending on the vacuum inside the rotor chamber� 1� Atmospheric state� The vacuum pump is not active� 2� Low vacuum� The rotor remains at 4,000 rpm until the vacuum reaches medium level� 3� Medium vacuum�...
- Page 18 On-screen keypad ƒ Use the on-screen keypad to enter numeric values for run parameters� [ : / . ] When entering a time: Switches from hours to minutes� [Hold] When entering the operation time: Sets continuous operation� [FREE] When entering deceleration conditions: Sets free coasting� [CE] Press this to cancel input (for example, if you enter the wrong number or the When entering the deceleration wrong value for a run parameter)�...
-
Page 19: Rotor Chamber
Rotor Chamber The structure of the rotor chamber (vacuum chamber) is shown in Figure 3: Rotor chamber� Figure 3: Rotor chamber If any sample or water drips onto the window of the temperature sensor, this may NOT E cause spurious detection. Should the sensor ever become wet, wipe it with a clean, dry cloth. -
Page 20: Safety Devices
Safety Devices Protection of rotor chamber Should the rotor spinning at high speed fail (or leave the drive shaft), the safety of the operator is ensured by the thick protective steel ring which encloses the bowl (Figure 3: Rotor chamber)� Imbalance detector If, during operation, the vibration of the rotor becomes excessive due to serious imbalance or improper installation of buckets, the imbalance detector detects the situation and decelerates the rotor immediately�... -
Page 21: Rotor Overspeed Decal
Rotor overspeed decal Overspeed decal The overspeed decal located on the rotor base has alternating black and white bands� The number of bands corresponds to the maximum permitted speed of the rotor (see Figure 4: Standard Rotor)� Overspeed decal Figure 4: Standard Rotor To protect the overspeed decal, make sure to store the rotor on the rotor stand provided (see Figure 5: Rotor stand)�... -
Page 22: 3� Operation
3. Operation The centrifuge comes with a wide range of functions to support a broad spectrum of applications� A brief description of each mode of operation is given below� Brief description Reference Normal operation Section Basic Operation� Time Programmed operation You can save set run parameters in memory for later use in Section How to Use the... - Page 23 RTC operation (Real Time This function is used to perform a run between a set Section RTC (Real Time Control) start time and end time� Control) Operation� End of set run time Press the START button Special operation Brief description Reference Zonal operation An operation that uses a zonal rotor�...
-
Page 24: Run Preparation
Run Preparation WA RNI NG 1� This centrifuge has is not protected against explosion� Never use explosive or flammable samples or materials that generate strong chemical reactions� Do not centrifuge such materials in this instrument nor handle or store them near the instrument� 2�... -
Page 25: Rotor And Tube Preparations And Precautions
Rotor and Tube Preparations and Precautions The Sorvall WX+ Ultra series centrifuges allow you to balance samples, by eye� The difference between meniscus levels of opposing samples must be less than 5 mm (Figure 7: Balancing Samples), but some rotors are exceptions to this rule� However, some tubes and bottles may trigger an imbalance alert in the case of certain rotor and sample combinations�... -
Page 26: Basic Operation
Basic Operation WARNIN G Do not incline or move the instrument while the rotor is spinning. Do not place any object on the instrument or lean against the instrument. The centrifuge itself may move if the rotor fails during high-speed rotation. Ensure that there is a 30 cm area around the centrifuge that will allow for such movement and do not allow individuals to enter that area during operation. - Page 27 Display and operations when entering run parameters Press the SPEED, TIME, TEMP, ACCEL or DECEL field on the touchscreen to display the on-screen keypad� 1� Press the field of the item you wish to set� The initial digits are displayed in blue� Color of initial digits: blue On-screen keypad 2�...
- Page 28 Methods for setting run parameters are described on the next page. 1� If you enter the wrong value, press the [CE] button and enter the correct value� If you have already pressed the [Enter] button, repeat the process and enter the correct value�...
- Page 29 Setting speed, run time and temperature Operation procedures are described below using examples� Setting Item Speed Run time Temperature SPEED (TIME) (TEMP) Setting example 100,000 rpm 2 hours 30 minutes 4 °C Press the SPEED, TIME or TEMP field to display the on-screen keypad�...
- Page 30 Setting acceleration and deceleration mode Setting Item Acceleration Deceleration (ACCEL) (DECEL) Setting example Press a field to display the on-screen keypad� Press the field whose value you wish to set� The numeric values are displayed in blue� Color: blue Color: blue Press the on-screen keypad to enter a numeric value�...
-
Page 31: Acceleration And Deceleration Modes
Acceleration and Deceleration Modes In order to meet a wide variety of applications, the acceleration and deceleration rates can be adjusted between 0 and 500 rpm� By setting an ideal acceleration and deceleration time samples will not be disturbed; this improves efficiency and reduces centrifugation time� The table below shows the relationship between ACCEL and DECEL code numbers and acceleration and deceleration time�... -
Page 32: Rotor Selection
Rotor Selection This centrifuge stores the maximum and average radius of each rotor in its internal memory� It provides a function that will automatically calculate and display the relative centrifugal force (RCF) from a set speed and calculate and display the speed from an RCF setting (for information, refer to section RCF (Relative Centrifugal Force) Display and Setting Function)�... - Page 33 When the Rotor management screen does ƒ ROTOR CATALOG screen not display the desired rotor, press the [Rotor Catalog] button� In the ROTOR CATALOG screen, select the desired rotor type� In the screen displaying rotor types, press ƒ The screen for selecting a rotor appears� the field of the desired rotor�...
- Page 34 The Run screen appears and the name of the ƒ The Run screen appears� selected rotor type is displayed in the Rotor indicator field� Rotor indicator field 1� You cannot perform life management of a rotor simply by selecting a rotor in the ROTOR CATALOG screen�...
-
Page 35: Logging In As A User
Logging in as a User By registering users in the instrument, it will be possible to manage the operation history of users that log in� For information on how to register a user, refer to section User management� User Login Procedures Step Touchscreen operation Screen displays and notes... - Page 36 Step Touchscreen operation Screen displays and notes The user name appears in the USER area in ƒ The Run screen appears� the Run screen� USER area 1� When the user lockout function described in section User lockout is enabled, you must login as a user to operate the centrifuge�...
-
Page 37: Operation Procedures
Operation Procedures Below is a description of normal operating procedures� C A UT I ON Take care not to get your hands or fingers caught in the door of the centrifuge. Before you begin using your centrifuge, carefully read through the instruction manual NOT E for your rotor and make sure that the correct tube types and number of samples are supplied. - Page 38 Step Touchscreen operation Centrifuge operations and notes Press the [START] button� ƒ The [START] button lamp blinks and the rotor starts turning� ƒ The timer begins operating� (If the actual run timer is set, the timer will start operating when the set speed is reached�) ƒ...
- Page 39 Figure 10: Operation Procedures is an overview of the procedures described above� See section Zonal Operation Procedures for information on using a zonal rotor� * You can start operation using [START] without having to press [VACUUM]� Then the vacuum pump will start up when [START] is pressed and the rotor will stabilize at 4,000 rpm until the set vacuum level is achieved�...
-
Page 40: How To Use The Function Selection Area
How to Use the Function Selection Area This centrifuge provides programmed operation including step-mode operation, RCF display and setting function, ω T display and setting function and Real Time Control (RTC), which can be used to operate the centrifuge at a preset date and time, and a host of other functions�... -
Page 41: Programmed Operation
Programmed Operation When a set of centrifuging conditions is to be used frequently, it is inconvenient to enter these every time you wish to perform centrifugation� This centrifuge has a programmed operation feature that stores run parameters� Storing frequently used run parameters allows you to call these up when you need them, thus saving setup time (the stored run parameters remain in memory even when the POWER switch is turned off�) As shown in the figure below, the centrifuge has a program area that can store up to 1,000 memory items, each of which can contain... - Page 42 Basic operation of the programmed operation feature Press the [PROGRAM] button� Program display screen Step operation display The Function Selection Area switches to the Program display screen� [Folder] button [PROGRAM No�] button If the registered program If the registered program number is known number is not known Press the [Folder] button Press the [PROGRAM No�] button�...
- Page 43 When the Run screen appears, the registered run parameters are set� The program number is displayed in the [Folder] button on the Program display screen� When multiple steps are registered, the step operation display indicates the total number of steps and the current step� Press the [START] button�...
-
Page 44: Procedures For Entering A Program
Procedures for Entering a Program Procedures for entering run parameters The procedures for entering run parameters are described below� Step Touchscreen operation Screen displays and notes Turn on the centrifuge POWER switch� ƒ The Run screen appears� [PROGRAM] button Press the [Program] button in the Function ƒ... - Page 45 Press the [Folder] button in the Program ƒ The Run screen replaces the Program list screen� display screen� ƒ Program folders come in four colors� ƒ The program list can be displayed in different colors� [New Folder] button Program list display [All folder] button: Press to display all set programs on the screen in number order�...
- Page 46 Press the [New Folder] button� ƒ The Program No� entry screen appears� Program No� entry field The unregistered To enter the folder, press the [Enter] button� program with the To select a different number, use the lowest number is on-screen keypad to select the desired displayed when the number and press the [Enter] button�...
- Page 47 Press the white area in the Registered user ƒ The User Management screen appears� display/registration field ((2)) to select a user� (You can omit this operation�) ƒ Select the user name you wish to use and press the [LOGIN] button� ƒ...
- Page 48 Press the field as in Step 1, check that the field turns blue and press the [Edit] button� [Edit] button Press the white area in the SPEED setting ƒ The run parameter entry/display screen appears� value display field ((1))� (You can press the TIME ((2)) or TEMP ((3)) setting value display fields and make similar settings�) SPEED setting value display field...
- Page 49 Check the entry and press the [OK] button� ƒ The run parameter entry/display screen reappears� ƒ The SPEED, TIME, TEMP display fields and the on-screen keypad appear� ƒ Selecting a rotor in step 5 will make it possible to compute and display RCFmax and RCFavg values from the set SPEED value�...
- Page 50 Press the display area of the item you wish ƒ The RCF setting screen appears� to set and enter the desired value� Set rotor model Example: RCFmax: 513,700 x g SPEED display RCFavg setting value display field RCFmax setting value display field ƒ...
- Page 51 Press the ω ƒ The ω T display area and enter the T setting screen appears� desired value� Example) ω T display, (Left area) ω T: 1�98×10 Mantissa, (Right area) Exponent ƒ Enter the desired value and press the [Enter] button� The [Enter] button is replaced by the [OK] ƒ...
- Page 52 Check the setting and press the [Register] When a normal operation is registered ƒ The Program list screen appears� button� Program registered in this example When a step-mode operation is registered ƒ The Check registered condition screen appears� [X] button ƒ...
- Page 53 Procedures for changing program run parameters The following describes how to change run parameters for registered programs� Step Touchscreen operation Screen displays and notes Press the [PROGRAM] button in the Run screen (in the Function Selection Area)� [PROGRAM] button [Folder] button Program display screen Press the [Folder] button on the Program ƒ...
- Page 54 To change run parameters, press the [Next] ƒ The Run parameter setting/display screen appears� button� [Edit] button Press a field in Step 1, check that the field ƒ The run parameter entry/display screen appears� turns blue and press the [Edit] button� ƒ...
- Page 55 Procedure for deleting programs The following describes how to delete registered programs� Step Touchscreen operation Screen displays and notes Open the Program list screen and press ƒ The program list appears and the frame of the selected folder turns blue� the program folder you wish to delete as described in step 1 in Procedures for...
- Page 56 Operation procedures for copying programs The following describes how to copy a registered program and register the result as a new program� This is a convenient method to use when you wish to register a new program by changing part of a registered program� Step Touchscreen operation Screen displays and notes...
- Page 57 Press the [Enter] button� ƒ The Program list screen appears� (The [Enter] button will not accept entry of a program number already entered�) The copied and newly registered program folder ƒ The copied program is now registered under a new number�...
-
Page 58: Programmed Operation Procedures
Programmed Operation Procedures The following describes procedures for “programmed operations” by calling up registered run parameters� This is convenient when you wish to use the same run parameters repeatedly� (1) If the registered program number is known Step Touchscreen operation Screen displays and notes Turn on the centrifuge POWER switch�... - Page 59 Use the on-screen keypad to enter the ƒ The display once again shows the Run screen� number of the program you wish to call up and press the [Enter] button� A run parameter called from the program Program display screen A run parameter called up from the program ƒ...
- Page 60 (2) If the registered program number is not known Step Touchscreen operation Screen displays and notes Turn on the centrifuge POWER switch� The Run screen appears� Press the [PROGRAM] button in the Function ƒ The Function Selection Area switches to the Program display screen� Selection Area�...
- Page 61 a) If the [Folder] button display shows ƒ The display once again shows the Run screen� the program folder you wish to call up, press that [Folder] button� Check that the periphery of the folder turns blue and press the [Select] button� A run parameter called from the program...
-
Page 62: Step-Mode Operation Procedures
Step-Mode Operation Procedures This centrifuge is provided with a “step-mode operation” function that can store two or more run parameters in one program memory area and a total of 30 steps� This allows changes in speed, run time, temperature and other conditions during operation� For example, you could set the speed of a step to 0 rpm to stop rotation to enable opening and closing vacuum leaks and doors�... - Page 63 Step Touchscreen operation Screen displays and notes As described in steps 1 to 8 in Procedures ƒ Program registration screen Run parameter setting/display for entering run parameters in section Procedures for Entering a Program, enter the program number, registered rotor, user and remarks, select a folder color and press the [Next] button�...
- Page 64 Press the [Next Step] button and enter the ƒ The run parameter entry/display screen in STEP 3 appears� run parameters for step 3 from the run parameter entry/display screen for step 3� STEP 2 SPEED: 60,000 rpm TIME: 30 min TEMP: 4�0 °C ACCEL: 9 DECEL: 7...
- Page 65 Step-Mode Operation Procedures Call up the number of the program where the step-mode operation is registered and run it according to the instructions in section Operation Procedures� Once you have called up the program, begin operation without changing the run parameters� (Changing the run parameters will cancel the program called up�) 1�...
- Page 66 Procedures for Registering Step-Mode Operation that Includes Stops Follow the instructions in Registration Procedures for Step-Mode Operation� Perform the registration procedures described below� [Setting example] The following describes the setup procedures for continuous operation under the five run parameters (including a 0 rpm setting) shown in the figure below�...
- Page 67 Enter the run parameters for step 1 as ƒ The run parameter entry/display screen appears� described in “(1) Registration Procedures for Step-Mode Runs�” STEP 1 SPEED: 50,000 rpm TIME: 1 hour TEMP: 15�0 °C [Next Step] ACCEL: 9 button DECEL: 7 ƒ...
- Page 68 Check the entries displayed for each step ƒ The Program list screen reappears� in the run parameter setting/display screen� [X] button If these are correct, press the [X] button and press the [X] button on the Program registration screen� The program registered in this example Procedures for Step-Mode Operations that Include Stops...
- Page 69 When the run time for step 1 has elapsed, ƒ The Program display screen in the Run screen proceeds to step 2� processing proceeds to step 2 and the rotor decelerates and stops� A run parameter called up from the program Program display screen ƒ...
-
Page 70: Rcf (Relative Centrifugal Force) Display And Setting Function
Thermo Scientific Sorvall WX+ Ultracentrifuge RCF (Relative Centrifugal Force) Display and Setting Function This centrifuge stores the maximum and average radii of each rotor in internal memory� When a speed is set, the centrifuge automatically calculates and displays the RCFmax value (the maximum centrifugal force of each rotor) and the RCFavg value (the average centrifugal force of each rotor)�... - Page 71 Thermo Scientific Sorvall WX+ Ultracentrifuge Press the RCF display screen field� ƒ The RCF setting screen appears� Set rotor model SPEED display Calculated RCFavg value Calculated RCFmax value ƒ The RCF setting screen displays the RCFmax and RCFavg values computed from the currently displayed SPEED value and the rotor set in step 1�...
- Page 72 Thermo Scientific Sorvall WX+ Ultracentrifuge Check the value entered and press the ƒ The entered value is confirmed� [Enter] button� SPEED display ƒ Calculates and displays the RCFavg value from the RCFmax value entered and the rotor set in step 1 (the value in this case is 355,000 x g)�...
-
Page 73: Operation
Thermo Scientific Sorvall WX+ Ultracentrifuge ω T Operation This function is used to indicate ω T, the centrifugal effect (a value obtained by adding the run time to the angular velocity squared)� When the same rotor is used, setting the ω... - Page 74 Thermo Scientific Sorvall WX+ Ultracentrifuge Press the on-screen keypad to enter a setting value� Exponent entry When the mantissa has been entered, press field the exponent entry field, enter the exponent Mantissa entry and press the [Enter] button� field Example: To enter [2�81 x 10 ƒ...
-
Page 75: Rtc (Real Time Control) Operation
Thermo Scientific Sorvall WX+ Ultracentrifuge RTC (Real Time Control) Operation This centrifuge contains an internal clock allowing you to operate the centrifuge between a set start time and end time� This function for operating the centrifuge between set time intervals is called Real Time Control (RTC)�... - Page 76 Thermo Scientific Sorvall WX+ Ultracentrifuge Step Touchscreen operation Screen displays and notes Set run parameters according to the ƒ The set value is displayed in the setting value display field� instructions in section Setting Run Parameters� Setting value display field [RTC] button ƒ...
- Page 77 Thermo Scientific Sorvall WX+ Ultracentrifuge To set the start time, press the [Start Time] button and to set the stop time, press the [Stop Time] button� Enter the start time and stop time using the on-screen keypad� Set state display ƒ...
- Page 78 Thermo Scientific Sorvall WX+ Ultracentrifuge 1� In the following situations RTC cannot be set� » When TIME (run time) is set to HOLD (continuous operation) in the Run screen: Change the run time (centrifugation time) to a numeric value instead of HOLD�...
-
Page 79: Features Of The Menu Screen
Thermo Scientific Sorvall WX+ Ultracentrifuge Features of the MENU Screen These features have been designed to make your Sorvall WX+ Ultra series centrifuge easier to use by including, for example, the Run History function shown in Figure 16: MENU screen�... - Page 80 Thermo Scientific Sorvall WX+ Ultracentrifuge Customize Allows you to adjust screen displays, the stop signal and other settings in a way that works best for you� For details, refer to section Customizing� Customize Manager (Admin) Allows you to set administrator functions such as user lockout, etc� For details,...
-
Page 81: Outputting And Reusing Run History Display And Run Parameters
Thermo Scientific Sorvall WX+ Ultracentrifuge Outputting and Reusing Run History Display and Run Parameters The centrifuge can automatically store a run history containing up to 5,120 run parameters� The run history can be used for checking operation and for reuse, to verify the user and rotor performance and output data in CSV format�... - Page 82 Thermo Scientific Sorvall WX+ Ultracentrifuge Press the [Load for a new run] to use the ƒ The touchscreen displays the Run screen again and the run parameters in the history are set� run parameters in the Run history details screen�...
- Page 83 Thermo Scientific Sorvall WX+ Ultracentrifuge Checking and Using User Run History Step Touchscreen operation Screen displays and notes Press the [Menu] button at the bottom left of ƒ The Menu box in Run History appears the Run History screen� Press the [User Log] button in the Menu box� ƒ The User Run History screen appears�...
- Page 84 Thermo Scientific Sorvall WX+ Ultracentrifuge Checking and Using Rotor Run History Step Touchscreen operation Screen displays and notes Press the [Menu] button at the bottom left of ƒ The Menu box in Run History appears the Run History screen� Press the [Rotor Log] button in the Menu ƒ...
-
Page 85: Rotor Catalog
Thermo Scientific Sorvall WX+ Ultracentrifuge Rotor Catalog This catalog provides information on rotor models and rotor specifications� Example showing how to reference the catalog Step Touchscreen operation Screen displays and notes Press the [Rotor Catalog] button in the ƒ The ROTOR CATALOG screen appears�... -
Page 86: Zonal Operation Procedures
Thermo Scientific Sorvall WX+ Ultracentrifuge Zonal Operation Procedures Zonal operation uses a zonal rotor for density gradient centrifugation to efficiently process large-volume samples� Zonal operation involves the following three zonal modes� 1� With the door open, the rotor turns at low-speed (* zonal speed) to allow loading of samples�... - Page 87 Thermo Scientific Sorvall WX+ Ultracentrifuge Press the [ZONAL] button on the ZONAL ƒ The Set Validation No� screen appears� setting screen� Enter “30” for the PIN on the on-screen ƒ ZONAL operation is enabled when the [ZONAL] button is surrounded by keypad and press the [Enter] button�...
- Page 88 Thermo Scientific Sorvall WX+ Ultracentrifuge Press the Rotor indicator field to select a ƒ The selected rotor type appears in the Rotor indicator field� zonal rotor as described in section Rotor Selection� Rotor indicator field Press the [START] button� ƒ The rotor accelerates to zonal speed (normally 3,000 rpm) and stabilizes�...
- Page 89 Thermo Scientific Sorvall WX+ Ultracentrifuge Open the door, remove the cap, install the CAUTION: seal assembly and unload the samples� Removing the cap from the rotor by hand and installing the seal assembly while the rotor is turning: Perform this operation with care and make sure to follow the instructions in the instruction manual�...
-
Page 90: Defrost
Thermo Scientific Sorvall WX+ Ultracentrifuge Defrost The presence of frost or moisture in the rotor chamber (especially in the bowl) prior to a run will considerably lengthen the time it will take to reach a high vacuum level� This centrifuge comes with a defrost function that heats and evacuates the bowl to quickly remove frost and moisture�... - Page 91 Thermo Scientific Sorvall WX+ Ultracentrifuge Reference As described below, the defrost function operates differently depending on centrifuge status when defrosting is started� Evacuation is performed simultaneously with defrosting� Enabling defrosting when the rotor is standing still Enabling defrosting when the rotor is turning...
-
Page 92: Customizing
Thermo Scientific Sorvall WX+ Ultracentrifuge Customizing This function allows you to adjust Run screen displays, the stop signal, sound volume, screen backlight brightness and other functions to your preferences� Press the [Customize] button in the MENU screen to open the CUSTOM screen with the icons for setting and changing zoom display,... -
Page 93: Zoom Display Setting
Thermo Scientific Sorvall WX+ Ultracentrifuge Date/Time Use for making date and time settings (for details, refer to section Date/time setting)� Date/Time Status display lamp Use to set status displays (LED indicator) (for details, refer to section Status display (LED indicator) lamp setting)�... -
Page 94: Stop Signal Setting
Thermo Scientific Sorvall WX+ Ultracentrifuge Stop signal setting Select to change the stop signal� This function provides a selection of six sounds including 5 tunes and an electric beep� Figure 20: Stop signal setting screen Pressing the selected stop signal field will sound the signal, and the field turns blue�... -
Page 95: Backlight Adjustment And Dimming Backlight Mode Setting
Thermo Scientific Sorvall WX+ Ultracentrifuge Backlight adjustment and dimming backlight mode setting Adjusts screen brightness and sets the dimming backlight mode� 1� Adjusting screen brightness More green segments in the indicator bar mean a brighter screen� When all segments are black, the backlight is set to its darkest level�... -
Page 96: Language Switch Button
Thermo Scientific Sorvall WX+ Ultracentrifuge Language switch button Select to change the language� This function provides a selection of languages� Press the selected language field�The selected field turns blue� Press the CUSTOM tab or [X] button to store the settings�... - Page 97 Thermo Scientific Sorvall WX+ Ultracentrifuge Press the [Add] button� ƒ The User list screen appears� User cell ƒ Use the [<] and [>] buttons to turn pages in the user list� Press the cell of the user whose schedule ƒ The User PIN field appears�...
- Page 98 Thermo Scientific Sorvall WX+ Ultracentrifuge Method for canceling centrifuge schedules Step Touchscreen operation Instrument operations and notes Press the [Schedule] button� ƒ The CUSTOM screen is replaced by the Schedule screen� Press the schedule cell you wish to delete� ƒ The selected cell turns blue�...
-
Page 99: Date/Time Setting
Thermo Scientific Sorvall WX+ Ultracentrifuge Enter the PIN of the user who registered the ƒ The Schedule list screen appears� schedule and press the [Enter] button� ƒ The selected schedule is deleted from the schedule list� ƒ Press the CUSTOM tab, the [X] button, the Run screen tab or the MENU tab�... -
Page 100: Status Display (Led Indicator) Lamp Setting
Thermo Scientific Sorvall WX+ Ultracentrifuge Status display (LED indicator) lamp setting Sets the display color, brightness and lighting pattern of the status display lamp (LED indicator) beside the rotor chamber door to indicate instrument operating conditions� The display color, brightness and display pattern of the status display lamp can be set for the operating conditions described below�... - Page 101 Thermo Scientific Sorvall WX+ Ultracentrifuge Press the [Set display color] button for the ƒ The Color palette screen appears� operating condition you wish to change� Example: To change the display color for [X] button [When stopped] from blue to white...
- Page 102 Thermo Scientific Sorvall WX+ Ultracentrifuge 3� Method for setting display patterns for the status display lamp Step Touchscreen operation Instrument operations and notes Press the [LED] button� ƒ The LED indicator setting screen appears� [Set pattern] screen Press the [Set pattern] button for the ƒ...
-
Page 103: Economy Mode Setting
Thermo Scientific Sorvall WX+ Ultracentrifuge Economy mode setting When economy mode is enabled, the touchscreen backlight will automatically dim and the cooling fan will stop turning to reduce power consumption when the centrifuge has been left idle for a preset period of time�... - Page 104 Thermo Scientific Sorvall WX+ Ultracentrifuge Press the “CUSTOM” tab, the [X] button, the ƒ Press the CUSTOM tab or the [X] button to return to the CUSTOM Run screen tab or the MENU tab� screen� ƒ Press the Run screen tab or MENU tab to return to the respective screen�...
-
Page 105: Admin Function
Thermo Scientific Sorvall WX+ Ultracentrifuge Admin Function This function allows you to access administrator functions such as changing the display language� Press the [Admin] button on the MENU screen to open the ADMIN screen shown in Figure 27: ADMIN screen� This screen provides icons for controlling functions such as user management and user lockout�... -
Page 106: User Management
Thermo Scientific Sorvall WX+ Ultracentrifuge Zonal speed Zonal speed can be changed between 2,000 and 3,000 rpm in increments of 100 rpm (for details, refer to section Zonal speed)� ZONAL SPEED LAN communications Connects and disconnects LAN communications (for details, refer to section communications)�... - Page 107 Enter the name of the user you wish to ƒ The user entered in the User name field is displayed� register� [Enter] button Check the entry and press the [Enter] ƒ The Register PIN screen appears� button� PIN field Enter a PIN (four numeric digits) and press ƒ...
- Page 108 Again enter the PIN entered in step 5 and ƒ An Access level dialog box appears� press the [Enter] button� Access level dialog box ƒ An access level setting makes it possible to control access at three different levels� ƒ The user lockout function can only be used if enabled� For details, refer to section User lockout�...
- Page 109 Method for deleting users and changing registered information Step Touchscreen operation Screen displays and notes Press the [User Management] button� ƒ The Admin screen replaces the user management screen� Press the User field of the user you wish to ƒ The selected user field changes from white to blue� delete or whose registered information you wish to change�...
- Page 110 Press the [Change the Access level] button ƒ The Select access level field appears� to change the access level� Access level dialog box Press the access level you wish to change; ƒ Enter the user PIN you wish to change and press the [Enter] button� this opens the PIN field�...
-
Page 111: User Lockout
User lockout When enabled, User lockout makes it possible to control user access at three different levels� Method for setting user lockout Step Touchscreen operation Screen displays and notes Log in as a user as described in section ƒ The user logging in must have [Administrator] privileges� Logging in as a User�... - Page 112 1� Only a user logged in with [Administrator] privileges can enable the user lockout function� 2� The user lockout function can be used only if users are registered� Register users as described in (1) “User Management�” 3� When user lockout is enabled, a user must be logged in to use the touchscreen� 4�...
-
Page 113: Rotor Management
Rotor management You can register the rotor and its serial number in the instrument to use in setting operations and controlling total run time and number of runs� It is very important to manage the life of each rotor you use with the ultracentrifuge� The warranted life of the rotor varies depending on the type of rotor, the material the rotor is fabricated from and the policy of the rotor manufacturer�... - Page 114 Registering a rotor A standard rotor can be registered when you use the rotor management feature of the ultracentrifuge� If the rotor has not been registered, the feature does not operate for the rotor� To register a rotor, use the procedure described below�...
- Page 115 Enter the serial number (S/N) and press the ƒ The Rotor Management screen appears� [Enter] button� ƒ The added rotor and its serial number are displayed� ƒ An “M” (for manual) appears at the right end of the field for the added rotor indicating that it is a rotor with an overspeed decal�...
- Page 116 Press the [Edit Runs] button in the menu ƒ The Number of runs field appears� box� From the “Rotor log” find the total number ƒ The Rotor management screen reappears and the entered time is of runs the rotor was used in the other displayed in the Total run time indicator in the field of the selected rotor�...
- Page 117 Procedure for deleting a registered rotor Step Touchscreen operation Screen display and notes Press the Rotor management button, select ƒ The MENU box appears in the Rotor management screen� the rotor for deletion and press the [MENU] button� [MENU] button Press the [Delete Rotor] button in the menu ƒ...
-
Page 118: Run Time Indication
Run time indication Select either the elapsed time or remaining time as run time� Note that when the run time setting is set to [HOLD], elapsed time is automatically selected� 1� [Elapsed] button: Elapsed time is displayed in the centrifuge run time indication field in the Run screen and “Lapse” is indicated to the right above the display field�... -
Page 119: Vacuum Level
Vacuum level You can select a vacuum level when acceleration starts after the vacuum waiting time at 4,000 rpm has elapsed� Select Start high vacuum to prevent a temperature increase caused by wind� 1� [Medium] button: When the vacuum level in the rotor chamber reaches about 133 Pa, the vacuum waiting time ends and the rotor starts accelerating to set speed�... -
Page 120: Lan Communications
LAN communications Connects and disconnects LAN communications� When the centrifuge is connected to a LAN, the “LogManager” software can be used for communications and storing of operation results� To connect to a LAN, insert a LAN cable into the LAN port in the external connections on the right side of the instrument�... -
Page 121: Instrument Id, Service Contact Information
Instrument ID, Service Contact Information When multiple instruments are used, set separate IDs in each� Service contact information and other data can be stored as memos� Step Touchscreen operation Screen display and notes Press the [ID/Contact] button� ƒ The instrument ID, service contact display/setting screen appears� Press the Instrument ID�... -
Page 122: Occurrences In The Event Of Power Failure
Occurrences in the Event of Power Failure DANGE R To avoid electrical shock hazards, proceed as below when servicing the centrifuge. 1) Make sure to turn off the POWER switch and, if your centrifuge is equipped with a three-wire power cord, turn off the distribution board of your centrifuge room. Then wait at least three minutes before removing the covers from the centrifuge. - Page 123 Figure 32: Removing the front cover 4� Open the air vent (by turning the vacuum release screw on the left of the vacuum chamber counterclockwise) to let air into the rotor chamber� When the pressure in the rotor chamber reaches atmospheric pressure, make sure to remember to tighten the vacuum release screw as it was before (see Figure 33: Ultracentrifuge with the front cover removed�)
- Page 124 Figure 33: Ultracentrifuge with the front cover removed Figure 34: Installing the front cover 7� Turn on the power breaker� C A UTI ON When the centrifuge will not be used for a long time, keep the power breaker off.
-
Page 125: 4� Maintenance
Thermo Fisher Scientific may question you as to how the centrifuge, rotor or part has been handled if the decontamination level is checked and judged to be insufficient by Thermo Scientific. It is your responsibility to bear the cost of sterilization or decontamination. -
Page 126: Rotor Chamber
Rotor Chamber C A UT I ON Do not pour any solution such as water, detergent or disinfectant directly into the rotor chamber. Otherwise, the bearings of the drive unit may become corroded or deteriorated. To maintain the rotor chamber, follow the instructions given below: 1�... -
Page 127: 5� Troubleshooting
Fisher Scientific may question you as to how the centrifuge, rotor or part has been handled if the decontamination level is checked and judged to be insufficient by Thermo Scientific. It is your responsibility to bear the cost of sterilization or decontamination. If you have any questions, please contact a Thermo Fisher Scientific representative. -
Page 128: Alert Indicators
This ultracentrifuge incorporates a “self-diagnosis feature” that diagnoses the cause of any problem which may occur when you start the centrifuge or while it is in operation� Alert Indicators If any problem occurs, this machine produces a buzzer sound and displays an alert message in the FUNCTION area of the Run screen to warn of the problem�... - Page 129 SET ROTOR or NO ROTOR 1� Incorrect rotor is selected� ƒ Select the correct rotor� 2� No rotor is installed� ƒ Install the rotor� ROOM TEMP 1� High room temperature ƒ Lower the room temperature� 2� The centrifuge surroundings do not allow free ƒ...
-
Page 130: Diagnosed Problems Requiring Maintenance
Diagnosed Problems Requiring Maintenance If any alert message between E11 and E86 appears, the ultracentrifuge requires maintenance by a service representative� When ordering a repair, inform us of the alert code you have received� If the “E13: Unexpected MPG pulse” alert message appears, this alert message is NOT E impossible to clear until the rotor stops. -
Page 131: 6� Installation
6. Installation Installation or relocation of your centrifuge must be performed by an authorized Thermo Fisher Scientific service representative� Contact your local dealer or a Thermo Fisher Scientific service representative� In order to use the ultracentrifuge fully and safely, follow the installation instructions given below�... - Page 132 Figure 37: Place of installation WARNIN G The centrifuge itself may move if the rotor fails during high-speed rotation. Ensure that there is a 30 cm area around the centrifuge that will allow for such movement and do not allow individuals to enter that area during operation. Also do not place dangerous objects such as flammable or explosive materials on top of the centrifuge or in the surrounding area.
- Page 133 Connecting the power cord WARNIN G Your ultracentrifuge must be properly grounded. WARNIN G Do not touch the power cord with wet hands to avoid electrical shocks. All electrical connections should be carried out by a suitable qualified person� 1� When your centrifuge is equipped with a three-wire power cord (see below), plug the power cord coming from the rear of the centrifuge into the jack on the distribution board in accordance with ANSI/NFPA 70, NEC, with CSA C22�1, CEC, Part :...
- Page 134 Figure 40: Level Placement 5� Moving the ultracentrifuge When moving the ultracentrifuge, disconnect the power cord and unscrew the leveling screws with a wrench to lower the caster to the floor� Raise the leveling screws enough to remove the leveling pads, then move the ultracentrifuge� After moving, be sure to install and level the instrument again�...
-
Page 135: 7� Warranty For The Thermo Scientific Sorvall Wx Plus Ultra Series Centrifuge
7. Warranty for the Thermo Scientific Sorvall WX Plus Ultra Series Centrifuge THERMO FISHER SCIENTIFIC MAKES NO WARRANTY OF ANY KIND, EXPRESSED OR IMPLIED, INCLUDING THAT OF MERCHANTABILITY OR FITNESS FOR A PARTICULAR PURPOSE EXCEPT AS STATED IN THIS WARRANTY POLICY STATEMENT�... - Page 136 THERMO FISHER SCIENTIFIC EXPRESSLY DISCLAIMS ANY LIABILITY TO ITS CUSTOMERS, DEALERS, AND REPRESENTATIVES, AND TO USERS OF ITS PRODUCTS, AND TO ANY OTHER PERSON OR PERSONS FOR SPECIAL OR CONSEQUENTIAL DAMAGES OF ANY KIND AND FROM ANY CAUSE WHATSOEVER ARISING OUT OF OR IN ANY WAY CONNECTED WITH THE SALE, HANDLING, REPAIR, MAINTENANCE OR REPLACEMENT ARISING OUT OF OR IN ANY WAY CONNECTED WITH THE USE OF SAID PRODUCTS�...
-
Page 137: 8� Supply List
8. Supply List The items below are those supplied with the ultracentrifuge� Item Name Part No� Q’ty Item drawing Remarks Instruction manual Simulation CD assembly “Compass” Software Vacuum pump oil 45128 Supplied in 1-liter NEO VAC Containers (MR100) M4 connecting screw Hex bar wrench Vacuum grease 65937... -
Page 138: Service Decontamination
Service Decontamination Policy WARNIN G Due to the characteristics of the samples likely to be processed, biological or radioactive contamination may occur. Always be aware of this possibility and take normal precautions. Use appropriate decontamination procedures in the event of exposure. - Page 139 WEEE Compliance This product is required to comply with the European Union`s Waste Electrical & Electronic Equipment (WEEE) Directive 2012/19/EU� It is marked with the following symbol: Thermo Fisher Scientific has contracted with one or more recycling/disposal companies in each EU Member State, and this product should be disposed of or recycled through them�...
- Page 140 Thermo Electron LED GmbH Zweigniederlassung Osterode Am Kalkberg, 37520 Osterode am Harz Germany thermofisher.com/centrifuge © 2014–2022 Thermo Fisher Scientific Inc. All rights reserved. All trademarks are the property of Thermo Fisher Scientific Inc. and its subsidiaries unless otherwise indicated. Delrin is a registered trademark of Dupont Polymers, Inc. TEFLON and Viton are registered trademarks of The Chemours Company FC. Noryl and Valox are registered trademarks of Sabic Global Technologies.
Need help?
Do you have a question about the Sorvall WX100 Plus and is the answer not in the manual?
Questions and answers