Advertisement
Quick Links
Advertisement

Related Manuals for 23zero PANTHER


Summary of Contents for 23zero PANTHER
- Page 1 PANTHER ALUMINIUM HARDSHELL ROOF TOP TENT USER MANUAL...
-
Page 2: Table Of Contents
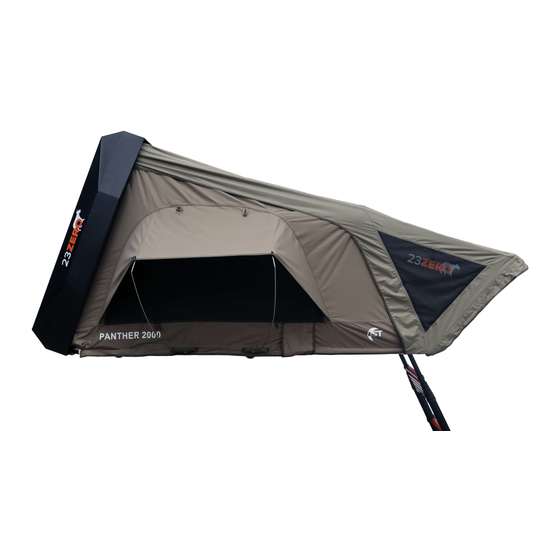
Congratulations on the purchase of 23ZERO’s PANTHER Hardshell Roof Top Tent. We strive to provide you with the ultimate camping experience. The PANTHER Tent mounts directly to a roof rack, tub rack or aftermarket roof bars. It opens and is fully setup in seconds. As well as our innovative LST fabric, this hardshell tent is made with durable materials and high-quality fabrics that provide excellent water and wind protection. -
Page 3: Safety & Warnings
PANTHER USER MANUAL Safety & Warnings Improper installation or use of the PANTHER roof top tent may result in serious injury or death. Follow these installation instructions carefully to ensure proper installation to vehicle and safe use of the roof top tent. -
Page 4: Hardware & Accessories
PANTHER USER MANUAL Hardware & Accessories The PANTHER Hardshell roof top tent includes a mounting kit with everything required to mount the roof top tent to most roof or tub racks. See included accessories below. Note: Some platform style roof racks have platforms which are wider than the supplied mounting plate. -
Page 5: Fitting To Roof Rack
Fitting to roof rack The PANTHER roof top tent must be fitted to roof racks with hinges facing left hand side of vehicle (AUS passenger side). It will open over the right hand side (AUS driver’s side). Clamp 4 corners using 8 x 45mm M8 Bolts with slides &... -
Page 6: Ladder Adjustment
PANTHER USER MANUAL Ladder adjustment For your safety and protection, ensure correct placement and angle of ladder. See diagrams below. Recommended ladder placement is a 4:1 ratio or approx. 70° to 75°. NOTE: Under no circumstances should anyone be inside the roof top tent if the ladder is not locked and secured at the correct angle. -
Page 7: Opening & Set Up
Insert hex bolts through handle and feed through lid. Screw nut from behind and tighten with supplied tools. 3. Lift Panther lid until gas struts take over. Use pull straps to control strut speed and sudden stop. Important this is done every use. - Page 8 PANTHER USER MANUAL Opening & Set up 4. Release pack up assisting shock cords and hook both onto underside of baseboard. 5. Release ladder strap and extend ladder fully. Using ladder as a lever, pull down & out to unfold inner baseboard.
- Page 9 PANTHER USER MANUAL Opening & Set up 8. Secure bottom of canopy to bottom of baseboard via hook & loop strips. Repeat both sides. 9. Locate window stay pole points on baseboard and insert BLACK window stay poles. Flex pole and feed black hook end through eyelet on window canopy. Repeat both sides.
-
Page 10: Closing & Pack Up
PANTHER USER MANUAL Closing & Pack up 1. Bedding can be left in the PANTHER. Before closing, fold all bedding and stow neatly against PANTHER lid. Bedding will stow here when closed NOTE: The amount of bedding left in tent may affect closure. If tent is not folding and closing smoothly, bedding may be too bulky and must be removed. - Page 11 PANTHER USER MANUAL Closing & Pack up 4. Use ladder to fold baseboard. NOTE: If ladder has been height adjust, extend fully before proceeding. 5. Retract ladder and secure with strap. Lift shock cords and place around centre of tent ensuring all canvas is tucked inward and not flapping on sides.
- Page 12 Anti-clockwise. Fix in position with locking nut. Pack up complete IMPORTANT: Ensure the PANTHER is packed dry at all times. If weather conditions dictate a wet pack up, open the tent and allow to dry fully as soon as possible.
-
Page 13: Warranty
PANTHER USER MANUAL 2 Year Warranty 23ZERO will replace or repair any product at its discretion that is subject to faulty manufacturing or workmanship including materials. Exclusions The above warranty is limited to manufacturing and materials defects. Not including damage caused by misuse or abuse, wear and tear, condensation, extreme weather, accidents, incorrect set up, damage caused by mould, insects, animals or children. -
Page 14: Mounting Rail Dimensions
PANTHER USER MANUAL Mounting rail dimensions The diagrams and dimensions below will assist in preparing roof racks and roof bars for fitment. - Page 15 PANTHER USER MANUAL Mounting rail dimensions The diagrams and dimensions below will assist in preparing roof racks and roof bars for fitment.
Need help?
Do you have a question about the PANTHER and is the answer not in the manual?
Questions and answers