
Related Manuals for Cornelius HELIX


Summary of Contents for Cornelius HELIX
- Page 1 HELIX Operator’s Manual Release Date: July 13, 2012 Publication Number: 621058497OPR Revision Date: February12, 2014 Revision: A18 Visit the Cornelius web site at www.cornelius-usa.com for all your Literature needs.
- Page 2 Commercial Warranty. Cornelius will not be responsible for any repair, replacement or other service required by or loss or damage resulting from any of the following occurrences, including but not limited to, (1) other than normal and proper use and normal...
-
Page 3: Table Of Contents
Helix Machine Usage ........ - Page 4 Preparing Replacement Product Bags..........19 Calibration .
-
Page 5: Safety Instructions
• Keep safety signs in good condition and replace missing or damaged items. • Learn how to operate the unit and how to use the controls properly. © 2012-2014,Cornelius Inc. All Rights Reserved - 1 - Publication Number: 621058497OPR... -
Page 6: Qualified Service Personnel
A freezing ambient environ- ment will cause residual sanitizing solution or water remaining inside the unit to freeze resulting in damage to internal components. Publication Number: 621058497OPR - 2 - © 2012-2014, Cornelius Inc. All Rights Reserved... -
Page 7: Co2 (Carbon Dioxide) Warning
This unit contains fans. Caution must be taken to keep hands, etc. from contacting the rotating blades. Failure to avoid rotating blades could result in injury or equip- ment damage. ATER SAGE Connect only to the drinking water supply. © 2012-2014,Cornelius Inc. All Rights Reserved - 3 - Publication Number: 621058497OPR... -
Page 8: Ventilation Warning
• staff kitchen areas in shops, offices and other working environments • farm houses and by clients in hotels, motels and other residential type environments • bed and breakfast type environments • catering and similar non-retail applications Publication Number: 621058497OPR - 4 - © 2012-2014, Cornelius Inc. All Rights Reserved... -
Page 9: Decommissioning And/Or Transporting The Unit
TORAGE WITHIN THE ACHINE CAUTION: Do not store explosive substances such as aerosol cans with a flammable propel- lant in this appliance. © 2012-2014,Cornelius Inc. All Rights Reserved - 5 - Publication Number: 621058497OPR... -
Page 10: System Overview
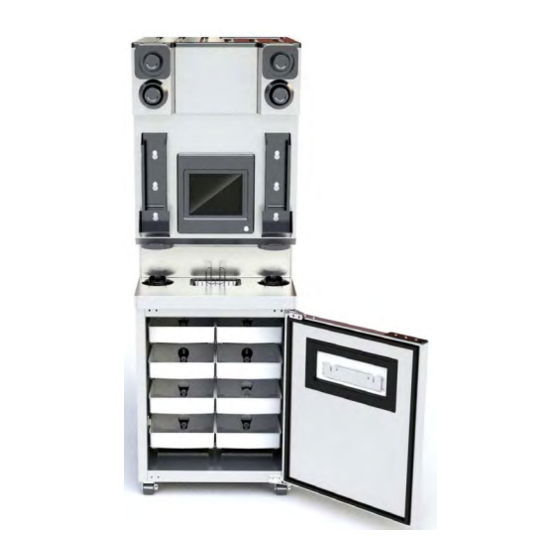
The Helix unit is an automated smoothie machine. It allows blended drinks to be made easier and faster. All the products are stored in the Helix unit, removing the need for a back room package while retaining a small, compact footprint. -
Page 11: Specifications
A-Weighted Sound Pressure Level (during blender operation) ..<70dB The Helix unit is capable of using syrups with particulate matter up to 1/8” in size. © 2012-2014,Cornelius Inc. All Rights Reserved... - Page 12 Helix Operator’s Manual Publication Number: 621058497OPR - 8 - © 2012-2014, Cornelius Inc. All Rights Reserved...
-
Page 13: Operation
The system is now ready for operation. Pressurizing the Water System The Helix unit is designed to operate with a water inlet pressure of 0.48-0.83 MPa (70-120 psig) Perform the procedure in Table 2 to verify the water connection to the unit. -
Page 14: Initial Unit Setup
Spray the lid and clear ice chute with sanitizing solution and let air dry. Reassemble the lid and clear ice chute. Tighten the lid bracket and reattach the quick disconnect. Menu Button Figure 1. Publication Number: 621058497OPR - 10 - © 2012-2014, Cornelius Inc. All Rights Reserved... - Page 15 Helix Operator’s Manual Figure 2. Figure 3. © 2012-2014,Cornelius Inc. All Rights Reserved - 11 - Publication Number: 621058497OPR...
-
Page 16: Unit Startup
If the supply cord is damaged, it must be replaced by a special cord or assembly available from the manufacturer or its service agent. Turn on the power switch located behind the control panel, as shown in Figure 6. Publication Number: 621058497OPR - 12 - © 2012-2014, Cornelius Inc. All Rights Reserved... -
Page 17: System Sanitation
Figure 8. The sanitization program steps through the rest of the proce- dure providing step-by-step instructions. NOTE: During initial set up, all ingredient lines and blenders must be sani- tized. When selected, the ingredient image turns grey. © 2012-2014,Cornelius Inc. All Rights Reserved - 13 - Publication Number: 621058497OPR... -
Page 18: Ingredient Sanitation
Select the weekly product tab to sanitize ALL ingredient trays and lines. Press the Play button to start the sanitation process. Follow the steps shown on the screen to complete the sanitation process. Publication Number: 621058497OPR - 14 - © 2012-2014, Cornelius Inc. All Rights Reserved... -
Page 19: Blender Sanitation
Bucket #2: Fill the bucket with five gallons of clean hot water (100° F. - 38° C). Bucket #3: Fill the bucket with sanitizer solution (100 ppm, Kay-5 cleaner/ sanitizer) mixed as directed on the package. © 2012-2014,Cornelius Inc. All Rights Reserved - 15 - Publication Number: 621058497OPR... -
Page 20: Ice Maker Sanitation
To sanitize the ice maker, perform the procedure in Table 7. Table 7 Step Action Wash and sanitize hands or use clean rubber gloves. Select the Ice Maker Sanitization tab, shown in Figure 12. Publication Number: 621058497OPR - 16 - © 2012-2014, Cornelius Inc. All Rights Reserved... -
Page 21: Sanitation Scheduler
Figure 12. Sanitation Scheduler The Helix software contains a Sanitation Scheduler that allows the user to set up an automated schedule for sanitizing the unit. Pressing the Sani Scheduler button shows the current sanitation schedule settings. - Page 22 Press the “Set” button (check mark) to save the settings. The arrows can be pressed to restore the defaults and the “X” can be pressed to cancel the changes. Figure 14. Publication Number: 621058497OPR - 18 - © 2012-2014, Cornelius Inc. All Rights Reserved...
-
Page 23: Preparing Replacement Product Bags
NOTE: The bag should engage the fitting on the back wall. If product is leak- ing out, the connection did not seal and the bag should be reinserted. Figure 15. © 2012-2014,Cornelius Inc. All Rights Reserved - 19 - Publication Number: 621058497OPR... -
Page 24: Calibration
To begin normal operation, the unit must be calibrated for all ingredients. These pro- cedures can be done by a manager or service technician. Refer to the installation manual (P/N 621058497INS) for calibration instructions. Publication Number: 621058497OPR - 20 - © 2012-2014, Cornelius Inc. All Rights Reserved... -
Page 25: Blender Operation
Press the Menu button to access the Daily Clean screen, shown in Figure 18. Press the Play button to start the process. Follow the steps shown on the screen to complete the cleaning process. © 2012-2014,Cornelius Inc. All Rights Reserved - 21 - Publication Number: 621058497OPR... -
Page 26: Dispensing A Drink
Figure 21. (Screen indicates which blender to use.) Press the Blend button (lower right or left corner of the screen) and wait for the blend cycle to finish. Blender will stop and lift blade. Publication Number: 621058497OPR - 22 - © 2012-2014, Cornelius Inc. All Rights Reserved... - Page 27 This can be disabled by a manager level or above in the settings menu. Figure 19. Figure 20. © 2012-2014,Cornelius Inc. All Rights Reserved - 23 - Publication Number: 621058497OPR...
- Page 28 Helix Operator’s Manual Figure 21. Publication Number: 621058497OPR - 24 - © 2012-2014, Cornelius Inc. All Rights Reserved...
-
Page 29: Maintenance
WARNING: Do not store explosive substances, such as aerosol cans with a flammable propellant in this unit. The Helix unit is capable of using syrups with particulate matter up to 1/8” in size. EPLACING UPPLIES To replace a product bag, perform the procedure in Table 12. -
Page 30: Priming The New Product Bag
Select the bag that was replaced and then press the Arrow button and follow the steps shown on the screen to complete the priming pro- cess.(See Figure 26.) Press the Home button to return to the Main Screen Publication Number: 621058497OPR - 26 - © 2012-2014, Cornelius Inc. All Rights Reserved... -
Page 31: Temperature Monitoring
Temperatures in the product cabinet is monitored by the system. This allows the operator to ensure that all products are acceptable to dispense and consume. See Figure 27 for the Temperature screen. © 2012-2014,Cornelius Inc. All Rights Reserved - 27 - Publication Number: 621058497OPR... -
Page 32: Cabinet Temperature
Use the up and down arrows to set the Hour, Minute, AM/PM, Month, Day and Year. To save the settings press the check mark, or to cancel changes press the “X”. Publication Number: 621058497OPR - 28 - © 2012-2014, Cornelius Inc. All Rights Reserved... -
Page 33: Daily Maintenance
Perform the procedure in the System Sanitation section on page 13. The unit requires sanitation at least once a week. More frequent sanitation may be required by local code. © 2012-2014,Cornelius Inc. All Rights Reserved - 29 - Publication Number: 621058497OPR... -
Page 34: Product Cabinet Inspection
• Inspect upper bearings on auger assembly Water System Inspection Check for water leaks in all of the tubing connections, water fittings and the lower ice maker water seal. Publication Number: 621058497OPR - 30 - © 2012-2014, Cornelius Inc. All Rights Reserved... -
Page 35: Drain Tube Inspection
Check unit for any unusual noise or rattles. Tighten any loose screws if necessary. Auger Bearing Inspection Check white upper auger bearings for wear. If bearings are less than 1/16” thickness, replace the bearing. Refer to Figure 29. Figure 29. © 2012-2014,Cornelius Inc. All Rights Reserved - 31 - Publication Number: 621058497OPR... -
Page 36: Alarms
Figure 31, provides a history of the unit’s performance and is intended for service technicians. To access the Alarm Status screen, press the Alarms button on the Menu screen. Figure 30. Figure 31. Publication Number: 621058497OPR - 32 - © 2012-2014, Cornelius Inc. All Rights Reserved... -
Page 37: Unit Level Alarms & Warnings
Expiration date of the product is based on the time value entered into the recipe. The expiration date is reset when a new product BIB is connected in the BIB rack. © 2012-2014,Cornelius Inc. All Rights Reserved - 33 - Publication Number: 621058497OPR... -
Page 38: Troubleshooting
Bad connections to dispense switch Check connections / correct as needed Product does not dispense C. Dispense switch bad or mis-located C. Adjust/replace as needed Control Board bad Replace board Publication Number: 621058497OPR - 34 - © 2012-2014, Cornelius Inc. All Rights Reserved... -
Page 39: Troubleshooting Product Not Cold
Bad connection. A. Correct wiring. B. Replace sensor. AF. Bad sensor. Thermistors/Reed Switches C. Reposition sensor and clip. AG. Sensor out of position. D. Replace. AH. Defective control board. © 2012-2014,Cornelius Inc. All Rights Reserved - 35 - Publication Number: 621058497OPR... - Page 40 Helix Operator’s Manual Publication Number: 621058497OPR - 36 - © 2012-2014, Cornelius Inc. All Rights Reserved...
- Page 42 Cornelius Inc. www.cornelius-usa.com...
Need help?
Do you have a question about the HELIX and is the answer not in the manual?
Questions and answers