RGBlink TAO 1pro User Manual
Hide thumbs
Also See for TAO 1pro:
- User manual (39 pages) ,
- Manual (6 pages) ,
- Quick start manual (14 pages)
Table of Contents
Advertisement
Quick Links
Advertisement
Table of Contents

Related Manuals for RGBlink TAO 1pro


Summary of Contents for RGBlink TAO 1pro
- Page 1 TAO 1pro User Manual Article NO: RGB-RD-UM-TAO 1pro E0005 Version NO: V1.5...
-
Page 2: Table Of Contents
Chapter 3 Use Your Product.........................13 3.1 Input/Output Area........................13 3.1.1 Input Signal...........................13 3.1.2 How to Config TAO 1pro as a NDI Decoder................14 3.1.3 How to Config TAO 1pro as a Player..................14 3.1.4 How to Config TAO 1pro to Stream..................15 3.1.5 How to Config TAO 1pro as a NDI encoder................17... - Page 3 Chapter 6 Support..........................33 6.1 Contact us........................... 33 Chapter 7 Appendix..........................34 7.1 Specification..........................34 7.2 Battery Installation........................35 7.3 FAQ..............................37 7.4 Terms & Definitions........................38 7.5 Revision History.......................... 45 © Xiamen RGBlink Science & Technology Co., Ltd. Ph: +86 0592 5771197 | support@rgblink.com | www.rgblink.com...
-
Page 4: Declarations
RGBlink. If the purchaser or a third party carries out modifications or repairs on goods delivered by RGBlink, or if the goods are handled incorrectly, in particular if the systems are commissioned operated incorrectly or if, after the transfer of risks, the goods are subject to influences not agreed upon in the contract, all guarantee claims of the purchaser will be rendered invalid. -
Page 5: Operators Safety Summary
The environment in which you install your product should be clean, properly lit, free from static, and have adequate power, ventilation, and space for all components. © Xiamen RGBlink Science & Technology Co., Ltd. Ph: +86 0592 5771197 | support@rgblink.com | www.rgblink.com... -
Page 6: Chapter 1 Your Product
Chapter 1 Your Product 1.1 In the Box Type-C Power Cord Doublethread Power Adapter 1/4 Screw Note:The color of the accessories is subject to actual conditions © Xiamen RGBlink Science & Technology Co., Ltd. Ph: +86 0592 5771197 | support@rgblink.com | www.rgblink.com... -
Page 7: Product Overview
Anywhere to Everywhere. TAO 1pro is compatible with standard USB 2.0 and USB 3.0 cameras by UVC protocol, and brings itself as a much affordable and user friendly streaming tools for anybody, the talents who is willing to be Anchor Online. -
Page 8: Front Panel
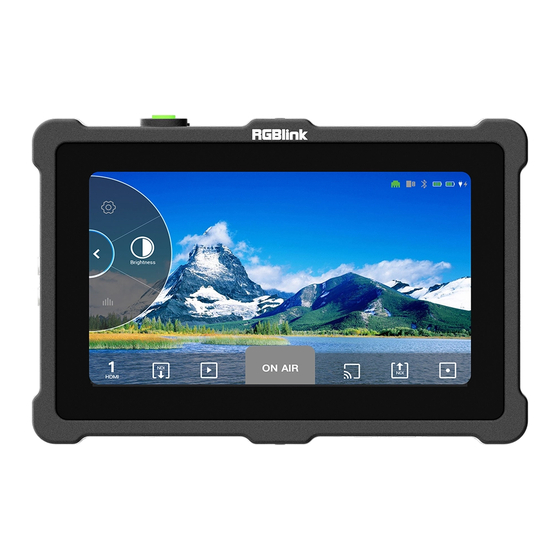
Description Item Gently press to turn on,long press 3 seconds to turn off Power Button 5.5 inch touch screen for menu control Touch Screen © Xiamen RGBlink Science & Technology Co., Ltd. Ph: +86 0592 5771197 | support@rgblink.com | www.rgblink.com... -
Page 9: Interface Panel
USB 2.0 1×USB Type A Connect to harddisk for recording,and storage up to USB 3.0 2×USB Type A Connect to USB camera for UVC capture © Xiamen RGBlink Science & Technology Co., Ltd. Ph: +86 0592 5771197 | support@rgblink.com | www.rgblink.com... -
Page 10: Dimension
1.3 Dimension Following is the dimension of TAO 1pro for your reference: 160.92mm×106mm×36mm © Xiamen RGBlink Science & Technology Co., Ltd. Ph: +86 0592 5771197 | support@rgblink.com | www.rgblink.com... -
Page 11: Chapter 2 Install Your Product
Chapter 2 Install Your Product 2.1 Plug in Power RGBlink TAO 1pro is packaged with a Type C power link cable and a standard power adapter. When connect the power supply, please check the power supply standard used in your country/area. -
Page 12: Connecting Hdmi Output
For external HDMI 2.0 monitor, only once TAO 1pro is used as an converter. 2.4 Connecting Network On the left panel of TAO 1pro,there is a LAN port which can be connected to the router via CAT5e/CAT6 cable or connected wirelessly via SIM card for live streaming.(Details refers to <3.4 Streaming>) 2.5 Connecting Microphone and External Monitor... -
Page 13: Turn On Tao 1Pro
2.6 Turn on TAO 1pro After TAO 1pro is connected to power supply, gently press the Power button on the top panel,the device will enter to the boot interface and enter operation interface. © Xiamen RGBlink Science & Technology Co., Ltd. -
Page 14: Chapter 3 Use Your Product
TAO 1pro. The main menu of TAO 1pro can be devided into four parts: Input/Output Area, Scroll Area, Reminder Area and Status Display Area. -
Page 15: How To Config Tao 1Pro As A Ndi Decoder
3.1.2 How to Config TAO 1pro as a NDI Decoder If you need to operate NDI decoding mode, you need to set the IP address (same as IP of camera ), subnet mask and gateway in [Network Settings] of [Scroll Area] first. Then long press the icon to enter the following interface, turn on the switch to start NDI decoding function. -
Page 16: How To Config Tao 1Pro To Stream
Step 3: Create a new TXT file first,and paste the Streaming URL and Stream Key (the format must be : rtmp//:YOUR STREAM URL/YOUR STREAM KEY), and save the TXT file to USB as rtmp.ini.(Newline is required to add multiple streaming addresses) and connect the USB disk to TAO 1pro’s RECORD USB port. © Xiamen RGBlink Science & Technology Co., Ltd. - Page 17 After completing the above steps, click [ON AIR] to stream ( support up to 4 live streaming platforms at the same time). Source Status: --Streaming; --Standby. © Xiamen RGBlink Science & Technology Co., Ltd. Ph: +86 0592 5771197 | support@rgblink.com | www.rgblink.com...
-
Page 18: How To Config Tao 1Pro As A Ndi Encoder
If you select Multicast, you can also set Net Mask/ IP Address/TTL. After setting, click [Save]. 3.1.6 How to Config TAO 1pro as a Recorder Plug USB hard drive to TAO 1pro USB 2.0 port and then TAO 1pro can work as a recorder. Click record icon to start recording. -
Page 19: Scroll Area
Click [Input] to enter [Input Settings] page. In this interface, you can set the Input Signal, Input Format, Audio Sampling Rate, Signal Name, Brightness, Contrast, Saturation, Hue and Sharpness. © Xiamen RGBlink Science & Technology Co., Ltd. Ph: +86 0592 5771197 | support@rgblink.com | www.rgblink.com... - Page 20 Netmask and Gateway in the menu;When HDCP is turned on, the IP Address can be captured automatically. After setting, click [Save]. 3.2.1.3 Bluetooth You can connect the Bluetooth controller to control PTZ camera.(only RGBlink PTZ) Turn ON Bluetooth and choose the device to be connected to achieve control of PTZ camera. 3.2.1.4 UVC Control ©...
- Page 21 [Auto] to achieve automatic adjustment of the speed. 3.2.1.6 Stream Output Click [Stream Output] to enter the setting page. For more details, please refer to 3.1.4 How to config TAO 1pro to Stream. © Xiamen RGBlink Science & Technology Co., Ltd.
- Page 22 3.2.1.7 NDI Decoder Click [NDI Decoder] to enter the setting page. For more details, please refer to 3.1.2 How to config TAO 1pro as a NDI Decoder. 3.2.1.8 NDI Encoder Click [NDI Encoder] to enter the setting page. For more details, please refer to 3.1.5 How to config TAO 1pro as a NDI Encoder.
- Page 23 3.2.1.9 Display Click [Display] to enter the setting page. In this interface, you can set the brightness of the output, HDMI output resolution. In addition, TAO 1pro also comes with a screen rotation function. Brightness: 0-100% HDMI Output: 2K, 4K Display Rotation: 0°, 180°...
-
Page 24: Brightness
As shown in the picture above,the top side of Brightness means the brightest, the bottom means the darkest.As we can see, the wave is close to the top side, which means the picture now is bright. © Xiamen RGBlink Science & Technology Co., Ltd. Ph: +86 0592 5771197 | support@rgblink.com | www.rgblink.com... -
Page 25: Rgb Waveform
So RGB Waveform is used to detect white balance. 3.2.4 Vector Click [Vector] to select position and transparency. © Xiamen RGBlink Science & Technology Co., Ltd. Ph: +86 0592 5771197 | support@rgblink.com | www.rgblink.com... -
Page 26: Histogram
Blue,Cyan,Green and Yellow. Through the Vector, we can easily see that the picture color are mostly yellow and cyan. 3.2.5 Histogram Click [Histogram] to select position and transparency. © Xiamen RGBlink Science & Technology Co., Ltd. Ph: +86 0592 5771197 | support@rgblink.com | www.rgblink.com... -
Page 27: Audio Meter
3.2.7 Viewfinder Click [Viewfinder] to select frame size(16:9 or 4:3). Users can cut out the screen outside the frame based on the actual size. © Xiamen RGBlink Science & Technology Co., Ltd. Ph: +86 0592 5771197 | support@rgblink.com | www.rgblink.com... -
Page 28: Reminder Area
3.3 Reminder Area TAO 1pro also comes with [Reminder Area] as shown. reminder area The above massage shown in the Reminder Area means exclusive use of several modes. The following table concludes the of TAO 1pro. mutual exclusion © Xiamen RGBlink Science & Technology Co., Ltd. -
Page 29: Status Display Area
3.4 Status Display Area The upper right of interface is the Status Display Area, which displays the status of the TAO 1pro. no input signal no USB Bluetooth is not plugged in not connected. with input signal with USB Bluetooth is plugged in connected. -
Page 30: Chapter 4 Upgrade
5. Two approaches for this upgrade guideline: 1) Website ( decompression required) CN: https://www.rgblink.cn/productsinfo.aspx?id=157 EN: https://www.rgblink.com/productsinfo.aspx?id=204 2) Dropbox (without decompression) https://www.dropbox.com/sh/akcgjcqcsbn8b8q/AAAhYUsU4qVS9P7aD2-qmB46a?dl=0 © Xiamen RGBlink Science & Technology Co., Ltd. Ph: +86 0592 5771197 | support@rgblink.com | www.rgblink.com... - Page 31 Note: After upgrading the img format package, the ZIP format package upgrade is no longer supported 2. Insert the U disk into the record USB port. Power on TAO 1pro. Enter system setting and select the [Upgrade] option. 1) Upgrade the V1.2.28 first. The new UI change a lot and need to upgrade it first then go on the new version.
- Page 32 2) After finishing the V1.28 upgrade, then choose V1.3.07, and do the upgrade operation again. Then wait for about 5 minutes (do not power off during upgrade ). And the TAO 1pro will upgrade the img package synchronously, no need of any other operation during this process.
-
Page 33: Chapter 5 Ordering Codes
Chapter 5 Ordering Codes 5.1 Product Code 410-5513-01-0 TAO 1pro © Xiamen RGBlink Science & Technology Co., Ltd. Ph: +86 0592 5771197 | support@rgblink.com | www.rgblink.com... -
Page 34: Chapter 6 Support
Chapter 6 Support 6.1 Contact us © Xiamen RGBlink Science & Technology Co., Ltd. Ph: +86 0592 5771197 | support@rgblink.com | www.rgblink.com... -
Page 35: Chapter 7 Appendix
HDMI 1.3(Input) | 2.0(Output) Standard Screen Screen Dimension 5.5 ’TFT Feature Resolution 1080×1920 pixels Dot Pitch 0.063(H)×0.021(W)(mm) Aspect Ratio 16:9 Brightness 450cd/m² Contrast 1000:1 © Xiamen RGBlink Science & Technology Co., Ltd. Ph: +86 0592 5771197 | support@rgblink.com | www.rgblink.com... -
Page 36: Battery Installation
255mm×145mm×85mm 7.2 Battery Installation TAO 1pro supports power supply via Type C cable as well as two batteries. Install: press the lock button first and put the batteries into the slots until it is locked in the correct position. Remove: press lock button first and remove the batteries. - Page 37 Sony NP-F960 5400mA 300g 2~3 hours Panasonic AG-VBR59MC 5900mA 300g 3 hours Panasonic D54S 5400mA 300g 2~3 hours Panasonic CGA-D54D 5400mA 300g 2~3 hours © Xiamen RGBlink Science & Technology Co., Ltd. Ph: +86 0592 5771197 | support@rgblink.com | www.rgblink.com...
-
Page 38: Faq
2.TAO 1pro failed to record a file? A: TAO 1pro will identify the files inside the U disk one by one after the recording starts. If the files have not been identified completely, clicking the record will not work. To avoid this, if the file is not fully identified, the icon is left in gray rather than green. -
Page 39: Terms & Definitions
A: the TAO 1pro's HDMI input is only recognized as 1080P 50,60 and 720P (computer signal excluded). Support i format signal input; If computer signal input is used, it must be 1080P50 and 60, others are not supported. TAO 1pro does not support de-interlacing function. - Page 40 1920 × 1080 at 120 Hz. Compared to HDMI 1.3, 3 more features added which are HDMI Ethernet Channel (HEC) , audio return channel (ARC),3D Over HDMI, a new Micro HDMI Connector, an expanded set of color spaces. © Xiamen RGBlink Science & Technology Co., Ltd. Ph: +86 0592 5771197 | support@rgblink.com | www.rgblink.com...
- Page 41 Nippon Telegraph and Telephone. SC is a push-pull coupling type of connector and has a 2.5mm diameter. Nowadays, it is used mostly in single mode fiber optic patch cords, analog, GBIC, and CATV. SC is one of the most © Xiamen RGBlink Science & Technology Co., Ltd. Ph: +86 0592 5771197 | support@rgblink.com | www.rgblink.com...
- Page 42 It takes four full images (8 fields) for the colour-to-horizontalimages (8 fields) for the colour-to-horizontal phase relationship to return to the reference point. This alternation helps cancel out phase errors. For this reason, the hue © Xiamen RGBlink Science & Technology Co., Ltd. Ph: +86 0592 5771197 | support@rgblink.com | www.rgblink.com...
- Page 43 ● MPEG: Moving Picture Experts Group is a working group formed from ISO and IEC developing standards that allow audio/video digital compression and Transmission. © Xiamen RGBlink Science & Technology Co., Ltd. Ph: +86 0592 5771197 | support@rgblink.com | www.rgblink.com...
- Page 44 The less white in a colour, the truer the colour or the greater its saturation. Saturation is the amount of pigment in a colour, and not the intensity. © Xiamen RGBlink Science & Technology Co., Ltd. Ph: +86 0592 5771197 | support@rgblink.com | www.rgblink.com...
- Page 45 ●UHD: Standing for Ultra High Definition and comprising 4K and 8K television standards with a 16:9 ratio, UHD follows the 2K HDTV standard. A UHD 4K display has a physical resolution of3840x2160 which is four times the area © Xiamen RGBlink Science & Technology Co., Ltd. Ph: +86 0592 5771197 | support@rgblink.com | www.rgblink.com...
-
Page 46: Revision History
All information herein is Xiamen RGBlink Science & Technology Co Ltd. excepting noted. is a registered trademark of Xiamen RGBlink Science & Technology Co Ltd.While all efforts are made for accuracy at time of print ing, we reserve the right to alter otherwise make change without notice.
Need help?
Do you have a question about the TAO 1pro and is the answer not in the manual?
Questions and answers