Table of Contents
Advertisement
Quick Links
Advertisement
Table of Contents

Related Manuals for Roland E-X50


Summary of Contents for Roland E-X50
- Page 1 E-X50 Arranger Keyboard Owner’s Manual Version: V06 - 1 -...
- Page 2 Changes or Modifications not expressly approved by the party responsible could void the user’s authority to operate this device. This equipment has been tested and found to comply with the limits for a Class B digital device, pursuant to Part 15 of the FCC Rules. These limits are designed to provide reasonable protection against harmful interference in a residential installation.
-
Page 3: Table Of Contents
Table of Contents Panel & Display Description ..........................5 Front Panel ..............................5 LCD ................................7 Rear Panel ..............................8 Setup ..................................9 Power Supply .............................. 9 Setting a Music Rest ..........................9 Connections ............................... 10 Connecting a Pair of Headphones ......................10 Connecting a USB Flash Drive ....................... - Page 4 Playing a Style/Song from USB Flash Drive ..................29 Saving User Song to USB Flash Drive ....................29 Loading User Song from USB Flash Drive ................... 30 Saving User Style to USB Flash Drive ....................30 Loading User Style from USB Flash Drive .................... 31 Saving User Setting to USB Flash Drive ....................
-
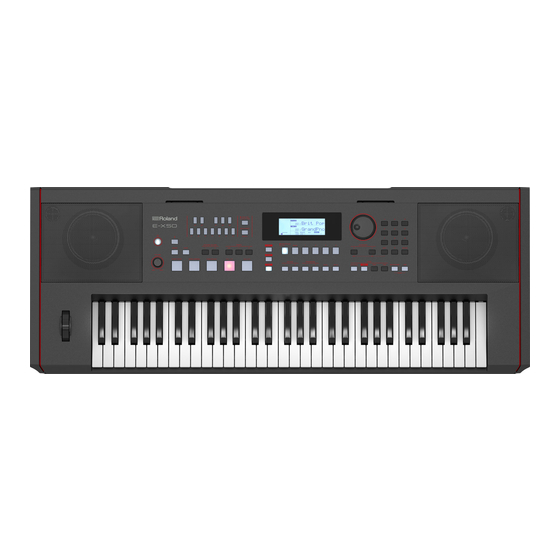
Page 5: Panel & Display Description
Panel & Display Description Front Panel 1. [POWER] switch Switch the power on or off. 2. [MASTER VOLUME] knob Adjust the master volume. 4. [AUDIO PAD / SCALE TUNE] button Switch between Scale Tune mode and Audio Pad mode. ------------------------------------------------ In Scale Tune mode: 3. - Page 6 Enter or exit the Bluetooth menu. 7. [CHORD] button Enter the Chord mode. 8. [SYNC] button Turn the Sync function on or off. 9. ACCOMP VOLUME [-] / [+] buttons Adjust the accompaniment volume. 10. TEMPO [TAP] / [-] / [+] buttons Adjust the current tempo.
-
Page 7: Lcd
29. LCD display Display all parameters and values related to the current operation. 30. Data dial Adjust the parameter. 31. CATEGORY [<] / [>] buttons Change the category in the current menu. 32. [EXIT] / [ENTER] and Numeric buttons Go back / confirm current setting or select the Style/Tone number. 33. -
Page 8: Rear Panel
7. TEMPO 8. MEASURE 9. BEAT 10. RECORD 11. MEMORY / O.T.S. / DEMO Rear Panel 39. USB MEMORY jack: connecting a USB flash drive. 40. USB COMPUTER jack: connecting to a computer. 41. PEDAL jack: for connecting a sustain pedal. 42. -
Page 9: Setup
Setup This section contains information about setting up your instrument and preparing to play. Please go through this section carefully before turning the power on. Power Supply You can power the instrument by using the included power adaptor. Turn down the volume of instrument and the connected audio equipment before you switch the instrument on. Connect the adaptor to the DC 12V jack of this instrument. -
Page 10: Connections
Connections Connecting a Pair of Headphones A standard pair of stereo headphones can be connected to the PHONES jack for private practice or late-night playing. The internal stereo speaker system is automatically shut off when a pair of headphones is plugged into this jack. Note: To avoid the risk of hearing loss, do not listen with headphones at high volume level for a long period of time. -
Page 11: Connecting An Audio Equipment
Notes: 1. Please connect the plug of the pedal to the PEDAL jack before turning the power on. 2. The polarity of different pedals may vary. If the connected sustain pedal works in reversed behavior, please plug the pedal to the PEDAL jack before turning the power Connecting an Audio Equipment The rear-panel OUTPUT jacks deliver the output of the instrument to external audio equipment such as a keyboard amplifier, a stereo... -
Page 12: Adjusting The Master Volume
If the LCD isn't lit after you turn on the instrument, please check the power connection. When power on, the [POWER] switch LED will stay lit. Adjusting the Master Volume Rotate the [VOLUME] knob clockwise to increase the master volume or counter-clockwise to decrease it. Adjust to set the desired volume level. -
Page 13: Function Menu
Function Menu Press the [MENU] button to enter the Function Menu. For the operation details, please In the Function Menu, you can edit the parameters and functions of this instrument. see the chapter Function Menu (P.33). Playing Demo Song Press the [METRONOME] + [USB] buttons simultaneously to play the demo song. -
Page 14: Playing Two Tones Simultaneously
Note: When Dual and Split functions are in use, you can press the [TONE] button repeatedly to switch between the tone layers. Playing Two Tones Simultaneously The dual function allows you to layer two different tones together, creating a much richer sound. Press the [DUAL] button to enter Dual mode. -
Page 15: Pitch Bend
Pitch Bend Use the pitch bend wheel to bend notes up (roll the wheel away from you) or down (roll the wheel toward you) while playing the keyboard. The pitch bend wheel is self-centering and will automatically return to normal pitch when released. With the pitch bend wheel, you can easily imitate the pitch bend effect of the guitar, violin, saxophone or other instruments. -
Page 16: Selecting Chord Modes
Selecting Chord Modes When chord mode is off, you can press the [START/STOP] button to start playing the rhythm tracks. When chord mode is on, the [CHORD] button LED lights up. You can press the [START/STOP] button to start the rhythm tracks, then play a chord in the chord section to start all tracks. -
Page 17: Playing Auto Accompaniment (All Tracks)
Playing Auto Accompaniment (All Tracks) Press the [CHORD] button to enter Chord mode. Press the [SYNC] button to turn on the Sync function. The button LED lights up and the beats on LCD blink. The Sync function puts the playback on standby. You can play a chord in the chord section to start playing all tracks. Or you can press the [START/STOP] button to start the rhythm tracks. -
Page 18: Fade In / Out
Press the [INTRO/ENDING] button. The “ENDING” icon on LCD lights up. It will play the Ending section. When the Ending is finished, the playback will stop. Notes: 1. When style stops, press the [INTRO/ENDING] button to engage the long Intro. The button LED and the “INTRO” icon on LCD stay lit. -
Page 19: Accompaniment Volume
Accompaniment Volume You can adjust the accompaniment volume to keep an appropriate balance between the accompaniment volume and the tone volume. Press the ACCOMP VOLUME [-] / [+] button. The LCD displays the current accompaniment volume level. Use the ACCOMP VOLUME [-] / [+] button, the [EXIT] + [<] / [>] buttons or the data dial to adjust the volume level. -
Page 20: Tempo
批注:改成 38 批注: 在后面增加这 6 种和弦在→ Tempo Press the Tempo [-] / [+] button to change the tempo. The tempo value on LCD blinks. When the tempo value blinks, use the data dial to fast change the tempo. Press the TEMPO [-] and [+] buttons simultaneously to restore the default tempo. -
Page 21: Metronome
Metronome The metronome provides a steady beat to help you practice at a preset tempo. Press [METRONOME] button to start the metronome. The button LED will blink in sync with the metronome sound. Press the [METRONOME] button again to stop the metronome. The button LED turns off. -
Page 22: One Touch Setting
that button. Parameters that can be saved to registration memory include: Tone: main tone, dual tone, split tone, DSP effects, mixer settings. Accompaniment: style, tempo, Chord mode. Function: touch response, mic effect and some parameters in the function menu. Recalling the Registered Settings Press one of the memory buttons [1] - [4]. -
Page 23: Recording
Recording You can record your performance in real time and save it as a user song. The user songs can be exported to a USB flash drive. (Please refer to Connecting USB Flash Drive for details.) Prepare Recording Before you start recording, you need to select a user song to which the recording will be saved. -
Page 24: Play Back Recording
During recording, you can press the [REC] button to stop recording. The button LED and the “REC” icon on LCD turn off. The beat counting stops. Or you can press the [EXIT] button to stop recording. It will go back to the user song menu. Automatically Stop Recording: When memory is used up, recording will stop automatically and be saved. -
Page 25: Bluetooth
Bluetooth function is turned on by default. The Bluetooth Audio name is E-X50 Audio. Turn on the Bluetooth function on mobile device, search the Bluetooth Audio name “E-X50 Audio “.Tap this name to pair it. After it is paired, the [ ] button LED and the Bluetooth icon on LCD will light up. -
Page 26: Sustain Type
Press the [MENU] button to enter the function menu. Use the [<] / [>] button to select the “KEYBOARD” menu. Then use the data dial to select the “Pedal” parameter. Press the [ENTER] button to move the cursor to the lower menu. Now use the data dial or the [EXIT] + [<] / [>] buttons to change the pedal function. -
Page 27: Scale Tune
Press the [ENTER] button to move the cursor to “OFF” in the lower menu. Now use the data dial or the [EXIT] + [<] / [>] buttons to turn this function on or off. Please refer to the function menu (P.33). Scale Tune There are two modes: “SCALE TUNE”... -
Page 28: Audio Pad
Audio Pad When a USB flash drive is connected and recognized, you can press the [AUDIO PAD / SCALE TUNE] button to switch to Audio Pad mode. The button LED lights up and the LCD will temporarily display “AudioPad”. Audio Pad buttons are [C], [C#], [D], [D#], [E], [F], [F#], [G], [G#], [A], [A#] and [B]. -
Page 29: Connecting Usb Flash Drive
Bit Rate 16bit Notes: 1. Two or more audio files cannot be played at the same time. 2. The tempo of an audio file cannot be changed. Connecting USB Flash Drive The instrument recognizes USB flash drives (32MB to 128GB) in FAT32 format. It does not support multi-partitioned flash drives. -
Page 30: Loading User Song From Usb Flash Drive
songs will be saved to the root directory of the USB flash drive. The files will be named as “RecSng_XX_NUB.MIDI”. After saving, the LCD will prompt “Save OK!”, then return to the USB menu. File name description: “RecSng_XX” is the user song name and number (corresponding to the user songs on the instrument). -
Page 31: Loading User Style From Usb Flash Drive
Press the [MENU] button to enter the function menu, then press the [USB] button to enter the USB menu. Use the data dial to select “SaveSTY”. Press the [ENTER] button to move the cursor to “Yes?” in the lower menu. Press the [ENTER] button, the LCD will display “Saving..”. -
Page 32: Loading User Setting From Usb Flash Drive
volume), and registration memory. When exporting the user settings, user songs and user styles will be saved to the USB flash drive as well. Press the [MENU] button to enter the function menu, then press the [USB] button to enter the USB menu. Use the data dial to select “SaveUSet”. Press the [ENTER] button to move the cursor to “Yes?”... -
Page 33: Function Menu
menu. Press the [ENTER] button to format the USB flash drive, or press the [EXIT] button to cancel. After formatting, it will return to the USB menu. Note: Formatting will delete all data on the USB flash drive. It may take several minutes to format a USB flash drive of large capacity. - Page 34 up or down in a 2-cent increment. Upper tone octave OctvR1 -2 ~ +2 (default: 0) Shift the pitch of the specified tone layer up or down by one Dual tone octave OctvR2 -2 ~ +2 (default: 0) octave. Split tone octave OctvL -2 ~ +2 (default: 1) Touch response...
- Page 35 Rock Class Jazz R&B (default: Piano) Chorus type ChrTYPE Chorus1 Select the chorus type. Chorus2 Chorus3 Chorus4 ChrGMC1 ChrGMC2 ChrCel1 ChrCel2 ChrSym1 ChrSym2 ChrDoub ChrStd. (default: ChrStd.) Chorus level Chr Lev 0 ~ 32 (default: 0) Adjust the chorus level of the current chorus type.
- Page 36 MChrSym1 MChrSym2 MChrDoub MChrStd. MWah MPhaser MDist. MOvDr. MPan (default: MChrStd.) Mic effect level MEfLev 0 ~ 32 (default: 0) Adjust the mic effect level. Mic delay type MDlType MDelay Select the mic delay type. MPanDly (default: MDelay) Mic delay time MDlTime 0 ~ 32 (default: 10) Set the mic delay time.
-
Page 37: Factory Reset
Factory Reset Press the [MENU] button to enter the function menu (P.33 . Use the [<] / [>] button to select “OTHERS”, then use the data dial to select “Reset”. Press the [ENTER] button to move the cursor to “Reset?” in the lower menu. -
Page 38: Troubleshooting
Use a standard USB cable to connect the instrument to computer. Make sure the instrument is turned on. Open Digital Audio Workstation (DAW) software on computer. The software will automatically recognize the E-X50 USB DEVICE either as the MIDI Input or as the MIDI Output. -
Page 39: Specifications
Speakers do not produce sound when the 1. Check if the master volume is set too low. keyboard is played. 2. Check if the R1/R2/L1 sound volume is set too low in the mixer in the function menu. 3. Check if headphones are plugged into the PHONES jack. The speakers produce noise when a Using a mobile phone in close proximity to the instrument may produce mobile phone is put near them. - Page 40 Start / Stop Sync Start Intro (1, 2) Main (1, 2, 3, 4) Style control Fill (1, 2, 3, 4) Ending (1, 2) Chord mode Fade in / out Style creator Chord type Reverb 11 types, 33 levels Chorus 12 types, 33 levels Effects DSP effects, Mic effects Master EQ...
- Page 41 Roland website. * All specifications are subject to change without notice. - 41 -...
-
Page 42: Tone List
Tone List Clavi 1 Clavi1 NO. English Name LCD Name Clavi 2 Clavi2 PIANO(Piano) Phase Clavi PhaseClv Grand Piano GrandPno Wah Clavi WahClv Ballad Piano BalladP Pulse Clavi PluseClv Mellow Piano MellowP Dream EP DreamEP Bright Piano BrightP Tremolo EP TremoEP Acoustic Piano AcPiano... - Page 43 Drawbar Organ 3 DrawOrg3 Mid Tone Guitar MidTonGt Detuned Drawbar Organ DeDraOrg Electric Guitar (muted) 1 MutedGt1 Detuned Percussive Organ DePerOrg Electric Guitar (muted) 2 MutedGt2 Electric Guitar (funky Percussive Organ 1 PercOrg1 FunkGt cutting) Percussive Organ 2 PercOrg2 Electric Guitar (muted MutVelGt Percussive Organ 3 PercOrg3...
- Page 44 Violin 2 Violin2 Trombone 1 Trmbone1 Violin (slow attack) SlViolin Trombone 2 Trmbone2 Viola 1 Viola1 Trombone 3 Trmbone3 Viola 2 Viola2 Bright Trombone BritBone Cello 1 Cello1 Tuba 1 Tuba1 Cello 2 Cello2 Tuba 2 Tuba2 Contrabass 1 Contrbs1 Muted Trumpet 1 MuteTrp1 Contrabass 2...
- Page 45 Lead 2d (sequenced 2 Oboes 2Oboes SqAnaLd1 analog) 1 English Horn 1 EngHorn1 Lead 2d (sequenced English Horn 2 EngHorn2 SqAnaLd2 analog) 2 English Horn 3 EngHorn3 Wavy Sawtooth 1 WavySaw1 2 English Horns 2EngHons Bauble Lead BaubleLd Bassoon 1 Bassoon1 Super Analog SuperAna...
- Page 46 Pad 1 (new age) 3 NewAge3 FX 1 (rain) 1 FXRain1 Pad 1 (new age) 4 NewAge4 FX 1 (rain) 2 FXRain2 Pad 2 (warm) 1 WarmPad1 FX 2 (soundtrack) 1 Sondtrk1 Pad 2 (warm) 2 WarmPad2 FX 2 (soundtrack) 2 Sondtrk2 Pad 2 (warm) 3 WarmPad3...
- Page 47 Santur 2 Santur2 Vib-Zurna-A VibZrnA Santur 3 Santur3 Vib-Zurna-D VibZrnD Mountain Dulcimer MtDulcmr Vib-Zurna-E VibZrnE BRAZIL(Brazil) India Stroke IndStrok TablaTarang IndTarng Acc. Master AcMaster Indian Flute 1 IndFlut1 Acc. Classic AcClasic Indian Flute 2 IndFlut2 Cavaquinho Cavaqnho Sitar 4 Sitar4 Warm JP STR WmJP-STR Sitar 5...
- Page 48 Taiko Drum 1 TaikDrm1 Analog Mid Conga AnMiCnga Taiko Drum 2 TaikDrm2 Analog Low Conga AnLoCnga Taiko Drum 3 TaikDrm3 High Timbale HiTimbal Concert Bass Drum 1 ConBsDm1 Low Timbale LoTimbal Concert Bass Drum 2 ConBsDm2 Cabasa Cabasa Acoustic Bass Drum BassDrum Maracas Maracas...
- Page 49 Vibraphone & Stereo Bird Tweet 1 Tweet1 Vib&Str Strings Bird Tweet 2 Tweet2 Vibraphone Octave VibraOct Vibraphone & Marimba & Vib&M&K Horse Gallop HouseGlp Kalimba Telephone Ring 1 Telphon1 Marimba & Kalimba Mar&Kal Telephone Ring 2 Telphon2 Marimba Delay MarDelay Door Creaking DoorCrek Xylophone Octave...
- Page 50 LD Std Kit LD-Std IndoMix4 IndoMix4 - 50 -...
-
Page 51: Style List
Style List Pop Ballad 1 PopBald1 Fusion Fusion NO. English Name LCD Name Soft Beat SoftBeat 8 BEAT(8BEAT) Natural Ballad NatulBld 8Beat Pop 8BtPop Love Ballad LoveBald Brit. Pop BritPop Blues Ballad 2 BluBld2 8Beat 1 8Beat1 Pop Ballad PopBald Pop Funk PopFunk EP Ballad... - Page 52 Smooth Jazz 1 SmthJz1 Samba 2 Samba2 Swing Shuffle SwShufl Samba 3 Samba3 LATIN Jive Jive Samba 1 Samba1 Fox Trot FoxTrot Bossa Nova 1 BosaNov1 Waltz Waltz Latin Latin Old Waltz OldWaltz New Reggae NewRegga English Waltz EngWaltz Reggae Dance DanRegga German Waltz GemWaltz...
- Page 53 South Pattern 2 SouthPt2 Baladi Live BaladiLv Pramad NM PramadNM RAYE2 RAYE2 Keral Keral Maksoum Sarei MaksmSar Dhamaal Dhamaal RMXALL RMXALL DesiRock DesiRock 4444 4444 Sufi Sufi Sa3idi Sa3idi Filmy Masti 1 FilmyMs1 Fox Mix Fox Mix Filmy Masti 2 FilmyMs2 Gypsy Laff GypsyLaf...
-
Page 54: Demo List
10-THM-1 10-THM-1 Jazz 1 Jazz1 10-THM-2 10-THM-2 Jazz 2 Jazz2 ACS-2-4 ACS-2-4 Jazz Pub JazzPub Ciftetelli-1 Ciftetl1 Piano Rock PianoRk Duble-Vahde DblVahde Pop Bossa PopBossa Harmandali Harmandl March 1 March1 Misket Misket March 2 March2 Moulfo Moulfo Piano Beat PianoBt Pop Halay PopHalay Piano Bar... -
Page 55: Midi Implementation Chart
MIDI Implementation Chart (same as E-X30) - 55 -...
Need help?
Do you have a question about the E-X50 and is the answer not in the manual?
Questions and answers
как работает банк
@СОРОКИН АНАТОЛИИ СЕМЕНОВИЧ