
Related Manuals for Rexing MTC1


Summary of Contents for Rexing MTC1
- Page 1 MTC1 Motorcycle Dash Cam User Manual The information in this manual is subject to change without notice. Rexing All Rights Reserved www.rexingusa.com...
- Page 2 We hope you love your new products as much as we do. If you need assistance, or have any suggestions to improve it, please contact us. care@rexingusa.com (877) 740-8004 Our support team will respond you as soon as possible. Always a surprise in Rexing. Check us out here. • https://www.facebook.com/rexingusa/ • https://www.instagram.com/rexingdashcam/ • https://www.rexingusa.com/support/registration/...
-
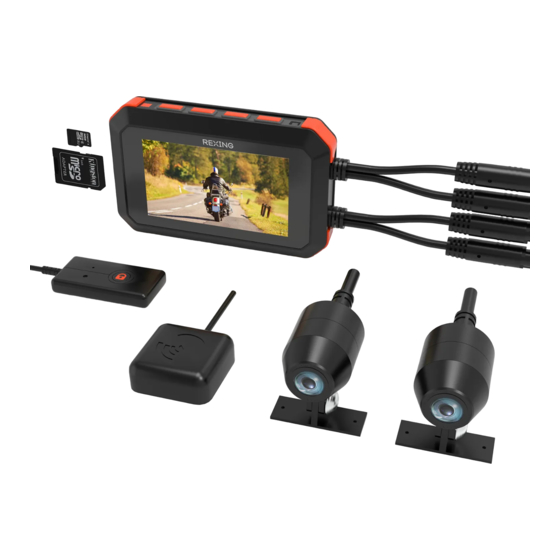
Page 3: What's In The Box
What’s in the box? - Page 4 MTC1 Motorcycle Dash Cam User Manual Safety Guide 安全ガイド The information in this manual is subject to change without notice. Rexing All Rights Reserved www.rexingusa.com www.rexingusa.com Monitor Remote Control Front camera Zip Ties X 5 Rear Camera Adhesives Hardwire Kit Cable...
-
Page 5: Installation
Installation Various Motorcycles models require different installation instructions. For you and your bikes own safety, please consider consulting a local professional for installation. Warning This is for reference only, please adjust installation method based on your own motorcycle model. If you would like to purchase other accessories (Camera Extending Cable, Extra parts), please feel free to contact us. - Page 6 Rear camera Remote Monitor GPS Logger KM/H 08:55 Front camera...
- Page 7 Front and Rear Cameras Installation Remove the 3M adhesive Use a screw driver to loose/fix to stick the camera to the screw. After the screw is right place. released, you can adjust the lens angle to up to 270 degrees. Dash cam lens’s terminal Dash cam lens connection connection port.
- Page 8 Warning Different motorcycles can have different positioning point for your lenses. In some cases, you can stick your lenses upside down. If this is the case, you need to adjust the recording angle. Unscrew the lens support fix. Turn the cylinder-shaped lens body 360 degree. You can adjust lens vertical angle up to 270 degrees.
- Page 9 Monitor Installation Screw the dash cam monitor into the socket Place your motorcycle’s handle in the middle of the ring, then use a screw driver to tide the ring Socket...
- Page 10 Install a Micro SD Card • Please use 8GB to 128GB micro SD card. • Please use “Class 10 UHS-1” or higher standard card and higher speed card. If you use class 10 or lower standard cards, the camera may not able to film. •...
- Page 11 Cable Connection Before installing your camera to your motorcycle, you can connect the camera to power source through a USB power cable. You can connect USB power cable to a 5V/2.0A output or a portable battery’s AC adaptor. Black KM/H Black Yellow 08:55...
- Page 12 Items Instructions Connect to port Connect to port Connect remote control to the yellow port Connect to port Connect to port...
- Page 13 Hardwire Kit Connection Connect to the Hot Fuse Ground Connect to the Switched Fuse Hardwire Kit Optional Connection Methods USB terminal can be connected to an AC adaptor/ a portable battery. Portable battery 5V 2.0A (optional) AC Wall Charger (Not Included) Warning •...
-
Page 14: Product Overview
Product Overview KM/H 08:55... - Page 15 Basic Operations Power/Screen On/Off • Hold for about 3 secs to switch ON/OFF camera. • Press the button to deactivate/activate the camera screen. Menu/Up Button • Recording Mode: Press to turn ON/OFF microphone (to record). When not filming (press OK button to stop recording), hold for about 3 secs to enter the setting menu for filming, hold for about 3 secs again to exit setting.
- Page 16 Remote control cable Power connection port 9-1: Powered by Smart hardwire kit 9-2: Powered By USB cable Monitor mount socket Install the dash cam monitor and fix with the quick release plate Emergency Video Press: switch front and rear lenses display mode. Hold for about 3 secs to start Emergency Video, after entering the Emergency Video Mode, hold for another 3 secs to cancel the mode.
- Page 17 Wi-Fi Connect To connect to your mobile phone or tablet: Download the APP via link https://www.rexingusa.com/support/rexing-apps/ or scanned the QR code below. SSID: NPD_CarDV_WiFi_XXXX PASSWORD: 1234567890...
- Page 18 Screen Display While Filming Voice Memory G sensor Locked Cycling Record Record Card Signal sensitivity video Lens 1 Lens 2 Filming Resolution time 02 07 2021 18:45:25 Date and time indication, Display for lens 1 Display for lens 2 sync after GPS connected Note 1 Note 2 Emergency Filming Icon...
-
Page 19: Menu Setting
Menu Setting Under the video filming mode, pressing for about 3 secs to open menu setting page, so you can change settings Video resolution: FHD/HD Loop Recording: 1/2/3/5/10 minutes *1-minute cycle is recommended Mic: ON/OFF Volume: Standard/Low Beep: ON/OFF Start-up/Shutdown voice: ON/OFF Time setting: set your dash cam’s date and hour Date Format: set your date and hour display format Stamp Format: Date and hour + model type/Date/model type/OFF... - Page 20 Loop Recording: With different settings, videos can be stored as 1/2/3/5/10 minute intervals. When the memory card full, the newest video will overwrite the oldest. Emergency Video/Anti-Overwrite: When filming, hold for about 3 secs, or G sensor detects shocks, Emergency Video begins. When Emergency Video is on, an icon will show up on the top of the screen.
- Page 21 Filming Time Filming Time Reference Filming time may vary depends on different Micro SD cards. Storage Cpability 1920P X 1080P 1280 X 720P 128GB 1000 min 1280 min 64GB 500 min 640 min 32GB 500 min 320 min 16GB 125 min 160 min 60 min 160 min...
-
Page 22: Troubleshooting
Troubleshooting If you have any problems while using our product, please refer to the following table: Problems Solutions Make sure your power cable is connected Power button no response Make sure you are using factory power cable Crash Reset the unit Insert SD card properly Unable to read SD card Format SD card with your computer... -
Page 23: Specification
Specification Micro SD Card 8~128GB(Class10 or Higher) • 2 million-pixel CMOS sensor Front camera • Wide angle:140° • 1920×1080 • 2 million-pixel CMOS sensor Rear camera • Wide angle:140° • 1920×1080 Video length 1/2/3/5/10 minutes Up+down (Windows)/Down+Up (Mini Windows)/Up Front and rear camera display (Right)+Down (Left)/Down(Left)+Up(Right) Support G-Sensor... -
Page 24: Warranty And Support
Warranty & Support Warranty The Rexing MTC1 Motorcycle Dash Cam comes with a full 12-month warranty. If you register your product on our official site (https://www.rexingusa.com/support/ registration), you can extend the warranty to 18 months. Support If you have any questions regarding your product, please do not hesitate to contact us at care@rexingusa.com, or call us at... - Page 25 FCC ID: 2AW5W-MTC1 This device complies with part 15 of the FCC Rules. Operation is subject to the following two conditions: (1) This device may not cause harmful interference, and (2) this device must accept any interference received, including interference that may cause undesired operation.
Need help?
Do you have a question about the MTC1 and is the answer not in the manual?
Questions and answers