Table of Contents
Advertisement
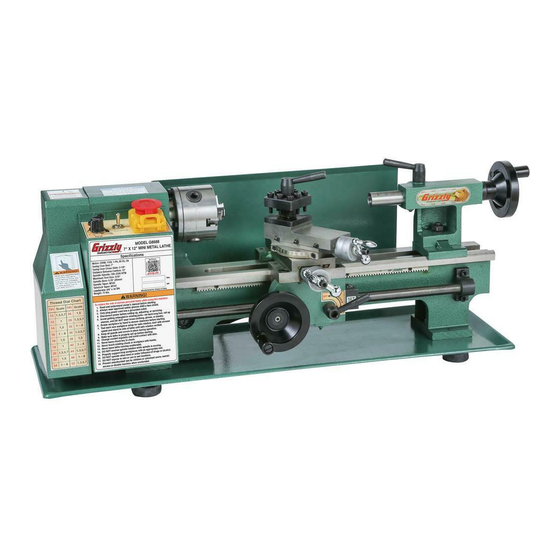
MODEL G8688
MINI METAL LATHE
OwNEr's MANuAL
Copyright © SEptEMBEr, 2005 By grizzly induStrial, inC., rEViSEd January, 2010 (tr)
wArNING: NO pOrTION Of THIs MANuAL MAy bE rEprODucED IN ANy sHApE
Or fOrM wITHOuT THE wrITTEN ApprOvAL Of GrIzzLy INDusTrIAL, INc.
(For ModElS ManuFaCturEd SinCE 3/09) #pC7563 printEd in China
Advertisement
Table of Contents

Subscribe to Our Youtube Channel
Related Manuals for Grizzly G8688


Summary of Contents for Grizzly G8688
- Page 1 MODEL G8688 MINI METAL LATHE OwNEr's MANuAL Copyright © SEptEMBEr, 2005 By grizzly induStrial, inC., rEViSEd January, 2010 (tr) wArNING: NO pOrTION Of THIs MANuAL MAy bE rEprODucED IN ANy sHApE Or fOrM wITHOuT THE wrITTEN ApprOvAL Of GrIzzLy INDusTrIAL, INc.
- Page 2 This manual provides critical safety instructions on the proper setup, operation, maintenance and service of this machine/equipment. Failure to read, understand and follow the instructions given in this manual may result in serious personal injury, including amputation, electrocution or death. The owner of this machine/equipment is solely responsible for its safe use.
-
Page 3: Table Of Contents
... 11 hardware recognition Chart ... 12 Clean up ... 13 Site Considerations ... 13 Moving & placing Mini lathe ... 14 installing handwheel handles ... 15 test run ... 16 sEcTION 4: OpErATIONs ... 17 Speed & power Controls ... 17 Chuck Jaws ... -
Page 4: Introduction
Machine For your convenience, we post all available man- uals and manual updates for free on our website at www.grizzly.com. any updates to your model of machine will be reflected in these documents as soon as they are complete. -
Page 5: Identification
If you have never used this type of machine or equipment before, wE sTrONGLy rEcOMMEND that you read books, trade magazines, or get formal training before beginning any projects. regardless of the content in this section, Grizzly Industrial will not be held liable for accidents caused by lack of training. -
Page 6: Machine Data Sheet
Machine Data sheet Customer Service #: (570) 546-9663 · To Order Call: (800) 523-4777 · Fax #: (800) 438-5901 MODEL G8688 7" X 12" MINI METAL LATHE Product Dimensions: Weight... 75 lbs. Length/Width/Height... 27-3/4 x 11-1/2 x 12 in. Foot Print (Length/Width)... 27-3/4 x 8-3/4 in. - Page 7 The information contained herein is deemed accurate as of 1/3/2010 and represents our most recent product specifications. Model G8688 Due to our ongoing improvement efforts, this information may not accurately describe items previously purchased. Model g8688 (Mfg. 3/09+) PAGE 2 OF 3...
-
Page 8: Section 1: Safety
Wear protective hair covering to con- tain long hair and wear non-slip footwear. 6. NEvEr OpErATE MAcHINEry wHEN TIrED, Or uNDEr THE INfLuENcE Of OpErATING DruGs Or ALcOHOL. Be mentally alert at all times when running machinery. OpErATING MAcHINEry. Model g8688 (Mfg. 3/09+) - Page 9 Follow instructions for lubricating and changing accessories. 16. MAKE surE GuArDs ArE IN pLAcE AND wOrK cOrrEcTLy bEfOrE usING MAcHINEry. Model g8688 (Mfg. 3/09+) 17. rEMOvE wrENcHEs. Make a habit of checking for keys and adjusting wrenches before turn- ing machinery ON.
-
Page 10: Additional Safety For Metal Lathes
ON. 20. crAsHEs. Make sure no part of the tool, tool holder, compound slide, cross slide, or carriage will contact the chuck during operation. Make sure never walk away while Model g8688 (Mfg. 3/09+) -
Page 11: Section 2: Circuit Requirements
Minimum Circuit Size ... 15 amps Model g8688 (Mfg. 3/09+) power connection Device this machine comes with a plug, similar to figure 2, to connect the machine to power. -
Page 12: Section 3: Set Up
Flat head Screwdriver ... 1 • open End Wrench 14mm ... 1 moving the Model g8688 was carefully packed when it left our warehouse. if you discover the machine is damaged after you have signed for delivery, please immediately call Customer Service at (570) 546-9663 for advice. -
Page 13: Inventory
1: (figures 3 & 4) A. Model g8688 Mini lathe ... 1 b. lathe dog ... 1 c. hex Wrenches 3, 4, & 5mm ... 1 ea. -
Page 14: Hardware Recognition Chart
Hardware recognition chart -12- Model g8688 (Mfg. 3/09+) -
Page 15: Clean Up
G2544—solvent cleaner & Degreaser H9692—Orange power Degreaser great products for removing shipping grease. figure 5. Cleaner/degreasers available from grizzly. Model g8688 (Mfg. 3/09+) site considerations workbench Load refer to the Machine Data sheet for the weight and footprint specifications of your machine. -
Page 16: Moving & Placing Mini Lathe
Moving & placing Mini Lathe The Model G8688 is a heavy machine. DO NOT over-exert yourself while unpacking your machine—get assis- tance. the lathe should be mounted or placed on a strong well lit workbench of sufficient height so that you do not need to bend your back to per- form normal operations. -
Page 17: Installing Handwheel Handles
9. installing the handwheel handles. Model g8688 (Mfg. 3/09+) Cross Slide Feed figure 10. Flipping the handle. the cross slide feed has been turned around for shipment. With a 5mm hex wrench, remove the cap screw, turn the handle around, and retighten the cap screw (see figure 10). -
Page 18: Test Run
Check this by rotating the chuck by hand. Set the lathe to loW range on the back of the headstock. See page 18 for control loca- tions. -
Page 19: Section 4: Operations
Model g8688 (Mfg. 3/09+) speed & power controls it is important to know all of the controls on the g8688 before operation. use figures 11 & 12 as a guide. figure 11. power controls and features. NOTICE DO NOT vOID yOur wArrANTy! DO NOT... -
Page 20: Chuck Jaws
(exterior of the part). Common uses are shown in figure 14. External Jaw figure 13. internal & external jaws. External Jaw figure 14. Workholding options. chuck Jaws internal Jaw internal Jaw with External grip internal Jaw with internal grip Model g8688 (Mfg. 3/09+) -
Page 21: Replacing Chuck Jaws
(see figure 15). figure 15. lead thread. Model g8688 (Mfg. 3/09+) insert jaw # 1 into this slot then continue to turn until the jaw is engaged with the lead thread. -
Page 22: Removing/Installing Chuck Or Faceplate
Model g8688 chuck is mounted directly to the spindle nose plate by the use of studs and hex nuts. To remove a chuck or faceplate from the lathe spindle: unplug thE lathE! place a piece of plywood over the bedways to protect your hands and the precision ground bedways in case the chuck should fall. -
Page 23: Tailstock
G. Quill Gib screw : removes play from tailstock quill. figure 18. tailstock controls. Model g8688 (Mfg. 3/09+) Tailstock positioning Longitudinal positioning To adjust the tailstock longitudinally: using a 17mm wrench, loosen the tailstock lock nut shown in figure 18. -
Page 24: Dead Center
—if the tool tip is above the dead center tip, it needs to be replaced with the correct tool or ground to bring it to center. Model g8688 (Mfg. 3/09+) -
Page 25: Steady Rest
(see figure 20). figure 20. installing steady rest. Model g8688 (Mfg. 3/09+) loosen the three hex nuts and knurled screws so the finger position can be adjusted to fit around the outer diameter of the part. -
Page 26: Cross Slide
Similar to adjusting the cross slide handwheel, make sure the threads are engaging and all backlash has been cleared before you set the handwheel scale to “0”, or it will not be accurate. Model g8688 (Mfg. 3/09+) -
Page 27: Carriage
(car- riage feed) on the Model g8688 can be controlled both manually and automatically. To move the carriage feed manually: rotate the handwheel clockwise to move the carriage right and rotate the handwheel coun- terclockwise to move the carriage left. -
Page 28: Gear Charts
Gear charts the Model g8688 can be geared for a variety of different feed rates, so a chart is placed on the drive cover of the lathe that explain how to set up the gear combinations for threads per inch. the chart for metric thread pitches is included in the manual. -
Page 29: Cutting Threads
1,3,5,7 1 – 8 1,3,5,7 1 or 5 1 – 8 1,3,5,7 1 – 8 1,3,5,7 figure 28. g8688 thread dial chart. scALE pITcH 1,3,5,7 1 – 8 1 – 8 1 or 4.5 1 or 5 1 – 8 1.25... -
Page 30: Section 5: Accessories
G5686—MT #2 Live center G5687—MT #3 Live center perfect for just about any turning requirement, these dust, chip, and oil proof live centers feature 60° included angle and pre-loaded taper bear- ings. figure 32. live center. dial Calipers. ® Model g8688 (Mfg. 3/09+) - Page 31 34. Model g9864 4-Jaw Chuck. Model g8688 (Mfg. 3/09+) H1508—Hss square Tool bits OvErALL our ground tool bits are M-2 hSS, making them LENGTH some of the most durable tool bits around.
-
Page 32: Section 6: Maintenance
-30- cleaning Cleaning the Model g8688 is relatively easy. remove all chips at the end of the day. Wipe up any coolant used that settled in the bottom of the chip tray or has settled on any other part of the lathe. -
Page 33: Section 7: Service
3. Cutting tool is dull. 4. gear setup is too tight, causing them to bind. Model g8688 (Mfg. 3/09+) Troubleshooting possible Solution 1. Correct short/replace fuse on control panel. 2. rotate clockwise slightly until it pops out/replace it. - Page 34 1. realign the tailstock to the headstock spindle bore center line (see page 36). 1. remove jaws, clean and lubricate chuck threads, and replace jaws. 1. adjust gear positions. 2. replace. 3. tighten. Model g8688 (Mfg. 3/09+) ⁄ of the total...
- Page 35 1. Quill lock knob is tightened down. out of tailstock. Model g8688 (Mfg. 3/09+) cOrrEcTIvE AcTION 1. Check to make sure table locks are fully released. 2. Frequently clean away chips that load up during turning operations.
-
Page 36: Adjusting Gibs
Over tightening will make turning the handwheel difficult. there are two gib adjustments for the Model g8688—the cross-slide gib and the compound slide gib. the apron gib has been adjusted at the factory and should need no further attention. See figure 37 for location. -
Page 37: Tailstock Alignment
Tailstock Alignment the tailstock on the Model g8688 is aligned with the headstock at the factory. it will need to be re- aligned after adjusting for offset. See page 22 for instructions. To align the tailstock: 1. Center drill a 6'' long piece of round cold rolled stock on both ends. - Page 38 NOTICE DO NOT forget to lock down the tailstock after each adjustment. failure to follow this notice may cause damage to the tailstock, workpiece or both. Model g8688 (Mfg. 3/09+)
-
Page 39: Electrical Components
Electrical components Fuse F/o/r toggle Printed Circuit Board rpM dial Emergency Stop Switch figure 43. g8688 Fuse location. Fuse Dial F/O/R Spindle Toggle Motor Emergency Stop Switch rear Motor Brush figure 45. g8688 Wiring diagram. figure 44. g8688 Motor location. -
Page 40: Parts Breakdown
-38- Model g8688 (Mfg. 3/09+) -
Page 41: Parts List
KEY 3 X 3 X 8 P8688048 MOUNT PSB53M CAP SCREW M5-.8 X 18 P8688050 PINION 20T PW03M FLAT WASHER 6MM Model g8688 (Mfg. 3/09+) parts List REF PART # DESCRIPTION PSB68M CAP SCREW M6-1 X 8 P8688053 COVER PSB108M CAP SCREW M5-.8 X 45... - Page 42 MusT maintain the original location and readability of the labels on the machine. If any label is removed or becomes unreadable, rEpLAcE that label before using the machine again. contact Grizzly at (800) 523-4777 or www.grizzly.com to order new labels. -40-...
- Page 45 FOLD ALONG DOTTED LINE FOLD ALONG DOTTED LINE Send a Grizzly Catalog to a friend: Name_______________________________ Street_______________________________ City______________State______Zip______ GRIZZLY INDUSTRIAL, INC. P.O. BOX 2069 BELLINGHAM, WA 98227-2069 TAPE ALONG EDGES--PLEASE DO NOT STAPLE Place Stamp Here...
-
Page 46: Warranty Card
Do you think your machine represents a good value? Would you recommend Grizzly Industrial to a friend? Would you allow us to use your name as a reference for Grizzly customers in your area? Note: We never use names more than 3 times. -
Page 47: Warranty And Returns
WARRANTY AND RETURNS Grizzly Industrial, Inc. warrants every product it sells for a period of 1 year to the original purchaser from the date of purchase. This warranty does not apply to defects due directly or indirectly to misuse, abuse, negligence, accidents, repairs or alterations or lack of maintenance. - Page 48 Buy Direct and Save with Grizzly – Trusted, Proven and a Great Value! ® ~Since 1983~ Visit Our Website Today For Current Specials! ORDER 24 HOURS A DAY! 1-800-523-4777...
Need help?
Do you have a question about the G8688 and is the answer not in the manual?
Questions and answers