Grizzly G9972Z Owner's Manual
11" x 26" light-duty lathe w/gearbox
Hide thumbs
Also See for G9972Z:
- Parts manual (16 pages) ,
- Owner's manual (76 pages) ,
- Owner's manual (76 pages)
Table of Contents
Advertisement
Quick Links
MODEL G9972Z
11" X 26" LIGHT-DUTY
LATHE w/GEARBOX
OWNER'S MANUAL
(For models manufactured since 03/20)
COPYRIGHT © JULY, 2008 BY GRIZZLY INDUSTRIAL, INC., REVISED APRIL, 2020 (CS)
WARNING: NO PORTION OF THIS MANUAL MAY BE REPRODUCED IN ANY SHAPE
OR FORM WITHOUT THE WRITTEN APPROVAL OF GRIZZLY INDUSTRIAL, INC.
#TS10714 PRINTED IN CHINA
V3.04.20
Advertisement
Table of Contents

Related Manuals for Grizzly G9972Z


Summary of Contents for Grizzly G9972Z
- Page 1 OWNER'S MANUAL (For models manufactured since 03/20) COPYRIGHT © JULY, 2008 BY GRIZZLY INDUSTRIAL, INC., REVISED APRIL, 2020 (CS) WARNING: NO PORTION OF THIS MANUAL MAY BE REPRODUCED IN ANY SHAPE OR FORM WITHOUT THE WRITTEN APPROVAL OF GRIZZLY INDUSTRIAL, INC.
- Page 2 This manual provides critical safety instructions on the proper setup, operation, maintenance, and service of this machine/tool. Save this document, refer to it often, and use it to instruct other operators. Failure to read, understand and follow the instructions in this manual may result in fire or serious personal injury—including amputation, electrocution, or death.
-
Page 3: Table Of Contents
Table of Contents INTRODUCTION ..........2 SECTION 5: ACCESSORIES ......47 Foreword ............2 SECTION 6: MAINTENANCE ......50 Contact Info............ 2 Schedule ............50 Functional Overview ........2 Cleaning & Protecting ........50 Identification ........... 3 Lubrication ........... 51 Controls &... -
Page 4: Introduction
INTRODUCTION Machine Description Manual Accuracy The primary purpose of Model G9972Z 11" x We are proud to provide a high-quality owner’s 26" Light-Duty Lathe w/Gearbox is to make con- manual with your new machine! centric cuts in metal stock. With the lathe, round... -
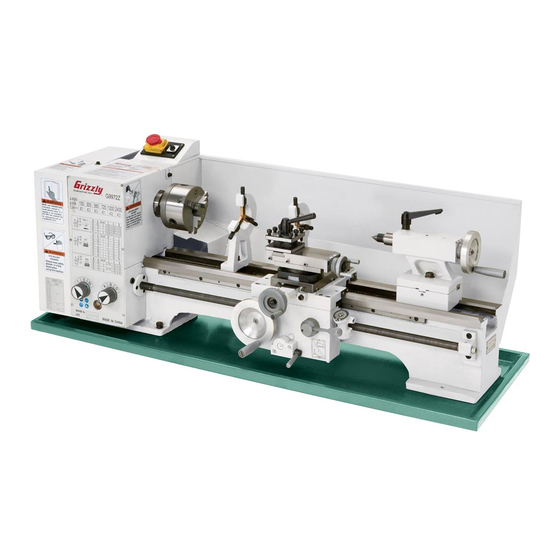
Page 5: Identification
Identification Figure 1. Model G9972Z identification. A. Change Gear Cover N. Splash Guard B. Headstock O. Tailstock Lock Bolt C. Motor ON/OFF Switch P. Compound Slide & Handwheel D. Spindle Switch Q. Thread Dial E. Threaded Spindle 1 ⁄ "-8 MT#4 R. -
Page 6: Controls & Components
C. Spindle Switch: Starts/stops spindle rota- tion—turn the switch to the left for clockwise rotation, to the right for counterclockwise rotation, and to the center to stop spindle rotation. Model G9972Z (Mfd. Since 03/20) - Page 7 P. Power Feed Lever: Configures the apron gears for powered carriage movement. Move the lever up to engage the power feed and down to disengage. Model G9972Z (Mfd. Since 03/20)
-
Page 8: Machine Data Sheet
MACHINE DATA SHEET Customer Service #: (570) 546-9663 · To Order Call: (800) 523-4777 · Fax #: (800) 438-5901 MODEL G9972Z 11" X 26" BENCH LATHE W/ GEARBOX Product Dimensions: Weight................................490 lbs. Width (side-to-side) x Depth (front-to-back) x Height................51 x 23 x 19 in. - Page 9 The information contained herein is deemed accurate as of 4/10/2020 and represents our most recent product specifications. Model G9972Z PAGE 2 OF 3 Due to our ongoing improvement efforts, this information may not accurately describe items previously purchased. Model G9972Z (Mfd. Since 03/20)
-
Page 10: Section 1: Safety
Never operate under the influence of drugs or injury or blindness from flying particles. Everyday alcohol, when tired, or when distracted. eyeglasses are NOT approved safety glasses. Model G9972Z (Mfd. Since 03/20) - Page 11 EXPERIENCING DIFFICULTIES. If at any time debris. Make sure they are properly installed, you experience difficulties performing the intend- undamaged, and working correctly BEFORE ed operation, stop using the machine! Contact our operating machine. Technical Support at (570) 546-9663. Model G9972Z (Mfd. Since 03/20)
-
Page 12: Additional Safety For Metal Lathes
CLEARING CHIPS. Metal chips can be razor MEASURING WORKPIECE. To reduce risk of sharp. Avoid clearing them by hand or with a rag. Use a brush or vacuum instead. entanglement, never measure rotating workpieces. -10- Model G9972Z (Mfd. Since 03/20) -
Page 13: Additional Safety For Chucks
Failure to do so could result in serious per- risk of operator injury. If normal safety pre- cautions are overlooked or ignored, serious sonal injury, damage to equipment, or poor work results. personal injury may occur. -11- Model G9972Z (Mfd. Since 03/20) -
Page 14: Section 2: Power Supply
-12- Model G9972Z (Mfd. Since 03/20) - Page 15 Two-prong outlets do not meet the grounding requirements for this machine. Do not modify or use an adapter on the plug provided—if it will not fit the outlet, have a qualified electrician install the proper outlet with a verified ground. -13- Model G9972Z (Mfd. Since 03/20)
-
Page 16: Section 3: Setup
Assistant ............. 1 you are completely satisfied with the machine and • Safety Glasses ....1 For Each Person have resolved any issues between Grizzly or the • Machinist's Level ........1 shipping agent. You MUST have the original pack- •... -
Page 17: Inventory
NOTICE Avoid harsh solvents like acetone or brake parts cleaner that may damage painted sur- faces. Always test on a small, inconspicu- Figure 6. Model G9972Z inventory. ous location first. -15- Model G9972Z (Mfd. Since 03/20) -
Page 18: Site Considerations
Moving & Placement Floor Load Refer to the Machine Data Sheet on Page 6 for the weight and footprint specifications of your The Model G9972Z is a machine. Some residential floors may require heavy machine. Serious additional reinforcement to support both the personal injury may occur machine and operator. -
Page 19: Mounting
Note: We recommend using a silicon sealant between the flat washers and the chip pan to avoid coolant or other fluids leaking through onto the bench or floor. -17- Model G9972Z (Mfd. Since 03/20) -
Page 20: Check Gearbox Oil
To test run machine: Clear all setup tools away from machine. Perform all lubrication procedures as instruct- ed in the Lubrication subsection on Page 51. -18- Model G9972Z (Mfd. Since 03/20) - Page 21 Strange or unusual noises should be inves- tigated and corrected before operating the machine further. Always disconnect the machine from power when investigating or correcting potential problems. -19- Model G9972Z (Mfd. Since 03/20)
-
Page 22: Spindle Break-In
Turn the lathe OFF. The spindle break-in is maintain the warranty. Failure to do this complete and your lathe is ready for opera- could cause rapid wear-and-tear of spindle tion. bearings once they are placed under load. -20- Model G9972Z (Mfd. Since 03/20) -
Page 23: Carriage Lock
SERVICE section starting on Page 55. Factory adjustments that should be verified: Cross slide backlash adjustment (Page 58) • Gib adjustments (Page 59) • Figure 12. Carriage lock bolt. -21- Model G9972Z (Mfd. Since 03/20) -
Page 24: Section 4: Operations
Regardless of the content in this sec- in this manual are easier to understand. tion, Grizzly Industrial will not be held liable for accidents caused by lack of training. Due to the generic nature of this overview, it is not intended to be an instructional guide. -
Page 25: Chuck & Faceplate Mounting
Figure 13. Examples of common devices used LARGE, VERY HEAVY CHUCKS ing parts at all times. during chuck installation and removal. Pre-Threaded Hole Fabricated Steel Entanglement can result for Lifting Eye Lifting Hook in death, amputation, or severe crushing injuries! -23- Model G9972Z (Mfd. Since 03/20) -
Page 26: Chuck Installation
(see Figure 14 below) and is seated against the spindle shoulder. Chuck Key There are two chucks included with the Model G9972Z: a 3-jaw and 4-jaw. A chuck key has been included for each. Spindle Shoulder Spanner Wrench Figure 15. -
Page 27: Chuck Removal
Removal Devices on Page 23). Remove both spindle clamps from behind the chuck or faceplate (see Figure 17). Spindle Clamp & Cap Screw Figure 17. Spindle clamp and cap screw securing chuck/faceplate to spindle. -25- Model G9972Z (Mfd. Since 03/20) -
Page 28: Changing Jaw Set
— If the jaws do not converge evenly, remove them. Re-install the jaws sequentially 1–3, and make sure each one engages with the scroll-gear lead thread during its first Figure 20. Jaw guide and jaw numbers. rotation. -26- Model G9972Z (Mfd. Since 03/20) -
Page 29: Scroll Chuck Clamping
INCORRECT device, position the workpiece so it is cen- tered in the chuck. Unsafe Jaw Position Safer Inside Jaw Use Cylinder Poor Scroll CORRECT INCORRECT Gear Engagement Figure 22. Jaw selection and workpiece holding. -27- Model G9972Z (Mfd. Since 03/20) -
Page 30: Faceplate
To mount a non-concentric workpiece to the faceplate: DISCONNECT LATHE FROM POWER! Protect the bedway with a piece of plywood. Figure 24. Generic picture of non-cylindrical workpiece correctly mounted on the 4-jaw chuck. -28- Model G9972Z (Mfd. Since 03/20) -
Page 31: Tailstock
Tighten the tailstock lock nut to lock the tailstock against the bedway. Using Quill Loosen the quill lock lever. Turn quill handwheel clockwise to move quill toward spindle or counterclockwise to move it away from it. Tighten the quill lock lever. -29- Model G9972Z (Mfd. Since 03/20) - Page 32 Open-End Wrench 19mm ........1 tool to provide a solid surface for the quill pin to push against when the quill is retracted for tool removal. Otherwise, removal of such tooling may be difficult. -30- Model G9972Z (Mfd. Since 03/20)
- Page 33 60° point, as Figure 30. Set screw adjustment in relation to illustrated in Figure 31. tailstock movement. Retighten the tailstock lock nut to secure the offset. Figure 31. Turning a dead center. -31- Model G9972Z (Mfd. Since 03/20)
- Page 34 Offsetting Tailstock on Page 30 for detailed instructions. Move tailstock toward the back of the machine half the distance of the taper Figure 34. Adjust tailstock away from the operator. Repeat Steps 6–8 until the desired accuracy is achieved. -32- Model G9972Z (Mfd. Since 03/20)
-
Page 35: Centers
Use the dead center in the spindle for operations where the workpiece rotates with the center and Figure 36. Example photo of using a dead does not generate friction. center with a faceplate and lathe dog. -33- Model G9972Z (Mfd. Since 03/20) - Page 36 -34- Model G9972Z (Mfd. Since 03/20)
-
Page 37: Steady Rest
Secure the quill lock lever and tailstock lock gers are barely touching the workpiece, then nut. tighten the finger lock nuts. Lubricate the finger tips with an anti-seize lubricant during operation. Note: Mill or file the tips if they show wear. -35- Model G9972Z (Mfd. Since 03/20) -
Page 38: Follow Rest
This will allow you to quickly return the compound rest to that exact angle the next time you need to cut threads. -36- Model G9972Z (Mfd. Since 03/20) -
Page 39: Four-Way Tool Post
Page 31 for detailed instructions). Firmly secure the cutting tool with at least two tool post screws. Check and adjust the cutting tool to the spindle centerline, as instructed in the next subsection. -37- Model G9972Z (Mfd. Since 03/20) -
Page 40: Manual Feed
Use this to move the cutting tool linearly along the set angle of the compound rest. Set the com- pound rest angle by hand-rotating it and securing in place with two hex nuts. The compound rest has an indirect-read graduated dial. -38- Model G9972Z (Mfd. Since 03/20) -
Page 41: Spindle Speed
120 (Determined SFM) x 4 = 480 more detailed information. Step 3: Figure 47. Recommend cutting speed table. 480 / 1" (Diameter of workpiece) = 480 Result: The correct spindle speed is 480 RPM. -39- Model G9972Z (Mfd. Since 03/20) - Page 42 Figure 50. V-belt in the "B–C" configuration. Note: There is hex nut on either end of the idler pulley adjustment stud that is loosened when adjusting the idler pulley. -40- Model G9972Z (Mfd. Since 03/20)
-
Page 43: Power Feed
Otherwise, severe riage to crash into the spindle or tailstock damage to the lathe could occur. resulting in severe damage to the lathe. -41- Model G9972Z (Mfd. Since 03/20) -
Page 44: Feed Rate
Figure 52. Recommended feed rate table. lever C ins/ 0.0022 0.0045 0.0090 0.0030 0.0060 0.0120 0.0033 0.0067 0.0135 0.0038 0.0077 0.0150 Figure 54. Feed rate chart for power feed movement of the carriage. -42- Model G9972Z (Mfd. Since 03/20) - Page 45 Figure 55. Change gear pivot arm in lowered Examine the chart in Figure 54 or Figure position. 57, then correctly set feed rate dials for your selected feed rate. -43- Model G9972Z (Mfd. Since 03/20)
- Page 46 (Figure 54 on Page 42) for the lathe. In this case, it will be 0.0150 IPR. lever B n/1" lever 0.50 1.00 2.00 1.25 2.50 0.75 1.50 3.00 1.75 3.50 Figure 57. Feed rate chart for threading. -44- Model G9972Z (Mfd. Since 03/20)
-
Page 47: Threading Controls
NEVER force Engaged (On) these levers. Always disengage the power feed (lever down) before engaging the half- nut. Otherwise, severe damage to the lathe could occur. Disengaged (Off) Figure 59. Half-nut lever engaged/disengaged. -45- Model G9972Z (Mfd. Since 03/20) - Page 48 DO NOT engage the half-nut when the spin- dle speed is over 300 RPM. Ignoring this instruction could result in damage to the 1 – 8 leadscrew or carriage components. 2, 6 Figure 61. Thread dial chart. -46- Model G9972Z (Mfd. Since 03/20)
-
Page 49: Section 5: Accessories
Moly-D to maximize compo- To reduce this risk, only install accessories nent life and minimize wear. recommended for this machine by Grizzly. NOTICE Refer to our website or latest catalog for additional recommended accessories. - Page 50 Cut-off tool holder with three HSS blades • Hex wrenches • Protective wooden case Figure 68. Model G9257 8" Dial Calipers. Figure 66. Model H7540 Metalworking Kit No. 1. www.grizzly.com 1-800-523-4777 order online at or call -48- Model G9972Z (Mfd. Since 03/20)
- Page 51 Bar size is ⁄ " x 4½", holder is 2¼" x ½", uses ⁄ " tool bits. Figure 72. H2987-91 Lathe Dogs. Figure 70. H2996 Double Ended Boring Bar. www.grizzly.com 1-800-523-4777 order online at or call -49- Model G9972Z (Mfd. Since 03/20)
-
Page 52: Section 6: Maintenance
® • V-belt tension, damage, or wear. After First Three Months and Annually: Change feed rate gearbox oil (Page 52). • Figure 73. Recommended products for protect- ing unpainted cast iron/steel parts on machinery. -50- Model G9972Z (Mfd. Since 03/20) -
Page 53: Lubrication
2 Ball Oilers outlined in this manual for your lathe. Failure to do so could lead to premature failure of your lathe and will void the war- Figure 78. Tailstock quill and leadscrew ball ranty. oilers. -51- Model G9972Z (Mfd. Since 03/20) - Page 54 Remove the fill plug. Slowly add oil until the level is centered in the Figure 80. Feed rate gearbox oil reservoir drain sight glass. plug. Replace the fill plug. -52- Model G9972Z (Mfd. Since 03/20)
- Page 55 Figure 81) at all times. Use a stiff brush and mild solvent to remove any debris or grime before using a clean shop rag to wipe on the oil. Figure 82. Compound bottom slide. Rack Leadscrew Figure 81. Longitudinal leadscrew and carriage rack. -53- Model G9972Z (Mfd. Since 03/20)
- Page 56 Move the steady rest, carriage, and tailstock to access the entire length of the bedway. We recommend using Model H8257 Primrose Armor Plate with Moly-D Machine and Way Oil (see ACCESSORIES on Page 47). -54- Model G9972Z (Mfd. Since 03/20)
-
Page 57: Section 7: Service
8. Spindle bearings are at fault. 9. Motor bearings are at fault. 9. Rotate motor shaft to check for noisy or burnt bearing; repair/replace as necessary. 10. Gears are at fault. 10. Replace bad gears/bearings. -55- Model G9972Z (Mfd. Since 03/20) - Page 58 11. Clear obstacles away from the motor fan cover, let motor cool, and reduce workload on machine. 12. Spindle switch is at fault. 12. Test; replace if necessary. 13. Motor is at fault. 13. Test/repair/replace. 14. Centrifugal switch is at fault. 14. Adjust/replace. -56- Model G9972Z (Mfd. Since 03/20)
- Page 59 Tailstock quill will not 1. Quill lock is tightened down. 1. Turn quill lock counterclockwise to loosen. feed out of tailstock. -57- Model G9972Z (Mfd. Since 03/20)
-
Page 60: Cross Slide Backlash Adjustment
Test after each adjustment by rotating the compound slide to the cross slide (see handwheel back-and-forth until the backlash Figures 84–85). amount is acceptable. Re-install the compound slide. Compound Slide Fasteners (1 of 2) Figure 84. Compound slide fasteners. -58- Model G9972Z (Mfd. Since 03/20) -
Page 61: Gib Adjustments
Gib Adjustments The gibs on the Model G9972Z control the accu- racy of the cross slide and compound slide move- ments. These gibs are sliding plates that either increase or decrease pressure on the sliding components around them. Compound Slide... -
Page 62: Half-Nut Adjustment
Contact Grizzly Customer Service at (570) 546- Tools Needed 9663 to order a replacement shear pin (Part # Wrench 8mm ............. -
Page 63: Ribbed Belt Replacement
Lower the motor to produce reasonable ten- sion on the ribbed belt, then re-tighten the motor mount hex nuts. Re-install the V-belt and close the cover. -61- Model G9972Z (Mfd. Since 03/20) - Page 64 When the dial indicator needle stops mov- ing, there will be no spindle end-play and no bearing preload. It is essential that you find this point without tightening the spanner nut too much and inadvertently preloading the spindle bearings. -62- Model G9972Z (Mfd. Since 03/20)
- Page 65 NOTICE Do not overtighten the outer spanner nut because additional pressure can force the bearings even tighter against the races in the headstock and cause the headstock to compress, crack, or cause bearing failure. -63- Model G9972Z (Mfd. Since 03/20)
-
Page 66: Section 8: Wiring
Technical Support at (570) 546-9663. The photos and diagrams included in this section are best viewed in color. You can view these pages in color at www.grizzly.com. -64- Model G9972Z (Mfd. Since 03/20) -
Page 67: Wiring Diagram
Figure 95. Switch wiring. Neutral WARNING! SHOCK HAZARD! NEMA 5-15 Plug Disconnect power (As Recommended) before working on wiring. Figure 96. Capacitor wiring. Motor 1HP 110V Figure 97. Motor wiring. -65- READ ELECTRICAL SAFETY Model G9972Z (Mfd. Since 03/20) ON PAGE 64! -
Page 68: Section 9: Parts
SECTION 9: PARTS Headstock 17 17-1 BUY PARTS ONLINE AT GRIZZLY.COM! -66- Model G9972Z (Mfd. Since 03/20) Scan QR code to visit our Parts Store. - Page 69 Please Note: We do our best to stock replacement parts whenever possible, but we cannot guarantee that all parts shown here are available for purchase. Call (800) 523-4777 or visit our online parts store at www.grizzly.com to check for availability.
-
Page 70: Change Gears
GEAR 127T P9972Z0222 GEAR 70T P9972Z0207 GEAR 120T P9972Z0223 GEAR 77T P9972Z0208 RETAINING CLIP P9972Z0224 GEAR 78T P9972Z0209 BALL OILER 6MM PRESS-IN BUY PARTS ONLINE AT GRIZZLY.COM! -68- Model G9972Z (Mfd. Since 03/20) Scan QR code to visit our Parts Store. -
Page 71: Feed Rate Gearbox
Feed Rate Gearbox 301 302 BUY PARTS ONLINE AT GRIZZLY.COM! -69- Model G9972Z (Mfd. Since 03/20) Scan QR code to visit our Parts Store. - Page 72 KEY 4 X 4 X 8 P9972Z0348 ROLL PIN 5 X 20 P9972Z0324 GEAR SHAFT 22T P9972Z0349 SHIFT LEVER P9972Z0325 GEAR 44T P9972Z0350 SHIFTING FORK BUY PARTS ONLINE AT GRIZZLY.COM! -70- Model G9972Z (Mfd. Since 03/20) Scan QR code to visit our Parts Store.
-
Page 73: Apron
Apron Front 413 414 442-1 Rear BUY PARTS ONLINE AT GRIZZLY.COM! -71- Model G9972Z (Mfd. Since 03/20) Scan QR code to visit our Parts Store. - Page 74 P9972Z0431 HANDWHEEL P9972Z0466 PHLP HD SCR M4-.7 X 6 P9972Z0432 ROLL PIN 4 X 24 P9972Z0467 ROLL PIN 5 X 12 BUY PARTS ONLINE AT GRIZZLY.COM! -72- Model G9972Z (Mfd. Since 03/20) Scan QR code to visit our Parts Store.
-
Page 75: Saddle & Cross Slide
P9972Z0538 CAP SCREW M6-1 X 35 P9972Z0519 CAP SCREW M6-1 X 12 P9972Z0539 HANDLE BOLT P9972Z0520 SET SCREW M6-1 X 16 BUY PARTS ONLINE AT GRIZZLY.COM! -73- Model G9972Z (Mfd. Since 03/20) Scan QR code to visit our Parts Store. -
Page 76: Compound Slide & Tool Post
CAP SCREW M6-1 X 12 P9972Z0630 THREADED COLLAR P9972Z0615 SET SCREW M5-.8 X 16 P9972Z0631 SET SCREW M8-1.25 X 16 P9972Z0616 HEX NUT M5-.8 BUY PARTS ONLINE AT GRIZZLY.COM! -74- Model G9972Z (Mfd. Since 03/20) Scan QR code to visit our Parts Store. -
Page 77: Tailstock
P9972Z0711 SPACER P9972Z0724 FLAT WASHER 12MM P9972Z0712 TAILSTOCK CASTING P9972Z0725 SET SCREW M5-.8 X 6 P9972Z0713 TAILSTOCK BASE P9972Z0726 INDICATOR PLATE BUY PARTS ONLINE AT GRIZZLY.COM! -75- Model G9972Z (Mfd. Since 03/20) Scan QR code to visit our Parts Store. -
Page 78: Bed
BALL OILER 6MM PRESS-IN P9972Z0814 HEX NUT M8-1.25 P9972Z0807 CAP SCREW M6-1 X 20 P9972Z0815 CHIP PAN P9972Z0808 HEX NUT M10-1.5 BUY PARTS ONLINE AT GRIZZLY.COM! -76- Model G9972Z (Mfd. Since 03/20) Scan QR code to visit our Parts Store. -
Page 79: Steady Rest
FLAT WASHER 8MM 1003 P9972Z1003 FINGER T-BOLT 1007 P9972Z1007 CAP SCREW M8-1.25 X 35 1004 P9972Z1004 ADJUSTING SCREW 1008 P9972Z1008 FLAT WASHER 8MM BUY PARTS ONLINE AT GRIZZLY.COM! -77- Model G9972Z (Mfd. Since 03/20) Scan QR code to visit our Parts Store. -
Page 80: Electrical Components
ON/OFF SWITCH W/COVER 1110 P9972Z1110 PHLP HD SCR M5-.8 X 10 1120 P9972Z1120 FWD/REV SWITCH KEDU EN61058 1111 P9972Z1111 MOTOR 1HP 110V 1PH BUY PARTS ONLINE AT GRIZZLY.COM! -78- Model G9972Z (Mfd. Since 03/20) Scan QR code to visit our Parts Store. -
Page 81: Accessories
WRENCH 12 X 14MM OPEN-ENDS 1139 P9972Z1139 CAP SCREW M6-1 X 20 1129 P9972Z1129 WRENCH 17 X 19MM OPEN-ENDS 1140V2 P9972Z1140V2 SPANNER WRENCH V2.04.20 BUY PARTS ONLINE AT GRIZZLY.COM! -79- Model G9972Z (Mfd. Since 03/20) Scan QR code to visit our Parts Store. -
Page 82: Labels & Cosmetics
Safety labels help reduce the risk of serious injury caused by machine hazards. If any label comes off or becomes unreadable, the owner of this machine MUST replace it in the original location before resuming operations. For replacements, contact (800) 523-4777 or www.grizzly.com. BUY PARTS ONLINE AT GRIZZLY.COM! -80- Model G9972Z (Mfd. -
Page 83: Warranty & Returns
WARRANTY & RETURNS Grizzly Industrial, Inc. warrants every product it sells for a period of 1 year to the original purchaser from the date of purchase. This warranty does not apply to defects due directly or indirectly to misuse, abuse, negligence, accidents, repairs or alterations or lack of maintenance.
Need help?
Do you have a question about the G9972Z and is the answer not in the manual?
Questions and answers