
Related Manuals for NUVE NF 200


Summary of Contents for NUVE NF 200
- Page 1 NÜVE SANAYİ MALZEMELERİ İMALAT VE TİCARET A.Ş. NF 200 BENCH - TOP CENTRIFUGE USER’S MANUAL Z14. K25 249 Rev. No: 08 Rev.Date: 01/2016...
- Page 2 TEL: +(90) 312 399 28 30 (pbx) FAX: +(90) 312 399 21 97 E-mail: sales@nuve.com.tr WARRANTY CERTIFICATE Nüve warrants that the equipment delivered is free from defects during material and workmanship. This warranty is provided for a period of two years. The warranty period begins from the delivery date.
- Page 3 Information contained in this document is the property of Nüve. It may not be duplicated or distributed without its permission. PLEASE REGISTER ONLINE TO VALIDATE WARRANTY: To register your warranty online, please visit our web page www.nuve.com.tr and fill in WARRANTY REGISTRATION FORM.
-
Page 4: Table Of Contents
DISPOSAL MANAGEMENT CONCEPT ..................13 SECTION 9 ..........................14 TROUBLESHOOTING ......................... 14 SECTION 10 ..........................15 ELECTRICAL CIRCUIT DIAGRAM ....................15 10.1 NF 200 ELECTRICAL CIRCUIT DIAGRAM ........H ER İŞARETİ TANIMLANMAMIŞ SECTION 11 ..........................16 WARNING LABEL ........................16... -
Page 5: Section 1
‘pulse’ function allows the operator to run short spins. NF 200 ensures safe operation by means of the locking system which does not allow the centrifuge to operate if the lid is open the lid cannot be opened while the rotor is spinning. -
Page 6: Section 2
SECTION 2 TECHNICAL SPECIFICATIONS 2.1 TECHNICAL SPECIFICATIONS TABLE Technical Specifications NF 200 Maximum speed 5.000 rpm Maximum RCF 2.822xg Tube capacity 12 x 15 ml Control system Programmable Microprocessor Control System Speed set range 1.000-5.000 rpm Speed set step 10 rpm / 1 rcf Timer set range 1-99 min. -
Page 7: General Presentation
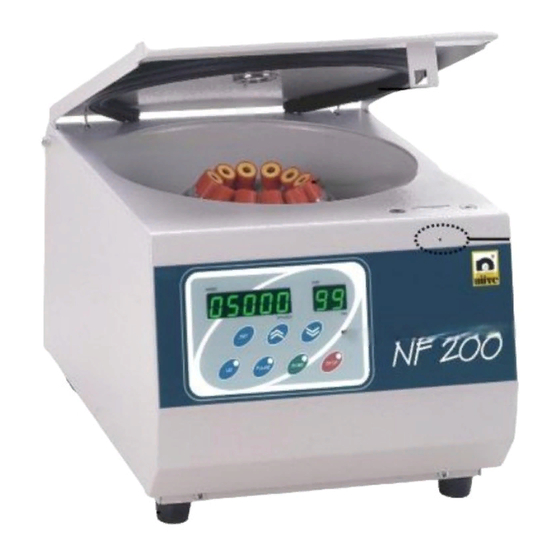
2.3 GENERAL PRESENTATION Figure 1 Control panel LID Gasket Observatıon hole Manual LID opening hole Rotor Fixing feeling 2.4 PRECAUTIONS AND USAGE LIMITATIONS Do not use the device for any purpose other than the usage purpose. Prior to first use, the user’s manual should be read and the device is only to be used by authorized and trained personnel. -
Page 8: Section 3
Do not use rotors and accessories with corrosion and mechanical damages. Use only the spare parts and accessories which are supplied by NUVE. Mains supply should be appropriate to power of the device and grounded. ... -
Page 9: Section 4
SECTION 4 INSTALLATION PROSEDURE 4.1 LIFTING AND TRANSPORT All lifting and transport must be carried out by using proper handling equipment. The instrument must be supported from underneath and never turned over. 4.2 UNPACKING Remove the packing cardboard box and the second nylon packing around the centrifuge. The below written are provided with the instrument, please check them;... -
Page 10: Section 5
SECTION 5 WORKING PRINCIPLES 5.1 CONTROL PANEL 01-Speed Display : This display shows the speed values (RPM or RCF) during programming. It also indicates accelerating condition, braking condition, power failure condition, open lid condition and the condition that occurs when Start is pressed while the lid is open by the expressions Acc, br, E oFF, oPEn, cLoSE Lid, respectively. -
Page 11: Section 6
07-Start Key and Led: This key starts the centrifugation operation and the led turns on. The led turns off if the program is stopped manually or the lid is opened at the end of the program. 08-Value Decreasing Key : ... -
Page 12: Programming
6.2 PROGRAMMING At stand-by position, Push the Set key. The rotor type starts to flash on the speed display. Choose the rotor type by using the Value Increase and Decrease keys (nC for the microlitre rotor, HE for the haematocrit rotor). ... -
Page 13: Section 7
SECTION 7 PERIODIC MAINTENANCE, CLEANING AND STERILIZATION Close the device by using on/off switch and plug out, before every periodic maintenance. After every care, check the continuity the network of ground line. Turn-off the equipment and plug it off prior to each maintenance, cleaning and sterilization. 7.1 PERIODIC MAINTENANCE ... -
Page 14: Sterilization
While re-installing the rotor, make sure that it is properly placed on the motor’s axis, such that the inscriptions on it are facing the top. Tighten the fixing bolt back. Rotor, tube inserts and adapters should be cleaned with a damp cloth using soap or mild detergent ideally every day but at least once a week against corrosion. -
Page 15: Troubleshooting
It occurs in case of a power failure during the run. It dissapears if you wait for 2 minutes or open and close the lid again. PLEASE CONTACT TO AN AUTHORIZED NUVE AGENT TO SEEK TECHNICAL HELP IF AN ERROR OCCURS. -
Page 16: Electrical Circuit Diagram
SECTION 10 ELECTRICAL CIRCUIT DIAGRAM... -
Page 17: Section 11
SECTION 11 WARNING LABEL EARTHED WALL SOCKET...
Need help?
Do you have a question about the NF 200 and is the answer not in the manual?
Questions and answers
Pjd1528 what is the device called
The NUVE NF 200 device is called a centrifuge.
This answer is automatically generated