Table of Contents
Advertisement
Quick Links
Advertisement
Table of Contents

Subscribe to Our Youtube Channel
Related Manuals for Kartsana BRAVO 2


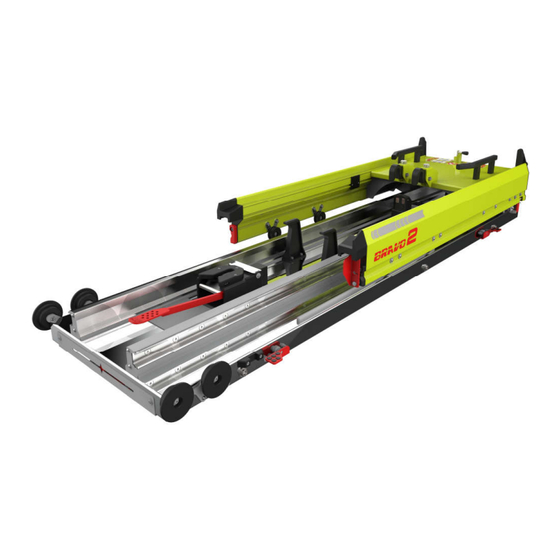
Summary of Contents for Kartsana BRAVO 2
- Page 1 Narcís Monturiol, 34 08192 Sant Quirze del Vallès BARCELONA TEL. 93 714-49-24 ventas@kartsana.com www.kartsana.com INSTRUCTIONS MANUAL BRAVO 2 RAIL Read these maintenance instructions Before using the product and keep them for future references.
- Page 2 OPERATION AND USAGE OF BRAVO 2 RAIL Rev. 9 20-02-18...
-
Page 3: Table Of Contents
2.2.2.- U NLOADING LEVER 3.- ASSEMBLY OF THE RAIL IN THE AMBULANCE 3.1.- S ETTING THE RAIL IN THE AMBULANCE 3.2.- E LECTRICAL CONNECTION 4.- INTERMEDIATE POSITION (OPTIONAL) 5.- DISINFECTION 6.- MAINTENANCE 7.- BRAVO 2 EXPLODED VIEW Rev. 9 20-02-18... - Page 4 OPERATION AND USAGE OF BRAVO 2 RAIL Rev. 9 20-02-18...
-
Page 5: Introduction
The Bravo 2 rail has been tested in conformity with the regulation UNE-EN 1789. All the information regarding treatment, disinfection and maintenance is indicated, taking into consideration our current experience and know-how. We reserve the right to change the specifications of the BRAVO 2 rail to improve the products 1.2.- Responsibility and warranty The stretcher must be checked at the time of its delivery to the rescue organisation. -
Page 6: Attention
An unrestrained patient may fall from the stretcher and be injured. - The Bravo 2 rail is designed to be compatible with the Power Brava Kartsana stretchers, and is operator responsibility that these products work together. - Two operators must be present when the stretcher is occupied. - Page 7 - Kartsana recommends that, prior to installation, the certified mechanic plan the placement of the safety hook in the rear of the vehicle.
-
Page 8: Instructions Manual
OPERATION AND USAGE OF BRAVO 2 RAIL 2.- INSTRUCTIONS MANUAL Only the BRAVA stretcher may be put on the BRAVO 2 rail. (BASED ON THE UNE-EN 1789 STANDARD). BRAVA stretcher BRAVO 2 rail To reduce the risk of injuries to the patient and accompanying persons in the event of an accident, it is advisable to avoid sharp edges and projecting parts inside the ambulance, paying special attention to the areas nearest the BRAVO 2 rail. -
Page 9: Technical Characteristics
OPERATION AND USAGE OF BRAVO 2 RAIL 2.1.- Technical characteristics Approximate rail weight 100 Kg Maximum load permitted: 300 Kg. Approximate measurements of the stretcher (in mm.) based on the drawing below. 2.2.- Rail operation and usage To prevent injuries to limbs and other body parts, make sure they are not within the range of the rail moveable parts. - Page 10 OPERATION AND USAGE OF BRAVO 2 RAIL - Press the red trigger “B” at the front right of the rail to unlock the mechanism and to push the stretcher towards the inside until the limit has been reached. To be sure that the whole stretcher rail is correctly placed make sure that the unload lever is in the horizontal position.
-
Page 11: Unloading Lever
OPERATION AND USAGE OF BRAVO 2 RAIL 2.2.2.- Unloading lever. Push down the unloading lever “C” located between the guides at the front of the rail as shown in the figure below. While maintaining the lever in this position, pull the stretcher towards the outside of the ambulance until the mechanical limit has been reached. - Page 12 OPERATION AND USAGE OF BRAVO 2 RAIL 2.2.3.- Side movement (lower pedal) Press one of the four red “D” levers and move the upper trolley sideways until the desired position is reached. Then, release the red lever so that it locks in the chosen position.
-
Page 13: Assembly Of The Rail In The Ambulance
3.- ASSEMBLY OF THE RAIL IN THE AMBULANCE 3.1.- Setting the rail in the ambulance The Bravo 2 rail must be secured to the ambulance using the aluminum profile 03-1164 and 22 screws DIN 7991 M8 – 10.1. The drilling situation is as follows:... - Page 14 OPERATION AND USAGE OF BRAVO 2 RAIL 2. Push the rail until the mechanical stop and then tighten the 4 hexagonal DIN 933 M10x20 screws at the front (x2) and rear (x2) zone. Rev. 9 20-02-18...
-
Page 15: Electrical Connection
OPERATION AND USAGE OF BRAVO 2 RAIL 3.2.- Electrical connection 12 V The electronics is prepared to admit a current of The BRAVO rail must be connected to the electricity network of the vehicle using section 4 mm2 electric cable as a minimum (paying special attention to the poles + o -). -
Page 16: Intermediate Position (Optional)
OPERATION AND USAGE OF BRAVO 2 RAIL 4.- INTERMEDIATE POSITION (OPTIONAL) If you want to rise the stretcher inside the ambulance, you have to remove the trigger of the slot as you can see below and move de mobile part of the rail until the vertical trigger stays inside the black piece of plastic. -
Page 17: Disinfection
OPERATION AND USAGE OF BRAVO 2 RAIL IMPORTANT: 5.- DISINFECTION When disinfecting the stretcher, use products that will not damage the surface of the materials and wipe with a cloth or something similar. If the surface to be disinfected is greased, re-greased it after disinfecting it. -
Page 18: Bravo 2 Exploded View
OPERATION AND USAGE OF BRAVO 2 RAIL 7.- BRAVO 2 EXPLODED VIEW Rev. 9 20-02-18... - Page 19 OPERATION AND USAGE OF BRAVO 2 RAIL Rev. 9 20-02-18...
- Page 20 OPERATION AND USAGE OF BRAVO 2 RAIL Rev. 9 20-02-18...
- Page 21 OPERATION AND USAGE OF BRAVO 2 RAIL Rev. 9 20-02-18...
- Page 22 OPERATION AND USAGE OF BRAVO 2 RAIL Rev. 9 20-02-18...
- Page 23 OPERATION AND USAGE OF BRAVO 2 RAIL Rev. 9 20-02-18...
- Page 24 OPERATION AND USAGE OF BRAVO 2 RAIL The pieces that his number reference starts in 13-xxxx-xxx will be elements of fixation. The pieces that his number reference starts in 50-xxxx-xxx will be welding sets and it will be supplied like an inseparable set, not at loose parts.
- Page 25 OPERATION AND USAGE OF BRAVO 2 RAIL Rev. 9 20-02-18...
- Page 26 OPERATION AND USAGE OF BRAVO 2 RAIL Rev. 9 20-02-18...
- Page 27 OPERATION AND USAGE OF BRAVO 2 RAIL Rev. 9 20-02-18...
- Page 28 OPERATION AND USAGE OF BRAVO 2 RAIL 1, Rue Pierre Rectoran Les Mirabelles 64100 Bayonne sav@iberik.fr Certified management System Rev. 9 20-02-18...
Need help?
Do you have a question about the BRAVO 2 and is the answer not in the manual?
Questions and answers