Table of Contents
Advertisement
Quick Links
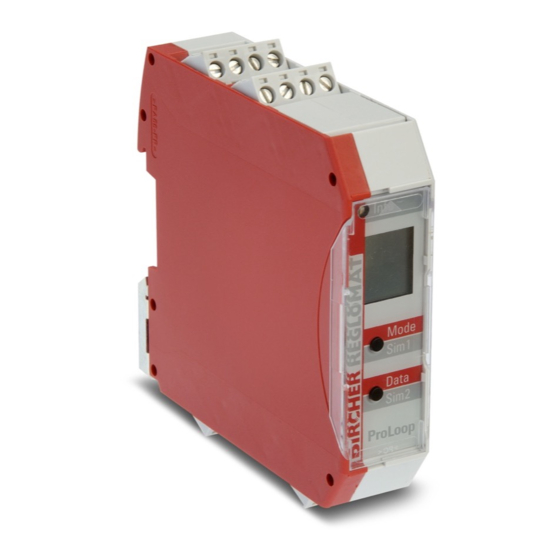
EsGate
2,
EsGate
Original operating instructions (translation)
Safety and warning notices
The electrical connection may only be set up by an electrician. The arrangement of the components depends on the structural conditions and the
gate design. Switch off the operating voltage before working on the system. The switching device monitors pressure-sensitive protective devices
from Bircher Reglomat AG (proper use). Use of components not supplied by Bircher-Reglomat (including safety edges) will render the guarantee and
liability null and void. Connect all operating and switching voltages to the same fuse. Connect the operating voltage to the same circuit as the indu-
strial door controller. Disconnect device from mains in the event of a fault. Protection max. 10 A
1
Electrical connection and terminal diagram
Version
Operating voltage
EsGate 2
+/~
EsGate 2.LVAC
–/~
2
Operation
«Mode» button
Control buttons
Mode
on device:
3
Standard operation
When everything is connected correctly:
Status LED lights up green
4
Diagnostic menu
«
»
«
Press the
Mode
and
Data
«
»
mode. Press the
Mode
button for 2 s to exit diagnostic menu.
Error display mode
The 5 most recent errors
can be interrogated. Press
«
»
the
Data
key briefly in each
case, and the errors are dis-
played one after the other. End
«
»
appears when the
Data
button
is pressed for the 5th time. The
malfunctions are displayed in
chronological order (new old)
Mode «I» Test input
Display when
test input inactive
Display when
1 2
test input active
5
Configuration Mode (for configuration before starting up, via diagnostic menu, after mode «h»)
Please read chapters 5.1 to 5.4 in full before attempting configuration.
5.1
Activating configuration menu
Status LED flashes orange,
press «Data» button
Configuration menu can be exited at any time by pressing the «Mode» button (2 s).
«End» is displayed Press «Data» button and release Restart undertaken with new configuration.
5.2
Configuration of safety edge inputs
The current setting for the safety
edge inputs is displayed.
Use the «Data» button to set the configuration
you want for the safety edge inputs
(according to Table 1).
2.LVAC
safety edge
A1
1
A2
2
Display
«Data» button
1
2
Data
Displays shown when safety edge is actuated: Status LED lights up orange
Dots
actuated:
flash
»
buttons simultaneously for 2 s status LED flashes orange. Press
Mode «r» Resistance
The resistances of the
safety edges are dis-
played. Example:
8 = Resistance between
7 and 9 kohm.
1 = safety edge
To access the next safety edge:
«
»
Press the
Data
button
Mode «C» current
configuration
Displays current configu-
ration of safety edge
inputs, see configuration
table.
Configuration chapter 5
Press the «Mode» and «Data» buttons
simultaneously for 2 s.
Configuration menu is activated.
Switching device in combination with safety edges to
avoid dangers at crushing and shearing points in sliding gate systems
safety edge
Test input
T2
3
4
T1
+
CLOSE Output
OPEN Output
= Symbol for display flashes
Mode
Data
Dots
1
2
actuated:
Mode «S» Output 1
Mode «S» Output 2
Output 1: Press the
1
«
»
Data
button
The Output 1
1
is deactivated
«
»
Press the
Data
1
button again
The Output 1 is
activated
Mode «C» current configuration
test signal
Displays current configura-
tion, test signal,
see test pulse table.
Configuration chapter 5
Table 1
Output 1
Output 2
14
24
21
11
Active test input:
«
»
Mode
buttons briefly to change to the next
Modus «S» Simulation test
Output 2: Press the
Both outputs: Press
2
1 2
«
»
the «Data» button
Data
button
Both outputs are
1 2
2
The Output 2
deactivated
is deactivated
Press the «Data»
«
»
Press the
Data
2
1 2
button again
button again
The Output 2 is
Both outputs are
activated
activated
Mode «h» current
fall-delay time
Displays current fall-delay
time, see fall-delay time
table.
Configuration chapter 5
To access the config. mode:
Proess the «Mode» button
Dysplay
safety edge
UNC
not configured
001
X
002
X
003
5
6
safety edge
X
X
Advertisement
Table of Contents

Related Manuals for Bircher Reglomat EsGate 2


Summary of Contents for Bircher Reglomat EsGate 2
- Page 1 Switch off the operating voltage before working on the system. The switching device monitors pressure-sensitive protective devices from Bircher Reglomat AG (proper use). Use of components not supplied by Bircher-Reglomat (including safety edges) will render the guarantee and liability null and void.
- Page 2 Bircher Reglomat AG, Wiesengasse 20, CH-8222 Beringen Product: Switching device with inductive transmission system Models: InTra6 2, InTra6 2.LVAC, InTra6 3, InTra6 3.LVAC; EsGate 2, EsGate 2.LVAC, EsGate 3, EsGate 2.LVAC (without transmiss.) Serial numbers: 00240578[000000…900000], 00244423[000000…900000], 00263915[000000…900000], 00263916[000000…900000], 00263911[000000…900000], 00263912[000000…900000], 00263913[000000…900000], 00263914[000000…900000]...
Need help?
Do you have a question about the EsGate 2 and is the answer not in the manual?
Questions and answers