Table of Contents
Advertisement
Advertisement
Table of Contents

Related Manuals for Ecostrad iQ WiFi


Summary of Contents for Ecostrad iQ WiFi
- Page 1 Ecostrad iQ WiFi Heating Element PLEASE READ AND SAVE THESE INSTRUCTIONS...
- Page 2 Symbols Warning This symbol indicates a hazard with an average risk level which, if not avoided, could result in serious injury or death. Warning of electrical voltage This symbol indicates danger to the life and health of persons due to electrical voltage.
-
Page 3: Table Of Contents
Contents Warnings & Precautions Technical Information Installation Fitting instructions Control Dial Display 4-2 Standby mode 4-3 Heating modes 4-4 Child lock Connecting to WiFi Downloading the app 5-2 Connecting to the app Using the App Home overview 6-2 Control interface 6-3 Choose mode 6-4 Device settings Warranty... -
Page 4: Warnings & Precautions
1 | Warnings & Precautions Read this manual carefully before using or installing the heating element. Always store the manual in the immediate vicinity of the element or its site of use. Read all safety warnings and all instructions. Failure to follow the warnings and instructions may result in electric shock, fire, serious injury, or all of the above. - Page 5 • The element is designed for use in horizontal or vertical radiators, or vertical towel rails. Use in horizontal towel rails is not recommended because the long horizontal bars can impede heat circulation. • It is imperative that the towel rail or radiator intended for use with the radiator has the correct volume of fluid.
-
Page 6: Technical Information
• The element must be placed where the switches and controllers cannot be touched by a person in a bathtub or shower. • The element must be disconnected from the mains during cleaning and maintenance. • Never attempt to disconnect the control head from the heating element. The product is an integrated unit that has been factory sealed. -
Page 7: Installation
3 | Installation These are general-purpose instructions for fitting your element into a suitable radiator or towel rail. Always check with the radiator manufacturer to ensure the product is suitable for use with the element, and follow any additional installation guidance provided with the unit. - Page 8 4. Remove the cap from the inlet and push the heating element into the radiator. 5. Tighten the element at the main nut, using a size 22 spanner. Ensure the rubber O-ring, above the main nut, makes a firm seal between the radiator and the element.
-
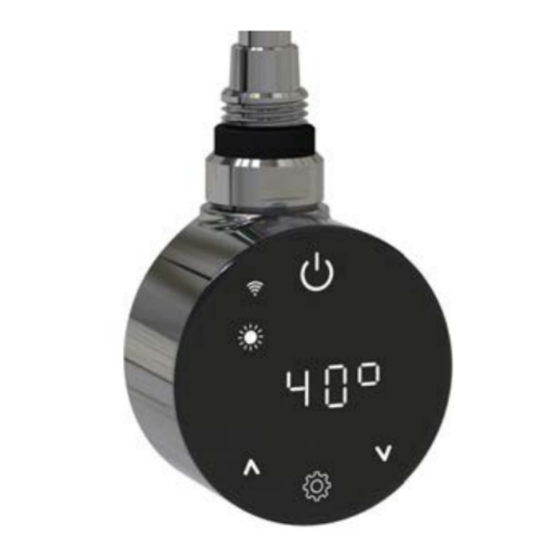
Page 9: Control Dial
electrician or heating engineer and should not be attempted DIY. If unsure, use the element only with a pre-filled radiator. 7. Rotate the radiator to its correct orientation and hang on the wall, according to the instructions provided with the unit. 8. -
Page 10: Standby Mode
4 – 2 | Standby Mode In standby mode the time is displayed and the element does not heat. You can use button to switch between standby and the heating modes. When the element is first switched on, the time will appear as 00:00. The display will update to the correct time when the element is connected to the app. -
Page 11: Child Lock
customisable program. You can modify the program when you connect to the element with the app. See section 6-3-2 for full instructions. It is not possible to set the program via the control dial. The program consists of 24 hourly slots for each day of the week which can be set to either comfort or eco mode. -
Page 12: Connecting To Wifi
5 | Connecting to WiFi 5 – 1 | Downloading the App The element is designed to work with the Smart Life app. Scan the code below to go to the app. Press install and follow the app’s instructions to create an account. NOTE –... - Page 13 7. The element will begin connecting. When it is successfully added, the word “PASS” will show on the display and the element will appear as below on the app. Press change its name or “Done” to return to the home screen. Troubleshooting If the element does not connect on the first attempt: •...
-
Page 14: Using The App
6 | Using the App NOTE – The Smart Life app is a constantly evolving third party system. The guide below was correct at time of printing but may differ slightly from future versions. 6 – 1 | Home Overview You can use the Smart Life app to control multiple devices. -
Page 15: Choose Mode
6 – 3 | Choose Mode Tap the mode icon on the control interface to choose mode. The four options correspond to the five modes on the control panel. 6 – 3 – 1 | Comfort & Eco Mode In comfort and eco mode, simply use the sliding dial or the –... -
Page 16: Device Settings
6 – 4 | Device Settings Tap the icon to view and adjust the element’s settings. This menu allows you to configure several settings not available through the control dial. Tap the icon for settings that relate to the element’s listing on the app, including its name, any automations it is included in, and the quality of its network connection. -
Page 17: Warranty
7 | Warranty The Ecostrad iQ WiFi element carries a 2-year guarantee. Within the stated period, starting from the date the customer receives their unit, Ecostrad guarantee to repair or replace the unit where a fault is due to defects in materials or manufacturing.
Need help?
Do you have a question about the iQ WiFi and is the answer not in the manual?
Questions and answers